Carl Hackman's Blog, page 3
April 25, 2025
Airfix Battle Of Britain Memorial Flight Gift Set Part 3 – Lancaster B MKIII
In this final part of our build and review of the Airfix Battle Of Britain Memorial Flight Gift Set I describe my process of building the Lancaster B III and also give my final thoughts on the gift set as a whole.
If you haven’t subscribed to my YouTube channel yet, it would be great if you did. Please also click the little bell that will notify you when I upload a new video. Thank you.
The post Airfix Battle Of Britain Memorial Flight Gift Set Part 3 – Lancaster B MKIII appeared first on Carl's Scale Models.


Airfix Battle Of Britain Memorial Flight Gift Set Part 2 – Spitfire MKIIa
In this video we take a look at the Spitfire MK IIA in the Airfix Battle Of Britain Memorial Flight Gift Set. The quality isn’t what I would have liked as this video wasn’t planned but I want to show some of the processes I used in the second kit I had built in 50 years.
If you haven’t subscribed to my YouTube channel yet, it would be great if you did. Please also click the little bell that will notify you when I upload a new video. Thank you.
The post Airfix Battle Of Britain Memorial Flight Gift Set Part 2 – Spitfire MKIIa appeared first on Carl's Scale Models.
Airfix Battle Of Britain Memorial Flight Gift Set Part 1 – Spitfire PR.XIX
In this video we take a look at the Spitfire PR XIX in the Airfix Battle Of Britain Memorial Flight Gift Set. The quality isn’t what I would have liked as this video wasn’t planned but I want to show some of the processes I used in the first kit I had built in 50 years.
If you haven’t subscribed to my YouTube channel yet, it would be great if you did. Please also click the little bell that will notify you when I upload a new video. Thank you.
The post Airfix Battle Of Britain Memorial Flight Gift Set Part 1 – Spitfire PR.XIX appeared first on Carl's Scale Models.
April 1, 2025
Airfix Lancaster B III in 1:72 Scale
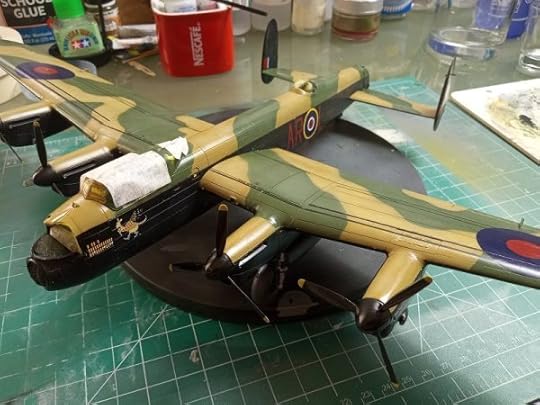
Welcome to this review and build of the Airfix Lancaster B III in 1:72 scale. This model is part of the Airfix Battle Of Britain Memorial Flight gift set and is the last of the 3 models in this kit. I will also be doing a video on my YouTube channel of the build if you would prefer to watch that rather than reading about the build.

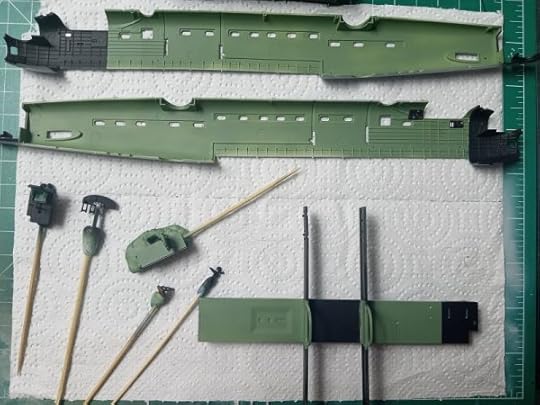
Above I have laid out the initial parts of the construction. As you can see here, we have the 2 sides of the fuselage, the cabin floor and the assembled cockpit. I have also filled a few ejector pin marks that would be visible in the cockpit if you looked through the windows when the model is complete. I presume they were designed to go there because the underside is a pretty detailed part of the bomb bay, which I closed because of reasons we will go into later.
The next stage was getting paint down ready for some weathering and some decals. I mixed my own interior green because I didn’t have the actual paint color in the call out and also because the color in reference photos I had didn’t really match what was being asked for. This all went down really nicely and the Gaahleri airbrush preformed very well, especially as I seem to have the thinning ratio for Vallejo paints dialed in.

I applied a gloss coat to the parts previously painted and then applied the decals required for this part of the build. They went down great, being Cartograf there was obviously no issues, using Micro Set and Micro Sol. Once the decals were in place I then added the sub assemblies to the fuselage and did some light weathering with an oil wash and dry brush. I was now ready to close the fuselage halves.

The fuselage halves went together without much of a problem and any seams were filled with Vallejo Plastic Putty.
The real issue was that the bomb bay doors were so warped that I couldn’t have them in the open position, which I was that happy about. I had to work my way along each of the doors gluing as I went to get them to fit in an acceptable manner. I breathed a sigh of relief when they were finally done and moved on to more enjoyable things.
I added the struts to support the upper and lower parts of the wings and taped off the upper portion of the fuselage.
The next stage would be to paint the lower half black. Before doing that I tried something that I’d seen on YouTube and that was a bit of pre-shading. This would be the opposite way round because the base color would be black. I ran the airbrush along the panel lines with a light grey to create some modulation. This didn’t work out as I really wanted it to so I tried something else once the paint was down.

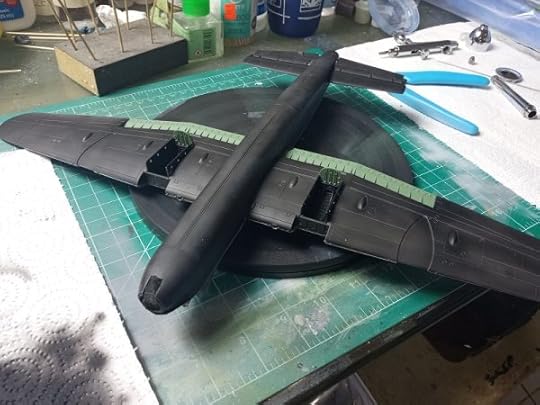
As you can see from the above image I have now applied the black paint to the lower half of the fuselage and it was beginning to look very nice.
Because the pre-shading didn’t go as well as I’d hoped I tried a bit of post shading instead and this came out really well.
I know it was a bit early to start doing these sort of techniques, but I was determined to try out more advanced techniques as I went along and if I made a mistake at this stage I could always just go over it again with a flat black coat.

The Airfix kit was finally beginning to look like an aircraft and I was pretty excited about the way it was beginning to look. When I attached the upper wing surfaces I was pretty astounded at how big this bomber actually was.
As you can see from the above image, I got all the parts together that would need to be primed before I moved forward with the build. There were a lot and I was beginning to feel slightly out of my depth, especially as this was only my 3rd scale model. But, I carried on and was determined to finish it.
Once the parts had all been primed, I flipped the Lancaster over and attached the lower wing pieces. As you can see I’d previously painted the landing gear wells and the underside of the flaps ready for the next stage. I had also attached the rear wings but left off the twin tails at this stage. This made the model easier to handle for the next stage.
While the model was inverted I did try and do some modulation and weathering to the black panted areas and was pleased how the bleaching effect turned out. I was definitely getting more comfortable with the airbrush at this point.
The twin tails/rudder assemblies were black so I didn’t need to attach them to paint the camoflage pattern that would be coming in the next stage of the build.

Normally I would have masked the camoflage pattern after applying the lighter color, but I just did the one wing to see if I could freehand it with the airbrush. To me, it came out really well and my confidence levels rose a lot.
I was so happy with the freehand painting of the camo that I pushed myself a litte further. This was mainly to see if I could control the airbrush and also to see if the Gaahleri CS-36 airbrush could do finer work. I lightened each camo color and thinned to 80% Vallejo flow improver and 20% Vallejo paint and tried some modulation over the camo pattern.
To my surprise the result was very pleasing. Because the paint was thinned so much the effect was hard to notice at first and I realized that each pass would increase the coverage. Doing it this way with the needle cover removed I found that I had a lot of control of how much of the effect I was getting.
This was a revelation and a huge step forward in how I think about modelling. As a novice it is very exciting to be able to successfuly attempt something that I thought was way too advanced for me.
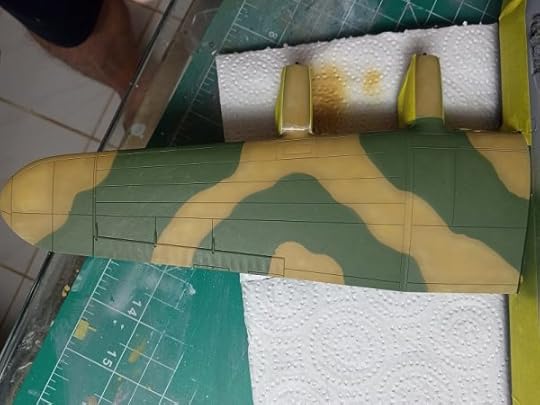
The above image shows how much of a difference a subtle modulation can make to a flat opaque layer. The rest of the model has the first base layer without any effects prior to the camo scheme or any modulation. The port wing shows the camo pattern and modulation effect applied.

Now I have painted the full camoflage scheme and added modulation and I loved the result. In the future I definitely won’t be afraid to give a technique a try. 

Knowing that I would want to gloss coat the model before adding decals I added a lot of the sub assemblies that I had painted previously. It is really beginning to look like a Lancaster now.
I went ahead and put a gloss layer down then waited 24hrs before applying the decals with Micro Set and Micro Sol. I managed to destroy one of the long decals and thought I’d ruined the model, but my wife said “just airbrush the lines on’. I thought she was joking and that doing that was beyond my capabilities, but I gave it a go, thinking that, at the worst, I could repaint the model if it turned out really bad. The result wasn’t perfect, but knowing I would be doing weathering later, I thought it was acceptable for my experience level.
Funnily enough, noone where I have posted images of the build had noticed that the lines are wider than they would have been with the decals. I did paint both sides so they would be the same rather than just painting the one part where the decal was destroyed, so at least they match

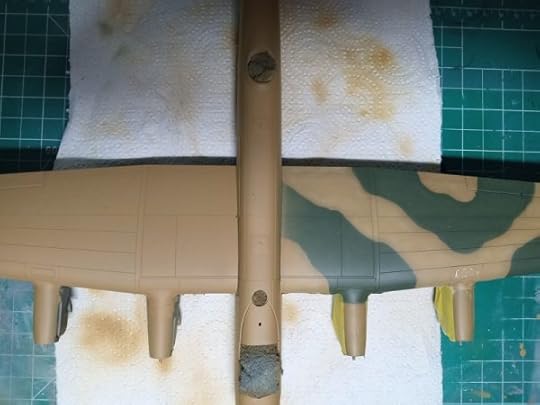
Now we move on to the weathering. Because this Lancaster is part of the Battle Of Britain Memorial Flight it would have been maintained and the weathering wouldn’t have been as bad as it would have on an operational bomber. But, the smoke stains were evident in photos I looked at, especially the noticible whiteish stains where the octane level of the fuel was changed.
There was the usual bit of chipping around access hatches and the rear door on the stbd side of the fuselage, but I didn’t push it too far. The smoke stains were, again, done with an airbrush which was very surprising for me as I never would have attempted smoke stains using an airbrush in previous builds. This showed me how comfortable I was becoming with the use of the airbrush.

At this stage, the build was basically done and all I had to do was the final matte coat and then remove the masking from the canopy and gun turrets. You can also see a little bit more chipping around the propellers, spinners and leading edges of the wings. I just couldn’t resist it

Finally, the Lancaster was finished and I was really proud that I had managed to bring this build to completion. The challenge was a lot greater with the Lancaster than it was for the two Spitfires included in the gift set, and this aircraft definitely tested me. But, it also allowed me to learn a lot of new techniques that I can use in future builds. At the minimum it taught me not be be afraid to have a go.
Now we get to my thoughts on the gift set as a whole. For me it was definitely worth the $35 I paid for it. I was lucky enough that it was on offer and there was an extra coupon on Amazon which allowed me to buy it for that price. This in itself made the gift set a huge value for money buy. The Lancaster was a huge step up from the Spitfires, so if you are new to modelling, like me, then expect to be challenged when you get to the Lancaster.
My only real gripe with this kit, and I’ve heard it is the same for starter kits, is that the supplied paints are terrible. I can guarantee that if you expect to just buy this gift set and be able to assemble and paint it with only what is in the box you will be disappointed. At least four of the paints out of the twelve included were unusable and could not be re-hydrated.
At a minimum you should invest in some decent paints to complete all the three models in this gift set.
Out of 5 stars I would give it 4, just because the models were so much fun to build. I could have been harsher and given it 3 or 3.5 because of the warping of the bomb bay doors and the fact that Airfix insist in throwing all the sprues in a single bag which is asking for damaged parts. B,ut because of the enjoyment I got from the gift set and the value for money I felt I got from it I will stick to my 4 star rating.
Happy modelling
The post Airfix Lancaster B III in 1:72 Scale appeared first on Carl's Scale Models.
March 9, 2025
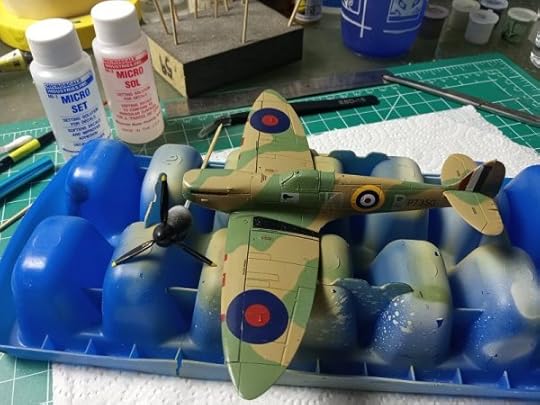
Airfix Spitfire MKIIa in 1:72 Scale
This post describes my build of the Airfix Spitfire MKIIa (Al Deere) provided in the Airfix ‘Battle Of Britain Memorial Flight’ gift set. This Spitfire model is based on the one flown by New Zealand pilot Alan Christopher Deere during WWII.

I started the build by removing the cockpit and the 2 fuselage parts from the sprue. After cleaning them up I assembled the cockpit which went together with no issues. I used Tamyia Extra Thin which is a far cry from the thick cement glue I used in the 1970’s.
Once I had assembled these parts I primed the cockpit tub and fuselage sides with Vallejo grey primer. This was a departure from my first model, where I primed everything all at once while it was still attached to the sprue. I’ve seen that done several times on YouTube videos, but I felt that it actually complicated things for me.
Next I painted the cockpit and visible areas of the fuselage. I had to mix my own color from the paints supplied in the Vallejo set I’d purchased earlier. Most of the paints supplied with the Airfix gift set were unusable, so I had to mix the colors myself.
Once this had all dried I then added a gloss clear coat (Vallejo) and waited for that to cure. After the gloss coat had cured I added a wash made from heavily diluted Vallejo paints. I know this wasn’t ideal, but I was restricted by what I could afford to get at the time.

I moved on and closed the fuselage up fixing any joint issues using Vallejo plastic putty. There wasn’t too much work to be done and was very pleased with the result. Once I had sanded the down the joints I proceeded to add the wings and tail section. It all went together without any issues.
The Airfix Spitfire was beginning to look like an aircraft now. Once assembled I primed it with the Vallejo primer and let it all dry.

I allowed the final primer coats to dry and cure then moved on to adding color. This is where the Spitfire begins to look like the actual aircraft. As you can see, there is a lot of detail on these more modern toolings. I was really pleased to see all the panel lines. Before painting I added all the ancillary parts required and then mixed a color I thought resembled photographs of the real Spitfire. I was pretty pleased with the result.

I moved on to the top of the Spitfire. This was an area that I was pretty nervous of dealing with. I had never painted a camouflage pattern before, especially with an airbrush and I must admit that the Gaahlari GTS-06 kit made this a lot easier. Once I removed the masking tape after applying the final color, I was really pleased. Getting this paint scheme under my belt gave me confidence for my next build. Once again, I had to mix the colors myself using reference photographs of the real Spitfire.
The post Airfix Spitfire MKIIa in 1:72 Scale appeared first on Carl's Scale Models.
March 8, 2025
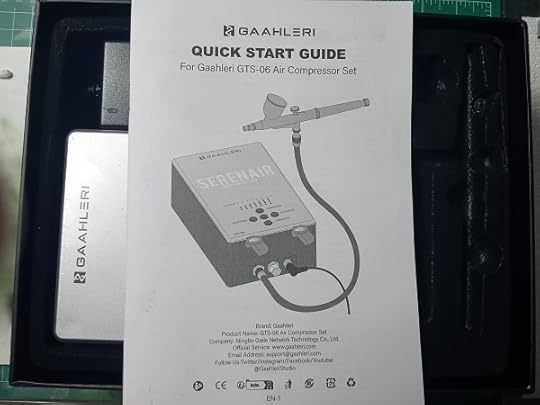
Gaahleri GTS-06 Mini Compressor and Airbrush Kit
Before we start, if you would rather watch a video review of the Gaahleri GTS-06 Mini Compressor and Airbrush Kit rather than read one then hop over to my YouTube review: HERE
I bought this compressor and airbrush kit just after I started my first model this year. I had been researching scale modelling and soon realized that the hobby had come a long way since my youth. One of the tools that seemed to be common was an airbrush and compressor. This was something I’d never come across when building scale models in the 1970’s. After viewing a myriad of videos on YouTube I came across a review for the Gaahleri GTS-06 Mini Compressor and Airbrush Kit. I was immediately drawn to the simplicity of setting it up and using it. As a novice scale modeller this was exactly the sort of thing I wanted to get me started in the use of an airbrush.

When the product arrived I was pretty pleased with the size and weight. I could use it wherever I wanted, although my little workbench would be where it would live.
On opening the box there was an instruction booklet that was pretty comprehensive. It was well designed with the beginner in mind and gave just the right amount of information. This made it easy to use the compressor and airbrush and also disassemble the provided airbrush and clean it. Pretty simple and not intimidating.
Once I’d read through the instructions I delved into the box. You are provided with; the GTS-06 compressor, a CS-36 airbrush, a 1/4oz fluid cup, a pair of airbrush holders that attach to the compressor casing, a power supply and a braided hose. Everything needed to start your journey was there, apart from the paint.

I added a quick release to the hose and airbrush. These are available from Amazon or your local hobby shop and are pretty inexpensive. One other item I’m going to buy, which I would recommend, is an inline mini air filter to keep water out of the airbrush. It is particularly important in climates where there is high humidity. When you are spraying the compressor runs continually and water will gather in the hose and end up in your airbrush causing splatters.
I sat the compressor up on my workbench (desk) and assembled the quick release. I then connected it to the compressor and airbrush; all very simple. The compressor has 2 outlets for air so that you can connect two airbrushes simultaneously. I prefer just to have a quick release system and connect the airbrush I want to use when it is needed.
The power supply fits firmly into the jack socket with no play. At this point you are ready to add paint and try it out. When you turn the compressor on using the central button it defaults to 21psi and is surprisingly quiet. I really expected it to be louder. You can control the air pressure using the 4 buttons circling the power button on the top of the unit. The settings are maximum pressure, minimum pressure, increase pressure and decrease pressure. The pressure range runs from 15psi to 27psi in 2psi steps. I love this system as everything is at the touch of a button and you don’t have to fiddle with a valve to set your desired pressure: very beginner friendly.
I recommend that you practice with the Gaahleri airbrush and compressor on paper before using it on a project piece. Each paint also has different requirements when it comes to thinning; even different colors of the same brand may differ. The paint thinning ratios are also affected by pressure settings, so getting used to what makes a good setting for your current job is pretty crucial, but have fun practicing. It may sound like a lot of effort, but you will be surprised how easy the Gaahleri compressor and airbrush kit make it. I was quickly painting my second model using the kit and the results were great.

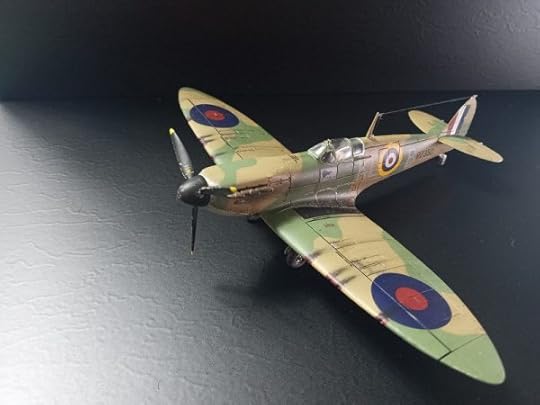
As you can see you can get great results with this kit very quickly. I was using Vallejo Model Air paints to paint this model. Below is the completed model which I am pretty proud of.
Once you have finished painting clean your airbrush as recommended by the manual and paint manufacturer. Disassembly is pretty simple and well laid out in the manual. I would advice doing this after each session to keep your airbrush in top condition. There are plenty of instructional videos on YouTube. I’d recommend you spend a decent amount of time learning how to airbrush and also maintain your airbrush.
If, like me, your main focus is painting scale models then getting an airbrush and compressor is a game changer. The Gaahleri GTS-06 Compressor and Airbrush Kit is a great option. You get everything you need in one package and is definitely a good way to start your airbrushing journey. I’m looking at getting a Mobius 2.0 or 3.0 in the future to use with this compressor, so keep an eye out for a review on the airbrush I decide to get.
You can also get the Gaahleri GTS-06 Mini Compressor Kit directly from their website here which is a referral link and will give you a discount when you purchase any item from the Gaahleri website. I get a small commission at no cost to you.
Happy modelling
The post Gaahleri GTS-06 Mini Compressor and Airbrush Kit appeared first on Carl's Scale Models.
Gaahleri GTS-06 Mini Compressor Kit
I bought this compressor and airbrush kit from Amazon just after I had started my first model this year. I had been researching scale model kit building and soon realized that the hobby had come a long way since my youth. One of the tools that seemed to be common was an airbrush and compressor, something I’d never come across when building scale models in the 1970’s.
After viewing a myriad of videos on YouTube I came across a review for the Gaahleri GTS-06 and was immediately drawn to the simplicity of setting it up and using it. As a novice scale modeller this was exactly the sort of thing I wanted to get me started in the use of an airbrush.
When the product arrived I was pretty pleased with the packaging and it had some weight, but was also portable, meaning I could use it wherever I wanted, although my little workbench would be where it would live.
On opening the box there was an instruction booklet that was pretty comprehensive, but you didn’t have to wade through reams of technical data. It was well designed with the beginner in mind and gave just the right amount of information to allow you to use the compressor and airbrush and also disassemble the provided airbrush and clean it. Pretty simple and not intimidating.
Once I’d read through the instructions I delved into the box and you are provided with; the GTS-06 compressor, a CS-36 airbrush, a 1/4oz fluid cup, a pair of airbrush holders that attach to the compressor casing, a power supply and a braided hose. Everything needed to start your journey was there, apart from the paint.
I added a quick release to the hose and airbrush, these are available from Amazon or your local hobby shop and are pretty inexpensive. One other item I’m going to buy, which I would recommend is an inline mini air filter to keep water out of the airbrush. It is particularly important in climates where there is high humidity because when you are spraying the compressor runs continually and water will gather in the hose and end up in your airbrush causing splatters.
I sat the compressor up on my workbench (desk) and assembled the quick release and the connected it to the compressor and airbrush; all very simple. The compressor has 2 outlets for air so that you can connect two airbrushes simultaneously, but I prefer just to have a quick release system and connect the airbrush I want to use when it is needed.
The power supply fits firmly into the jack socket with no play. At this point you are ready to add paint and try it out. When you turn the compressor on using the central button it defaults to 21psi and is surprisingly quiet. I really expected it to be louder. You can control the air pressure using the 4 buttons circling the power button on the top of the unit. The settings are maximum pressure, minimum pressure, increase pressure and decrease pressure. The pressure range runs from 15psi to 27psi in 2psi steps. I love this system as everything is at the touch of a button and you don’t have to fiddle with a valve to set your desired pressure: very beginner friendly.
I recommend that you practice with the Gaahleri airbrush and compressor on paper before using it on a project piece, which for me would be a scale model, to get used to the brush and pressure settings. Each paint also has different requirements when it comes to thinning; even different colors of the same brand may differ. The paint thinning ratios are also affected by pressure settings, so getting used to what makes a good setting for your current job is pretty crucial, but have fun practicing. It may sound like a lot of effort but you will be surprised how easy the Gaahleri compressor and airbrush kit make it. I was quickly painting my second model using the kit and the results were great.
As you can see you can get great results with this kit very quickly. I was using Vallejo Model Air paints to paint this model. Below is the completed model which I am pretty proud of.
Once you have finished painting clean your airbrush as recommended by the manual and paint manufacturer. Disassembly is pretty simple and well laid out in the manual, and should be done after each session to keep your airbrush in top condition. There are plenty of instructional videos on YouTube and I’d recommend you spend a decent amount of time learning how to airbrush and also maintain your airbrush.
If, like me, your main focus is painting scale models then getting an airbrush and compressor is a game changer and the Gaahleri GTS-06 Compressor and Airbrush Kit is a great option. You get everything you need in one package and is definitely a good way to start your airbrushing journey. I’m looking at getting a Mobius 2.0 or 3.0 in the future to use with this compressor so keep an eye out for a review on the airbrush I decide to get.
You can also get the Gaahleri GTS-06 Mini Compressor Kit directly from their website here.
Happy modelling
The post Gaahleri GTS-06 Mini Compressor Kit appeared first on Carl's Scale Models.
My First Scale Model In 50 Years
Just after Christmas 2024 I bought the Airfix ‘Battle of Britain Memorial Flight’ scale model kit as my first scale model in 50 years when it was on offer at only $35 on Amazon. The kit contained 3 models; a Spitfire PR XIX, a Spitfire MKIIa and a Lancaster B III.

The kit I chose to reignite my interest in the hobby was the Spitfire PR XIX, mainly because it was a single color which meant I didn’t have to cope with an intricate camouflage pattern. The kit went together pretty smoothly and the main reason for that was because I bought some initial tools and paints to ensure that I wouldn’t struggle too much. If I had any problems then it would be down to me and not because I was missing tools I would need to build it well.
It was lucky that I had bought paints because the Humbrol paints, supplied in the kit, were awful and at least 40% of them were unusable. Airfix need to sort out this quality control issue because a lot of potential new customers would be put off just because of that reason.
I had no real issues with the kit and below are photographs of the progress:
[See image gallery at carlhackman.com]The post My First Scale Model In 50 Years appeared first on Carl's Scale Models.
November 2, 2019
Jaguar Released
Just a quick post to let you know that JAGUAR has now been released.
It is available in paperback and kindle formats and you can also read it for free if you have kindle unlimited.
Grab a copy and let me know what you think :)
JAGUAR
March 7, 2018
My First Rejection
I was considering my journey so far and one thing popped into my head that I hadn't thought about in a long time, and that was my first ever rejection. If had known then what I know now perhaps my writing journey might have been very different.
It was 1996 and I had just been discharged from the Royal Navy with a broken back. I decided to try and write a novel. I'd spent most of my life reading, especially at sea, and I had always wondered what it would feel like to see my name on the cover of a book. I never thought it would happen, after all I'd been a poor school student, and only clever and talented people could write a book, couldn't they?
I picked a subject that I loved; I'd always had a passion for animals and loved William Horwood's Duncton Wood series. I started to write a novel called Jaguar.
Here is the blurb for it:
"Valaria is young, in prison and pregnant. She is also a Jaguar.
The brutal slaying of her mate prompts her audacious escape from an illegal predator collection on the edge of Exmoor Forest, England. Heavily frequented by humans, the woodland presents an even more dangerous proposition than her natural home in the lush rain forests of South America. But Valaria finds an unexpected, and unlikely, ally in the form of a local shepherd and animal rights defender, Tom Smith.
Her captor and tormentor, Edward Forsyth, is in hot pursuit and must track Valaria down and kill her, or risk spending the rest of his life behind bars if his illegal collection of predators is discovered. For Edward this is not an option and his greatest desire is to hang her head on his trophy room wall.
Putting herself between the barrel of a gun and her offspring to ensure their freedom may be her only option. "
I did a lot of research about jaguars and visited a local zoo so that I could get close and personal with the cat. The owners of the zoo at Sparkwell, just outside Plymouth were really helpful when they found out I was writing a novel and had the cat's keeper give us a tour and a talk about the jaguar. To me this was amazing, a very authory thing to be doing LOL. Remember, I was very new to this writing game; naive and excited.
I sat at home with all my research and started typing on an old electronic typewriter with a copy of the Writers and Artists Yearbook sat on the table. I also had a couple of magazines which talked about the craft of writing and who to submit your shiny new novel to. I spent several days thinking about what I wanted to write about. I'd always hated the idea of these rich people who hunted animals just to decorate themselves and their homes. I also wasn't a fan of people who thought that they could capture these beautiful creatures and keep them in cages as living trophies. So, the story of Valaria grew in my head.
I sat and wrote the first three chapters and was so excited that I'd managed to achieve that small victory. I knew at that point that I wanted to be a writer for a living; yes there is that naive bit again LOL. So, the stupid part of me, which rears its head fairly often, decided that what I really needed was a literary agent or an editor to help me shape the novel. I sent the first three chapters off to one of the big five (can't remember exactly which one, but it may have been Harper Collins). While it sat in their slush pile--they had slush piles in 1996--I carried on writing.
After a while, when I was half way through the novel, around chapter 16-17, my manuscript came back with a rejection slip. I was pretty gutted, but I didn't realize that what I had in my hand was golden. The rejection slip wasn't a form rejection, it was a very nice personalized one that said she loved my writing, but wanted to see more from jaguar's point of view. If I had known then what I did now I would have dove back into the manuscript and worked it using the advice of this big 5 editor. But, I decided that I needed to get a job and earn some money rather than try and scrape by on my military pension. Jaguar was stuffed into a drawer and I taught myself how to be a computer programmer. I got a job and that was that, until in 2003 we decided to move out here.
Fast forward 8 years and while having a shower an idea popped into my head that revolved around an inept young wizard who lives in a realm where a wizard's power is dictated by his height, and promotion is given in inches; they also take inches away when demoting you for mistakes. Gerald being who he is is never going to have a smooth ride trying to become a great wizard. I jumped onto my pc and had written the first draft within 6 months. I then revised it time and again until I started to send it out--I'd finally learned about the correct way to query agents and publishers by then and I still feel embarrassed when I thought back to my initial foray into the publishing world with JAGUAR. GERALD was finally published in May 2017. Since then I've finished JAGUAR, written the sequel to GERALD; written a free prequel short story and am half way through an Anglo Saxon novel.
I still think back to that rejection slip I received in 1996 and wonder what might have happened if I had known what a nugget I had then. A personalized rejection with advice on how to improve the chapters I'd sent. I've had plenty of rejections since then from agents, but I carried on and finally got a yes from a publisher for GERALD.
Can you remember your first rejection, and were you as naive as me when it came to querying agents and publishers?