Airfix Lancaster B III in 1:72 Scale
Welcome to this review and build of the Airfix Lancaster B III in 1:72 scale. This model is part of the Airfix Battle Of Britain Memorial Flight gift set and is the last of the 3 models in this kit. I will also be doing a video on my YouTube channel of the build if you would prefer to watch that rather than reading about the build.

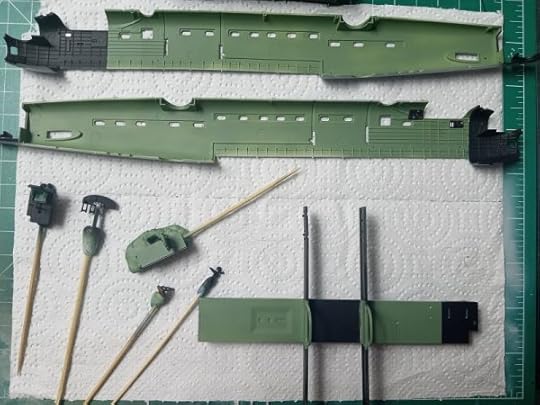
Above I have laid out the initial parts of the construction. As you can see here, we have the 2 sides of the fuselage, the cabin floor and the assembled cockpit. I have also filled a few ejector pin marks that would be visible in the cockpit if you looked through the windows when the model is complete. I presume they were designed to go there because the underside is a pretty detailed part of the bomb bay, which I closed because of reasons we will go into later.
The next stage was getting paint down ready for some weathering and some decals. I mixed my own interior green because I didn’t have the actual paint color in the call out and also because the color in reference photos I had didn’t really match what was being asked for. This all went down really nicely and the Gaahleri airbrush preformed very well, especially as I seem to have the thinning ratio for Vallejo paints dialed in.

I applied a gloss coat to the parts previously painted and then applied the decals required for this part of the build. They went down great, being Cartograf there was obviously no issues, using Micro Set and Micro Sol. Once the decals were in place I then added the sub assemblies to the fuselage and did some light weathering with an oil wash and dry brush. I was now ready to close the fuselage halves.

The fuselage halves went together without much of a problem and any seams were filled with Vallejo Plastic Putty.
The real issue was that the bomb bay doors were so warped that I couldn’t have them in the open position, which I was that happy about. I had to work my way along each of the doors gluing as I went to get them to fit in an acceptable manner. I breathed a sigh of relief when they were finally done and moved on to more enjoyable things.
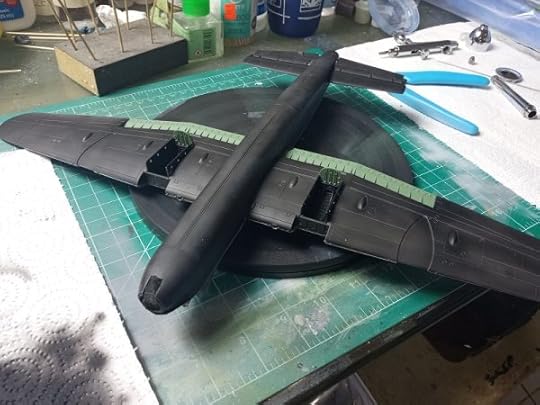
I added the struts to support the upper and lower parts of the wings and taped off the upper portion of the fuselage.
The next stage would be to paint the lower half black. Before doing that I tried something that I’d seen on YouTube and that was a bit of pre-shading. This would be the opposite way round because the base color would be black. I ran the airbrush along the panel lines with a light grey to create some modulation. This didn’t work out as I really wanted it to so I tried something else once the paint was down.

As you can see from the above image I have now applied the black paint to the lower half of the fuselage and it was beginning to look very nice.
Because the pre-shading didn’t go as well as I’d hoped I tried a bit of post shading instead and this came out really well.
I know it was a bit early to start doing these sort of techniques, but I was determined to try out more advanced techniques as I went along and if I made a mistake at this stage I could always just go over it again with a flat black coat.

The Airfix kit was finally beginning to look like an aircraft and I was pretty excited about the way it was beginning to look. When I attached the upper wing surfaces I was pretty astounded at how big this bomber actually was.
As you can see from the above image, I got all the parts together that would need to be primed before I moved forward with the build. There were a lot and I was beginning to feel slightly out of my depth, especially as this was only my 3rd scale model. But, I carried on and was determined to finish it.
Once the parts had all been primed, I flipped the Lancaster over and attached the lower wing pieces. As you can see I’d previously painted the landing gear wells and the underside of the flaps ready for the next stage. I had also attached the rear wings but left off the twin tails at this stage. This made the model easier to handle for the next stage.
While the model was inverted I did try and do some modulation and weathering to the black panted areas and was pleased how the bleaching effect turned out. I was definitely getting more comfortable with the airbrush at this point.
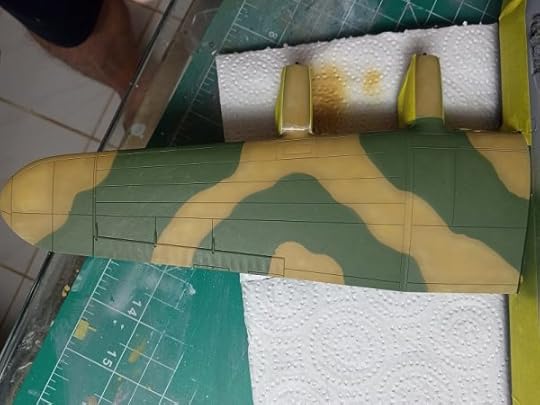
The twin tails/rudder assemblies were black so I didn’t need to attach them to paint the camoflage pattern that would be coming in the next stage of the build.

Normally I would have masked the camoflage pattern after applying the lighter color, but I just did the one wing to see if I could freehand it with the airbrush. To me, it came out really well and my confidence levels rose a lot.
I was so happy with the freehand painting of the camo that I pushed myself a litte further. This was mainly to see if I could control the airbrush and also to see if the Gaahleri CS-36 airbrush could do finer work. I lightened each camo color and thinned to 80% Vallejo flow improver and 20% Vallejo paint and tried some modulation over the camo pattern.
To my surprise the result was very pleasing. Because the paint was thinned so much the effect was hard to notice at first and I realized that each pass would increase the coverage. Doing it this way with the needle cover removed I found that I had a lot of control of how much of the effect I was getting.
This was a revelation and a huge step forward in how I think about modelling. As a novice it is very exciting to be able to successfuly attempt something that I thought was way too advanced for me.
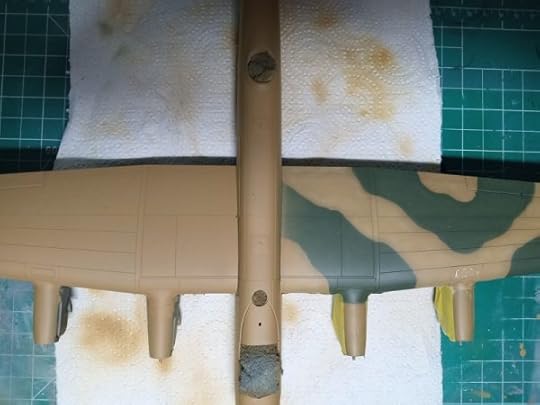
The above image shows how much of a difference a subtle modulation can make to a flat opaque layer. The rest of the model has the first base layer without any effects prior to the camo scheme or any modulation. The port wing shows the camo pattern and modulation effect applied.

Now I have painted the full camoflage scheme and added modulation and I loved the result. In the future I definitely won’t be afraid to give a technique a try. 

Knowing that I would want to gloss coat the model before adding decals I added a lot of the sub assemblies that I had painted previously. It is really beginning to look like a Lancaster now.
I went ahead and put a gloss layer down then waited 24hrs before applying the decals with Micro Set and Micro Sol. I managed to destroy one of the long decals and thought I’d ruined the model, but my wife said “just airbrush the lines on’. I thought she was joking and that doing that was beyond my capabilities, but I gave it a go, thinking that, at the worst, I could repaint the model if it turned out really bad. The result wasn’t perfect, but knowing I would be doing weathering later, I thought it was acceptable for my experience level.
Funnily enough, noone where I have posted images of the build had noticed that the lines are wider than they would have been with the decals. I did paint both sides so they would be the same rather than just painting the one part where the decal was destroyed, so at least they match

Now we move on to the weathering. Because this Lancaster is part of the Battle Of Britain Memorial Flight it would have been maintained and the weathering wouldn’t have been as bad as it would have on an operational bomber. But, the smoke stains were evident in photos I looked at, especially the noticible whiteish stains where the octane level of the fuel was changed.
There was the usual bit of chipping around access hatches and the rear door on the stbd side of the fuselage, but I didn’t push it too far. The smoke stains were, again, done with an airbrush which was very surprising for me as I never would have attempted smoke stains using an airbrush in previous builds. This showed me how comfortable I was becoming with the use of the airbrush.

At this stage, the build was basically done and all I had to do was the final matte coat and then remove the masking from the canopy and gun turrets. You can also see a little bit more chipping around the propellers, spinners and leading edges of the wings. I just couldn’t resist it

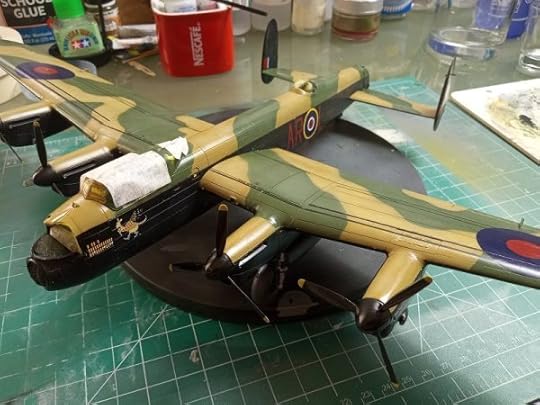
Finally, the Lancaster was finished and I was really proud that I had managed to bring this build to completion. The challenge was a lot greater with the Lancaster than it was for the two Spitfires included in the gift set, and this aircraft definitely tested me. But, it also allowed me to learn a lot of new techniques that I can use in future builds. At the minimum it taught me not be be afraid to have a go.
Now we get to my thoughts on the gift set as a whole. For me it was definitely worth the $35 I paid for it. I was lucky enough that it was on offer and there was an extra coupon on Amazon which allowed me to buy it for that price. This in itself made the gift set a huge value for money buy. The Lancaster was a huge step up from the Spitfires, so if you are new to modelling, like me, then expect to be challenged when you get to the Lancaster.
My only real gripe with this kit, and I’ve heard it is the same for starter kits, is that the supplied paints are terrible. I can guarantee that if you expect to just buy this gift set and be able to assemble and paint it with only what is in the box you will be disappointed. At least four of the paints out of the twelve included were unusable and could not be re-hydrated.
At a minimum you should invest in some decent paints to complete all the three models in this gift set.
Out of 5 stars I would give it 4, just because the models were so much fun to build. I could have been harsher and given it 3 or 3.5 because of the warping of the bomb bay doors and the fact that Airfix insist in throwing all the sprues in a single bag which is asking for damaged parts. B,ut because of the enjoyment I got from the gift set and the value for money I felt I got from it I will stick to my 4 star rating.
Happy modelling
The post Airfix Lancaster B III in 1:72 Scale appeared first on Carl's Scale Models.