
Michael Driscoll's Blog, page 3
December 23, 2024
An Intro to pre-commit
You can use many great tools to help you in your software development journey. One such tool is pre-commit, a framework for managing and maintaining multi-language pre-commit hooks. You use pre-commit to run one or more tools before allowing you to commit your code locally. For example, you might run the Flake8 linter or the Ruff formatter on your Python code in GitHub Actions or some other CI. But rather than waiting for CI to run, you want to run those checks locally and automatically.
That is where pre-commit comes in. You tell pre-c0mmit what to run, and it will run right before it allows you to commit your code.If any of those checks fail, you must fix your code before committing it.
Installing pre-commitpre-commit is a Python package, so you can install it using pip. Here’s the command you’ll need to run in your terminal:
pip install pre-commitOnce pre-commit is installed, you can confirm that it works by running the following:
pre-commit --versionAdding the git HooksThe next step is to navigate to one of your local GitHub code bases in your terminal. Once inside one of your repos, you will need to run this command:
pre-commit installThis command installs pre-commit in your .git\hooks folder so that pre-commit runs whenever you commit. But how does pre-commit know what to run?
You have to define what pre-commit runs using a special YAML file. You’ll learn how in the next section!
Adding a pre-commit ConfigurationYou need to add a file named .pre-commit-config.yaml (note the leading period) into the root of your repo. If you want to generate a simple config file, you can run this command:
pre-commit sample-configHere’s an example config for running Black on your code:
repos:- repo: https://github.com/pre-commit/pre-com...
rev: v2.3.0
hooks:
- id: check-yaml
- id: end-of-file-fixer
- id: trailing-whitespace
- repo: https://github.com/psf/black
rev: 22.10.0
hooks:
- id: black
Personally, I like to run the Ruff formatter and linter as well as a couple of defaults, so I use this config a lot:
repos:- repo: https://github.com/pre-commit/pre-com...
rev: v3.2.0
hooks:
- id: trailing-whitespace
- id: end-of-file-fixer
- id: check-added-large-files
- repo: https://github.com/astral-sh/ruff-pre...
# Ruff version.
rev: v0.1.7
hooks:
# Run the linter.
- id: ruff
# Run the formatter.
- id: ruff-format
When you add a new rule to pre-commit, you should run that rule against all the files in your repo so you don’t have any surprises later on. To do that, you need to run this command:
pre-commit run --all-filesOnce you have run all your new rules against all your code files, you can start working on your next feature or bug fix. Then, when you run, git commit the pre-commit hooks will run, and you’ll see if your code is good enough to pass.
Wrapping UpThere are TONs of hooks you can add to pre-commit. A lot of them are mentioned on the pre-commit website. You can add Mypy, pytest, and much, much more to your pre-commit hooks. Just don’t get too crazy, or they may take too long to run, and you’ll go nuts waiting for it.
Overall, running so many of your CI hooks locally is great because your machine is usually faster than waiting on a queue in CI. Give it a try and see what think!
The post An Intro to pre-commit appeared first on Mouse Vs Python.


December 16, 2024
The Python Countdown to Christmas 2024 Giveaway
Happy Holidays and Merry Christmas from me to you! I have been giving away hundreds of Python books and courses for Christmas for the last couple of years!
https://www.blog.pythonlibrary.org/wp-content/uploads/2024/12/Countdown-to-christmas-1.mp4From now until Christmas, I will be giving away hundreds more. You can start learning Python for free using my books or courses.
All you have to do is follow me on one of these platforms and watch out for my post that describes how to get a free book or course:
X / TwitterLinkedInMastodonThreadsBlueSkyThe post The Python Countdown to Christmas 2024 Giveaway appeared first on Mouse Vs Python.
December 10, 2024
Checking Python Code with GitHub Actions
When you are working on your personal or work projects in Python, you usually want to have a way to enforce code standards. You can use tools like Flake8, PyLint or Ruff to lint your code. You might use Mypy to verify type checking. There are lots of other tools at your disposal. But it can be hard to remember to do that every time you want to create a pull request (PR) in GitHub or GitLab.
That is where continuous integration (CI) tools come in. GitHub has something called GitHub Actions that allow you to run tools or entire workflows on certain types of events.
In this article, you will learn how to create a GitHub Action that runs Ruff on a PR. You can learn more about Ruff in my introductory article.
Creating a WorkflowIn the root folder of your code, you will need to create a folder called .github/workflows. Note the period at the beginning and the fact that you need a subfolder named workflows too. Inside of that, you will create a YAML file.
Since you are going to run Ruff to lint and format your Python files, you can call this YAML file ruff.yml. Put the following in your new file:
name: Ruffon: [workflow_dispatch, pull_request]
jobs:
build:
runs-on: ubuntu-latest
steps:
- uses: actions/checkout@v4
- name: Install Python
uses: actions/setup-python@v4
with:
python-version: "3.13"
- name: Install dependencies
run: |
python -m pip install --upgrade pip
pip install ruff
# Include `--format=github` to enable automatic inline annotations.
- name: Run Ruff
run: ruff check --output-format=github .
continue-on-error: false
- name: Run Ruff format
run: ruff format --check .
continue-on-error: false
Note: This example comes from my textual-cogs repo
Let’s talk about what this does. This line is pretty important:
on: [workflow_dispatch, pull_request]It tells GitHub to run this workflow when there’s a pull request and also with “workflow_dispatch”. That second option lets you go to the Actions tab in your GitHub repo, select the workflow and run it manually. If you do not include that, you cannot run it manually at all. This is useful for testing purposes, but you can remove it if you do not need it.
The next part tells GitHub to run the build on ubuntu-linux:
jobs:build:
runs-on: ubuntu-latest
If you have a GitHub subscription, you can also get Windows as a runner, which means that you can also run these actions on Windows in addition to Linux.
The steps section is the meat of this particular workflow:
steps:- uses: actions/checkout@v4
- name: Install Python
uses: actions/setup-python@v4
with:
python-version: "3.13"
- name: Install dependencies
run: |
python -m pip install --upgrade pip
pip install ruff
# Include `--format=github` to enable automatic inline annotations.
- name: Run Ruff
run: ruff check --output-format=github .
continue-on-error: false
- name: Run Ruff format
run: ruff format --check .
continue-on-error: false
Here is uses a built-in checkout@v4 workflow, which is something that comes with GitHub. There are many others you can use to enhance your workflows and add new functionality. Next, you get setup with Python 3.13 and then you install your dependencies.
Once your dependencies are installed, you can run your tools. In this case, you are installing and running Ruff. For every PR, you run ruff check --output-format=github ., which will do all sorts of linting on your Python code. If any errors are found, it will add inline comments with the error, which is what that --output-format flag is for.
You also have a separate section to run Ruff format, which will format your code to follow the Black formatter (for the most part).
Wrapping UpYou can add lots of other tools to your workflows too. For example, you might add a Mypy workflow, or some test workflows to run on PR or perhaps before merging to your main branch. You might even want to check your code complexity before allowing a merge too!
With a little work, you will soon be able to use GitHub Actions to keep your code cleaner and make it more uniform too. Adding automated testing is even better! Give it a try and let me know what you think.
The post Checking Python Code with GitHub Actions appeared first on Mouse Vs Python.
December 9, 2024
JupyterLab 101 Book is Now Available
JupyterLab, the latest iteration of the Jupyter Notebook, is a versatile tool that empowers you to share your code in an easily understandable format.
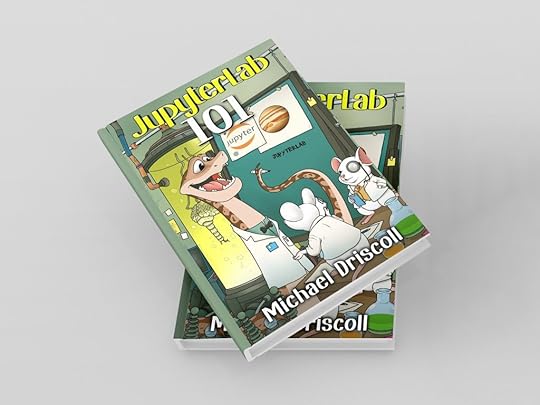 Front View Two Hard Cover Book Psd Mockup
Hundreds of thousands of people around the world use Jupyter Notebooks or variations of the Notebook architecture for any or all of the following:
teachingpresentationslearning a computer languagenumerical simulationsstatistical modelingdata visualizationmachine learningand much more!Jupyter Notebooks can be emailed, put on GitHub, or run online. You may also add HTML, images, Markdown, videos, LaTeX, and custom MIME types to your Notebooks. Finally, Jupyter Notebooks support big data integration.
JupyterLab 101 will get you up to speed on the newest user interface for Jupyter Notebooks and the other tools that JupyterLab supports. You now have a tabbed interface that you can use to edit multiple Notebooks, open terminals in your browser, create a Python REPL, and more. JupyterLab also includes a debugger utility to help you figure out your coding issues.
Rest assured, JupyterLab supports all the same programming languages as Jupyter Notebook. The main difference lies in the user interface, and this guide is here to help you navigate it effectively and efficiently.
After reading JupyterLab 101, you will be an expert in JupyterLab and produce quality Notebooks quickly!
Where to PurchasePurchase on Gumroad, Leanpub or Amazon
The post JupyterLab 101 Book is Now Available appeared first on Mouse Vs Python.
November 25, 2024
Black Friday Python Deals 2024
Black Friday and Cyber Monday are nearly here, so it’s time to do a Python sale! All my books and courses are 35% off until December 4th if you use this code: BF24 at checkout.
You can learn about any of the following topics in my books and courses:
Basic Python (Python 101)PDF Processing (ReportLab book)Excel and PythonImage processing (Pillow book)Python Logging (NEW this year!)Jupyter NotebookJupyterLab 101 (NEW this month!)and moreCheck out my books and courses today!
Other Python Sales Sundeep Agarwal : ~50% off Sundeep’s all book and Python bundles with code FestiveOffer Python Jumpstart with Python Morsels: 50% off Trey Hunner’s brand new Python course, an introduction to Python that’s very hands-on ($99 instead of $199) Rodrigo 50% off Rodrigo’s all books bundle with code BF24 The Python Coding Place : 40% off The Python Coding Book and 40% off a lifetime membership to The Python Coding Place with code black2024Adam Johnson’s Django-related Deals for Black Friday 2024The post Black Friday Python Deals 2024 appeared first on Mouse Vs Python.
November 19, 2024
How to Debug Your Textual Application
Textual is a great Python package for creating a lightweight, powerful, text-based user interface. That means you can create a GUI in your terminal with Python without learning curses! But what happens when you encounter some problems that require debugging your application? A TUI takes over your terminal, which means you cannot see anything from Python’s print() statement.
Wait? What about your IDE? Can that help? Actually no. When you run a TUI, you need a fully functional terminal to interact with it. PyCharm doesn’t work well with Textual. WingIDE doesn’t even have a terminal emulator. Visual Studio Code also doesn’t work out of the box, although you may be able to make it work with a custom json or yaml file. But what do you do if you can’t figure that out?
That is the crux of the problem and what you will learn about in this tutorial: How to debug Textual applications!
Getting StartedTo get the most out of this tutorial, make sure you have installed Textual’s development tools by using the following command:
python -m pip install textual-dev --upgradeOnce you have the latest version of textual-dev installed, you may continue!
Debugging with Developer ModeWhen you want to debug a Textual application, you need to open two terminal windows. On Microsoft Windows, you can open two Powershell or two Command Prompts. In the first terminal, run this command:
textual consoleThe Textual console will listen for any Textual application running in developer mode. But first, you need some kind of application to test with. Open up your favorite Python IDE and create a new file called hello_textual.py. Then enter the following code into it:
from textual.app import App, ComposeResultfrom textual.widgets import Button
class WelcomeButton(App):
def compose(self) -> ComposeResult:
yield Button("Exit")
def on_button_pressed(self) -> None:
self.mount(Button("Other"))
if __name__ == "__main__":
app = WelcomeButton()
app.run()
To run a Textual application, use the other terminal you opened earlier. The one that isn’t running Textual Console in it. Then run this command:
textual run --dev hello_textual.pyYou will see the following in your terminal:

If you switch over to the other terminal, you will see a lot of output that looks something like this:

Now, if you want to test that you are reaching a part of your code in Textual, you can add a print() function now to your on_button_pressed() method. You can also use self.log.info() which you can read about in the Textual documentation.
Let’s update your code to include some logging:
from textual.app import App, ComposeResultfrom textual.widgets import Button
class WelcomeButton(App):
def compose(self) -> ComposeResult:
yield Button("Exit")
print("The compose() method was called!")
def on_button_pressed(self) -> None:
self.log.info("You pressed a button")
self.mount(Button("Other"))
if __name__ == "__main__":
app = WelcomeButton()
app.run()
Now, when you run this code, you can check your Textual Console for output. The print() statement should be in the Console without you doing anything other than running the code. You must click the button to get the log statement in the Console.
Here is what the log output will look like in the Console:

And here is an example of what you get when you print() to the Console:

There’s not much difference here, eh? Either way, you get the information you need and if you need to print out Python objects, this can be a handy debugging tool.
If you find the output in the Console to be too verbose, you can use -x or --exclude to exclude log groups. Here’s an example:
textual console -x SYSTEM -x EVENT -x DEBUG -x INFOIn this version of the Textual Console, you are suppressing SYSTEM, EVENT, DEBUG, and INFO messages.
Launch your code from earlier and you will see that the output in your Console is greatly reduced:

Now, let’s learn how to use notification as a debugging tool.
Debugging with NotificationIf you like using print() statements then you will love that Textual’s App() class provides a notify() method. You can call it anywhere in your application using self.app.notify() , along with a message. If you are in your App class, you can reduce the call to simply self.notify().
Let’s take the example from earlier and update it to use the notify method instead:
from textual.app import App, ComposeResultfrom textual.widgets import Button
class WelcomeButton(App):
def compose(self) -> ComposeResult:
yield Button("Exit")
def on_button_pressed(self) -> None:
self.mount(Button("Other"))
self.notify("You pressed the button!")
if __name__ == "__main__":
app = WelcomeButton()
app.run()
The notify() method takes the following parameters:
message – The message you want to display in the notificationtitle – An optional title to add to the messageseverity – The message’s severity, which translates to a different color for the notification. You may use “information”, “error” or “warning”timeout – The timeout in seconds for how long to show the messageTry editing the notification to use more of these features. For example, you could update the code above to use this instead:
self.notify("You pressed the button!", title="Info Message", severity="error")Textual’s App class also provides a bell() method you can call to play the system bell. You could add this to really get the user’s attention, assuming they have the system bell enabled on their computer.
Wrapping UpDebugging your TUI application successfully is a skill. You need to know how to find errors, and Textual’s dev mode makes this easier. While it would be great if a Python IDE had a fully functional terminal built into it, that is a very niche need. So it’s great that Textual included the tooling you need to figure out your code.
Give these tips a try, and you’ll soon be able to debug your Textual applications easily!
The post How to Debug Your Textual Application appeared first on Mouse Vs Python.
November 13, 2024
ANN – The textual-cogs Package – Creating Reusable Dialogs for Textual
Textual-cogs is a collection of Textual dialogs that you can use in your Textual application. You can see a quick demo of the dialogs below:

Dialogs included so far:
Generic MessageDialog – shows messages to the userSaveFileDialog – gives the user a way to select a location to save a fileSingleChoiceDialog – gives the user a series of choices to pick fromTextEntryDialog – ask the user a question and get their answer using an Input widgetand moreYou can check out textual-cogs on GitHub.
Installation
You can install textual-cog using pip:
python -m pip install textual-cogYou also need Textual to run these dialogs.
Example Usage
Here is an example of creating a small application that opens the MessageDialog immediately. You would normally open the dialog in response to a message or event that has occurred, such as when the application has an error or you need to tell the user something.
from textual.app import Appfrom textual.app import App, ComposeResult
from textual_cogs.dialogs import MessageDialog
from textual_cogs import icons
class DialogApp(App):
def on_mount(self) -> ComposeResult:
def my_callback(value: None | bool) -> None:
self.exit()
self.push_screen(
MessageDialog(
"What is your favorite language?",
icon=icons.ICON_QUESTION,
title="Warning",
),
my_callback,
)
if __name__ == "__main__":
app = DialogApp()
app.run()
When you run this code, you will get something like the following:

Creating a SaveFileDialog
The following code demonstrates how to create a SaveFileDialog:
from textual.app import Appfrom textual.app import App, ComposeResult
from textual_cogs.dialogs import SaveFileDialog
class DialogApp(App):
def on_mount(self) -> ComposeResult:
self.push_screen(SaveFileDialog())
if __name__ == "__main__":
app = DialogApp()
app.run()
When you run this code, you will see the following:

The textual-cogs package is currently only a collection of reusable dialogs for your Textual application. However, this can help speed up your ability to add code to your TUI applications because the dialogs are taken care of for you.
Check it out on GitHub or the Python Package Index today.
The post ANN – The textual-cogs Package – Creating Reusable Dialogs for Textual appeared first on Mouse Vs Python.
October 16, 2024
SSH Scripting with Fabric and Python
Reading and writing files is a basic task that most software applications need to do. You will also find that you sometimes need to read and write files to a remote machine or perhaps run commands on a remote machine as well. Python is well-suited for this type of activity using tools such as Paramiko. However, in this tutorial, you will spend some time learning how to use a different package called Fabric.
Fabric is a high-level Python package designed especially to execute shell commands remotely over SSH and then yielding useful Python objects in return. This article will focus on the latest version of Fabric, which is 3.2.2 at the time of writing.
Getting FabricFabric is a third party package. That means you need to install Fabric to be able to use it. Fortunately, you can use Python’s pip tool to do so.
Open up a terminal application and run the following command:
python -m pip install fabricIf you don’t want to clutter up your main Python environment, then you should use a Python virtual environment. You can learn more about those in An Intro to Python Virtual Environments.
Once you are finished installing Fabric, you can move on to learning how to use it!
Connecting to the Server with FabricThe Fabric documentation uses the following as a super simple example of running a command on a remote machine using SSH:
from fabric import Connectionresult = Connection('web1.example.com').run('uname -s', hide=True)
You only need two lines of code to start running commands on a remote machine. But what if the remote machine requires credntials?
In that case, you need to create a Config object and update your instantiation of Connection like this:
from fabric import Connection, Configconfig = Config(overrides={"sudo": {"password": "MyAmazingPassword123"}})
conn = Connection("mike@10.10.166.128:22", connect_kwargs={"password": "MyAmazingPassword123!"}, config=config)
If you have a machine that uses an SSH key pair, you can use this alternate connect_kwargs dictionary:
connect_kwargs={"key_filename": "/home/myuser/.ssh/private.key",
}
Then simply update the call to Connection and you’re good to go.
Running Commands with FabricNow that you have the knowledge needed to connect to the remote machine, you probably want to start running more complex commands. Here is an example of running a ping command:
from fabric import Connection, Configconfig = Config(overrides={"sudo": {"password": "MyAmazingPassword123"}})
conn = Connection("mike@10.10.166.128:22", connect_kwargs={"password": "MyAmazingPassword123!"}, config=config)
conn.run("ping -c 2 www.google.com")
What if you want to be able to use the super user (i.e. root) when running a command? Fabric makes that easy by using the sudo() method:
from fabric import Connection, Configconfig = Config(overrides={"sudo": {"password": "MyAmazingPassword123"}})
conn = Connection("mike@10.10.166.128:22", connect_kwargs={"password": "MyAmazingPassword123!"}, config=config)
conn.sudo("systemctl restart nfs-kernel-server")Transferring Files with Fabric
If you want to download a file from a remote machine, Fabric makes this rudimentary task even easier. Here’s how to do it:
from fabric import Connection, Configconfig = Config(overrides={"sudo": {"password": "MyAmazingPassword123"}})
conn = Connection("mike@10.10.166.128:22", connect_kwargs={"password": "MyAmazingPassword123!"}, config=config)
conn.get("remote_file_path", "local_file_path")
Note that all you need to do is call get() while specifying the location of the remote file that you want for the first argument and the local path for where you want to download the file as the second argument.
Sending a file to the remote server is done using the put() method:
from fabric import Connection, Configconfig = Config(overrides={"sudo": {"password": "MyAmazingPassword123"}})
conn = Connection("mike@10.10.166.128:22", connect_kwargs={"password": "MyAmazingPassword123!"}, config=config)
conn.put("local_file_path", "remote_file_path")
You reverse the arguments for put() versus get(). The local path is passed in first, followed by the remote location that you want to upload to.
But what if you want to upload to a restricted area of the file system on the remote machine? You know, like to the etc folder or any of the other root-owned folders?
Fabric doesn’t have a built-in way to do that. Instead you use a two-step process:
Upload the file to a directory that your user ownsThen use sudo() to move the file to the restricted locationHere’s an example:
from fabric import Connection, Configconfig = Config(overrides={"sudo": {"password": "MyAmazingPassword123"}})
conn = Connection("mike@10.10.166.128:22", connect_kwargs={"password": "MyAmazingPassword123!"}, config=config)
# Send the file to a user directory
conn.put("local_file_path", "remote_file_path")
# Use sudo to move that file to a root location
conn.sudo("mv remote_file_path root_location_path")Wrapping Up
Fabric is a great tool that greatly simplifies running SSH commands on remote computers. If you know how to use common Linux commands or know Python well, you can do lots of different things. For example, you could even upload a Python script to the remote server, run it, and then remove the file. At that point, you could do just about anything that you needed to.
Give Fabric a try and see what you can do!
The post SSH Scripting with Fabric and Python appeared first on Mouse Vs Python.
September 25, 2024
Textual – The New MaskedInput Widget
Textual v0.80.0 was released today, and it included the brand-new MaskedInput widget. If you have used other GUI toolkits, such as wxPython, you might already be familiar with a masked input widget. These widgets allow you to control the user’s input based on a mask string that the developer provides when instantiating the widget.
Let’s spend a few brief moments learning how this new widget works.
Getting the Latest TextualBefore you can use the MaskedInput widget, you must ensure you have version 0.80.0 or greater. If you have an older version, then you’ll need to upgrade by running the following command in your terminal:
python -m pip install textual --upgradeNow that you have a 0.80.0 or greater, you can use this great widget!
Using the MaskedInput WidgetThe Textual documentation has a credit card masked string for their demo application. Let’s start by looking at that example:
from textual.app import App, ComposeResultfrom textual.widgets import Label, MaskedInput
class MaskedInputApp(App):
# (1)!
CSS = """
MaskedInput.-valid {
border: tall $success 60%;
}
MaskedInput.-valid:focus {
border: tall $success;
}
MaskedInput {
margin: 1 1;
}
Label {
margin: 1 2;
}
"""
def compose(self) -> ComposeResult:
yield Label("Enter a valid credit card number.")
yield MaskedInput(
template="9999-9999-9999-9999;0", # (2)!
)
if __name__ == "__main__":
app = MaskedInputApp()
app.run()
The template in this code says that you want four groups of four digits. The template automatically adds a dash after each four digits except the last one.
When you run this code, you will see something like this:

Note that when the widget is empty or not completely filled out, there is a red outline around it. The widget will ignore all keys except for number keys. So if you press A-Z or any special characters like semi-colon or question mark, the MasketInput widget will ignore them and nothing appears in the widget.
When you have entered four groups of four integers though, you will see the red outline turn green. Here’s an example:
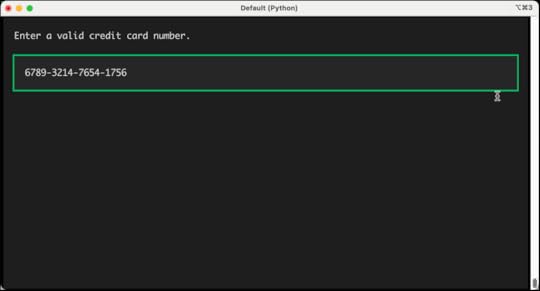
Note that this code does NOT actually validate that these are working credit card numbers. It only validates that there four groups of four integers.
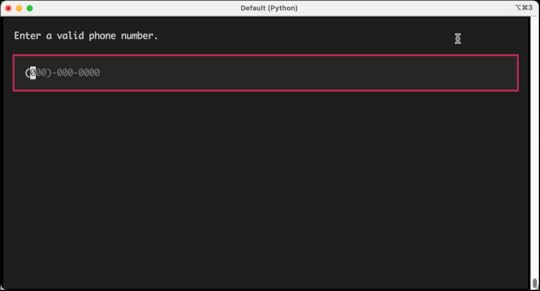
A more common mask would be to create something to accept phone numbers. Let’s take the code above and rewrite the mask and the label text accordingly:
from textual.app import App, ComposeResultfrom textual.widgets import Label, MaskedInput
class MaskedInputApp(App):
# (1)!
CSS = """
MaskedInput.-valid {
border: tall $success 60%;
}
MaskedInput.-valid:focus {
border: tall $success;
}
MaskedInput {
margin: 1 1;
}
Label {
margin: 1 2;
}
"""
def compose(self) -> ComposeResult:
yield Label("Enter a valid phone number.")
yield MaskedInput(
template="(999)-999-9999;0",
)
if __name__ == "__main__":
app = MaskedInputApp()
app.run()
If you runt his code, the output it a little different, but the concept is the same:
The MaskedInput widget is using regular expressions to mask characters. If you look at the documentation you can see how it works. Following are a few examples from the documentation:
A[A-Za-z]Yesa[A-Za-z]NoN[A-Za-z0-9]Yesn[A-Za-z0-9]NoX[^ ]Yesx[^ ]No9[0-9]YesThis widget may get additional updates to include more refined regular expressions, so it is definitely best to review the documentation for the latest information on the masked templates and how they work.
Wrapping UpThe MaskedInput widget is a great addition to the Textual TUI toolkit. There are lots of great widgets included with Textual now. While there may not be as many as wxPython or PyQt, those projects have been around for a couple of decades and have had much more time to mature. You can create really amazing and neat applications in your terminal with Python and Textual. You should try it out today!
The post Textual – The New MaskedInput Widget appeared first on Mouse Vs Python.
JupyterLab 101 Kickstarter Stretch Goal
My Kickstarter for my latest Python book is still going on for another eight days. Now is a great time to pre-order the book as well as get my other Python books.

The project is fully funded, and I added a stretch goal.
Stretch GoalThe stretch goal is $5000 or 350 backers. If we reach either of those, I will create a video course version of the book and release it to all backers. I think being able to show JupyterLab in a video format may be an even better medium for teaching this type of topic, although the book may be better for quick browsing.
What You’ll LearnIn this book, you will learn how about the following:
Installation and setup of JupyterLabThe JupyterLab user interfaceCreating a NotebookMarkdown in NotebooksMenus in JupyterLabLaunching Other Applications (console, terminal, text files, etc)Distributing and Exporting NotebooksDebugging in JupyterLabTesting your notebooksRewards to Choose FromAs a backer of this Kickstarter, you have some choices to make. You can receive one or more of the following, depending on which level you choose when backing the project:
An early copy of JupyterLab 101 + all updates including the final version (ALL BACKERS)A signed paperback copy (If you choose the appropriate perk)Get all by Python courses hosted on Teach Me Python or another site (If you choose the appropriate perk)T-shirt with the book cover (If you choose the appropriate perk)Get the book on Kickstarter today!
The post JupyterLab 101 Kickstarter Stretch Goal appeared first on Mouse Vs Python.


