
Michael Driscoll's Blog, page 2
July 1, 2025
Creating a Website with Sphinx and Markdown
Sphinx is a Python-based documentation builder. The Python documentation is written using Sphinx. The Sphinx project supports using ReStructuredText and Markdown, or a mixture of the two. Each page of your documentation or website must be written using one of those two formats.
The original Python 101 website uses an old version of Sphinx, for example.
In this tutorial, you will learn how to use Sphinx to create a documentation site. Here is an overview of what you’ll learn:
Getting the dependenciesSetting up the siteMaking Markdown work in SphinxBuilding your Sphinx siteAdding content to your siteLet’s start by installing all the packages you need to get Sphinx working!
Getting the DependenciesYou will need the following packages to be able to use Sphinx and Markdown:
sphinxmyst-parserYou should install these package in a Python virtual environment. Open up your terminal and pick a location where you would like to create a new folder. Then run the following command:
python -m venv NAME_OF_VENV_FOLDEROnce you have the virtual environment, you need to activate it. Go into the Scripts folder and run the activate command in there.
Now you can install the dependencies that you need using pip, which will install them to your virtual environment.
Here’s how to install them using pip:
python -m pip install myst-parser sphinxOnce your packages are installed, you can learn how to set up your site!
Setting Up the SiteNow that your packages are installed, you must set up your Sphinx website. To create a barebones Sphinx site, run the following command inside your virtual environment:
sphinx-quickstart NAME_OF_SITE_FOLDERIt will ask you a series of questions. The Sphinx documentation recommends keeping the source and build folders separate. Otherwise, you can set the other fields as needed or accept the defaults.
You will now have the following tree structure in your SITE_FOLDER:

You will work with the files and directories in this structure for the rest of the tutorial.
The next step on your Sphinx journey is to enable Markdown support.
Making Markdown Work in SphinxGo into the source directory and open the conf.py file in your favorite Python IDE. Update the extensions and the source_suffix variables to the following (or add them if they do not exist):
extensions = ['myst_parser']source_suffix = ['.rst', '.md']
These changes tell Sphinx to use the Myst parser for Markdown files. You also leave ReStructuredText files in there so that your Sphinx website can handle that format.
You now have enough of your site available to build it and ensure it works.
Building Your Sphinx SiteYou can now build a simple site with only an index page and the auto-generated boilerplate content. In your terminal, run the following command in the root of your Sphinx folder:
sphinx-build -M html .\source\ .\build\The HTML files will be created inside the build/html folder. If you open the index page, it will look something like this:

Good job! You now have a Sphinx website!
Now you need to add some custom content to it.
Adding Content to Your SiteYou can add ReStructuredText or Markdown files for each page of your site. You must update your index.rst file to add those pages to your table of contents using the toctree section:
.. toctree:::maxdepth: 2
:caption: Contents:
SUB_FOLDER/acknowledgments.md
doc_page1.md
OTHER_FOLDER/sub_doc_page1.md
Let’s add some real content. Create a new file called decorators.md in the root folder that contains the index.rst file. Then enter the following text in your new Markdown file:
# Python: All About DecoratorsDecorators can be a bit mind-bending when first encountered and can also be a bit tricky to debug. But they are a neat way to add functionality to functions and classes. Decorators are also known as a “higher-order function”. This means that they can take one or more functions as arguments and return a function as its result. In other words, decorators will take the function they are decorating and extend its behavior while not actually modifying what the function itself does.
There have been two decorators in Python since version 2.2, namely **classmethod()** and **staticmethod()**. Then PEP 318 was put together and the decorator syntax was added to make decorating functions and methods possible in Python 2.4. Class decorators were proposed in PEP 3129 to be included in Python 2.6. They appear to work in Python 2.7, but the PEP indicates they weren’t accepted until Python 3, so I’m not sure what happened there.
Let’s start off by talking about functions in general to get a foundation to work from.
## The Humble Function
A function in Python and in many other programming languages is just a collection of reusable code. Some programmers will take an almost bash-like approach and just write all their code in a file with no functions. The code just runs from top to bottom. This can lead to a lot of copy-and-paste spaghetti code. Whenever two pieces of code do the same thing, they can almost always be put into a function. This will make updating your code easier since you’ll only have one place to update them.
Make sure you save the file. Then, re-run the build command from the previous section. Now, when you open the index.html file, you should see your new Markdown file as a link that you click on and view.
Wrapping UpSphinx is a powerful way to create documentation for your projects. Sphinx has many plugins that you can use to make it even better. For example, you can use sphinx-apidoc to automatically generate documentation from your source code using the autodoc extension.
If you are an author and you want to share your books online, Sphinx is a good option for that as well. Having a built-in search functionality makes it even better. Give Sphinx a try and see what it can do for you!
The post Creating a Website with Sphinx and Markdown appeared first on Mouse Vs Python.


June 25, 2025
An Intro to ty – The Extremely Fast Python type checker
Ty is a brand new, extremely fast Python type checker written in Rust from the fine folks at Astral, the makers of Ruff. Ty is in preview and is not ready for production use, but you can still try it out on your code base to see how it compares to Mypy or other popular Python type checkers.
Getting Started with tyYou can try out ty using the online playground, or run ty with uvx to get started quickly:
uvx tyIf you prefer to install ty, you can use pip:
python -m pip install tyAstral provides other installation methods as well.
Using the ty Type CheckerWant to give ty a try? You can run it in much the same way as you would Ruff. Open up your terminal and navigate to your project’s top-level directory. Then run the following command:
ty checkIf ty finds anything, you will quickly see the output in your terminal.
Astral has also provided a way to exclude files from type checking. By default, ty ignores files listed in an .ignore or .gitignore file.
Adding ty to Your IDEThe Astral team maintains an official VS Code . You can get it from the VS Code Marketplace. Their documentation states that other IDEs can also use ty if they support the language server protocol.
Wrapping UpRuff is a great tool and has been adopted by many teams since its release. Ty will likely follow a similar trajectory if it as fast and useful as Ruff has been. Only time will tell. However, these new developments in Python tooling are exciting and will be fun to try. If you have used ty, feel free to jump into the comments and let me know what you think.
The post An Intro to ty – The Extremely Fast Python type checker appeared first on Mouse Vs Python.
June 17, 2025
Python 201 – All About the TypedDict
Python has supported the concept of type hinting for quite a while now. However, unlike other programming languages, Python does not enforce type hints. You must use an external tool, such as Mypy, for that.
In this tutorial, you will learn all about TypedDict, a special way of adding type hinting to Heterogeneous dictionaries. A heterogeneous dictionary is a dictionary that has values that are not all the same type.
But before you learn how to use the TypedDict, you should review how to type hint a regular dictionary.
Type Hinting a Regular DictionaryA regular Python dictionary is defined as follows:
my_dictionary = {"some_key": "some_value"}You can use any hashable type for the key, such as a string or an integer. The value of a dictionary can be any type whatsoever.
When you want to type hint a dictionary, you would use the following: dict[key_type, value_type]
Now let’s apply that to the example above:
my_dictionary: dict[str, str] = {"some_key": "some_value"}If you are using a version of Python before 3.9, you will need to do the following instead:
from typing import Dictmy_dictionary: Dict[str, str] = {"some_key": "some_value"}
Fortunately, modern Python no longer requires that extra import.
Now you’re ready to learn about how and why you might want to use the TypedDict
Creating a TypedDictThe TypedDict was introduced to Python in 3.8. You can read the full details about it in PEP 589. The reason you would use a TypedDict over a regular dictionary is when you have a dictionary with values of different types.
Here’s an example:
my_dictionary = {"names": ["Mike", "Andrea", "John"],"type": "employee",
"code": 123456
}
Type hinting this type of dictionary is more complex. You can do something like this, though:
my_dictionary: dict[str, list | str | int] = {"names": ["Mike", "Andrea", "John"], "otype": "employee", "code": 123456 }Depending on how your type checker is configured, this might work. However, if you write code that modifies the list, your type checker may complain that a string doesn’t have an append method or vice versa.
To make the type checker happier, you should use a TypedDict.
Here’s how you would use one with this example:
from typing import TypedDictclass MultiTypeDict(TypedDict):
names: list
otype: str
code: int
my_dictionary: MultiTypeDict = {"names": ["Mike", "Andrea", "John"], "otype": "employee", "code": 123456 }
Isn’t that great? There’s just one problem. What if your dictionary’s keys have spaces in them? You cannot create class attributes with spaces!
There’s a workaround for that. Check it out in the next section.
Creating a TypedDict with Keys that Have SpacesFor this example, you will create a new dictionary with four keys, three of which contain spaces.
To make a TypedDict for this type of dictionary, you need to call the TypedDict constructor instead of subclassing it:
from typing import TypedDictResults = TypedDict("Results",{"Animal Habitats": list,
"Tested": bool,
"Animal Name": str,
"Animal Location": str})
actual_results: Results = {
"Animal Habitats": ["Asia", "N. America"],
"Tested": False,
"Animal Name": "Tigris",
"Animal Location": "North Bay",
}
When you call TypedDict, you pass in the typename (what you would have named the class) and the fields the dictionary should have. You’ll note that the fields are a dictionary. This is where you will put the keys that contain spaces and those without spaces.
Give it a try and you’ll find it works great!
Wrapping UpTypedDict is a handy tool for storing a complex dictionary. You will find that sometimes you even have these complex dictionaries inside of lists, tuples or even other dictionaries. Using the TypedDict can make type-hinting these data structures easier and prevent hard-to-detect defects from creeping in.
The post Python 201 – All About the TypedDict appeared first on Mouse Vs Python.
June 5, 2025
Parsing XML Comments with Python
The Extensible Markup Language (XML) is a markup format originally for XML. Some companies use XML as a data serialization format or for configuration. Recently, I needed to learn how to uncomment some lines in an XML file to enable some settings that were defined in the XML.
Fortunately, Python’s xml module provides a way to do this. Let’s find out how!
AI Answers Might Not WorkWhen I used Google to search for an answer to this question: “How to edit comments in XML with Python”, Google Gemini piped up with this answer:
import xml.etree.ElementTree as ETxml_file = "PATH_TO_XML"
tree = ET.parse(xml_file)
root = tree.getroot()
for element in root.iter():
if isinstance(element.tag, str) and element.tag.startswith('{'):
continue
if element.tag == ET.Comment:
text = element.text.strip()
print(text)
Unfortunately, this code does not work. But it is close.
If you look through StackOverflow and similar forums, you will discover that you need a custom parser. Here’s how to create one:
import xml.etree.ElementTree as ETxml_file = r"PATH_TO_XML"
parser = ET.XMLParser(target=ET.TreeBuilder(insert_comments=True))
tree = ET.parse(xml_file, parser)
root = tree.getroot()
for element in root.iter():
if isinstance(element.tag, str) and element.tag.startswith('{'):
continue
if element.tag == ET.Comment:
text = element.text.strip()
print(text)
The key point here is to create an instance of ET.XMLParser and set insert_comments to True. Then the code will work.
Note that this example just prints out the commented text. You would need to do something like this to grab the commented text and reinsert it as a valid XML element:
for element in root.iter():if isinstance(element.tag, str) and element.tag.startswith('{'):
continue
if element.tag == ET.Comment:
text = element.text.strip()
if "COMMENTED CODE SUBSTRING" in text:
new_element = ET.fromstring(f"")
# Insert the uncommented text as a new XML element
root.insert(list(root).index(element), new_element)
# Remove the element that was commented out originally
root.remove(element)
# Make indentation work for the output
ET.indent(tree, space="\t", level=0)
with open(XML_PATH, "wb") as f:
tree.write(f)
Here, you loop over each element or tag in the XML. You check if the element is a comment type. If it is, you check for the substring you are looking for in the comment’s text. When you find the substring, you extract the entire string from the comment, create a new element, insert it as a regular element, and remove the comment.
Wrapping UpXML is a handy format, and Python includes several different methods of working with XML in its xml module. Several different third-party XML modules, such as lxml, are also great alternatives. If you work with XML, hopefully you will find this article helpful.
Have fun and happy coding!
The post Parsing XML Comments with Python appeared first on Mouse Vs Python.
April 28, 2025
Creating TUI Applications with Textual and Python Kickstarter Launched
Text-based user interfaces (TUIs) are making a BIG comeback. Many developers of today need to easy-to-use applications to configure and run jobs on headless servers. You can make your own life and the lives of your team so much easier by learning how to create a TUI yourself.
Textual is a rapid application development framework for your terminal or web browser that is written in Python. You can build complex, sophisticated applications in your terminal. While terminal applications are text-based rather than pixel-based, they still provide fantastic user interfaces.
Back the Kickstarter Now!
The Textual package allows you to create widgets in your terminal that mimic those used in a web or GUI application.
Creating TUI Applications with Textual and Python is to teach you how to use Textual to make striking applications of your own. The book’s first half will teach you everything you need to know to develop a terminal application.
The book’s second half has many small applications you will learn how to create. Each chapter also includes challenges to complete to help cement what you learn or give you ideas for continued learning.
Here are some of the applications you will create:
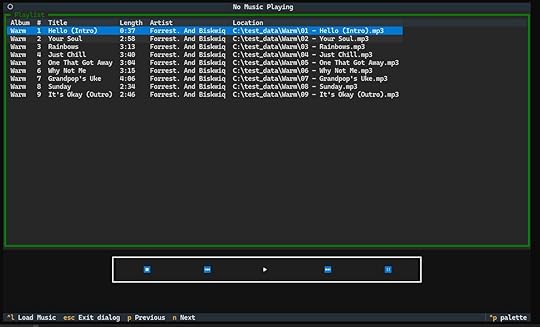
A basic calculatorA CSV viewerA Text EditorAn MP3 playerAn ID3 EditorA Weather applicationA TUI for pre-commitRSS Readerand more!Calculator

In this book, you will learn about the following:
Chapter 1 – Application BasicsChapter 2 – Adding Styles in TextualChapter 3 – Using CSS in TextualChapter 4 – Content MarkupChapter 5 – Working with DOM QueriesChapter 6 – Laying Out Your WidgetsChapter 7 – Textual Events and MessagesChapter 8 – Key and Mouse EventsChapter 9 – Reactive AttributesChapter 10 – ScreensChapter 11 – Textual Dev ToolsChapter 12 – Creating a CalculatorChapter 13 – Viewing Tabular Data with TextualChapter 14 – Creating a Text EditorChapter 15 – Creating an MP3 PlayerChapter 16 – Creating an ID3 EditorChapter 17 – Creating a Weather AppChapter 18 – pre-commit TUIChapter 19 – RSS Reader TUIChapter 20 – SMTP ClientChapter 21 – SQLite Viewer/EditorRewards to Choose FromAs a backer of this Kickstarter, you have some choices to make. You can receive one or more of the following, depending on which level you choose when backing the project:
An early copy of Creating TUI Applications with Textual and Python + all updates including the final version (ALL BACKERS)A signed paperback copy (If you choose the appropriate perk)Get all by Python courses (If you choose the appropriate perk)Get all TEN of my other Python eBooks (if you choose the appropriate perk)T-shirt with the book cover (If you choose the appropriate perk)Writing StyleThis book will be written in my conversational style. Creating TUI Applications with Textual and Python is over 400 pages long and will teach you all you need to know to be able to use the Textual package effectively.
If you’ve never read anything of mine before, you can download the original Python 101 for free or read it online. You can also check out this blog for writing examples.
About the AuthorMy name is Michael Driscoll, and I am a professional full-time Python programmer by day and Python blogger by night. I have been programming almost exclusively in Python for almost 15 years. I am also a contributor to Real Python. My previous successful campaigns include these other books:
Python 101 (1st Edition)Python 201: Intermediate PythonReportLab: PDF Processing with PythonJupyter Notebook 101Creating GUI Applications with wxPythonPillow: Image Processing with PythonAutomating Excel with Pythonand more!I also have two books that are published by Apress and Packt Publishing:
wxPython Recipes (Apress) Python Interviews (Packt)Book formatsThe finished book will be made available in the following formats:
paperback (at the appropriate reward level)PDFepubThe paperback is a 8.5″ x 11″ book and approximately 450+ pages in length.
Back the Kickstarter Today!The post Creating TUI Applications with Textual and Python Kickstarter Launched appeared first on Mouse Vs Python.
April 9, 2025
Python 101 – An Intro to Working with INI files Using configparser
Many programs require configuration. Most have a default configuration and many allow the user to adjust that configuration. There are many different types of configuration files. Some use text files while others use databases. Python has a standard library called configparser that you can use to work with Microsoft Windows INI files.
In this tutorial, you will cover the following topics:
An example INI fileCreating a config fileEditing a config fileReading a config fileBy the end of this tutorial, you will be able to use INI configuration files programmatically with Python.
Let’s get started!
Example INI FileThere are many examples of INI files on the Internet. You can find one over in the Mypy documentation. Mypy is a popular type checker for Python. Here is the mypy.ini file that they use as an example:
# Global options:[mypy]
warn_return_any = True
warn_unused_configs = True
# per-module options:
[mypy-mycode.foo.*]
disallow_untyped_defs = True
[ypy-mycode.bar]
warn_return_any = False
[mypy-somelibrary]
ignore_missing_imports = True
Sections are denoted by being placed inside square braces. Then, each section can have zero or more settings. In the next section, you will learn how to create this configuration file programmatically with Python.
Creating a Config FileThe documentation for Python’s configparsermodule is helpful. They tell you how to recreate an example INI file right in the documentation. Of course, their example is not the Mypy example above. Your job is a little bit harder as you need to be able to insert comments into your configuration, which isn’t covered in the documentation. Don’t worry. You’ll learn how to do that now!
Open up your Python editor and create a new file called create_config.py. Then enter the following code:
# create_config.pyimport configparser
config = configparser.ConfigParser(allow_no_value=True)
config["mypy"] = {"warn_return_any": "True",
"warn_unused_configs": "True",}
config.set("mypy", "\n# Per-module options:")
config["mypy-mycode.foo.*"] = {"disallow_untyped_defs": "True"}
config["ypy-mycode.bar"] = {"warn_return_any": "False"}
config["mypy-somelibrary"] = {"ignore_missing_imports": "True"}
with open("custom_mypy.ini", "w") as config_file:
config_file.write("# Global options:\n\n")
config.write(config_file)
The documentation states that the allow_no_value parameter allows for including sections that do not have values. You need to add this to be able to add comments in the middle of a section to be added as well. Otherwise, you will get a TypeError.
To add entire sections, you use a dictionary-like interface. Each section is denoted by the key, and that section’s values are added by setting that key to another dictionary.
Once you finish creating each section and its contents, you can write the configuration file to disk. You open a file for writing, then write the first comment. Next, you use the config.write() method to write the rest of the file.
Try running the code above; you should get the same INI file as the one at the beginning of this article.
Editing a Config FileThe configparserlibrary makes editing your configuration files mostly painless. You will learn how to change a setting in the config file and add a new section to your pre-existing configuration.
Create a new file named edit_config.py and add the following code to it:
# edit_config.pyimport configparser
config = configparser.ConfigParser()
config.read("custom_mypy.ini")
# Change an item's value
config.set("mypy-somelibrary", "ignore_missing_imports", "False")
# Add a new section
config["new-random-section"] = {"compressed": "True"}
with open("modified_mypy.ini", "w") as config_file:
config.write(config_file)
In this case, after create the ConfigParser()instance, you call read()to read the specified configuration file. Then you can set any value you want.
Unfortunately, you cannot use dictionary-like syntax to set values. Instead, you must use set()which takes the following parameters:
section – The name of the section.option – The option you wish to change.value – The new value you want to set.Adding a new section works like it did when you created the initial sections in the last code example. You still use dictionary-like syntax where the new section is the key and the value is a dictionary of one or more settings to go in your section.
When you run this code, it will create an INI file with the following contents:
[mypy]warn_return_any = True
warn_unused_configs = True
[mypy-mycode.foo.*]
disallow_untyped_defs = True
[ypy-mycode.bar]
warn_return_any = False
[mypy-somelibrary]
ignore_missing_imports = False
[new-random-section]
compressed = True
Good job! You’ve just learned how to modify an INI file with Python!
Now you are ready to learn about reading INI files.
Reading a Config FileYou already caught a glimpse of how to read a configuration file in the previous section. The primary method is by calling the ConfigParser‘s read()method.
Here’s an example using the new INI file you just created:
>>> import configparser>>> config = configparser.ConfigParser()
>>> config.read(r"C:\code\modified_mypy.ini")
['C:\\code\\modified_mypy.ini']
>>> config["mypy"]
>>> config["mypy"]["warn_return_any"]
'True'
>>> config["unknown"]
Traceback (most recent call last):
Python Shell, prompt 8, line 1
config["unknown"]
File "c:\users\Mike\appdata\local\programs\python\python312\lib\configparser.py", line 941, in __getitem__
raise KeyError(key)
builtins.KeyError: 'unknown'
You can access individual values using dictionary syntax. If you happen to try to access a section or an option that does not exist, you will receive a KeyError.
The configparser has a second reading method called read_string() that you can use as well. Here is an example:
>>> sample_config = """... [mypy]
... warn_return_any = True
... warn_unused_configs = True
...
... # Per-module options:
...
... [mypy-mycode.foo.*]
... disallow_untyped_defs = True
... """
>>> config = configparser.ConfigParser(allow_no_value=True)
>>> config.read_string(sample_config)
>>> config["mypy"]["warn_return_any"]
'True'
You use read_string() to read in a multiline string and then access values inside of it. Pretty neat, eh?
You can also grab the section and them use list comprehensions to extract the options from each section:
>>> config.sections()['mypy', 'mypy-mycode.foo.*']
>>> [option for option in config["mypy"]]
['warn_return_any', 'warn_unused_configs']
The code above is a handy example for getting at the configuration options quickly and easily.
Wrapping UpHaving a way to configure your application makes it more useful and allows the user more control over how their copy of the application works. In this article, you learned how about the following topics:
An example INI fileCreating a config fileEditing a config fileReading a config fileThe configparser library has more features than what is covered here. For example, you can use interpolation to preprocess values or customize the parser process. Check out the documentation for full details on those and other features.
In the meantime, have fun and enjoy this neat feature of Python!
Related ArticlesYou might also be interested in these related articles:
The Python 2 Intro to ConfigParserPython 101: An Intro to Working with JSONPython 101 – How to Work with a Database Using sqlite3
The post Python 101 – An Intro to Working with INI files Using configparser appeared first on Mouse Vs Python.
April 7, 2025
How to Download the Latest Release Assets from GitHub with Python
I recently needed to figure out how to write an updater script for a project I was working on. The application is released on an internal GitHub page with compressed files and an executable. I needed a way to check the latest release artifacts in GitHub and download them.
Let’s find out how all this works!
Getting Set UpYou will need to download and install a couple of packages to make this all work. Specifically, you will need the following:
requestsPyGitHubYou can install both of these using pip. Open up your terminal and run the following command:
python -m pip install PyGithub requestsOnce this finishes, you should have everything you need to get the latest GitHub release assets.
Downloading the Latest Release AssetsThe only other item you will need to make this work is a GitHub personal access token. You will need to create one of those. Depending on your use case, you may want to create what amounts to a bot account to make your token last a little longer.
The next step is to write some code. Open up your favorite Python IDE and create a new file. Then add the following code to it:
import requestsfrom github import Auth
from github import Github
from pathlib import Path
token = "YOUR_PERSONAL_ACCESS_TOKEN"
headers = CaseInsensitiveDict()
headers["Authorization"] = f"token {token}"
headers["Accept"] = "application/octet-stream"
session = requests.Session()
auth = Auth.Token(token) # Token can be None if the repo is public
g = Github(auth=auth)
# Use this one if you have an internal GitHub instance:
#g = Github(auth=auth, base_url="https://YOUR_COMPANY_URL/api/v3")
repo = g.get_repo("user/repo") # Replace with the proper user and repo combo
for release in repo.get_releases():
# Releases are returned with the latest first
print(release)
break
for asset in release.get_assets():
print(asset.name)
destination = Path(r"C:\Temp") / asset.name
response = session.get(asset.url, stream=True, headers=headers)
with open(destination, "wb") as f:
for chunk in response.iter_content(1024*1024):
f.write(chunk)
print(f"Downloaded asset to {destination}")
The first half of this code is your imports and boilerplate for creating a GitHub authentication token and a requests Session object. If you work for a company and have an internal GitHub instance, see the commented-out code and use that instead for your GitHub authentication.
The next step is to get the GitHub repository and loop over its releases. By default, the iterable will return the items with the latest first and the oldest last. So you break out of the loop on the first release found to get the latest.
At this point, you loop over the assets in the release. In my case, I wanted to find an asset that was an executable and download it, but this code downloads all the assets.
Wrapping UpThis is a pretty short example, but it demonstrates one of the many things you can do with the handy PyGitHub package. You should check it out if you need to script other tasks in GitHub.
Happy coding!
The post How to Download the Latest Release Assets from GitHub with Python appeared first on Mouse Vs Python.
April 3, 2025
ANN: Spring Python eBook Sale 2025
I am running a Spring sale on all my currently published Python books. You can get 25% off any of my complete books by using this code at checkout: MSON4QP

I have books on the following topics:
Basic PythonIntermediate PythonPython and PDFsPython and ExcelImage Processing with PythonPython LoggingJupyterLab and Jupyter NotebookCreating GUIs with wxPythonand more!Start learning some Python today!
The post ANN: Spring Python eBook Sale 2025 appeared first on Mouse Vs Python.
April 1, 2025
Textual – How to Add Widgets to a Container
Textual is an excellent Python package for creating beautiful user interfaces in your terminal. By default, Textual will arrange your widgets starting at the top of the screen and appending them in a vertically oriented stack. Each GUI or TUI toolkit provides a way to lay out your widgets. Textual is no different in this respect. They use an object called a container.
You can use containers to create the following types of layouts:
Vertical layoutHorizontal layoutGrid layoutand more!You will be learning how to use all three of these types of layouts. You will also learn how to add more widgets at runtime.
Let’s get started!
Creating a Vertical LayoutThe default orientation in Textual is to arrange widgets vertically. You don’t even need to use a CSS file to apply this orientation.
But what does a vertical layout mean anyway? A vertical layout is when you add widgets to your application vertically, from top to bottom. Here is an illustration of what that might look like:

Adding widgets to a Textual application will lay out the widgets similarly to the image above. If you want to see that for yourself, then open up your Python editor and create a new file named `vertical.py`.
Then enter the following code into your new script:
# vertical.pyfrom textual.app import App, ComposeResult
from textual.widgets import Button
class VerticalApp(App):
def compose(self) -> ComposeResult:
yield Button("OK")
yield Button("Cancel")
yield Button("Go!")
if __name__ == "__main__":
app = VerticalApp()
app.run()
Now open up a terminal and run your code. When you do so, you will see three buttons onscreen, with the topmost being your “OK” button and the bottom being the “Go!” button.
Here is a screenshot of the application to give you an idea of what it looks like:

You can change the widget size, color, and more using each widget’s styles attribute, but using CSS is simpler. Let’s update the code above to use a vertical.tcss file:
from textual.app import App, ComposeResult
from textual.widgets import Button
class VerticalApp(App):
CSS_PATH = "vertical.tcss"
def compose(self) -> ComposeResult:
yield Button("OK")
yield Button("Cancel")
yield Button("Go!")
if __name__ == "__main__":
app = VerticalApp()
app.run()
Now that you are referring to a CSS file, you should go ahead and write one. If you don’t, you will get an error when you attempt to run the code that says the CSS file could not be found.
Go ahead and open your favorite text editor or use your Python editor to create a file named `vertical.tcss`. Then enter the following code:
Screen {layout: vertical;
}
Button {
width: 100%;
color: yellow;
background: red;
}
You do not need the Screen portion of the CSS since that is technically taken care of automatically by Textual. Remember, Screen is the default widget when you launch an application. However, it is always good to be explicit so you understand what is happening. If you want the output to look exactly like the previous example, you can delete this CSS’s Button portion and try running the code that way.
If you decide to include the Button portion of the CSS, you will make all of the Button widgets 100% wide, which means they will all stretch across the entire width of the screen. The CSS also defines the button text to be yellow and the buttons themselves to have a read background color.
When you run this code, you will see something like the following:

That’s a fun way to change your vertically oriented widget layout. But what happens if you set the height of the Button widgets to 50%? Well, you have three widgets. Three times 50 will be 150%, which is greater than what can be shown all at once. Textual will add a scrollbar if you add widgets that go off-screen.
Try adding that setting to your CSS and re-run the code. You should see something like the following:

You should spend a few moments trying out various width and height sizes. Remember, you don’t have to use percentages. You can also use Textual’s other unit types.
Note: All style attributes can be adjusted at runtime, which means you can modify the layout at runtime, too. Use this wisely so as not to confuse the user!
When you finish experimenting, you will be ready to learn how horizontal layouts work!
Horizontal Layout
Laying widgets out horizontally, left-to-right, requires a little more work than laying them out vertically. But the change is still pretty minor, and in many ways, it affects only one line in the CSS file.
But before you change the CSS, you will want to update your Python code to point to the new CSS file. Open your Python editor and copy the previous example to a new file. Save it with the same horizontal.py and update the CSS_PATH to point to a new CSS file named horizontal.tcss:
# horizontal.pyfrom textual.app import App, ComposeResult
from textual.widgets import Button
class HorizontalApp(App):
CSS_PATH = "horizontal.tcss"
def compose(self) -> ComposeResult:
yield Button("OK")
yield Button("Cancel")
yield Button("Go!")
if __name__ == "__main__":
app = HorizontalApp()
app.run()
Yes, this code is almost the same as the previous example, except the CSS_PATH variable. That’s okay. The point is to show you how you can change the layout.
Create your horizontal.tcss file in a Python or text editor to make a horizontally oriented layout. Then enter the following CSS:
Screen {layout: horizontal;
}
Button {
height: 100%;
color: yellow;
background: red;
border: solid green;
}
The CSS above added a border to the buttons to make them stand out a bit more. Depending on the terminal, the widgets appear to blend together more when arranged horizontally. You can add space around the widgets by setting the margin style, though.
When you run this code, you should see something like the following:

When using a horizontal layout, the horizontal scrollbar will not automatically appear if the widgets do not fit the screen. If you want to have a horizontal scrollbar, then you will need to set overflow-x: auto;, like in the following CSS:
Screen {layout: horizontal;
overflow-x: auto;
}
Button {
height: 100%;
color: yellow;
background: red;
border: solid green;
}
Now, set the widgets’ width to greater than 33% so that the scrollbar will appear. Spend some time experimenting, and you’ll soon figure it out!
Layouts with Containers
The Textual package has several utility containers you can use to lay out your widgets. You are most likely to use Vertical, Horizontal, or Grid containers. You can also combine the containers to create more complex layouts.
Here is a full list of the containers included with Textual at the time of writing:
CenterContainerHorizontalHorizontalScrollMiddleScrollableContainerVerticalVerticalScrollYou will most likely use the Center, Middle, Horizontal, and Vertical containers the most.
Practicing is the best learning method, especially when laying out user interfaces. You can start your container journey by opening your Python editor and creating a new file called horizontal_container.py. Then enter the following code:
# horizontal_container.pyfrom textual.app import App, ComposeResult
from textual.widgets import Button
from textual.containers import Horizontal
class HorizontalApp(App):
def compose(self) -> ComposeResult:
yield Horizontal(
Button("OK"),
Button("Cancel"),
Button("Go!"),
)
if __name__ == "__main__":
app = HorizontalApp()
app.run()
You import the Horizontal container from textual.containers. The main contents of a container is its widgets. You reuse the widgets from the previous example here. Pay attention and note that you do not need to use yield inside the container. You can simply add the widget instances instead.
When you run this code, you will see something like this:

What will happen if you use your horizontal.tcss file with this code? Try adding it to the code above and re-run your example.
The result will look familiar:

The real benefit using containers comes when you nest them. You’ll find out about that concept next!
Nesting ContainersNesting containers allows you to combine horizontally and vertically oriented widgets, resulting in rows and columns of widgets. This design pattern can create some pretty nice layouts.
To start, create a new file called nested_containers.py in your Python editor. Then add this code to it:
# nested_containers.pyfrom textual.app import App, ComposeResult
from textual.widgets import Button
from textual.containers import Horizontal, Vertical
class NestedApp(App):
def compose(self) -> ComposeResult:
yield Vertical(
Horizontal(
Button("One"),
Button("Two"),
classes="row",
),
Horizontal(
Button("Three"),
Button("Four"),
classes="row",
),
)
if __name__ == "__main__":
app = NestedApp()
app.run()
Your code above has a single Vertical container with two Horizontal containers inside. You can think of the Horizontal containers as “rows”. You can see that you set the classes parameters to “row” to identify them. Each row contains two Button widgets.
When you run this code, you will see something like this:

This example doesn’t use any CSS. You should do that! Update the code to include a CSS file called nested.tcss, like the code below:
# nested_containers.pyfrom textual.app import App, ComposeResult
from textual.widgets import Button
from textual.containers import Horizontal, Vertical
class NestedApp(App):
CSS_PATH = "nested.tcss"
def compose(self) -> ComposeResult:
yield Vertical(
Horizontal(
Button("One"),
Button("Two"),
classes="row",
),
Horizontal(
Button("Three"),
Button("Four"),
classes="row",
),
)
if __name__ == "__main__":
app = NestedApp()
app.run()
Then, create the nested.tcss file. You will be putting the following CSS rules into it:
Button {content-align: center middle;
background: green;
border: yellow;
height: 1fr;
width: 1fr;
}
Here, you set various rules for the Button widgets to follow. You want the buttons to be green with a yellow border. You also set the width and height to 1fr, which causes the buttons to expand to fit all the horizontal and vertical space.
When you run this version of your code, you can see that the user interface has changed significantly:

Nice! You should spend some time adjusting the style rules and seeing how to change these layouts.
Wrapping UpLearning how to create layouts is a fundamental skill that you will need to master to be able to create engaging, intuitive user interfaces. Fortunately, Textual gives you enough tools that you can create your user interfaces fairly easily. No; you don’t get a What-you-see-is-what-you-get (WYSIWYG) tool as you do with some GUI toolkits, such as QT Creator. But you do get live-coding with CSS, and since most of your user interface layouts are controlled there, tweaking the user interface is so nicer.
Want to Learn More Textual?This tutorial is based on a chapter from my latest book, Creating TUI Applications with Textual and Python.
You will learn everything you need to know about Textual from this book. You will also create TEN small applications to apply what you learn. Check it out today!
The post Textual – How to Add Widgets to a Container appeared first on Mouse Vs Python.
January 14, 2025
Textual – Switching Screens in Your Terminal
The Screen is a container for your widgets. These screens occupy the dimensions of your terminal by default. While you can have many different screens in a single application, only one screen may be active at a time.
When you create your App class, Textual will create a screen object implicitly. Yes, Textual requires you to have at least one screen or your application won’t work. If you do not create a new screen or switch to a different one, the default screen is where your widgets will get mounted or composed to.
Screens are a great way to organize your application. Many applications have settings pages, help pages, and more. These are just a few examples of how you can use screens.
Now that you know what a screen is, you’re ready to learn how to create new ones!
Creating ScreensWhen you create an application, you create a Screen implicitly. But how do you create your own Screen? Fortunately, Textual has made that easy. All you need to do is import the Screen class from textual.screen and extend it as needed.
You can style screens the same way you do other widgets, except for the dimensions as screens are always the same size as your terminal window.
To see how this all works, you will create an application with two screens:
Your main screenYou second screen, which will be greenYou will be able to switch between the screens using a button. Each screen has its own button and its own event or message handler.
Open up your favorite Python IDE and create a new file called two_screens.py with the following contents:
# two_screens.pyfrom textual import on
from textual.app import App, ComposeResult
from textual.screen import Screen
from textual.widgets import Button
class GreenScreen(Screen):
def compose(self) -> ComposeResult:
self.styles.background = "green"
yield Button("Main Screen", id="main")
@on(Button.Pressed, "#main")
def on_main(self) -> None:
self.dismiss()
class MainAop(App):
def compose(self) -> ComposeResult:
yield Button("Switch", id="switch")
@on(Button.Pressed, "#switch")
def on_switch(self) -> None:
self.push_screen(GreenScreen())
if __name__ == "__main__":
app = MainAop()
app.run()
You use Textual’s handy on decorator to match against the button’s id. That keeps the message from bubbling around to other event handlers, which is what could happen if you had used on_button_pressed(), for example.
When you run your application, you will see something like this:

Try clicking the buttons and switching between the screens.
Of course, you don’t need to use button’s at all, if you don’t want to. You could use keyboard shortcuts instead. Why not give that a try?
Go back to your Python IDE and create a new file called two_screens_keys_only.py with this code in it:
# two_screens_keys_only.pyfrom textual.app import App, ComposeResult
from textual.screen import Screen
from textual.widgets import Label
class GreenScreen(Screen):
BINDINGS = [("escape", "app.pop_screen", "Dismiss the screen")]
def compose(self) -> ComposeResult:
self.styles.background = "green"
yield Label("Second Screen")
class MainAop(App):
SCREENS = {"green": GreenScreen}
BINDINGS = [("n", "push_screen('green')", "Green Screen")]
def compose(self) -> ComposeResult:
yield Label("Main screen")
if __name__ == "__main__":
app = MainAop()
app.run()
Using keyboard shortcuts makes your code a little less verbose. However, since you aren’t using a Footer widget, the shortcuts are not shown on-screen to the user. When you are on the main screen, you must press the letter “n” on your keyboard to switch to the GreenScreen. Then when you want to switch back, you press “Esc” or escape.
Here’s what the screen looks like on the GreenScreen:

Now try using the keys mentioned to swap between the two screens. Feel free to change the keyboard bindings to keys of your own choosing.
Wrapping UpTextual can do much more with Screens than what is covered in this brief tutorial. However, you can use this information as a great starting point for learning how to add one more additional screens to your GUI in your terminal.
Play around with these examples and then run over to the Textual documentation to learn about some of the other widgets you can add to bring your application to life.
Want to Learn More?If you’d like to learn more about Textual, check out my book: Creating TUI Applications with Textual and Python, which you can find on the following websites:

The post Textual – Switching Screens in Your Terminal appeared first on Mouse Vs Python.


