
Ray Harmony's Blog, page 4
February 25, 2024
How to Write a Crazy Drum Beat • Music Theory from Blue Lab Beats "Never Doubt"
How to Write a Crazy Drum Beat
Download Tutorial as PDF
includes MIDI + WAV file examples
Drums nowadays are arguably the most boring element in music! That’s probably due to the widespread use of drum loops. If you listen to the new releases on Spotify every Friday, you’ll hear the same handful of drum patterns over and over again. The best you can hope for is a few variations of those popular patterns.
It would be an interesting experiment to actually count how many different drum patterns are used in the New Music Friday playlist, which usually contains 100 songs. We’re pretty sure it’ll only be a handful of patterns, but that’s some super boring research, so we won’t be volunteering to conduct that experiment. AI can do it!
Having said all that, for us producers, this is actually a blessing in disguise. Why? Because it makes it easier than ever to stand out and grab people’s attention. All you need to do is use an unusual drum beat. Or even better, a crazy drum beat!
This is exactly what happened when the song “Never Doubt” started playing. It’s by the UK duo Blue Lab Beats. Their drums are unlike anything else we heard on that playlist! And after listening to their crazy beats, and then continuing through the remainder of that playlist, the other songs’ drums sounded even more boring.
Drum beats usually consist of three elements: kick, snare, and cymbals. Giving one or two of these an unusual pattern would be enough to make a beat stand out, but Blue Lab Beats have made the patterns of all three elements unusual. That’s crazy!
So, inspired by “Never Doubt”, here’s our 4-step method for writing crazy beats. But first… Tea!
Step 1. Snare
Set your tempo to 75 BPM and your time signature to 7|8.
And yes, that’s a crazy time signature! It’s the foundation of crazy upon which they build their standout beats. Why is 7|8 a crazy time signature? Because it sounds like 4|4 on a broken drum machine, as the last 1/8 note of each bar is cut off. This makes it sound like the record (or CD) is skipping. Ah, remember those days?
Next, create a two-bar loop on your drum track, with the grid set to 1/32 notes.
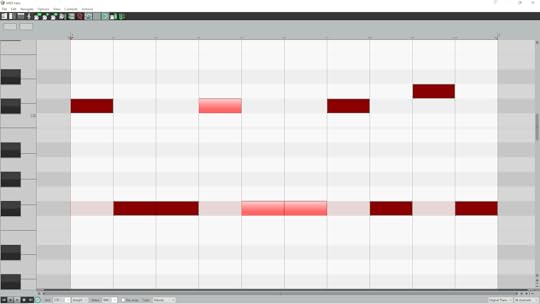
So, when it comes to a snare pattern in 7|8, the most common one is to play the snare on beats 3 and 7. That’s because in 4|4 the snare is almost always played on beats 2 and 4, which is called a regular backbeat. And if you count 4|4 in 1/8 note beats, then the snare hits of that regular backbeat fall on beats 3 and 7.
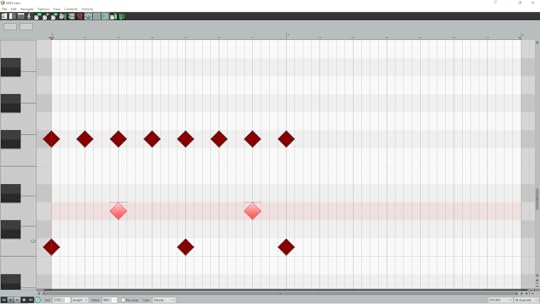
Standard 7|8 drum pattern with regular backbeat snare (highlighted) on beats 3 and 7
As you can hear (and see in the MIDI above), the bar is cut short by an 1/8 note.
And to be clear, while that’s the snare pattern you’ll most usually hear in 7|8, that definitely doesn’t make it sound normal. It still sounds crazy! That fact will give you an idea of exactly how crazy the snare patterns are in this Blue Lab Beats song.
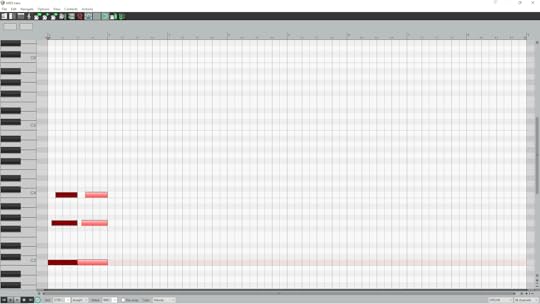
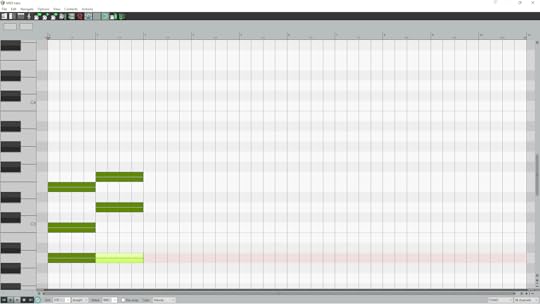
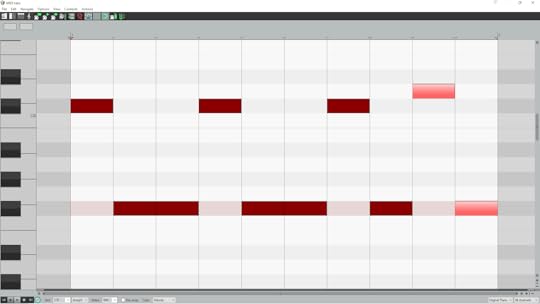
And without further ado. Here’s their snare pattern: beat 6. Yep, that’s all they play on the snare. That’s way more space than you’d usually hear in a 7|8 beat. But, spoiler alert: they’re not done with the snare yet. It’ll be revisited in Step 4 below.
Lastly, to give your beat 6 snare a reference point, draw in a kick drum on beat 1.
Also, there’s so much space in this snare pattern that you’ll need to hear the 1/8 note pulse to put the snare in context. So, turn on the metronome when listening.
Kick on beat 1, snare (highlighted) on beat 6
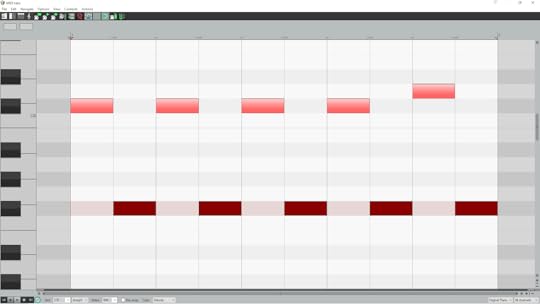
Step 2. Kick
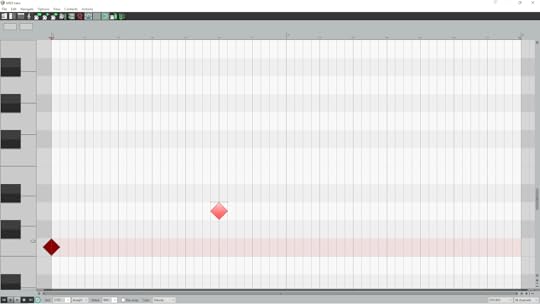
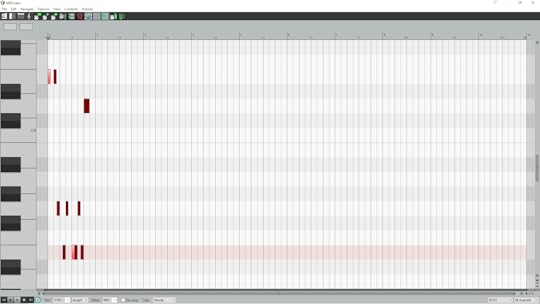
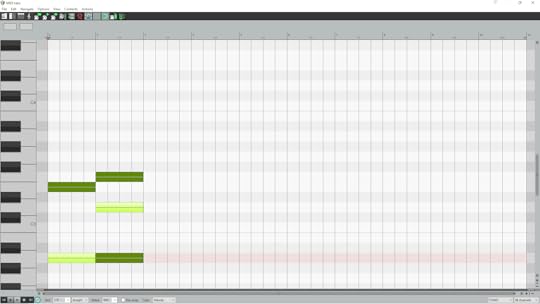
With hardly any snares in this beat (currently), all that space can be filled with kicks. And that’s precisely what Blue Lab Beats do. They play a kick on beat 1 and a super syncopated kick on the fourth 1/32 note. If you’re new to the concept of syncopation, it’s simply when an off-beat is accented. Their kick on the fourth 1/32 note is the perfect example of syncopation. And obviously when you accent a 1/32 note off-beat, it sounds a lot more syncopated than a 1/16 note off-beat.
Kick added on fourth 1/32 note (highlighted)
For the rest of the tutorial, please buy the PDF. Supporting our work helps us to keep teaching. Thank you :)
Download PDF Tutorial
Lastly, are you new to music theory? Or are you experienced, but you want a refresher? Then download our FREE BOOK (link opens in new tab). It only takes 30 minutes to read, then you’ll have a solid theory foundation that you can instantly apply to your songwriting and producing. Enjoy!
[image error]
Ray Harmony
Multi award-winning college lecturer


February 2, 2024
How to Write a Dreamy Chord Progression • Music Theory from Four Tet "Loved"
How to Write a Dreamy
Chord Progression
Download Tutorial as PDF
includes MIDI + WAV file examples
New single “Loved” by British producer Four Tet (Kieran Hebden) is a dreamy soundscape that floats your thoughts away on its neuro-massaging vibrations!
If you listen to it with your eyes closed, you can easily imagine sitting by a window on a rainy morning, sipping your tea and day-dreaming as you stare out into quantum clouds of possibility. Even the pitter-patter accent of his hi-hat rhythm mirrors the sound of rain drops on the roof.
The outro (from 2:43) further lowers the energy, deepening the introspection. There’s a sprinkling of arpeggios (i.e. chords played one note at a time) throughout the song, but in the outro he uses them exclusively. That’s only one of the many elements that make this section sooooo soothing. Right, inspired by the “Loved” outro, here’s our 6-step method for writing dreamy chords. But first… Tea!
Step 1. Arpeggio
Set your tempo to 82 BPM and your time signature to 4|4. Then, create an eight-bar section with a 1/16 note grid. Next, load up a gentle keyboard sound like a Rhodes organ, or something similar. You can find the perfect sound afterwards.
One of the most interesting elements of this section is that Four Tet wrote it in the major scale. Nowadays, the major scale is hugely unpopular, which is a shame and a loss. You’ll only really hear this scale in children’s music or Christmas songs. But, it’s the most consonant scale, which means the harmonies it creates are the most peaceful for us. In these dissonant times, we believe there needs to be far more music written in major keys to help people let go of their daily stress and anxiety.
To be fair, there’s a valid reason why most producers don’t use the major scale: all that consonance makes it predictable! Therefore, music written in a major key is at a high risk of being boring. That’s no problem for Four Tet, though, as he has some great hacks up his sleeve to avoid this problem.
Right, so Four Tet uses G major for this section. We chose C major, as it’s simply all the white notes from C to C, but you can use whatever major scale you like.
C major scale:
1
2
3
4
5
6
7
C
D
E
F
G
A
B
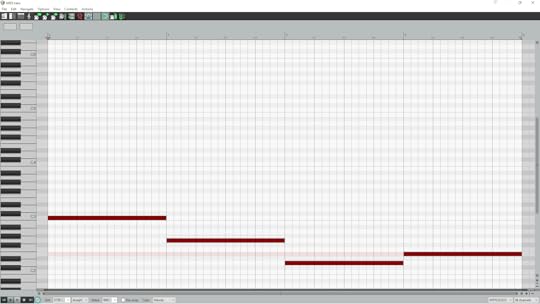
He starts this outro section by playing the root chord (Cmaj in our example), and the first hack he uses to create a dreamy vibe is to play the chord as an arpeggio. Also, he plays the root note in two octaves: C (1) → G (5) → C (8, i.e. the root an octave higher than 1). Technically this is a harmony (or interval) and not a chord, as it only contains 1 and 5 (it’s missing 3), but he does play 3 in the melody above.
FYI: If you wanna play this on the keyboard instead of drawing in the MIDI, you’ll play the arpeggio in your left hand, and the melody above in your right hand.
While the technique of playing a left-hand 1→5→8 arpeggio is nothing new (it was common in Mozart’s day), the way Four Tet weaves in his melody is original. He doesn’t just add a melody over the top, like most producers would do, he tricks the listener into hearing his melody as part of the arpeggio. Well, at first…
But then it sounds like his melody begins to break away from the arpeggio. We then hear it as a separate layer. And then it seems to join the arpeggio again?! This uncertainty as to whether it’s a separate melody or part of the arpeggios is one of the brilliant hacks Four Tet uses to create his dream-like atmosphere. It gives us that feeling of waking up from a dream and thinking: Did that really happen?
So, start by drawing in a 1→5→8 arpeggio from your root (C in our example). Let your arpeggio sound for half the bar, then copy and paste it into the second half.
1→5→8 Arpeggio
screenshot is zoomed in to the first two beats
1→5→8 Arpeggio copied and pasted (highlighted)
screenshot is zoomed out to the full eight-bar loop
Step 2. Repeat
Here’s a question for you: Have you ever had that dream where you’re running but you’re going nowhere?! Well, that’s the next hack Four Tet uses to create a dream-like quality to his chords. For the rest of the tutorial, please buy the PDF. Supporting our work helps us to keep teaching. Thank you :)
Download PDF Tutorial
Lastly, are you new to music theory? Or are you experienced, but you want a refresher? Then download our FREE BOOK (link opens in new tab). It only takes 30 minutes to read, then you’ll have a solid theory foundation that you can instantly apply to your songwriting and producing. Enjoy!
Ray Harmony
Multi award-winning college lecturer
December 7, 2023
How to Write a Non-Cheesy Festive Melody • Music Theory from the traditional Christmas carol "Noël Nouvelet"
How to Write a Non-Cheesy
Festive Melody
Download Tutorial as PDF
includes MIDI + WAV file examples
“Noël Nouvelet” is a traditional French Christmas Carol dating from the 15th or 16th century. So what on earth can we learn from a 500-year old holiday tune? A game-changing melody hack that will totally transform your festive season music!
You see, almost all Christmas songs are written in major keys. And as you can hear from walking into any shop in December, the results are usually very very very cheesy songs! And yes of course there are exceptions, but most of the new holiday music being released is blatantly trying (and failing) to cash in on the “happy holiday” song formula. That brings us back to our traditional tune…
The composer of “Noël Nouvelet” used the most innovative cheese-removal magic trick, as this Christmas carol is 100% cheese-free. And it could so easily have been cheesy because the melody is upbeat and uplifting (like most Christmas music), but it somehow stays far away from the cheese. It’s a Christmas miracle! So there you go, that’s what we can learn from a 500-year old Christmas carol.
And on that note, inspired by “Noël Nouvelet”, here’s our 4-step method for writing an upbeat and uplifting festive melody, without the cheese. But first… Tea!
Step 1. Festive Rhythm
First, regarding the tempo. As with most 500-year old music, you can more-or-less interpret the performance of it however you want. There are lots of breathtakingly beautiful versions of “Noël Nouvelet”, but our favourite is by Libera, a boy’s choir in London, UK. Libera’s performance is around 77 BPM, so we’ll use that too.
Now, create an eight-bar loop with a 1/16 note grid, then load up a piano sound on that track. And yes, piano, that’s not a typo. Piano is the perfect instrument for writing on, because it’s about as “neutral” sounding as you can get, and the attack of the instrument is instant (due to the piano’s hammer action).
Some choir plugins have a very slow attack, and we’ll be using some quicker notes in our melody because it’s a lively one, so we don’t want the choir plugin holding us back. At the end of the writing process, though, you can go through all your choir plugins and see which one works best for your final melody.
Right, spend some time writing a two-bar rhythm now, and be sure to use a vibrant combination of 1/4 notes, 1/8 notes, and two 1/16 notes. Regarding those 1/16 notes. Don’t make them syncopated. Approach them like an 1/8 note split in two.
Also, don’t use any rests within your rhythm. After your rhythm, though, you’ll use a rest. So, don’t play anything on beat 4 of your second bar. This 1/4 note rest is for phrasing (i.e. where the singers would breathe if your melody was sung). And lastly, remember that your rhythm needs to be an upbeat, festive one, so have fun!

Two-bar rhythm, ending with 1/4 note rest
Step 2. Cheesy Melody
Wait, what?! We promised you a cheese-free melody, and now we’re telling you to write a cheesy melody? Yep! That’s the genius of the “Noël Nouvelet” composer’s cheese-removal magic trick, but that will only be revealed in Step 4.
For the record, we obviously have no idea if this is how the anonymous composer wrote the carol, but when reverse-engineering this melody and trying to figure out their method (that’s the process we use to make all our PDF tutorials, by the way), it seems this method is certainly plausible. In fact, we can totally imagine the story…
It’s December 1st, 1499. Our composer turns up to choir rehearsal with their brand new carol, all pleased and proud of it. The choir gives it a run through. There’s an awkward silence as someone tries to think of a nice way to say it. Someone pipes up with “Erm… it’s very Christmassy!” More erms from the choir. Then a brave soul says: “Any chance of making it… erm… [silence] less cheesy?”
The composer storms out. Fast forward a couple hours. They’ve had a walk in the fresh December air and calmed down. Now, back in their study, they pull out the manuscript, dip their quill in the ink. And… Boom! A stroke of genius. They scream Hallelujah!, run out the room and back to the church, screaming Hallelujah! all the way. Choir sings it. Everyone cries. They love it. Composer sighs with relief.
The End.
[roll the credits]
Surely that’s a better story than the one where our composer walks into their study, sits down, then proceeds to write a non-cheesy Christmas carol in one go. Boring!
Alright, let’s write a melody. So we’re in the key of D major, and here’s our scale:
D major scale
1
2
3
4
5
6
7
D
E
F♯
G
A
B
C♯
In order for this method to work, there are 5 rules you need to follow in this step…
For the rest of the tutorial, please buy the PDF. Supporting our work helps us to keep teaching. Thank you :)
Download PDF Tutorial
Lastly, are you new to music theory? Or are you experienced, but you want a refresher? Then download our FREE BOOK (link opens in new tab). It only takes 30 minutes to read, then you’ll have a solid theory foundation that you can instantly apply to your songwriting and producing. Enjoy!
Ray Harmony
Multi award-winning college lecturer
November 24, 2023
How to Write a Captivating Bass Line • Music Theory from The Smile (Thom Yorke) "The Smoke"
How to Write Captivating Bass
Using Displacements for Variations
Download Tutorial as PDF
includes MIDI + WAV file examples
Do you ever write a bass line (or synth/guitar riff) that you love, but after a few loops it gets boring? No problem, you think to yourself, being here in the Hack Music Theory community you know that you need to write a variation for it. So you get to work on that. Fast forward an hour, and everything you’ve tried resulted in the magic of your original version being lost. This is a common problem, and Thom Yorke (Radiohead) and his band The Smile have a brilliant solution for you!
In their song “The Smoke”, they use a super creative method for turning a one-bar bass line (and guitar riff) into an epic ten-bar adventure. And most importantly, they do that without creating a conventional variation anywhere in their line/riff*. How? They take their one-bar riff and repeat it a few times, then just as it’s about to get boring, they displace it. What on earth does that mean? Well, this is how the dictionary defines the word “displace”: To move something from its usual place or position. So in musical terms, what displacement means is to play the exact same thing but in a different place/position in the bar (i.e. the riff starts on an earlier/later beat).
However, they don’t just displace their riff, they also cut it up and displace those segments. The result is mesmerising, and we’re captivated by this displacement as our brains try to figure out what’s going on. They then repeat their ten-bar riff, and the second loop feels even more captivating, as it catches us off-guard because we weren’t expecting it to repeat after ten bars (but more on that in Step 1).
So, inspired by “The Smoke”, here’s our 5-step method for writing a ten-bar riff that will totally captivate your listeners with its displacements. But first… Tea!
*Thom Yorke (bass) and Jonny Greenwood (guitar) play the exact same thing in the main section of this song, so to keep things simple, we’ll just be referring to what they both play as a riff.
Step 1. One-Bar Riff
Change your tempo to 93 BPM, then create a ten-bar loop on your bass track (or guitar track, if you prefer). When you’re done writing your riff, you’ll duplicate the track and load up the other instrument (guitar/bass), so it doesn’t actually matter which one you use to write the riff. Now, open your MIDI editor, set the grid to 1/16 notes, and let’s get to it!
You’re gonna start by writing a one-bar riff. You really want to take your time here, as this one bar is the source material for the whole ten bars, so make it good! The Smile uses E minor pentatonic scale for their riff, so we’ll use it too. If you’re new to this scale, it’s just the natural minor scale without its 2nd and 6th notes.*
E natural minor scale
1
2
♭3
4
5
♭6
♭7
E
F♯
G
A
B
C
D
E minor pentatonic scale
1
♭3
4
5
♭7
E
G
A
B
D
You can use any notes from the scale, but there are four rhythm rules to follow:
use 1/16 notes exclusivelyuse a few restsaccent beat 1 by playing a note on itaccent beat 3 by playing a note on it
*For help with writing in the minor pentatonic scale, as well as in the blues scale (a spicy variation of the minor pentatonic), use Hack 8 in our Songwriting & Producing PDF.
Here’s our one-bar riff:
One-bar riff, with the accented notes on beats 1 and 3 highlighted
Step 2. Repeat & Displace
The Smile repeats their one-bar riff four times, exactly as it is. Four bars is the absolute maximum you’d want to repeat such a short riff. Any more repetition than that, and it’ll not only be boring to your listeners, it’ll actually be annoying!
But, they’re very intentionally pushing their repetition to the max. The reason for that is because they need their listeners to be 100% familiar with the riff before they start messing with it. If the listeners don’t have the original version 100% stuck in their heads, then all the upcoming displacements would be completely disorientating, and therefore completely unpleasant to the ears.
But let’s not get ahead of ourselves. First things first, let’s get our riff stuck in the listeners’ heads! So, copy and paste your one-bar riff into bars two through four.
For the rest of the tutorial, please buy the PDF. Supporting our work helps us to keep teaching. Thank you :)
Download PDF Tutorial
We publish four new PDF tutorials every month.
Subscribe & Save 33%
on future PDFs.
Lastly, are you new to music theory? Or are you experienced, but you want a refresher? Then download our FREE BOOK (link opens in new tab). It only takes 30 minutes to read, then you’ll have a solid theory foundation that you can instantly apply to your songwriting and producing. Enjoy!
Ray Harmony
Multi award-winning college lecturer
November 17, 2023
How to Write Sweeping Arpeggios • Music Theory from Daft Punk "Motherboard"
How to Write Sweeping Arpeggios
using a unique layering technique
Download Tutorial as PDF
includes MIDI + WAV file examples
Do your arpeggios all sound rather similar? It’s a common problem for producers.
Arpeggios are when you play a chord one note at a time, and it’s one of the best techniques for making your progressions more interesting. And while it’s definitely more rare to hear arpeggios than “block” chords in popular music genres, most of the arpeggios you do hear are rather boring. Merely playing chords one note at a time is not a foolproof way of making progressions more creative. If you want better arpeggios, you need to write an internal melody within them. Want even better arpeggios? Write two internal melodies, or maybe even three!
What are we talking about when we talk about “internal melodies”? Well, the melodies need to be formed from notes within the arpeggios, as opposed to writing a melody over the top of them. There’s obviously nothing wrong with doing that, but it will be heard as a separate melody, not as part of the arpeggios.
While there’s an abundance of genius examples of this in classical music, there are sadly not many to be found in popular music genres. If you’re into the rock side of things, Muse has plenty of creative arpeggios. Examples are even rarer on the electronic side of things, though, but Daft Punk comes to the rescue with their song “Motherboard” (check out their new “Drumless Edition” of this song, as it’s easier to hear the arpeggios). At 28 seconds into this track, the most beautiful arpeggios begin to sweep up and down. Despite their fast pace (i.e. 1/16 notes), they’re thoroughly calming due to their smooth, sweeping motion. And it’s not just the fast pace that makes their arpeggios so creative, it’s also their choice of notes.
So, inspired by “Motherboard”, here’s our 5-step method for writing sweeping arpeggios, which are guaranteed to stand out from all those boring, clichéd arpeggios. But first… Tea!
Step 1. Chords
As arpeggios are simply broken up chords, the first step is to write a chord progression. So, set your tempo to 103 BPM, then create a four-bar loop and set your grid to 1/16 notes.
Daft Punk play their arpeggios on woodwind instruments, but we’ll get to that in the last step. For now, we actually recommend using a piano, for two reasons. Firstly, piano arpeggios are beautiful, so if you want, you can keep them on a piano sound (we did). Secondly, the piano has a much bigger range than any woodwind instrument, so you won’t be held back by not being able to play a note because it’s too high/low for that instrument.
Daft Punk’s arpeggios are in the key of E minor, so we’ll use it too:
E natural minor
1
2
♭3
4
5
♭6
♭7
Em
F♯dim
Gmaj
Am
Bm
Cmaj
Dmaj
Regarding what chords to choose. This PDF is all about arpeggios, so we’re not going to cover the “chord choice” topic. If you need help with writing better chord progressions, we recommend our Songwriting & Producing Course.
The only three guidelines we suggest are to choose four chords, avoid the diminished chord, and play the root chord somewhere (you don’t have to start with it, though). Here are the chords we chose for our progression:
Cmaj → Gmaj → Dmaj → Em
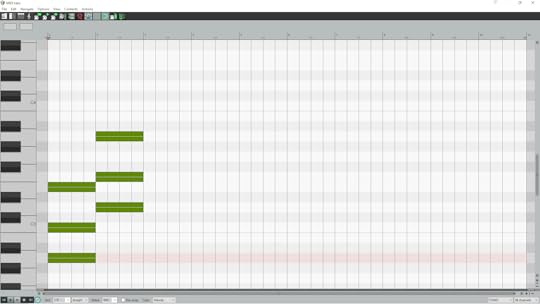
After you’ve chosen your four chords, draw in each chord’s root note for one bar.
Root note of each chord in progression
For the rest of the tutorial, please buy the PDF. Supporting our work helps us to keep teaching. Thank you :)
Download PDF Tutorial
We publish four new PDF tutorials every month.
Subscribe & Save 33%
on future PDFs.
Lastly, are you new to music theory? Or are you experienced, but you want a refresher? Then download our FREE BOOK (link opens in new tab). It only takes 30 minutes to read, then you’ll have a solid theory foundation that you can instantly apply to your songwriting and producing. Enjoy!
Ray Harmony
Multi award-winning college lecturer
November 10, 2023
How to Write a Timeless Piano Part • Music Theory from The Beatles "Now And Then"
How to Write Timeless Piano
like The Beatles
Download Tutorial as PDF
includes MIDI + WAV file examples
The last Beatles song. That’s what the official press release calls “Now And Then”. The Beatles made history this week (again!), but the internet is flooded with writing about this song, so we won’t repeat the story of how “Now And Then” came to be. Instead, we’ll focus exclusively on why this song sounds timeless.
Until recently, I used to think that J.S. Bach’s music was timeless. But now I’m not so sure. I’ve been to many Bach concerts, and while my head is bald by choice, almost all the other men in there didn’t have a choice with their bald heads, if you know what I mean?! So, who’s gonna be listening to Bach in 30 years from now? Don’t get me wrong, there will always be Bach superfans (like me!), but is his music timeless if it’s not popular with the general public now? Bach’s music is far too complex to appeal to most modern musical taste buds, so it’s not really timeless. It’s the same with art and poetry. Yes, there will always be William Blake superfans (like me!), but the general public nowadays is clearly not interested in this genius’ work. Great art will always be great art, but perhaps it’s not timeless.
So why is this PDF titled “Timeless Piano” then? Well, by definition timeless music has to appeal to generation after generation, and there’s been a clear trend for many decades in the music that the general public listens to. Yep, it’s been getting simpler and simpler. So, perhaps the way to write music that’s going to have the best chance of being timeless, is to make it extremely simple. But, the simpler the music, the more chance there is of it getting boring. And if it gets boring, it’s obviously not going to have a very long shelf life. That’s where the genius of The Beatles shines: they’re masters of making simple music that has just enough interest to prevent it from getting boring. The result? Timeless(ish) music.
You see, I still don’t believe that any music can be said to be truly timeless, as how can we possibly know if the general public will be listening to it in a thousand years from now!? Nevertheless, inspired by “Now And Then”, here’s our 4-step method for writing a piano part that’s as timeless as The Beatles. But first… Tea!
Step 1. A Couple Chords
The chord progression in “Now And Then” mainly consists of two chords. Before we get to those two chords, though, a brilliant and creative hack that The Beatles use is to make their progression ten bars long. We’re obviously used to hearing loops of two bars, four bars, or sometimes eight bars. But ten bars? Nope, we’re not used to that at all. So, despite their progression being super simple, those extra two bars at the end keep us interested and engaged, because they’re unexpected.
So, change your tempo to 87 BPM, then create a ten-bar loop on your piano track. We’re gonna start off with the grid on 1/4 notes. The Beatles begin their song (intro and verse, which is what we’re teaching here) in the key of A minor , so we’ll use it too.
A natural minor
1
2
♭3
4
5
♭6
♭7
Am
Bdim
Cmaj
Dm
Em
Fmaj
Gmaj
Now it’s time to choose your two chords. Your progression is going to change back and forth between these two chords for five bars, so make sure you really like them. You can use any chords from the key, other than the diminished (Bdim). Well, unless you want to make your listeners feel very very uncomfortable.
The Beatles begin on the root chord (Am), as it anchors their progression into the key. For this reason, we suggest you also start on Am. We did, too. Their second chord is Em. We chose Dm. Their choice of two minors (Am→Em) obviously makes “Now And Then” deeply solemn. If you want a more uplifting sounding progression, though, then definitely choose a major as your second chord.
Once you’re happy with your two chords, draw them in, with each chord lasting one bar. This is another great example of how The Beatles keep their progression simple. They could’ve changed chords on beat 3, or even an off-beat, which would sound more interesting, but maybe that’s too interesting for timeless(ish) music.
Beginning of our progression: Am to Dm
Next, invert your second chord to get the common note in the same place. If you don’t have a common note, you’ll need to make one. If you don’t know how to do that, we teach it in our Songwriting & Producing (Course). Otherwise just choose a different second chord that does contain a common note with the Am.
Dm inverted by moving A down an octave
Next, delete the ♭3 (C) in your Am chord. Why? Well, it’s yet another way that The Beatles create interest without making it too interesting. And by deleting the 3rd note of Am, it’s theoretically no longer Am, it’s now A5 (i.e. the root and 5th).
As you know, the 3rd note determines a chord’s quality (i.e. whether it’s major or minor), so by deleting the ♭3 in our Am chord, we’ve de-minored it. And no, that’s definitely not a musical term! Also, for the record, it’s no longer a “chord” either, because a chord requires at least three notes. It’s now an interval/harmony.
Am with ♭3 (C) deleted, moving to Dm/A* (root note of each chord highlighted)
For the rest of the tutorial, please buy the PDF. Supporting our work helps us to keep teaching. Thank you :)
Download PDF Tutorial
We publish four new PDF tutorials every month.
Subscribe & Save 33%
on future PDFs.
Lastly, are you new to music theory? Or are you experienced, but you want a refresher? Then download our FREE BOOK (link opens in new tab). It only takes 30 minutes to read, then you’ll have a solid theory foundation that you can instantly apply to your songwriting and producing. Enjoy!
Ray Harmony
Multi award-winning college lecturer
November 3, 2023
How to Write a Memorable Bass Line • Music Theory from Röyksopp "So Easy"
How to Write a
Memorable Bass Line
using modal ambiguity
Yes, your lead melody is important. But a great bass line has the power to make or break a section. Despite that fact, though, most producers approach their bass as an afterthought. Think about it. How many songs’ bass lines can you remember?
Almost all the bass lines we hear in the new releases each week are not really bass lines, they’re bass frequencies. If a producer merely plays each chord’s root note as their bass line, that’s not a melody (“line” is just an informal word for melody).
In order for it to be a bass line, it needs to be an actual melody. We’re obviously not saying that your bass should play a catchy melody like you’d want on the lead synth or vocals. But, it does need to contain the characteristics of a well-written melody, which will also make it memorable. And that’s a good test for yourself. The day after you’ve been writing, can you remember the bass line in your head?
A great example of a super memorable bass line, which doesn’t steal any attention away from the lead melody, can be found in the song “So Easy” by Norwegian electronic duo, Röyksopp. If you haven’t heard this song, have a quick listen, it’s the opening track on their brilliant album “Melody A.M.” from 2001. The song actually begins with both their bass line and lead melody playing, and while the lead is crazy catchy, the bass below is 100% memorable as well, without ever taking any attention away from the lead melody. It’s truly brilliant!
In this PDF you’ll learn the characteristics that make their bass line so memorable, as well as our 4-step method for writing memorable bass lines. But first… Tea!
Step 1. Half & Half
Set your tempo to 104 BPM and leave your time signature on 4|4. Then create an eight-bar loop on your bass track, and set your grid to 1/16 notes. When you analyse Röyksopp’s bass line, one of the most obvious characteristics you’ll notice is that half of it isn’t there, or so it seems. In other words, they use a ton of rests! So many, in fact, that their bass line consists of about half notes and half rests.
That’s a rather counterintuitive approach to bass, as it’s the foundation upon which the music is built. If half your foundation isn’t there, then surely you’re heading for trouble, right? Nope. Their clever use of rests ensures their bass line stands out because it’s different. But, as it’s not even there half the time, it’s not taking attention away from the lead melody. On that note, their lead is the opposite. It consists of longer connected notes, with no rests other than where they phrase it.
Okay let’s get to it! So you’re gonna start by writing a two-bar rhythm on C, the root note. But remember, you want about half of it to be rests. Also, all the notes should be short, so use a combination of 1/8 notes and 1/16 notes. And don’t be shy with the syncopation! If you play too many notes on the beat, it’s going to sound stiff and rigid. Those off-beat accents are gonna bring your bass line to life.

Two-bar rhythm on root note, C
When you’re happy with your lively two-bar rhythm, copy and paste it into bars three and four. Now, delete beat 4 in the fourth bar. You’ll find out why in Step 4.

Two-bar rhythm copied and pasted (highlighted) with beat 4 in fourth bar deleted
Then for variation, make one tiny change to a note towards the end of bar four.

Tiny rhythmic variation created at end of fourth bar (highlighted)
Step 2. Anchors & Arcs
The next thing you’ll notice about Röyksopp’s brilliant bass line is that it begins with three punchy on-beat root notes, before taking off to a bunch of other notes.
They repeat this pattern every two bars. That anchors the bass line into their key’s root note, as well as providing a rhythmic anchor. Every couple bars their bass briefly anchors melodically (to the root) and rhythmically (to the beat), before it ventures off to explore. And that exploration creates a melodic “arc” (i.e. contour), which we’ll get to in Step 3.
For the rest of the tutorial, please buy the PDF. Supporting our work helps us to keep teaching. Thank you :)
Download PDF Tutorial
We publish four new PDF tutorials every month.
You can
Subscribe & Save 33%
Lastly, are you new to music theory? Or are you experienced, but you want a refresher? Then download our FREE BOOK (link opens in new tab). It only takes 30 minutes to read, then you’ll have a solid theory foundation that you can instantly apply to your songwriting and producing. Enjoy!
Ray Harmony
Multi award-winning college lecturer
October 27, 2023
How to Write a Modulating Melody • Music Theory from John Carpenter "Halloween Theme"
How to Write a Modulating Melody
using a series of direct key changes
John Carpenter’s “Halloween Theme” is one of the most recognizable pieces of music in the horror film genre. And that’s not just because the movie is so famous, it’s because the music is massively attention-grabbing due to all its original ideas.
One of the many creative techniques he uses is modulating (i.e. changing key) in the middle of his melody. That’s completely crazy! To put it in context. Most music nowadays doesn’t even modulate at all. In other words, the whole song (verse, chorus, and everything else) is all in the same key. How mind-numbingly boring!
So, when Mr Carpenter changes key halfway through his “Halloween” melody, it grabs your full, undivided attention, as it’s unlike anything you’ve heard before. It goes without saying that this technique can be used in any genre, and wherever you use it, heads are gonna turn, because nothing grabs attention like a mid-melody modulation. And that’s not even the only modulation he does, there’s a lot more!
Without further ado. Inspired by the “Halloween Theme”, here’s our 7-step method for writing modulating melodies like John Carpenter. But first… Tea!
Step 1. Repetition
In our research for this tutorial, we found a video of John Carpenter talking about his “Halloween Theme” being in 5|4. However, because of the way he groups his piano part, the time signature is actually 10|8. And yes, they’re obviously the exact same length: five 1/4 notes = ten 1/8 notes. But, when you listen to the original you can clearly hear the 10|8 grouping: two groups of three 1/8 notes, followed by two groups of two 1/8 notes.
MIDI for John Carpenter’s “Halloween Theme” piano part (right-hand):

First group of three 1/8 notes highlighted (beats 1, 2, 3)
Second group of three 1/8 notes highlighted (beats 4, 5, 6)
First group of two 1/8 notes highlighted (beats 7, 8)
Second group of two 1/8 notes highlighted (beats 9, 10)
If the piano part was in 5|4, there would be five groups of two 1/8 notes, like this:
Example of what piano part would look like if time signature was 5|4 and not 10|8
(first note of each group of two 1/8 notes highlighted)
To complicate things, though, the drums play a four-on-the-floor style pattern, except it’s actually five-on-the-floor due to the length of each bar:

“Halloween Theme” drum beat plays a kick (highlighted) on each 1/4 note beat
With the drums accenting every 1/4 note beat, it’s clear that they’re in 5|4. So, when we take the drums into account, we realise there’s actually a polymeter here (i.e. two time signature playing simultaneously): the drums are playing in 5|4 while the piano is playing in 10|8. Very cool! But seeing as Mr Carpenter considers the whole thing to be in 5|4, we’ll go with that too, just to keep it nice and simple.
So, load up a piano track, then create a four-bar loop in 5|4, with your grid on 1/8 notes. Set your DAW’s tempo to 136 BPM. There’s actually two different versions of the “Halloween Theme”, the original one from 1978 and the remake from 2018. They’re both in the same tempo (and keys), and they’re pretty much the same, other than one relatively big difference that we’ll talk about in Step 4.
Right, let’s get down to the music making! We’re gonna start by writing the right-hand part of our piano. This part is super simple. As you can see in the MIDI screenshots above of the original version, John Carpenter only uses three notes: the 1 (F♯), 5 (C♯), and ♭6 (D). The original starts in the key of F♯ minor, but we’ll use A minor to keep things simple, as that’s just all the white notes from A to A.
For the rest of the tutorial, please buy the PDF. Supporting our work helps us to keep teaching. Thank you :)
Download PDF Tutorial
We publish four new PDF tutorials every month.
You can
Subscribe & Save 33%
Lastly, are you new to music theory? Or are you experienced, but you want a refresher? Then download our FREE BOOK (link opens in new tab). It only takes 30 minutes to read, then you’ll have a solid theory foundation that you can instantly apply to your songwriting and producing. Enjoy!
 Ray Harmony
Multi award-winning college lecturer
October 20, 2023
How to Write Haunting Arpeggios • Music Theory from Danny Elfman "Wednesday Main Titles"
How to Write Haunting Arpeggios
using parallel keys and borrowed chords
Danny Elfman’s theme song for the Netflix show Wednesday (officially called “Wednesday Main Titles” on the soundtrack album) is utterly brilliant! It’s just over one minute, but the amount of creative theory it contains is thoroughly impressive.
One of the most unusual sections is at 21 seconds into the track. It’s a crazy creative chord progression, played as triplet arpeggios. The section is so haunting and unsettling, because he slides through three different keys in the space of four bars. This leaves the listener feeling disorientated, as their subconscious is trying to figure out if it did actually hear a key change or if it just imagined that. You know the feeling, right? Maybe that was just a shadow at the window, and that noise was probably (hopefully) just a branch knocking against the house. Hmmm…
On that note, go and check that all your doors are locked and your windows are closed. Then, turn off your lights, put on your headphones, and let’s make some spooky music! So, inspired by the Wednesday theme song, here’s our 4-step method for writing haunting arpeggios like Danny Elfman. But first… Tea!
Step 1. Chords
There’s two stages to this method. First you’ll write a haunting chord progression (Steps 1 & 2), then you’ll turn that into arpeggios (Step 3). As a bonus, we’ve included a section on how to write a haunting bass line for your arpeggios (Step 4). By the way, Stage 2 is super quick and easy, but Stage 1 will take some time. Okay let’s get to work, cos these arpeggios aren’t gonna write themselves - they’re haunting arpeggios, not haunted arpeggios!
Set your tempo to 98 BPM, then create four bars of 4|4. You can just use a piano sound for now, then after you’ve finished writing, you can play around with some different sounds. Next, change your grid to 1/8 note triplets. If you want your whole song to be in this triplet feel, though, then you can use the 12|8 time signature. We’re using triplets because the opening section of Wednesday is in 4|4. It switches to 1/8 note triplets after 21 seconds, when this arpeggio section begins.
Now that you’re all set up, it’s time to grab some paper and a pen. Yep, we’re going old-school in Step 1. An arpeggio is simply a chord played one note at a time. So, before we get to our arpeggios, we obviously need to write a chord progression.
Here is Danny Elfman’s progression: Dm → F♯m → C♯m → Bm → Dm
A surface-level analysis of that progression reveals that he’s only using minor chords. That’s a great hack all on its own, because a progression made up exclusively of minor chords will sound seriously dark, as you’re never giving your listener a break from the somber nature of minor chords. Now, if you do a deep analysis, you’ll discover something far more remarkable. The progression is in the key of D minor, so what do you notice about its chords?
D natural minor scale
1
2
♭3
4
5
♭6
♭7
Dm
Edim
Fmaj
Gm
Am
B♭maj
Cmaj
Our deep analysis doesn’t even get past the second chord before we discover that Danny Elfman has officially left the key! There’s no F♯ in D minor. So, the second chord in this progression is a non-diatonic chord, i.e. a chord that’s not in the key. On we go to the third chord. Oh, he’s done it again! There’s no C♯ in D minor either. And on to the fourth chord. Same again! There’s no B in D minor. What?!
So, sandwiched between two root chords that start and finish the progression, he has three non-diatonic chords. That’s obviously not normal. In fact, it’s so unusual that it takes us back to the drawing board, because if the root chord is the only chord that’s in the key, then is the key really D minor or did we get it wrong?
No we didn’t. The key is D minor, but each of those three non-diatonic chords is from a different key. A parallel key! A parallel key is just the fancy term for a key (i.e. scale/mode) that has the same root note. And when you play a chord from a parallel key, it’s called a borrowed chord. In this example, D natural minor and D major are parallel. D Lydian is also parallel, which is another key Danny Elfman uses in his progression.
For the rest of the tutorial, please buy the PDF. Supporting our work helps us to keep teaching. Thank you :)
Download PDF Tutorial
We publish four new PDF tutorials every month.
You can
Subscribe & Save 33%
Lastly, are you new to music theory? Or are you experienced, but you want a refresher? Then download our FREE BOOK (link opens in new tab). It only takes 30 minutes to read, then you’ll have a solid theory foundation that you can instantly apply to your songwriting and producing. Enjoy!
Ray Harmony
Multi award-winning college lecturer
October 13, 2023
How to Write a Suspenseful Melody • Music Theory from Mike Oldfield "Tubular Bells" The Exorcist (1973) theme
How to Write a Suspenseful Melody
using Bitonality, AKA playing in two keys simultaneously
The dictionary definition of suspenseful is “causing a feeling of excitement or nervousness because you are waiting for something to happen”.
That perfectly describes the intro of “Tubular Bells - Pt. I” by Mike Oldfield. It’s easy to hear why The Exorcist (1973) director William Friedkin chose this music for his film. Recall that classic scene where Chris starts walking home alone as the “Tubular Bells” intro begins. Eeek! Talk about “waiting for something to happen”.
If you wanna make music that keeps people listening because they need to know what happens next, then knowing how to create suspense is essential. Mike Oldfield has given us a masterclass with this music. So, inspired by “Tubular Bells”, here’s our 4-step method for writing a suspenseful melody. But first… Tea!
Step 1. Odd
One of the first things we notice about the intro of “Tubular Bells - Pt. I” is that it’s in an odd time signature. If you count along with that piano part in the intro, you’ll count 15 beats. So, change your DAW’s time signature to 15|4 and set the tempo to 150 BPM.
On closer analyses of the piano part (i.e. where its melody repeats), it becomes apparent that the time signature is actually one bar of 7|4 followed by two bars of 4|4. But as that adds up to 15|4, we’ll just go with that to keep things simpler.
Next, create a one-bar loop of 15|4 on your piano track, with the grid on 1/8 notes. We’re gonna start by writing a rhythm on E (the root), using only 1/8 notes and 1/8 rests. You can do whatever you want, but don’t play more than two notes in a row. Also, only make your rhythm seven 1/4 notes long, i.e. one bar of 7|4.

7|4 rhythm (on E)
Step 2. Pitch
Now it’s time to turn this rhythm into a melody! For the rest of the tutorial, please buy the PDF. Supporting our work helps us to keep teaching. Thank you :)
Download PDF Tutorial
We publish four new PDF tutorials every month.
You can
Subscribe & Save 33%
Lastly, are you new to music theory? Or are you experienced, but you want a refresher? Then download our FREE BOOK (link opens in new tab). It only takes 30 minutes to read, then you’ll have a solid theory foundation that you can instantly apply to your songwriting and producing. Enjoy!
Ray Harmony
Multi award-winning college lecturer


