
Ray Harmony's Blog, page 3
April 18, 2025
Chord Quality Ratio
Every chord progression tells a musical story. So regardless of the key, think about how many major chords you want compared to minor chords. This ratio determines the overall feel of your progression. The order of the chords makes a difference too, e.g. starting on a major chord gives an uplifting first impression, while starting on a minor chord creates a serious vibe.
Ray & Kate :)
Want all our essential music making hacks in one PDF?
Download: Songwriting & Producing PDF


April 11, 2025
Change Keys
Most new songs are in the same key from start to finish, which is one of the main reasons why they get boring after a few listens. Musically they don't go anywhere!
Wanna make better songs? Change keys.
The easiest way to change keys (i.e. modulate) is to use a different scale/mode from the same root, e.g. if your verse is in A Dorian, write your chorus in A Lydian.
Ray & Kate :)
PS: For our 3 easy methods of changing keys, download the Songwriting & Producing PDF
September 5, 2024
How to Write a Magic-Trick Bass Line • Music Theory from Eminem "Houdini"
How to Write a
Magic-Trick Bass Line.
Download PDF Tutorial
includes MIDI + WAV file examples
Intro.
As you probably know, Harry Houdini (né Erik Weisz) was a Hungarian-American magician who was especially famous for his seemingly impossible escape acts. He was also the inspiration behind Eminem’s recent song “Houdini”. This was the lead single from his new album “The Death of Slim Shady”, and it was a huge hit!
Eminem’s lyrics are controversial at the best of times, so we’re not here to comment on that element. But, regardless of what we all think of his potty-mouth, there’s magic and illusion bubbling up from the bass line in this song. So what’s causing the magic? Well, Eminem* creates two musical illusions by using a melodic sequence, as well as a non-diatonic note. It’s simple yet super effective, kinda like the musical equivalent of that classic pull a rabbit out a hat magic trick.**
If you’re new to these techniques, a melodic sequence is when a segment of the melody is repeated at a higher or lower pitch. It creates the illusion that you’re listening to something fresh yet familiar at the same time, because the notes are different but the contour is the same. The other technique Eminem uses for his magic trick is a non-diatonic note, which is just a note that’s not in the scale.
So, inspired by “Houdini”, here’s our 5-step method for writing a magic-trick bass line that creates a captivating sonic illusion. But first… let’s pull a nice cup of tea out the hat!
*There are other people who co-wrote “Houdini”, but for brevity we’ll just be saying Eminem.
**If you have a pet rabbit, please don’t try this at home. Well, unless you want poop in your hat!
Step 1. Scale
Open your DAW, leave the time signature on 4|4, but change your tempo to 127 BPM. Next, create a four-bar loop on your bass track, with a 1/16 note grid.
“Houdini” is in the key of A minor, which is all the white notes on the piano from A to A. We’ll be using A minor for our example in this tutorial, too.
A natural minor
1
2
♭3
4
5
♭6
♭7
A
B
C
D
E
F
G
A natural minor (root note highlighted)
There’s a couple tweaks to this scale. We’ll cover one now, and the other in Step 5.
The first tweak is that Eminem actually uses the pentatonic version of A minor. If you’re new to the minor pentatonic, it’s the same scale but without its 2 and ♭6.
So, delete the B (2) and F (♭6) from your A minor scale. The remaining five notes are the A minor pentatonic, and that’s what we’ll be working with for this bass line.
A minor pentatonic
1
2
♭3
4
5
♭6
♭7
A
-
C
D
E
-
G
The minor pentatonic scale is a favourite in blues and funk, but it can be used in any and all genres. For example, lots of those heavy Rage Against The Machine riffs are in the minor pentatonic scale. Its simplicity makes it incredibly versatile!
A minor pentatonic (root note highlighted)
Step 2. Arpeggio+
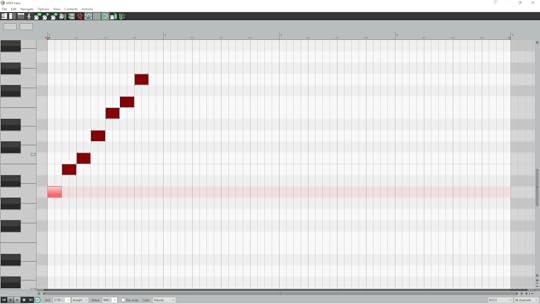
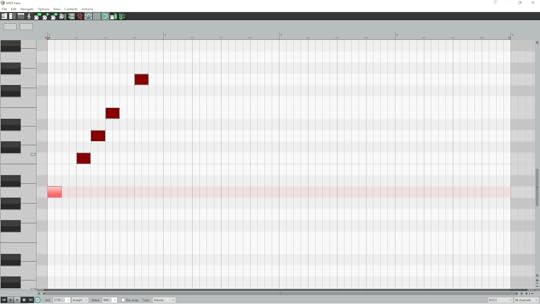
Alright, it’s time to get creative! So, the first thing you’re gonna do is write a one-bar arpeggio, i.e. play the Am chord one note at a time. You can start on the A, C, or E, and play them in any order. If you like, you can repeat a note or two.
The only guideline here is to use lots of rests. There’s two reasons for this. Firstly, you’re gonna smooth out your contour with some non-harmonic notes next, i.e. notes that are not in the chord (that’s D and G over Am). Secondly, rests add energy to a bass line. It sounds counterintuitive, but it’s true. Try both ways and compare. Use shorter notes with rests (like ours below). Then extend the notes to make them longer and don’t use any rests. You’ll hear instantly: rests add energy!
By the way, for maximum energy, use 1/8 notes and 1/16 notes for your arpeggio. Also, Eminem starts his bass line on an off-beat. This is a great hack for surprising your listeners right outta the gate, because beat 1 hits and there’s no bass, but then suddenly it comes in on beat 1+. We did this too, but you can start on another off-beat (i.e. beat 1e, or beat 1a). However, if you prefer, you can start on beat 1.
Our Am arpeggio in bar one (root note highlighted)
Now it’s time to create a more interesting contour. No diss to Eminem here, but he doesn’t do this. He only uses the harmonic notes (A, C, E). The teacher in me wants to give him a B grade for that. Good, but not great. It would’ve been more captivating with a non-harmonic note, or two. But hey, if you want your song to appeal to hundreds of millions of people, then keep it very simple. It’s your choice.
To read the rest of this tutorial, please buy the PDF. Supporting our work helps us keep teaching. Thank you :)
Download PDF Tutorial
Lastly, are you new to music theory? Or are you experienced, but you want a refresher? Then download our FREE BOOK (link opens in new tab). It only takes 30 minutes to read, then you’ll have a solid theory foundation that you can instantly apply to your songwriting and producing. Enjoy!
Ray Harmony
Multi award-winning college lecturer
July 25, 2024
How to Write a Staccato Chord Progression • Music Theory from Dr. Dre "Still D.R.E." (feat. Snoop Dogg)
How to Write a
Staccato Chord Progression.
Download PDF Tutorial
includes MIDI + WAV file examples
Intro.
I was living in Los Angeles when Dr. Dre’s album “2001” was released. On the streets, it seemed like every car was blasting it. Every store I walked into was either playing a song from it, or if not, they would be before I walked out. I’ve never heard one album played so much, and for good reason: it’s a hip-hop masterpiece!
The lead single from the album was “Still D.R.E.” (feat. Snoop Dogg), and in LA during November 1999, this was the one song you’d be guaranteed to hear absolutely everywhere! To this day, every time I hear that intro with those staccato chords, I’m instantly transported back there. Those chords have since become iconic, and for good reason too: they’re somehow rough and smooth at the same time! In this PDF you’ll learn the hacks Dre* used to make his unique progression.
Also, in a genre where the emphasis is almost always on the drums and bass, the fact that “Still D.R.E.” put chords in the spotlight was also unique. Obviously there were lots of hip-hop songs that had chords before “Still D.R.E.”, however, their chords were almost always in the background. Hip-hop was, and still is, all about the drums and bass. But, “Still D.R.E.” is all about the chords. And a quarter of a century later, it still stands out in the genre. That’s mightily impressive!
So, inspired by “Still D.R.E.”, here’s our 6-step method for writing a staccato chord progression that instantly stands out. But first… Tea!
P.S. Cool story: If you watch the “Still D.R.E.” music video, at 2:35 there’s a tall dude dressed all in white with a black hat. That was the rapper in my old band :)
*There are other producers who co-wrote “Still D.R.E.”, but for brevity, we’re just saying Dre.
Step 1. Chords
Open your DAW, leave the time signature on 4|4, but change your tempo to 93 BPM. Next, create a two-bar loop on your chords track, with a 1/16 note grid. Just use a piano sound for now, then when you’re finished writing you can change the sound, if you want. But, staccato chords sound amazing on piano, so we kept it. “Still D.R.E.” is in the key of A minor (it’s tuned slightly off A, though). So, we’ll use A minor too, which is just all the white notes on the piano from A to A.
A natural minor (notes)
1
2
♭3
4
5
♭6
♭7
A
B
C
D
E
F
G
A natural minor (chords)
1
2
♭3
4
5
♭6
♭7
Am
Bdim
Cmaj
Dm
Em
Fmaj
Gmaj
The main feature of Dre’s chords are the staccato way that they’re played. If you’re new to that word, “staccato” just means “detached”. And in practical terms, staccato means you’re playing the note/chord as a really short note value, like a 1/32 note. Because the main characteristic of this progression is rhythmic, Dre only uses two chords. If he used more than that, the listener’s attention would be drawn away from the rhythm to the melodic/harmonic side. We’ll do this example like Dre’s, with only two chords, but if you’re into a different genre where more chords would be better, you can choose four chords and follow the same method.
There is one BIG problem with only using two chords, though. If you choose the same two that Dre used, you’ll be getting a scary letter from his legal team. We certainly don’t want that letter, and we don’t want you to get it either, so let’s all avoid using Am and Em. It’s essential to start on Am, as the root chord anchors the progression into the key. So, your choice for the second chord is: Cmaj, Dm, Fmaj, or Gmaj. You don’t wanna use Bdim either, as it’s dissonant. We chose Am and Dm. And we won’t send you a scary letter if you wanna use those chords, too!
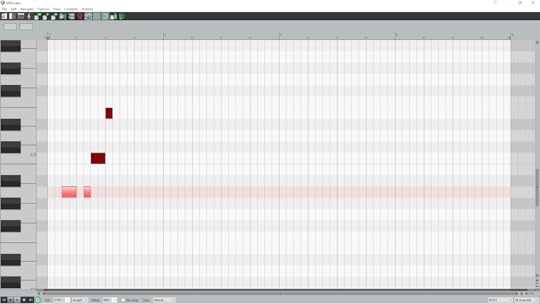
After you’ve chosen your two chords, draw them into your DAW with each chord lasting one full bar. Also, draw in the root note of each chord in the octave below.
Our two chords (roots highlighted), with their root notes below, i.e. in the bass
Step 2. Suspension
Here comes the first part of making this progression smooth. Dre uses a creative (and clever) hack here to not only make the chords sound like they’re melting into each other, but this hack also results in the progression sounding like it has three chords instead of two.
You see, instead of going directly from Am to Em, Dre uses a sus chord in between, which acts as a transition between the two chords. If you’re new to sus chords, the “sus” means “suspended”. And the reason they’re called that is because the 3rd note is suspended (i.e. moved off the 3rd). The 3rd note is the magic note*, though, because it determines whether a chord is major or minor.
*If you wanna learn all about the magic of the 3rd note, read Hacks 8 and 9 in our Free Book.
So, when you suspend the 3rd (i.e. move it down to the 2, or up to the 4), your chord is not major or minor, it’s neutral. The major or minor quality only occurs when (or if) you move the 2 or 4 to the 3. A sus2 chord is when you play the 2 instead of the 3 (i.e. 1, 2, 5). And a sus4 chord is when you play the 4 instead of the 3 (i.e. 1, 4, 5). Dre uses Esus4. Then he resolves the 4 (A) down to the ♭3 (G). The Esus4 is neutral. The chord quality only becomes minor after that resolution.
Dre uses the Esus4 because its 4 is A, which is the root note of the first chord (Am). That way he continues playing the A through this chord change, which makes it sound like the Am is melting into the Em. So, when you choose whether to play a sus2 or sus4, make that decision based on the Am (i.e. A, C, E). In other words, you want to continue playing A, C or E through this chord change.
You may already have a common note between your two chords (like Dre and we do), but Dre’s idea behind using a sus chord here is to create another common note. However, if you already had two common notes to start with (like Am and Cmaj), then you’ll actually lose one of your common notes when you create the sus chord. That’s not a problem. As long as there’s one common note, you’re good!
But, before you start experimenting with a sus chord, slice your second chord on beat 2+. Now you can play around with moving its 3rd to the 2nd, or to the 4th. To read the rest of this tutorial, please buy the PDF. Supporting our work helps us to keep teaching. Thank you :)
Download PDF Tutorial
Lastly, are you new to music theory? Or are you experienced, but you want a refresher? Then download our FREE BOOK (link opens in new tab). It only takes 30 minutes to read, then you’ll have a solid theory foundation that you can instantly apply to your songwriting and producing. Enjoy!
Ray Harmony
Multi award-winning college lecturer
May 28, 2024
How to Write a Relaxing Piano Piece • Music Theory from Ólafur Arnalds "Happiness Does Not Wait"
How to Write a
Relaxing Piano Piece.
Download PDF Tutorial
includes MIDI + WAV file examples
Intro.
The world seems to get more stressful every week. It’s no wonder that more and more people are seeking relief wherever they can find it. Sadly, though, their relief usually involves a substance or activity that isn’t very healthy. But it doesn’t have to be that way. There’s an abundance of scientific studies proving the effectiveness of music therapy. While a qualified professional is necessary for more serious issues, we can all freely enjoy the stress-relieving effects of relaxing music. And it’s safe, too. The only side-effect is drowsiness! So when you’ve finished this tutorial and you have your new piano piece, please don’t listen to it while driving. Mmmkay?
When writing relaxing music, we have to think completely differently to how we think when writing songs. The reason for this is because our goal is not to end up with a good song, but a piece of music that induces relaxation. You can think of it like writing soundtrack music. In films, the best soundtracks are the ones you don’t notice. Directors don’t want soundtracks taking attention away from their films, so they ask composers to write music that induces particular emotions. When we sit down to write a relaxing piano piece, we can imagine we’re making it for a scene in a movie. Perhaps the actor is walking on a beautiful Caribbean beach at sunset?
We’ve based this tutorial on “Happiness Does Not Wait” by Icelandic producer Ólafur Arnalds. In this track Ólafur perfectly balances simplicity with creativity. That balance is vital. If the music is too simple, it will get repetitive and annoying. That’s the opposite of relaxing! But, if it’s too creative, it will be stimulating, and that’s not relaxing either. This balance is what the art of relaxing music is all about.
So, inspired by “Happiness Does Not Wait”, here’s our 7-step method for writing piano music with relaxing arpeggios (left-hand) and soothing melodies (right-hand). But first… Tea! And maybe it should be a decaf this time?
Step 1 [Chords]. Common Notes
Open your DAW, change your time signature to 3|4, and set your tempo to 123 BPM. Next, create an eight-bar loop on your piano track, with an 1/8 note grid.
“Happiness Does Not Wait” is in the key of F minor, but we’ll use A minor to keep things simple, cos it’s just all the white notes on the piano from A to A.
A natural minor (notes)
1
2
♭3
4
5
♭6
♭7
A
B
C
D
E
F
G
A natural minor (chords)
I
II
♭III
IV
V
♭VI
♭VII
Am
Bdim
Cmaj
Dm
Em
Fmaj
Gmaj
You’ll notice a recurring theme in this tutorial: balancing simplicity with creativity.
We’re constantly gonna be striving to make the most creative music we can, but without stimulating our listeners. And when we listen to a chord progression, every time the chord changes, it has the potential to stimulate us with new notes. Newness and novelty are stimulating. So, we need to be extremely careful when introducing new notes. The best way to change chords without stimulating our listeners, is to use chords that have one or two notes in common. By doing this, we only introduce one or two new notes when the chords change, instead of all three.
Now, spend some time choosing four chords for your progression. Remember that your last chord will loop around to your first chord, so make sure those two chords also have a common note. Play your four chords for two full bars each. For interest sake, these are Ólafur’s chords: Im → ♭VImaj → ♭IIImaj → Vm. If you need help with roman numerals and chord symbols, read Hack 13 in our Free Book.
And here’s our progression: I (Am) → V (Em) → ♭VII (Gmaj) → IV (Dm).
As you’ll notice, Ólafur’s chord progression has two major (happy) chords and two minor (sad) chords, so his happy/sad balance is 50/50. If you want more of one, simply use three of that chord quality, and one of the other. We wanted a slightly more melancholic atmosphere, so we chose three minor chords and one major.
Also, although you can start on any chord in the key, beginning your progression on the root chord (Am) will be the most calming option. The reason for this is because starting on another chord will create some tension, as it’s not the “home” chord. While that’s fine in other circumstances, in this situation we want to instantly anchor our progression into the key, so the listeners feel instantly settled.

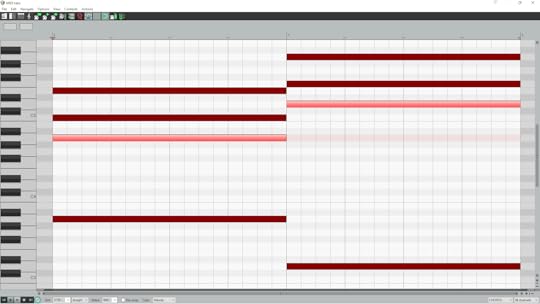
Our chord progression (root note of each chord highlighted)
Step 2 [Chords]. Inversions
The next way we’re gonna make our chord changes even more relaxed is to use inversions - the chords will actually sound like they’re melting into each other! If you’re new to inversions, it’s just when you re-arrange the notes of a chord.
By keeping the common note in the same place (i.e. bottom, middle, or top note) within adjacent chords, we create a common musical thread that’s deeply relaxing.
For example, in our progression the first chord (Am) and the second chord (Em) have the note E in common. E is the highest note in our Am chord, so we need to make E the highest note in our Em chord as well. We do this by inverting the Em chord. So in our Em chord, instead of playing E, G, B (see the second chord in MIDI above), we’re going to play G, B, E (see the second chord in MIDI below).

Chord progression with inversions (root note of each chord highlighted)
Then between our second chord (Em) and our third chord (Gmaj), there’s actually two common notes: G and B. And they’re already in the same place (bottom and middle) within both chords, so we don’t need to invert our Gmaj.
Finally, between our third chord (Gmaj) and our fourth chord (Dm), the common note is D. That note is at the top of our Gmaj chord, so we re-arranged Dm (D, F, A) to get D at the top of that chord too. So, our Dm chord is now F, A, D.
By the way, you’d usually wanna do this process from your last chord to your first chord as well, but in our progression that would involve playing two different versions of our last chord (see MIDI below) in order to get the common note (A) into the same place as it is in our first chord (bottom note). We’d do this in other situations, but it would add movement and therefore increase the energy, so we decided not to do that here. You can do whatever works best for your progression.
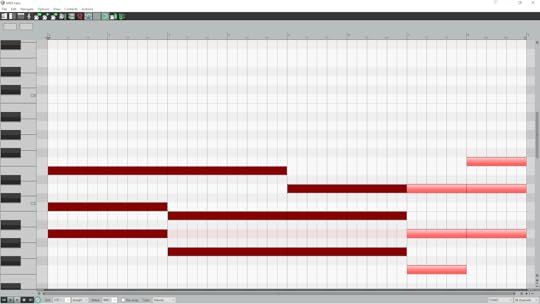
Two versions of last chord (highlighted), which we chose not to use
Step 3 [Chords]. Arpeggios v1
The next way we’re gonna soften our chords is by turning them into arpeggios. In other words, we’ll play each chord one note at a time. This is very relaxing indeed. To read the rest of this tutorial, please buy the PDF. Supporting our work helps us to keep teaching. Thank you :)
Download PDF Tutorial
Lastly, are you new to music theory? Or are you experienced, but you want a refresher? Then download our FREE BOOK (link opens in new tab). It only takes 30 minutes to read, then you’ll have a solid theory foundation that you can instantly apply to your songwriting and producing. Enjoy!
Ray Harmony
Multi award-winning college lecturer
May 8, 2024
How to Write a Catchy Melody • Music Theory from Glass Animals "Creatures in Heaven"
How to Write a Catchy Melody.
Download PDF Tutorial
includes multitrack MIDI file
If the link above does not work, paste this into your browser:
https://hackmusictheory.com/album/287...
Intro.
British band Glass Animals are absolutely massive! At the time of writing this, they’re ranked #257 in the world on Spotify. Most artists as famous as them have achieved their success as a result of an obsessive striving for celebrity. However, Glass Animals seem to be obsessed with making catchy music instead. And not only that, their music is surprisingly creative for a band as successful as them.
If you’ve been doing our Hack Music Theory tutorials for a few years, you’ll know that we don’t usually cover “celebrity artists”. The reason for that is because (nowadays) there’s an inverse correlation between the success of an artist and the creativity of their music. For an artist to achieve a fanbase of tens of millions, their music needs to appeal to the masses. And most people (nowadays) want “sugary” ear-candy music that’s pleasantly predictable, i.e. boring, bland background music.
So why are we doing a tutorial on such a huge band? Well, Glass Animals’ new single “Creatures in Heaven” is a masterclass in catchy melody writing. The lead melody in their chorus has a whole bunch of creative hacks, as well as a very clever twist in its tale. So, inspired by “Creatures in Heaven”, here’s our 6-step method for writing a great melody that’s catchy enough for the masses. But first… Tea!
Step 1. The Chords
Open your DAW, leave the time signature on 4|4, but change your tempo to 80 BPM. Next, create a four-bar loop on your melody track, with a 1/16 grid. Okay so you may be wondering why the first step in a melody tutorial is… the chords?!
Well, all great melodies are written over chords, or implied chords (chords are “implied” when they’re not played separately but their notes are incorporated into the melody instead). The reason it’s best to write a melody over chords is because it gives the melody a harmonic progression. Without this progression, the melody will sound mind-numbingly boring, as it won’t go anywhere harmonically. The difference is night and day. It’s like walking through a beautiful forest along the ocean compared to walking on a treadmill in a stinky gym. There’s no comparison!
So let’s get our chord progression written, that way we’ve set ourselves up to write a great melody. Glass Animals are in the key of D major for their chorus (so we’ll use it too), and they use four chords in their progression (so we’ll do that too).
D Major (notes)
1
2
3
4
5
6
7
D
E
F♯
G
A
B
C♯
D Major (chords)*
1
2
3
4
5
6
7
Dmaj
Em
F♯m
Gmaj
Amaj
Bm
C♯dim
*If you need help working out the chords in a key, read Hack 10 in our Free Book.
As you probably know (or as you’ll hear if you play it), the diminished chord is crazy dissonant. It’s safe to say that using C♯dim ain’t gonna appeal to the masses, so take that off your menu. But other than that, you can use whatever you want.
Glass Animals use all three major chords, and only one minor. Playing three major chords in a major key gives their chorus a wonderfully uplifting vibe. So, think about your balance between major (happy) and minor (sad) chords. Also, think about the order of your chords. Glass Animals play the root chord (Dmaj) second. This detracts attention from it and creates a more fluid atmosphere. We played Dmaj last, though, which creates a more final ending. You can play Dmaj wherever you want, but consider where you want to draw people to the “home” chord. Here’s our progression: Gmaj → Bm → Amaj → Dmaj
Once you’ve chosen your four chords, draw in the root note of each chord for a full bar (in a low octave). These roots will provide harmonic reference for your melody, which you’re gonna write above. This way you’ll be able to hear the relationship between each note in your melody and its accompanying chord. When you’ve finished writing your melody, mute these low roots. Then, create another track specifically for your progression, and draw in each full chord (i.e. 1, 3, 5).
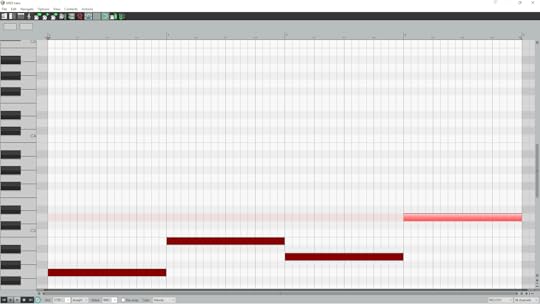
Root note of each chord in progression (key note, D, highlighted)
Step 2. The Drama
Great melodies contain drama, and there’s no better way to bring the drama than by using a big interval. You see, larger intervals create intensity, while smaller intervals create continuity. You need both. In fact, you need a lot more smaller intervals than bigger intervals. However, if your melody contains only small intervals, it’ll be awfully boring. On the other hand, if your melody contains only big intervals, people will presume you were thoroughly drunk when you wrote it. Download the PDF to read the rest of this tutorial…
Download PDF Tutorial
Lastly, are you new to music theory? Or are you experienced, but you want a refresher? Then download our FREE BOOK (link opens in new tab). It only takes 30 minutes to read, then you’ll have a solid theory foundation that you can instantly apply to your songwriting and producing. Enjoy!
If the FREE BOOK link doesn't work, just visit our BOOKS page:
https://hackmusictheory.com/books
Ray Harmony
Multi award-winning college lecturer
April 12, 2024
How to Write a Chromatic Bass Line • Music Theory from The Motet "We Got U"
How to Write
Chromatic Bass Lines
Download PDF Tutorial
includes MIDI + WAV file examples
Intro.
There aren’t many songs where the bass is in the spotlight. And there’s a good reason for that: Most bass lines suck! Of course there are exceptions, but in most genres the bass is nothing more than a frequency. Its only function is to fill out the bottom end of the sound. Thankfully though, not all genres have sucky bass lines.
Thank you, funk! Yep, funk is one of the only genres in which most songs (usually) contain real bass lines. In other words, actual melodies played on the bass.
You see, that’s what makes a real bass line. If a bass merely plays the root note of each chord, then that bass is perceived by the listeners as a frequency (not a melody). That’s why songs with good bass lines also have more depth, because their bass is adding a musical layer with both melodic and rhythmic independence.
An example of a great bass line can be heard in the new single “We Got U” by American funk band The Motet. Not only does this song kick off with an amazing bass line, but respect is due to their bassist Garrett Sayers for being able to play so fast, and with so much groove. It’s a complex bass line, but in this PDF we’ll break down its elements and teach you how to use them to make your own version.
So, inspired by “We Got U”, here’s our easy method for writing great bass lines (in any genre) with chromaticism. What’s that? Read on to find out. But first… Tea!
Step 1. Mixolydian Mode
Open your DAW, leave the time signature on 4|4, but change your tempo to 111 BPM. Next, create a four-bar loop on your bass track, with a 1/16 note grid.
Right, so the first unusual element about this bass line is its mode: Mixolydian. Mixolydian is a very underused mode, and that makes this bass line instantly stand out. If you’re new to Mixolydian, it’s just all the white notes from G up to G.
G Mixolydian
1
2
3
4
5
6
♭7
G
A
B
C
D
E
F
The first thing you’ll notice about Mixolydian is that it’s a major mode, i.e. it has a major 3rd (3). The next thing you’ll notice about it is its last note, which is a minor 7th (♭7).* As Mixolydian is major, listeners will be expecting a major 7th (7).**
The ♭7 is the only note that makes Mixolydian different to the major scale, so it’s vital to play that ♭7, otherwise it will just sound like the major scale. If you play Mixolydian a few times, you’ll hear that it sounds like a slightly sad version of the major scale, a.k.a. the “happy” scale. It’s amazing the difference one note makes, right? The major scale is known for its use in children’s music (and Christmas songs), due to its uplifting childlike quality. However, by simply moving its 7th note down one semitone, we create a mode that sounds like an adult version of the major scale. And that’s why Mixolydian should be used way more often: it brings the uplifting nature of the major scale, but without its childlike vibe.
Before we get writing, just a quick update. The Motet use E Mixolydian for their bass line, so if you programmed in those MIDI notes we mentioned above (from G to G), grab them all and move ‘em down to E. Now you’ve got E Mixolydian.
E Mixolydian
1
2
3
4
5
6
♭7
E
F♯
G♯
A
B
C♯
D
*Remember to use 3 and ♭7 a few times in your bass, as they’re what make Mixolydian unique!
**Wanna learn all the modes & how to use them? Read our Songwriting & Producing PDF.
Step 2. Chromatic Notes
For the record, a bass line in Mixolydian would already stand out. But, that wasn’t enough for The Motet. They spiced up this underused mode with not one but two chromatic notes! So what’s a chromatic note? It’s simply a note that is not in the scale/mode. And by the way, another word for chromatic is non-diatonic, so you’ll see both of those terms being used to describe notes outside the scale/mode. So, what two chromatic notes did they add? To read the rest of this tutorial, please buy the PDF. Supporting our work helps us to keep teaching. Thank you :)
Download PDF Tutorial
Lastly, are you new to music theory? Or are you experienced, but you want a refresher? Then download our FREE BOOK (link opens in new tab). It only takes 30 minutes to read, then you’ll have a solid theory foundation that you can instantly apply to your songwriting and producing. Enjoy!
Ray Harmony
Multi award-winning college lecturer
March 18, 2024
How to Write a Better Snare Rhythm • Music Theory from Matt Sassari & Tony Romera "Snare Thing"
How to Write a
Better Snare Rhythm.
Download PDF Tutorial
includes MIDI + WAV file examples
If the link above does not work, paste this into your browser:
https://hackmusictheory.com/album/280...
Intro.
While it’s normal to hear at least a few different kick patterns and hi-hat patterns in music nowadays, it’s rare to hear an interesting snare pattern. The rhythm assigned to this neglected element of the drumkit is almost always an afterthought. In 4|4 (which most music is in), the snare is usually one of these three rhythms:
Regular backbeat (beats 2 and 4): used in most songsHalf-time backbeat (beat 3): used for a slower vibeDouble-time backbeat (beats 1+, 2+, 3+, 4+): used for a faster vibe
So, when listening through to the new releases on Spotify, it was rather shocking (pleasantly so) to hear something completely unusual. The collaborative single “Snare Thing” by French producers Matt Sassari and Tony Romera is a refreshing celebration of the drum that almost always plays the most boring rhythm!
With these PDF tutorials, we usually have to make an educated guess as to what the creator’s intention and process was behind the song. But, based on the less-than-subtle title of their track, it’s safe to say that the duo were intentionally showcasing the snare drum’s creative potential. So, inspired by “Snare Thing”, here’s our 4-step method for writing creative snare patterns. But first… Tea!
Step 1. Motif
Set up two bars of 4|4 with your grid on 1/16 notes, and your tempo at 126 BPM. The first thing we need to do is write a motif, which is a short idea that’s repeated to give the music structure and make it more memorable.
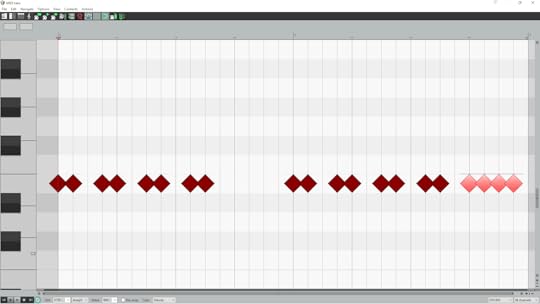
As we’re writing for the drums, our motif will obviously be a rhythmic motif (when using pitched instruments, you can also write melodic and harmonic motifs). The motif that Matt and Tony use is a couple of 1/16 notes followed by a 1/16 rest. They then repeat this motif to create their snare rhythm.

Motif repeated to create snare rhythm
As you can see, their motif is three 1/16 notes long. Having a motif that’s an odd duration (like three, five, seven, etc.) will make it far more interesting, because each time the motif is repeated it’ll start on a different 1/16 note beat (e.g. 1a, 2+, 3e).
A motif lasting four (or eight) 1/16 notes will repeat on the same beat, so it’ll get repetitive and boring extremely quickly. Therefore, avoid using an even-number motif here. For the record, though, they can sound great when played on melodic instruments, because you can repeat the same rhythm while changing the pitches.
Right, when you’re happy with your motif, copy and paste it into the first three 1/4 note beats of bar one. You wanna leave beat 4 open for now, as that’s where you’re gonna write a variation. Next, copy and paste your rhythm into bar two.

Snare rhythm copied and pasted into bar two (highlighted)
Now it’s time to write your variation in beat 4 of bar two. This variation will prevent the snare rhythm from getting boring, by turning it into a two-bar rhythm:
Two-bar snare rhythm created by adding variation (highlighted)
Step 2. Swing
With such an unusual snare rhythm, it would be completely acceptable to move on and write the kick drum pattern now. But, Matt and Tony have one more brilliant snare trick up their sleeves. Instead of using the regular straight grid that you hear in almost every song, they use a swing grid. This is a game-changer! Download the PDF to read the rest of this tutorial…
Download PDF Tutorial
Lastly, are you new to music theory? Or are you experienced, but you want a refresher? Then download our FREE BOOK (link opens in new tab). It only takes 30 minutes to read, then you’ll have a solid theory foundation that you can instantly apply to your songwriting and producing. Enjoy!
If the FREE BOOK link doesn't work, just visit our BOOKS page:
https://hackmusictheory.com/books
Ray Harmony
Multi award-winning college lecturer
How to Write Better Snare Drum Rhythms • Music Theory from Matt Sassari & Tony Romera "Snare Thing"
How to Write
Better Snare Rhythms.
Download PDF Tutorial
includes MIDI + WAV file examples
If the link above does not work, paste this into your browser:
https://hackmusictheory.com/album/280...
Intro.
While it’s normal to hear at least a few different kick patterns and hi-hat patterns in music nowadays, it’s rare to hear an interesting snare pattern. The rhythm assigned to this neglected element of the drumkit is almost always an afterthought. In 4|4 (which most music is in), the snare is usually one of these three rhythms:
Regular backbeat (beats 2 and 4): used in most songsHalf-time backbeat (beat 3): used for a slower vibeDouble-time backbeat (beats 1+, 2+, 3+, 4+): used for a faster vibe
So, when listening through to the new releases on Spotify, it was rather shocking (pleasantly so) to hear something completely unusual. The collaborative single “Snare Thing” by French producers Matt Sassari and Tony Romera is a refreshing celebration of the drum that almost always plays the most boring rhythm!
With these PDF tutorials, we usually have to make an educated guess as to what the creator’s intention and process was behind the song. But, based on the less-than-subtle title of their track, it’s safe to say that the duo were intentionally showcasing the snare drum’s creative potential. So, inspired by “Snare Thing”, here’s our 4-step method for writing creative snare patterns. But first… Tea!
Step 1. Motif
Set up two bars of 4|4 with your grid on 1/16 notes, and your tempo at 126 BPM. The first thing we need to do is write a motif, which is a short idea that’s repeated to give the music structure and make it more memorable.
As we’re writing for the drums, our motif will obviously be a rhythmic motif (when using pitched instruments, you can also write melodic and harmonic motifs). The motif that Matt and Tony use is a couple of 1/16 notes followed by a 1/16 rest. They then repeat this motif to create their snare rhythm.
Motif repeated to create snare rhythm
As you can see, their motif is three 1/16 notes long. Having a motif that’s an odd duration (like three, five, seven, etc.) will make it far more interesting, because each time the motif is repeated it’ll start on a different 1/16 note beat (e.g. 1a, 2+, 3e).
A motif lasting four (or eight) 1/16 notes will repeat on the same beat, so it’ll get repetitive and boring extremely quickly. Therefore, avoid using an even-number motif here. For the record, though, they can sound great when played on melodic instruments, because you can repeat the same rhythm while changing the pitches.
Right, when you’re happy with your motif, copy and paste it into the first three 1/4 note beats of bar one. You wanna leave beat 4 open for now, as that’s where you’re gonna write a variation. Next, copy and paste your rhythm into bar two.
Snare rhythm copied and pasted into bar two (highlighted)
Now it’s time to write your variation in beat 4 of bar two. This variation will prevent the snare rhythm from getting boring, by turning it into a two-bar rhythm:
Two-bar snare rhythm created by adding variation (highlighted)
Step 2. Swing
With such an unusual snare rhythm, it would be completely acceptable to move on and write the kick drum pattern now. But, Matt and Tony have one more brilliant snare trick up their sleeves. Instead of using the regular straight grid that you hear in almost every song, they use a swing grid. This is a game-changer! Download the PDF to read the rest of this tutorial…
Download PDF Tutorial
Lastly, are you new to music theory? Or are you experienced, but you want a refresher? Then download our FREE BOOK (link opens in new tab). It only takes 30 minutes to read, then you’ll have a solid theory foundation that you can instantly apply to your songwriting and producing. Enjoy!
If the FREE BOOK link doesn't work, just visit our BOOKS page:
https://hackmusictheory.com/books
Ray Harmony
Multi award-winning college lecturer
How to Write Better Snare Rhythms • Music Theory from Matt Sassari & Tony Romera "Snare Thing"
How to Write
Better Snare Rhythms.
Download Tutorial as PDF
includes MIDI + WAV file examples
While it’s normal to hear at least a few different kick patterns and hi-hat patterns in music nowadays, it’s rare to hear an interesting snare pattern. The rhythm assigned to this neglected element of the drumkit is almost always an afterthought. In 4|4 (which most music is in), the snare is usually one of these three rhythms:
Regular backbeat (beats 2 and 4): used in most songsHalf-time backbeat (beat 3): used for a slower vibeDouble-time backbeat (beats 1+, 2+, 3+, 4+): used for a faster vibe
So, when listening through to the new releases on Spotify, it was rather shocking (pleasantly so) to hear something completely unusual. The collaborative single “Snare Thing” by French producers Matt Sassari and Tony Romera is a refreshing celebration of the drum that almost always plays the most boring rhythm!
With these PDF tutorials, we usually have to make an educated guess as to what the creator’s intention and process was behind the song. But, based on the less-than-subtle title of their track, it’s safe to say that the duo were intentionally showcasing the snare drum’s creative potential. So, inspired by “Snare Thing”, here’s our 4-step method for writing creative snare patterns. But first… Tea!
Step 1. Motif
Set up two bars of 4|4 with your grid on 1/16 notes, and your tempo at 126 BPM. The first thing we need to do is write a motif, which is a short idea that’s repeated to give the music structure and make it more memorable.
As we’re writing for the drums, our motif will obviously be a rhythmic motif (when using pitched instruments, you can also write melodic and harmonic motifs). The motif that Matt and Tony use is a couple of 1/16 notes followed by a 1/16 rest. They then repeat this motif to create their snare rhythm.
Motif repeated to create snare rhythm
As you can see, their motif is three 1/16 notes long. Having a motif that’s an odd duration (like three, five, seven, etc.) will make it far more interesting, because each time the motif is repeated it’ll start on a different 1/16 note beat (e.g. 1a, 2+, 3e).
A motif lasting four (or eight) 1/16 notes will repeat on the same beat, so it’ll get repetitive and boring extremely quickly. Therefore, avoid using an even-number motif here. For the record, though, they can sound great when played on melodic instruments, because you can repeat the same rhythm while changing the pitches.
Right, when you’re happy with your motif, copy and paste it into the first three 1/4 note beats of bar one. You wanna leave beat 4 open for now, as that’s where you’re gonna write a variation. Next, copy and paste your rhythm into bar two.
Snare rhythm copied and pasted into bar two (highlighted)
Now it’s time to write your variation in beat 4 of bar two. This variation will prevent the snare rhythm from getting boring, by turning it into a two-bar rhythm:
Two-bar snare rhythm created by adding variation (highlighted)
Step 2. Swing
With such an unusual snare rhythm, it would be completely acceptable to move on and write the kick drum pattern now. But, Matt and Tony have one more brilliant snare trick up their sleeves. Instead of using the regular straight grid that you hear in almost every song, they use a swing grid. This is a game-changer! Download the PDF to read the rest of this tutorial…
Download PDF Tutorial
Lastly, are you new to music theory? Or are you experienced, but you want a refresher? Then download our FREE BOOK (link opens in new tab). It only takes 30 minutes to read, then you’ll have a solid theory foundation that you can instantly apply to your songwriting and producing. Enjoy!
Ray Harmony
Multi award-winning college lecturer


