Mahindra Morar's Blog
July 6, 2025
Azure Function App Circuit Breaker Pattern: Managing Function Triggers at Scale
In today’s cloud-native world, building resilient systems is more important than ever. As teams adopt microservices and rely on various downstream dependencies, it becomes crucial to handle failures gracefully. One common challenge when working with Azure Functions is how to temporarily pause message processing. In this post, we’ll explore how to implement a circuit breaker pattern that allows you to programmatically disable and re-enable function triggers, helping your system recover smoothly without losing data or overwhelming dependent services.
If you’re using Azure Functions at scale, you’ve likely encountered scenarios where you need to temporarily pause processing:
A critical downstream service is experiencing an outageYou’ve hit API rate limits with an external serviceYou’re performing maintenance on dependent systemsYou need to recover from an incident without processing new eventsManually disabling function triggers through the Azure Portal is cumbersome and doesn’t scale well. Automating this process provides more reliability and helps prevent cascading failures across your architecture.
The SolutionThe solution is based on an Azure Function App called called FuncTriggerManager which provides a circuit breaker pattern implementation for other Azure Function Apps. It allows you to programmatically enable or disable function triggers.

Let’s walk through the flow at a high level:
Function Triggered by MessageAn Azure Function is triggered by a message from a Service Bus queue or topic.Processing and API Call
The function processes the message and attempts to forward it to a downstream API.Failure Detected
If the API responds with an HTTP 503 (Service Unavailable), the function logs the error and sends a control message to an Azure Storage Queue.Trigger Manager Disables Function
A separate Function App (FuncTriggerManager) listens to this queue, disables the affected Function App, and places another message on the queue with a scheduled delay.Function Re-enabled
After the delay, the manager function re-enables the original Function App, allowing message processing to resume once the downstream service is likely to have recovered.
Key Features
Queue-based control: Send simple messages to enable/disable specific functionsAutomatic re-enablement: Set a time period after which functions automatically resumeMinimal permissions: Uses managed identity with least privilege accessSimple integration: Minimal code changes needed in your existing functionsHow it worksThe solution consists of an Azure Function with a queue trigger that:
Monitors a designated storage queue for control messagesParses instructions about which function to enable/disableUses Azure Resource Manager APIs to modify the function’s settingsIf configured, automatically re-enables functions after a specified periodHere’s what the control message looks like:
{ "FunctionAppName": "YourFunctionAppName", "FunctionName": "SpecificFunctionName", "RessourceGroupName": "YourResourceGroupName", "DisableFunction": true, "DisablePeriodMinutes": 30}When this message is processed, the specified function will be disabled for 30 minutes, then automatically re-enabled. If you set DisablePeriodMinutes to 0 or omit it, the function will remain disabled until explicitly enabled.
Full source code of the solution can be found here https://github.com/connectedcircuits/funcappshortcct
Implementation DetailsUnder the hood, FuncTriggerManager uses the Azure Management APIs to modify a special application setting called AzureWebJobs..Disabled that controls whether a specific function trigger is enabled. This is the same mechanism used by the Azure Portal when you manually disable a function.
The FuncTriggerManager service authenticates using its managed identity with the following permissions applied to the Function App you wish to control.
Reader access to the resource group of function apps to controlWebsite Contributor permissions on target function apps to controlTesting with a Sample Function AppI have included a sample Function App so you can follow how to send a control message onto the storage queue. This sample Function App is triggered when a message is placed onto a Service Bus queue. It then sends the message to a HTTP endpoint which represents an API. If it returns a status code of 5xx a control message is placed onto the Storage Account queue to disable its trigger.
The test function simulates a real-world scenario where you might need to temporarily disable message processing triggered messages from a Service Bus queue.
The source code for sample simulator can be found here – https://github.com/connectedcircuits/FuncSbProxy-funcappshortcct-
Getting StartedTo implement this pattern in your environment:
Deploy the FuncTriggerManager function app with managed identitySet up the required app settings:StorageConnection: Connection string to your Azure StorageQueueName: Name of the queue to monitorAzureSubscriptionId: Your Azure subscription IDDevelop your Function App service and copy the DisableFuncMessenger.cs (as in the sample FuncSbProxy)Setup the required app setting your Function App serviceStorageConnection: Connection string to your Azure StorageQueueName: Name of the queue to monitorResourceGroupName: Name of the Azure Resource where this function app will be deployed to.DisableFuncPeriodMin: Time in minutes you want disable the trigger for.Real-World Use CasesHere are some scenarios where I’ve found this pattern particularly useful:
Scenario 1: Downstream Service Outage
When an external API reports a 503 Service Unavailable error, your error handling code can place a message in the circuit breaker queue to disable the corresponding function until the service recovers.
Scenario 2: Rate Limit Protection
If your function processes data that interacts with rate-limited APIs, you can temporarily disable processing when approaching limits and schedule re-enablement when your quota resets.
ConclusionThe circuit breaker pattern is essential for building resilient systems, and having an automated way to implement it for Azure Functions has been invaluable in our production environments. FuncTriggerManager provides a simple yet powerful approach to managing function trigger states programmatically.
By incorporating this pattern into your Azure architecture, you can improve resilience, reduce cascading failures, and gain more control over your serverless workflows during incidents and maintenance windows.
Note: Remember to secure your circuit breaker queue appropriately as it provides control over your function apps’ operation.
Enjoy…
June 13, 2024
Automate Resource Management with Azure DevOps Pipeline Schedules
In today’s fast-paced business environment, managing cloud resources efficiently is crucial to optimizing costs and enhancing security. One effective strategy is to provision resources at the start of the business day and decommission them at the end of the day. This approach helps in reducing hosting costs and minimizing the surface area of any security risks.
Why Automate Resource Management?
Many businesses operate on a standard business day schedule, typically from 9 AM to 5 PM. However, resources such as virtual machines, databases, and storage accounts often remain active 24/7. This continuous operation can lead to unnecessary costs and increased security risks, especially if the resources are not adequately monitored outside business hours.
Automating the provisioning and decommissioning of resources provides several benefits:
Cost Reduction: By only running resources during business hours, you can significantly reduce hosting costs.Security: Decommissioning resources when not in use reduces the attack surface, thus minimizing potential security risks.Efficiency: Automation reduces the manual overhead of managing resources, allowing your team to focus on more critical tasks.In this blog, we will explore how you can use Azure DevOps pipeline schedules to automate this process.
The Solution
By leveraging pipeline schedules, businesses can automate the provisioning of resources at the start of the business day and decommission them at the end of the day. More about pipeline schedules can be found here – https://learn.microsoft.com/en-us/azure/devops/pipelines/process/scheduled-triggers?view=azure-devops&tabs=yaml
Schedules are added to your pipelines as a cron job where you can specify the time and the days that the pipeline will be triggered. The sample cron job below will trigger the pipeline to run at 7.00am UTC for every work day.

The solution involves two pipelines, one is used for provisioning your resources which is a typical YAML pipeline that you would normally develop to provision your resources. The other pipeline is used for decommissioning your resources. This pipeline uses Azure CLI commands to delete resources by type which you can specify as a variable string. In the example below, this will delete all VM’s, NIC’s and Storage Accounts in the specified Azure resource group.

Source code for a working example can be found here – https://github.com/connectedcircuits/schedule-pipelines. This sample will provision a storage account at 7:00am NZ time and then decommission the resources in the specified Azure Resource Group at 6:00pm NZ time every working day.
You can also add approval gates to the pipelines for added control of provisioning or decommissioning the resources.
Conclusion
By leveraging Azure DevOps pipeline schedules, you can automate the provisioning and decommissioning of resources to align with your business hours. This not only helps in reducing hosting costs but also minimizes the surface area of any security risks. Implement this strategy in your workflow to ensure efficient and secure resource management.
Start automating your resource management today to maximize efficiency and security in your cloud environment!
Enjoy…
May 21, 2023
Always Threat Model Your Applications
The Why
The motivation of a cyber attacker may fall into one or more of these categories financial gain, political motives, revenge, espionage or terrorism. Once an attacker gets in they may install malware, such as a virus or ransomware. This can disrupt operations, lock users out of their systems, or even cause physical damage to infrastructure. Understanding the motives behind cyber attacks helps to prevent and respond to them effectively.
The primary goal of threat modelling is to identify vulnerabilities and risks before they can be exploited by attackers, allowing organizations to take proactive measures to mitigate these risks.
This should include a list of critical assets and services that need to be protected. Examine the points of data entry or extraction to determine the surface attack area and check if user roles have varying levels of privileges.
Threat modelling should begin in the early stages of the SDLC, when the requirements and the design of the system are being established. This is because the earlier in the SDLC that potential security risks are identified and addressed, the easier and less expensive they are to mitigate. Also, it is advisable to engage your security operations team early in the design phase. Due to the sensitive nature of the threat modelling document, it would be advisable to label the document as confidential and not distribute freely within an organisation.
It is important to revisit the threat model to identify any new security risks that may have emerged and when new functionality is added to a system, or as the system is updated or changed.
Threat modelling is typically viewed from an attacker’s perspective instead of a defender’s viewpoint. Remember the most likely goal or motive of an attacker is information theft, espionage or sabotage. When modelling your threats, ensure you include both externally and internally initiated attacks.
To assist in determining the possible areas of vulnerabilities, a data flow diagram (DFD) would be beneficial. This will give a visual representation of how the application processes the data and highlights any persistent points. It helps to identify the potential entry points an attacker may use and the paths that they could take through the system to reach critical data or functionality.
The How
Let’s go through the process of modelling a simple CRM website which maintains a list of customers stored in a database hosted in Azure.
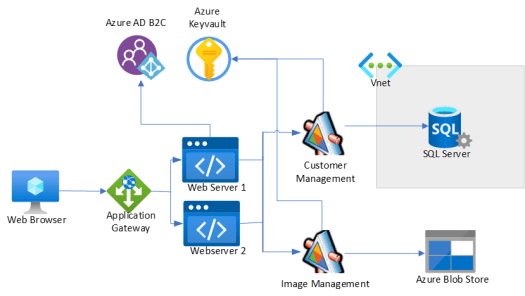
The hypothetical solution uses a Web Application Gateway to provide HA (High Availability) using two webservices. There are also two microservices, one manages all the SQL Database CRUD operations for customers and the other manages all customers images that are persisted to a blob store. Connection strings to the database are stored in Azure Key vault. Customers use their social enterprise identities to gain access to the website by using Azure AD B2C.
The help with the process of threat modelling the application, a DFD (Data Flow Diagram) is used to show the flow of information between the processors and stores. Once the DFD is completed, add the different trust boundaries on the DFD drawing.
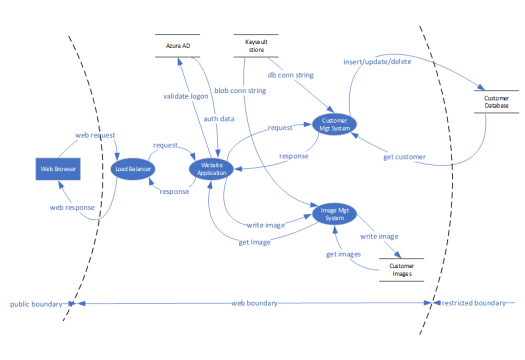 DFD Diagram of the CRM solution
Next, we will start the threat modelling process to expose any potential threats in the solution. For this we use the STRIDE Model developed by Microsoft https://learn.microsoft.com/en-us/azure/security/develop/threat-modeling-tool-threats#stride-model. There are other modelling tools available such as PASTA (Process for Attack Simulation and Threat Analysis), LINDDUN (link ability, identifiability, nonrepudiation, detectability, disclosure of information, unawareness, noncompliance), Common Vulnerability Scoring System (CVSS) and Attack Trees.
The STRIDE framework provides a structured approach to identifying and addressing potential threats during the software development lifecycle
STRIDE is an acronym for Spoofing, Tampering, Repudiation, Information disclosure, Denial of Service, and Elevation of privilege.
The method I use involves creating a table that outlines each of the STRIDE categories, documenting potential threats and the corresponding mitigation measures. Use the DFD to analyse the security implications of data flows within a system and identify potential threats for each of the STRIDE categories. The mitigation may include implementing access controls, encryption mechanisms, secure authentication methods, data validation, and monitoring systems for suspicious activities.
Spoofing (Can a malicious user impersonate a legitimate entity or system to deceive users or gain unauthorized access)
IdThreatRiskMitigationSF01Unauthorized user attempts to impersonate a legitimate customer or administrator accountModerateUsers authenticate using industrial authentication mechanisms and Administers enforced to use MFA. Azure AD monitoring to detect suspicious login activities.SF02Forgery of authentication credentials to gain unauthorized access.LowToken based authentication is used to protect against forged credentialsTampering (Can a malicious user modify data or components used by the system?)
IdThreatRiskMitigationTP01Unauthorized modification of CRM data in transit or at rest.ModerateTLS transport is used between all the components. SQL Database and Blob store are encrypted at rest by default.TP02Manipulation of form input fields to submit malicious data.HighData validation and sanitation is performed at every system process. Configure the Web Application Firewall (WAF) rules to mitigate potential attacks.TP03SQL injection attacks targeting the SQL Database.ModerateSecure coding practices to prevent SQL injection vulnerabilities. Configure the Web Application Firewall (WAF) rules to mitigate potential attacks.TP04Unauthorized changes to the CRM website’s code or configuration.LowSource code is maintained in Azure Devops and deployed using pipelines which incorporate code analyses and testing.Repudiation (Can a malicious user deny that they performed an action to change system state?)
IdThreatRiskMitigationRP01Users deny actions performed on the CRM website.LowLogging and audit mechanisms implemented to capture user actions and system eventsRP02Attackers manipulate logs or forge identities to repudiate their actions.ModerateAccess to log files are protected by RBAC roles.Information Leakage (Can a malicious user extract information that should be kept secret?)
IdThreatRiskMitigationIL01Customer data exposed due to misconfigured access controls. HighFollow the principle of least privilege and enforce proper access controls for CRM data. IL02Insecure handling of sensitive information during transit or storage. HighEncryption for sensitive data at rest and TLS is used when in transit. Improperly configured Blob Store permissions leading to unauthorized access to customer images.ModerateRegularly assess and update Blob Store permissions to ensure proper access restrictions.Elevation of Privilege (Can a malicious user escalate their privileges to gain unauthorized access to restricted resources or perform unauthorized actions?)
IdThreatRiskMitigationEP01Unauthorized users gaining administrative privileges and accessing sensitive functionalities.ModerateSensitive resource connection strings stored in Key vault. Implement network segmentation and access controls to limit lateral movement within Azure resources. SQL Database hosted inside VNet and access controlled by NSGEP02Exploiting vulnerabilities to escalate user privileges and gain unauthorized access to restricted data or features.LowRegularly apply security patches and updates to the CRM website and underlying Azure components. Conduct regular security assessments and penetration testing to identify and address vulnerabilities.Alternative Approach
Instead of going through this process yourself, Microsoft offer a threat modeling tool which allows you to draw your Data Flow Diagram that represents your solution. Then the tool allows you to generate an HTML report of all the potential security issues and suggested mitigations. The tool can be downloaded from here https://learn.microsoft.com/en-us/azure/security/develop/threat-modeling-tool
Conclustion
With the rising sophistication of attacks and the targeting of critical infrastructure, cyber threats have become increasingly imminent and perilous. The vulnerabilities present in the Internet of Things (IoT) further contribute to this escalating threat landscape. Additionally, insider threats, risks associated with cloud and remote work, and the interconnected nature of the global network intensify the dangers posed by cyber threats.
To combat these threats effectively, it is crucial for organisations and individuals to priorities cybersecurity measures, including robust defenses, regular updates, employee training, and strong encryption techniques.
By reading this article, it is hoped that the significance of incorporating threat modeling into your application development process is emphasized.
March 27, 2023
How Business Process Management Can Transform Your Business

Article written and submitted by Mary Shannon, email maryshannon@seniorsmeet.org
Would you like to improve compliance and efficiency in your company to get better results from your processes? Business process management (BPM) can help you do just that. According to Gartner, 75% of organizations are in the process of standardizing their operations to stay competitive in today’s market. Connected Circuits outlines the basics you need to know about the BPM methodology and how adopting it can transform your business.
What Is BPM?
BPM is a discipline that uses methods and tools to create a successful business strategy to coordinate the behavior of your employees with the operational systems you have in place. It looks for ways to eliminate rework in your company’s routine business transactions and increase your team’s efficiency.
What Are the Benefits of BPM?
BPM helps you streamline your operations, allowing you to achieve larger company goals. It also helps you take advantage of digital transformation opportunities. Here are the top benefits of adopting this methodology:
Eliminates workflow bottlenecksCreates more agile workflowsReduces costsIncreases revenuesProvides security and safety complianceHow Do I Get Started?
There are several steps to follow when implementing BPM at your company.
1. Get Your Staff On Board With the Change
To be successful, your entire staff needs to be on board with the change. Take the time to communicate with your leaders and employees how this process will help create a more productive workflow that results in lower costs, higher revenues and happier customers.
2. Select the Right Methodology and Tools
You will find several options to choose from to reach your goals. Two of the most popular are Lean or Six Sigma. Select the one that meets your needs and falls within your current budget. You can always upgrade to a more extensive program in the future.
Before investing in any technical tools or software, make sure help is available when you have technical problems with the program or tool. A great way to test this before you make a purchase is to call their support desk during your business hours to determine if assistance is available as promised.
3. Design a New Process
First, take a look at the current processes in place to make sure they align with your goals and are in compliance with any regulations. Then, look for any overlap of tasks that are no longer necessary. Finally, Integrify suggests designing a new process model to streamline operations and increase efficiency. Include Key Process Indicators (KPIs) to measure your results.
4. Implement the New Process
It’s a good idea to first test the new process with a small group of users to work out any unexpected issues before releasing it on a larger scale.
5. Analyze the Results
After implementing the new process, it’s time to analyze the results. Use your KPIs to track your metrics in each process to determine if this model is successful. The data may show the need to make additional adjustments to the workflow.
6. Optimize Your Company’s Processes
Use the data collected in your results to create an overall strategy to streamline and strengthen your business processes.
Adopting the BPM methodology at your company can transform your business by making your operations more efficient. These changes ultimately lead to an improved experience for your customers and higher profits for your company.
Connected Circuits zeroes in on the integration between wetware (people), hardware and software using various technologies. Contact us today to learn more !
February 5, 2023
DevOps Pipeline Token Replacement Template
There are times when you simply need to replace tokens with actual values in text files during the deployment phase of a solution. These text files may be parameter or app setting files or even infrastructure as code files such as ARM/Bicep templates.
Here I will be building a reusable template to insert the pipeline build number as a Tag on some LogicApps every time the resources are deployed from the release pipeline. Using the process describe below can easily be used to replace user defined tokens in other types of text files by supplying the path to the file to search in, the token signature and the replacement value.
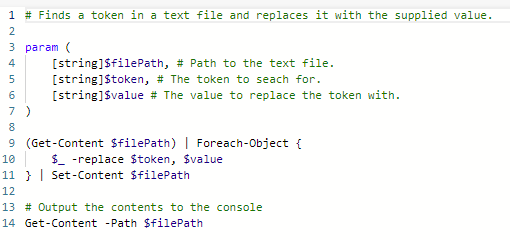
I used the PS script below to read in the text file contents and then search and replace the token with the required value. The PS script uses several parameters so it may be reused throughout the release pipeline for many different text file types and tokens.
The PS script is called from a template file below which takes a list of files to search as one of the template parameters. This allows me to search for the token across multiple files in one hit. The template iterates through each file calling the PS script and passing the file path and the other required parameters.
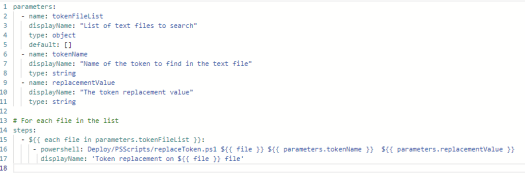
The yml release pipeline file is shown below which calls the template at line 19 to replace the tokens in the LogicApp.parameters.json files. In this scenario, the token name to search for is specified at line 24. You need to ensure the chosen token name does not clash with any other valid text.
The last step at line 27 deploys the LogicApps to the specified resource group.

Executing the pipeline will read the following LogicApp parameter file from the source code folder on the build agent and then replace the buildNumber token with the actual value.
{ "$schema": "https://schema.management.azure.com/s...#", "contentVersion": "1.0.0.0", "parameters": { "environment":{ "value": null }, "businessUnitName":{ "value": "n/a" }, "buildNumber":{ "value": "%_buildNumber_%" } }}After running through the token replacement step, the buildNumber is updated with the desired value.

The full source code for this article is available on Github here: https://github.com/connectedcircuits/tokenreplacement. I tend to use this template with my other blog about using global parameter files here: https://connectedcircuits.blog/2022/11/17/using-global-parameter-files-in-a-ci-cd-pipeline/
Enjoy…
November 17, 2022
Using Global Parameter Files in a CI/CD Pipeline
When developing a solution that has multiple projects and parameter files, more than likely these parameter files will have some common values shared between them. Examples of common values are the environment name, connection strings, configuration settings etc.
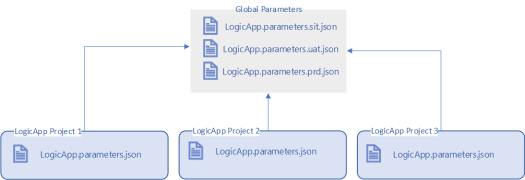
A good example of this scenario are Logic App solutions that may have multiple projects. These are typically structured as shown below where each project may several parameter files, one for each environment. Each of these parameter files will have different configuration settings for each of the 3 environments but are common across all the projects.

Keeping track of the multiple parameter files can be a maintenance issue and prone to misconfiguration errors. An alternative is to use a global parameter file which contains all the common values used across the projects. This global file will overwrite the matching parameter value in each of the referenced projects when the projects are built inside a CI/CD pipeline.
By using global parameter files, the solution will now look similar to that shown below. Here all the common values for each environment are placed in a single global parameter file. This now simplifies the solution as there is now only one parameter file under each project and all the shared parameter values are now in a global parameter file. The default global values for the parameter files under each Logic App project will typically be set to the development environment values.
The merging of the global parameter files is managed by the PowerShell script below.
# First parameter is the source param and the second is the destination param file.param ($globalParamFilePath,$baseParamFilePath)# Read configuration files$globalParams = Get-Content -Raw -Path $globalParamFilePath | ConvertFrom-Json$baseParams = Get-Content -Raw -Path $baseParamFilePath | ConvertFrom-Jsonforeach ($i in $globalParams.parameters.PSObject.Properties){ $baseParams.parameters | Add-Member -Name $i.Name -Value $i.Value -MemberType NoteProperty -force}# Output to console and overwrite base parameter file$baseParams | ConvertTo-Json -depth 100 |Tee-Object $baseParamFilePathThe script is implemented in the release pipeline to merge the parameter files during the build stage. A full working CI/CD pipeline sample project can be downloaded from my GitHub repo here https://github.com/connectedcircuits/globalParams
Using Environment variables available in Azure DevOPs is another option, but I like to keep the parameter values in code rather than have them scattered across the repo and environment variables.
Enjoy…
April 4, 2022
Azure APIM Content Based Routing Policy
Content based routing is where the message routing endpoint is determined by the contents of the message at runtime. Instead of using an Azure Logic App workflow to determine where route the message, I decided to use Azure APIM and a custom policy. The main objective of using an APIM policy was to allow me to add or update the routing information through configuration rather than code and to add a proxy API for each of the providers API endpoints.
Below is the high level design of the solution based on Azure APIM and custom policies. Here the backend ERP system sends a generic PO message to the PO Routing API which will then forward the message onto the suppliers proxy API based on the SupplierId contained in the message. The proxy API will then transform the generic PO to the correct format before being sent to the supplier’s API.
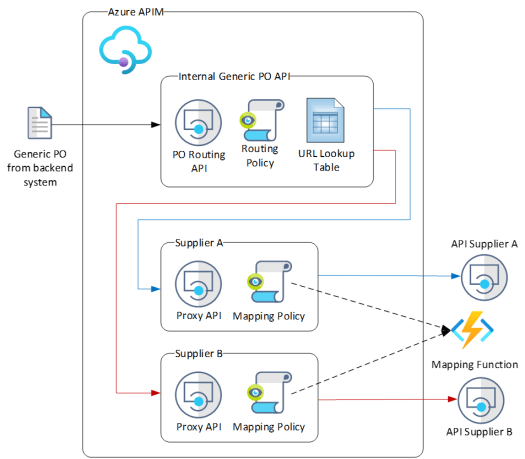
The main component of this solution is the internal routing API that accepts the PO message and uses a custom APIM Policy to read the SupplierId attribute in the message. The outbound URL of this API is then set to the internal supplier proxy API by using a lookup list to find the matching reroute URL for the SupplierId. This lookup list is a JSON array stored as a Name-Value pair in APIM. This allows us to add or update the routing information through configuration rather than code.
Here is the structure of the URL lookup list which is an array of JSON objects stored as a Name-value pair in APIM.
[ { "Name": "Supplier A", "SupplierId": "AB123", "Url": https://myapim.azure-api.net/dev/purc... }, { "Name": "Supplier B", "SupplierId": "XYZ111", "Url": https://myapim.azure-api.net/dev/purc... }, { "Name": "SupplierC", "SupplierId": "WAK345", "Url": https://myapim.azure-api.net/dev/purc... } ]PO Routing APIThe code below is the custom policy for the PO Routing API. This loads the above JSON URL Lookup list into a variable called “POList”. The PO request body is then loaded into a JObject type and the SupplierId attribute value found. Here you can use more complex queries if the required routing values are scattered within the message.
Next the URL Lookup list is converted into a JArray type and then searched for the matching SupplierId which was found in the request message. The variable “ContentBasedUrl” is then set to the URL attribute of the redirection object. If no errors are found then the backend url is set to the internal supplier’s proxy API and the PO message forwarded on.
// Get the URL Lookup list from the Name-value pair in APIM ("POList")); // Find the AccountId in the json array var arr = jsonList.Where(m => m["SupplierId"].Value() == (string)supplierId); if(arr.Count() == 0 ) { return "ERROR - No matching account found for :- " + supplierId; } var url = ((JObject)arr.First())["Url"]; if( url == null ) { return "ERROR - Cannot find key 'Url'"; } return url.ToString(); } catch( Exception ex) { return "ERROR - Invalid message received."; } }" /> @((string)context.Variables["ContentBasedUrl"]) Supplier Proxy API
A proxy API is created for each of the suppliers in APIM where the backend is set to the suppliers API endpoint. The proxy will typically have the following policies.

The primary purpose of this proxy API is to map the generic PO message to the required suppliers format and to manage any authentication requirements. See my other blog about using a mapping function within a policy https://connectedcircuits.blog/2019/08/29/using-an-azure-apim-scatter-gather-policy-with-a-mapping-function/ There is no reason why you cannot use any other mapping process in this section.
The map in the Outbound section of the policy takes the response message from the Suppliers API and maps it to the generic PO response message which is then passed back to the PO Routing API and then finally to the ERP system as the response message.
Also by adding a proxy for each of the supplier’s API provides decoupling from the main PO Routing API, allowing us to test the suppliers API directly using the proxy.
The last step is to add all these API’s to a new Product in APIM so the subscription key can be shared and passed down from the Routing API to the supplier’s proxy APIs.
Enjoy…
December 22, 2021
Enterprise API for Advanced Azure Developers
For the last few months I have busy developing the above course for EC-Council. This is my first endeavour doing something like this and wanted to experience the process of creating an online course.
You can view my course here at https://codered.eccouncil.org/course/enterprise-api-for-advanced-azure-developers and would be keen to get your feedback on any improvements I can make if I do create another course in the future.
The course will take you through the steps of designing and developing an enterprise-ready API from the ground up, covering both the functional and non-functional design aspects of an API. There is a total of 7 chapters equating to just over 4 hours of video content covering the following topics:
Learn the basics of designing an enterprise level API.Learn about the importance of an API schema definition.
Learn about the common non-functional requirements when designing an API.
Develop a synchronous and asynchronous API’s using Azure API App and Logic Apps
Understand how to secure your API using Azure Active Directory and custom roles.
Set up Azure API Management and customizing the Developer Portal.
Create custom APIM polices.
Configure monitoring and alerting for your API.
Enjoy…
July 14, 2021
Small Business Owners Should Avoid These App-Development Mistakes
Article written and submitted by Gloria Martinez, email info@womanled.org
Developing an app for your business is a great way to tune into the wants and needs of your customer base, but it’s important to take your time and do it right. Many apps begin as strong ideas but lose something in the execution, making things like beta testing and User Acceptance Testing essential parts of the process. While this can help you work out kinks in the design, it’s also the best way to ensure that your app meets your goals. Presented by Connected Circuits, here are a few tips on how you can avoid common development mistakes when you’re ready to create your own app.
Recruit the best talentAs with any important project, it’s crucial to start by finding the best talent for the job. The right app designer will keep both your needs and a user-friendly element in mind as they create your app, ensuring that the end result is consistent when used across multiple products and devices. These days, finding mobile app designers is easier than ever with job boards that give you access to experienced designers. You can read reviews of their work, see pricing, and compare timeframes for a finished product.
When you hire someone to handle the job, make sure you understand how to properly pay for their services. If you haven’t done so already, you need to set up your payroll system. There are many time tracking apps that allow your employees to access schedules and team management information. What’s more, these apps allow you to access this info from mobile devices.
Have a clear visionWhen you don’t have a clear vision for a project, the end result will likely be difficult for your customers to understand and use. Define your goals from the very beginning — not only is this essential for your own success, but also for the success of your designer. Do market research to find out what other businesses are doing with their apps, and think about what you could bring to the table that’s different. Who is your target customer? Be realistic when it comes to your reasons for developing an app, asking yourself whether there truly is a need for it or if you’re simply trying to keep up with the times.
Offer plenty of reasons to come backNot only does your app need to be necessary, but it also needs to offer your customers the features they want while providing meaningful analytics and other benefits for you. Many users these days are fickle when it comes to tech and don’t have much patience for apps that lag, have nothing special to offer, or are full of bugs, so you may only have a minute or so of user experience before they give up and try something else. Blow them away with easy-to-use design and features that will make their lives easier, such as swift, secure payment options and reminders for sales, events, and billing. When they can see the benefits right away, they’ll be more likely to return and keep using the service.
Keep it simpleWhile the app should have everything your customer wants and needs, it shouldn’t be complicated. Your business app should stay simple in design and execution, making it easy for even inexperienced users to interact with. Think about the most important elements of the app and make those the star attraction, stripping down extras to streamline. In beta testing, users should be able to quickly figure out how to navigate the app to find what they’re looking for. Keep in mind that you’ll want to have a backup plan in place before your product goes into beta testing so that small changes can easily be made. Remember, as well, that the beta testing process requires some planning in order to receive the most accurate feedback.
Developing an app for your business takes time and lots of thoughtful planning, and it also requires quite a bit of research. Make sure your goals have a realistic timeline, as this will prevent unnecessary stress on both you and your designer. With the right moves, you can create a successful app that benefits both you and your customers.
Photo via Pexels
June 5, 2021
Always Linter your API Definitions
An API definition may be thought of as an electronic equivalent of a receptionist for an organisation. A receptionist is normally the first person they see when visiting an organisation and their duties may include answering enquires about products and services.
This is similar to an API definition, when someone wants to do business electronically, they would use the API definition to obtain information about the available services and operations.
My thoughts are, API’s should be built customer first and developer second. Meaning an API needs to be treated as a product and to make it appealing to a consumer, it needs to be designed as intuitive and usable with very little effort.
Having standardised API definition documents across all your API’s, allows a consumer to easily navigate around your API’s as they will all have a consistent look and feel about them. This specially holds true when there are multiple teams developing Microservices for your organisation. You don’t want your consumers think they are dealing with several different organisations because they all look and behave differently. Also, when generating the client object models from several different API definitions from the same organisation, you want the property names to all follow the same naming conventions.
To ensure uniformity across all API schema definitions, a linter tool should be implemented. One such open-source tool is Spectral https://github.com/stoplightio/spectral from Stoplight, however there are many other similar products available.
Ideally the validation should be added as a task to your CI/CD pipelines when committing the changes to your API definition repository.
Using Spectral in MS DevOps API ProjectsSpectral provides the capability to develop custom rules as a yaml or json file. I typically create a separate DevOps project to store these rules inside a repository which may be shared across other API projects.
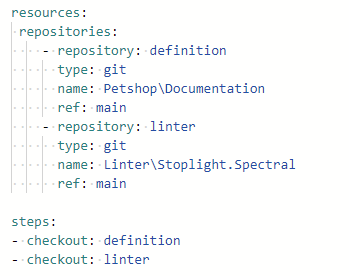
Below is how I have setup the repositories section in the pipeline to include the linter rules and the API definition.
After downloading the Spectral npm package in the pipeline, I then run the CLI command to start the linter on the schema specification document which is normally stored in a folder called ‘specification’ in the corresponding API repository.
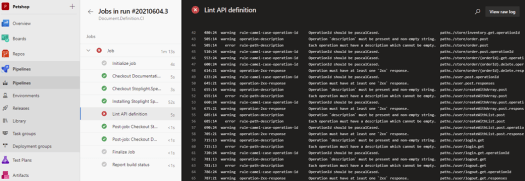
An example of the pipeline job can be seen below. Here the job failed due to some rule violations.
The build pipeline and sample rules can be found here https://github.com/connectedcircuits/devops-api-linter
Hope this article now persuades you to start using Linter across all your API definitions.
Enjoy…
Mahindra Morar's Blog
- Mahindra Morar's profile
- 1 follower


