
Mahindra Morar's Blog, page 2
February 15, 2021
Using Azure Event Grid for Microservice Data Synchronisation
This blog is about using the Event Driven architecture pattern to synchronise data across multiple services. I typically use this when several Microservices have their own database (Database per service) and are required to either cache or locally persist slow changing data as read-only retrieved from another source.
I mentioned slow changing data because using this pattern provides eventual data consistency. If data changes too rapidly, the subscribers may never keep up with the changes.
This other source would typically be an authoritative Microservice that sends out an event to any interested parties whenever its data has been modified. The events are typically lightweight and there is no strong contract between publisher and subscribers. Normally these events do not contain the updated data, it’s simply a notification to say something has been updated. If you want the actual changes, then come a get it by using another mechanism. This could be a HTTP Request/Response on another endpoint belonging to the authoritative service.
Microservices that cache or persisting external data locally have the following benefits:
Removes the dependency from any authoritative Microservices.Avoids API Composition by not having to query across multiple services.Improved overall performance of the Microservice.Promotes loose coupling between Microservices.Reduces network traffic and chatter between Microservices.Below is the high level solution using Azure Event Grid to publish events and Logic Apps as subscribers.

![clip_image001[7]](https://i1.wp.com/connectedcircuits.blog/wp-content/uploads/2021/02/clip_image0017.png?ssl=1)
Whenever specific data is updated in the authoritative Microservice, the service will also publish an event to Azure Event Grid as it provides a lightweight HTTP call-back function to the registered subscribers.
A Logic App is used as the event handler with a HTTP Trigger and will be the call-back endpoint for the Event Grid subscriber. Using a Logic App abstracts the data synchronisation process away from the actual downstream Microservice logic. Also the Logic App provides a number of available connectors for different data stores out of the box if pushing the data directly to the database is desired. Or the other alternative is the Logic App calls an API endpoint on the downstream Microservice to update the repository.
Use-caseA typical scenario would be an E-Commerce website which manages online orders from customers. This type of application would normally comprise of multiple Microservices. This may involve a CRM service which will be the authoritative service for the customer information, a Delivery service that manages the dispatch of orders.
To improve the performance of the Delivery service, a copy of the customers address would be persisted in the local database rather than query CRM each time an order is to be dispatched. This removes the dependency on the CRM service being available when dispatching orders..
This E-Commerce solution may also incorporate an Accountancy service which publishes an event whenever the customer’s account status changes from active to on-hold or vice versa. The Cart and Delivery Microservices would subscribe to this this event and persist the status of the customer locally. Again it’s the same architecture pattern as before except the event data may contain the customer’s account status as this data would be relatively small.
Below is the complete sequence diagram of the events between the artefacts.
![clip_image001[9]](https://i1.wp.com/connectedcircuits.blog/wp-content/uploads/2021/02/clip_image0019.png?ssl=1)
Whenever the website calls the CRM service to update the customers information, the service will also publish a custom event to the Azure Event Grid Topic.
The structure of the data payload has several properties, the customer Id, the event source and the CRM endpoint URL to retrieve the updated data. The value in the CallbackUrl property is what the Logic App will use to retrieve the full address dataset from the CRM service.
![clip_image001[11]](https://i1.wp.com/connectedcircuits.blog/wp-content/uploads/2021/02/clip_image00111.png?ssl=1)
![clip_image001[13]](https://i2.wp.com/connectedcircuits.blog/wp-content/uploads/2021/02/clip_image00113.png?ssl=1)
For the event handler, a Logic App with a Http request trigger is used. This provides the necessary workflow logic and built-in connectors to query the CRM service via HTTP and then update the Delivery Microservice database using the SQL Db connector.
Simple POCTo simulate the CRM service publishing events, I created a simple console app to publish several events onto the Event Grid. The code for the console app can be found here: https://github.com/connectedcircuits/azureeventgridpub
The Logic App workflow is shown below. The ‘For each Event’ iterates through each event calling the CRM endpoint defined in the event data. The switch task evaluates the event subject to determine the crud operation and the Db stored procedure to call to update the local database.
![clip_image001[15]](https://i0.wp.com/connectedcircuits.blog/wp-content/uploads/2021/02/clip_image00115.png?ssl=1)
Below is a sample received HTTP request sent by Azure Event Grid and the event subscription filter is based on the eventType and subject values.
![clip_image001[17]](https://i0.wp.com/connectedcircuits.blog/wp-content/uploads/2021/02/clip_image00117.png?ssl=1)
Enabling the dead lettering feature of the Azure Event Grid is recommended to track which consumers are not responding to the events and remember to setup alerting and monitoring around this.
If a subscriber misses a notification event, what kind of compensation transaction should occur. If events are received out of order, what should happen. These types of questions are typically answered by the business analyst.
Some form of event tracking mechanism should also be incorporated into the solution. Imagine there may be several hundred events per minute and trying to trace an event to a subscriber would be quite difficult. This could involve using a session Id that can be tracked across all services involved in the event.
When there are multiple subscribers interested in the same event and they all call the same endpoint to retrieve the full dataset, the authoritative Microservice should use some form of caching mechanism on the response object to improve performance.
Enjoy….


August 17, 2020
Extracting Claims from an OAuth Token in an Azure Function
This is a follow up from my previous blog on adding custom application claims to an App registered in AAD (https://connectedcircuits.blog/2020/08/13/setting-up-custom-claims-for-an-api-registered-in-azure-ad/). In this article I will be developing an Azure Function that accepts an OAuth token which has custom claims. The function will validate the token and return all the claims found in the bearer token as the response message.
Instead of using the built-in Azure AD authentication and authorization support in Azure Functions, I will be using the NuGet packages Microsoft.IdentityModel.Protocols and System.IdentityModel.Tokens.Jwt to validate the JWT token. This will allow decoding of bearer tokens from other authorisation providers.
These packages uses the JSON Web Key Set (JWKS) endpoint from the authorisation server to obtain the public key. The key is then used to validate the token to ensure it has not been tampered with. The main advantage of this option is you don’t need to worry about storing the issuer’s public key and remembering to update the certs before they expire.
Function Code
The full code for this solution can found on my github repository https://github.com/connectedcircuits/azOAuthClaimsFunct.
Below is a function which returns the list of signing keys from the jwks_uri endpoint. Ideally the response should be cached, as downloading the keys from the endpoint can take some time.
// Get the public keys from the jwks endpoint
private static async Task> GetSecurityKeysAsync(string idpEndpoint )
{
var openIdConfigurationEndpoint = $"{idpEndpoint}.well-known/openid-configuration";
var configurationManager = new ConfigurationManager(openIdConfigurationEndpoint, new OpenIdConnectConfigurationRetriever());
var openIdConfig = await configurationManager.GetConfigurationAsync(CancellationToken.None);
return openIdConfig.SigningKeys;
}
The next part of the code is to configure the TokenValidationParameters properties with the authorisation server address, the audiences and the signing keys obtained from the GetSecurityKeysAsync function mentioned above.
TokenValidationParameters validationParameters = new TokenValidationParameters
{
ValidIssuer = issuer,
ValidAudiences = new[] { audiences },
IssuerSigningKeys = keys
};
Next is to validate the token and acquire the claims found in the token which is assigned to the Claims Principal object.
//Grab the claims from the token.
JwtSecurityTokenHandler handler = new JwtSecurityTokenHandler();
SecurityToken validatedToken;
ClaimsPrincipal principal;
try
{
principal = handler.ValidateToken(token, validationParameters, out validatedToken);
}
catch(SecurityTokenExpiredException ex)
{
log.LogError(ex.Message);
req.HttpContext.Response.Headers.Add("X-Error-Message", $"Token expired at {ex.Expires}");
return new UnauthorizedResult();
}
catch(Exception ex)
{
log.LogError(ex.Message);
return new UnauthorizedResult();
}
Once you have the principle object instantiated, you can use the IsInRole(“”) method to check if the token contains the role. This method will return a boolean true value if the role is found.
Runtime results
This is the token request for an app registered in Azure AD that has the crm.read and crm.write claims assigned.

This is the response from the Azure Function using the bearer token attained from AAD. Here you can see the two custom application claims crm.read and crm.write listed amongst the default claims.

This is another example of using Auth0 (https://auth0.com/) as an alternative authorisation server. The API was registered with full crud permissions added whilst the client was only given access to read & update roles. Below is the request sent to Auth0 for a token.

This is the response from calling the Azure Function using the Bearer token from Auth0 with the two custom claims crm:read and crm:update returned with the other default claims.

Conclusion
As you can see, you can use any authorisation server that supports a jwks_uri endpoint to acquire the public signing keys and when the generated token uses RS256 as the algorithm for signing and verifying the token signatures.
Enjoy…
August 13, 2020
Setting up custom Claims for an API registered in Azure AD
One way to further reduce the surface area attack on an API when using the Client Credential OAuth flow is to pass claims in the token. This adds another layer of security and provides more granular control over your API. By adding custom claims within the token, the API can inspect these and restrict what operations the client may perform within the API service. This may be just to limit basic crud type operations or some other type of grant requirement. More information about optional claims can be found here: https://docs.microsoft.com/en-us/azure/active-directory/develop/active-directory-optional-claims
Just to recall, Client Credentials flow is normally Client-to-Service requests and has no users involved in the flow. A Service Principal (SP) object is associated with the Client App when making calls to a backend service API. The value of this Id can be found under AAD Enterprise Applications and is the ObjectId of the application name. To ensure the SP used to call your API is the one you are expecting, use the oid or sub claims to validate the SP as another security check.
Also the Client Credentials flow is meant to be used with confidential clients. These are clients that are running on the server as opposed to those running on user devices (which are often referred to as ‘public clients’) as they are able to store the secret securely. Confidential clients provide their client ID and client secret in the requests for access tokens.
Scenario
A typical scenario is where a Client App needs to call a backend API Service. Here the Client App is a CRM Website which is calling a CRM Service which is the backend API Service to either get a users profile or update their details using the Client Credentials flow. Also to limit operational functionality, two roles will be sent with the bearer token to allow only reading or updating the CRM contact information.

In this article I will go through the process of adding a list of Application claims to an App registered as an API service (CRM Service) in Azure Active Directory (AAD). Another App registration is also required for the client (CRM Website) which has a set of restricted claims. These restricted claims will be inserted into the Access token where the API service (CRM Service) would interrogate the claims and perform the required operations if the claims are valid.
Configuration Walkthrough
Below are the steps required to create an AAD App Registration for the CRM Service API and to add the required application claims (roles). The claims are added by modifying the manifest file after the App has been registered as there is no UI available to manage this.
Registering the Service API
1. Register the CRM Service API – Under the Azure Active Directory page, click on App registrations and New registration
![clip_image001[7]](https://i1.wp.com/connectedcircuits.blog/wp-content/uploads/2020/08/clip_image0017.png?ssl=1)
2. Add a name (CRM Service) for the application and then click the Register button at the bottom of the page.

3. Adding Claims – Once the App registration has been saved, click on the Manifest menu option to view and update the manifest appRoles via the portal.

Now we can add a of collection of custom roles under the “appRoles” attribute using the following JSON structure for the claims. This is where you define the complete list of custom roles that your API service will support. The claims I will be adding for the CRM service are basic crud type operations. Note the value for the id for each role is just a Guid to keep it unique within the tenant.

Remember to click the Save button to on the top to update the manifest.
4. Set Application ID URL – Under the Expose an API menu option, click the Set for Application ID URI. This value will be used as the Scope parameter when requesting an OAuth token for the Client App. You can also view this value from the app registration Overview page.
![clip_image001[13]](https://i0.wp.com/connectedcircuits.blog/wp-content/uploads/2020/08/clip_image00113.png?ssl=1)
That is all required to register the API Service and to add custom application claims. Next is registering the client.
Registering the Client App
1. Create a new App registration as before, but for the client (CRM Website)
![clip_image001[15]](https://i0.wp.com/connectedcircuits.blog/wp-content/uploads/2020/08/clip_image00115.png?ssl=1)
2. Add the required permissions – This section is where you define the roles required for the client app. To add the permissions, click on API Permissions and then Add a permission.
![clip_image001[17]](https://i2.wp.com/connectedcircuits.blog/wp-content/uploads/2020/08/clip_image00117.png?ssl=1)
Then click on My API’s on the top menu to list all your registered apps. Select the CRM Service app which was added in the first section to which you want access to.

Select Application permissions and then expand the permissions. This will list all the available roles available that was added when registering the CRM Service API. For the CRM Website, I only require the read and update roles. Once checked, then click on the Add permissions button.
![clip_image001[21]](https://i0.wp.com/connectedcircuits.blog/wp-content/uploads/2020/08/clip_image00121.png?ssl=1)
Once the permissions have been added, Click on Grant admin consent for the cloud and then press Yes on the dialogue box.
![clip_image001[23]](https://i2.wp.com/connectedcircuits.blog/wp-content/uploads/2020/08/clip_image00123.png?ssl=1)
The status of the permissions should then be all green as highlighted below.
![clip_image001[25]](https://i1.wp.com/connectedcircuits.blog/wp-content/uploads/2020/08/clip_image00125.png?ssl=1)
5. Add a client secret – Click on the Certificates & secrets menu option to add a new client secret. Remember to take note of this value as it is required when obtaining an OAuth token later.
![clip_image001[27]](https://i0.wp.com/connectedcircuits.blog/wp-content/uploads/2020/08/clip_image00127.png?ssl=1)
Requesting an OAuth Token
Before the Client App (CRM Website) can call the API Service (CRM Service), a bearer token needs to be obtained from the OAuth 2.0 token endpoint of AAD. For this, I am going to use Postman to act as the Client App by sending the following parameters. You should be able to get all these values from the Overview of the Client App (CRM Website) and the Scope value from the API Service (CRM Service)
grant_type – Must be set to client_credentials
client_id – The application found in the Client App (CRM Website)
client_secret – The secret that was generated in the Client App (CRM Website) which must be URL encoded.
scope – This the application ID URL of the API Service (CRM Service) which must be URL encoded. Also you need to append /.default to the end of the URL eg (scope=api://189f0961-ba0f-4a5e-93c1-7f71a10b1a13/.default)
Here is an example of the PostMan request to obtain the token. Remember to replace {your-tenant-id} with your one.

When you send it and all the parameters are correct, you should receive a JWT token as per below.

Now if you take the value of the “access_token” and use a tool like https://jwt.ms/ to decode it, you should see the custom application claims.

In conclusion, use custom claims to provide granular control of operations in your backend API’s and any security breaches from hijacked client applications.
Keep a watch out for my next blog where I will show you how to access these claims from within an Azure Function.
Enjoy…
April 23, 2020
Connecting an Azure WebApp to a SQL Server VM inside a VNet
This article is about connecting an Azure WebApp to a SQL Server VM which is hosted inside an Azure Virtual Network. Typically a SQL Server VM would be hosted inside an Azure Virtual Network (VNet) to isolate it from the internet by blocking all inbound and outbound internet traffic using a Network Security Group (NSG). In this scenario, connectivity to the SQL Database is achieved by using the new VNet Integration feature found on the App Service component. Using this feature removes the requirement of an App Service Environment (ASE) for the WebApp thus reducing overall hosting costs.
Using VNet integration provides private outbound access from your App Service to resources in your VNet using the RFC1918 internal IP address allocation range (10.0.0.0/8, 172.16.0.0/12, 192.168.0.0/16) by default.
Scenario
A web application is hosted in a WebApp which requires a connection to the SQL Database hosted inside a VNet.
The network topology of this scenario is shown below which uses the Regional VNet Integration option where both the WebApp and SQL VM are in the same region. Here we have a VNet called Backend which has two subnets, one for the VNet Integration used for delegating called IntegDeleg and the other to host the SQL Server VM called DataStore.

Configuration Walkthrough
The following are the sequence of steps used to setup VNet Integration between a Web App and SQL Server with the assumption the SQL Server VM is already hosted inside a VNet.
1. Adding a VNet subnet
2. Provisioning an AppSvc Plan
3. Provisioning a WebApp
4. Setting up the VNet Integration
5. Validating SQL Server Security Settings
6. Testing connectivity to the SQL Server
7. Updating the Web App SQL Connection String
1. Adding a VNet Subnet
A dedicated subnet used by the VNet Integration feature is required to be added to the existing VNet hosting the SQL Server VM. The IP range should match the maximum number of AppSvc plan instances when fully scaled out as each instance would require a IP address. For this scenario I will be using a /27 prefix giving a total range of 32 address, however 5 address are used internally by Azure leaving 27 usable addresses for each plan instance.

2. Provisioning App Svc Plan
To use VNet Integration, you will need to provision an App Service plan using newer V2 scale units. Note if you are currently using V1 App Services, you will need to provision a new plan using V2 and migrate you apps to this new plan.
To confirm if you have selected the newer V2 App Services, the Premium plans should be shown as P1V2, P2V2 and P3V2. Here I will be using a Standard Plan S1 for this scenario highlighted below.

3. Provisioning Web App
Create a new Web App and ensure it is in the same region as the VNet. Also ensure you have selected the App Service Plan you created above.

4. Enable VNet Integration
Under the Web App that was provisioned above, click on the Networking menu item to view the networking options and then click on “Click here to configure” under the VNet Integration heading.

Once the VNet Configuration form opens, click on the “Add VNet” to open the Network Feature Status blade. Select the VNet that hosts the SQL Server and then the Subnet that was created earlier for the VNet Integration. Then press OK to save the changes.

After you hit OK, the VNet Integration should be connected and ready for testing the connectivity. Remember the VNet Integration will route all outbound RFC1918 traffic from the WebApp into your VNet.

5. Validating SQL Server Security Settings
To reduce the surface area of attack, ensure the SQL Server can only accept connections within the VNet. This is done by setting the “SQL connectivity” option to Private (within Virtual Network) under the Security menu of the SQL Virtual Machine.

Also check the NSG attached to the SQL Server VM to ensure there is a rule to disable all outbound internet traffic. If there is a inbound rule called default-allow-sql as highlighted below, it is advisable to delete this rule if not required. This inbound rule default-allow-sql is normally created when the security on the SQL Server VM allows SQL connectivity via Public (Internet) connections.

6. Testing connectivity
To check connectivity between the Web App and the SQL server, we can use the tcpping command from a console window. Go to the Web App that was created previously and click on the Console menu item to open a console window similar to below.

In the console window type the command tcpping :1433. All going well you should get a reply similar to that below where 10.0.2.4 was the private IP address of my SQL Server VM using the default port 1433.

7. Updating the Web App SQL Connection String
Once the connectivity has been verified, the next step is to update the connection string on the Web App to use the private IP address of the SQL Server VM. Typically the connection string should look something like this:- Server=10.0.2.4;Database=coreDb;User Id=myusername;Password=mypassword;MultipleActiveResultSets=true
After the connection string has been updated to use the private IP address, you should be able to test your application. Here I am just adding some new tasks in the TodoList web application and confirming the records are written to the database.

Conclusion
VNet Integration provides an easy and cost effective solution to access databases hosted within a VNet without resorting to a dedicated ASE. Also using rules on the NSG applied to the SQL Server VM provides the capability to block all internet traffic and allow only RFC1918 internal addresses to have access.
More information about VNet Integration can be found on the MS docs site https://docs.microsoft.com/en-us/azure/app-service/web-sites-integrate-with-vnet.
Enjoy…
March 19, 2020
Ensuring Ordered Delivery of Messages using Azure Functions
Typically when using Azure Functions to consume messages from a Service Bus (SB), the ordering is not guaranteed although the SB is First-In-First-Out (FIFO). This is due to competing consumers, where multiple instances of the function are competing for messages of the service bus.
An example where out of ordering can happen is when a function instance takes longer to process a message than other instances therefore affecting the process ordering. This is represented in the sequence diagram below, where the function instance 1 took longer to update the same record in a database than instance 2.

One option to enforce ordered delivery is to configure the Azure Function to spin up only one instance. The only problem with this solution is it won’t scale very well. A more scalable option is to use sessions.This allows you to have multiple instances of a function executing giving you a higher message throughput.
To enforce message ordering several properties must be set. The property Requires Session must be enabled on the SB queues and topic subscriptions. Messages sent onto the SB must set the context property SessionId to unique value from other non related messages. Some examples of a session Id could be the account number, customer number, batch Id, etc. Azure Functions need to have the IsSessionsEnabled property set to enabled on the SB input binding.
This feature for Azure Functions to use SB sessions only came GA as of mid 2019. Enabling sessions on the Azure Function places a lock on all messages that have the same session Id causing the locked messages to be consumed by that one function instance that placed the lock.
Typical Scenario
A warehouse needs to track the progress of an order from when its first received to when it gets dispatched. Throughout each stage (Ordered, Picked, Packaged, Dispatched) of the ordering process, the status of the order must be updated. This involves placing a new message onto the service bus every time the order status needs to get updated. An Azure function will then pull the messages from the service bus and update the order status in a database where the customer can view the current state of their order.
To simulate the warehouse tracking system, a console app will be used to create messages for each status change (Ordered, Picked, Packaged, Dispatched), for several hundred orders. The session Id of each status message will be set to the order number. The app will then send the messages to a SB Topic where it will have two subscriptions, one with sessions enabled and the other disabled. This is so we can compare the ordering of messages being received with and without sessions enabled.
Order message generater
class Program
{
private static string connectionString = ConfigurationManager.AppSettings[“ServiceBusConnectionString”];
private static string topicName = ConfigurationManager.AppSettings[“TopicName”];
private static int orders = 100;
private static int messagePerSession = 4;
static async Task Main(string[] args)
{
Console.WriteLine(“Creating Service Bus sender….”);
var taskList = new List();
var sender = new MessageSender(connectionString, topicName);
//create an order
for (int order = 0; order < orders; order++)
{
var orderNumber = $”OrderId-{order.ToString()}“;
var messageList = new List();
//simulate a status update in the correct order
for (int m = 0; m < messagePerSession; m++)
{
var status = string.Empty;
switch (m)
{
case 0 :
status = “1 – Ordered”;
break;
case 1:
status = “2 – Picked”;
break;
case 2:
status = “3 – Packaged”;
break;
case 3:
status = “4 – Dispatched”;
break;
}
var message = new Message(Encoding.UTF8.GetBytes($”Status-{status}“))
{
//set the service bus SessionId property to the current order number
SessionId = orderNumber
};
messageList.Add(message);
}
//send the list of status update messages for the order to the service bus
taskList.Add(sender.SendAsync(messageList));
}
Console.WriteLine(“Sending all messages…”);
await Task.WhenAll(taskList);
Console.WriteLine(“All messages sent.”);
}
}
Two Azure functions will be created, where one has sessions enabled and the other disabled. The functions will have a random delay created from 1 to 10 seconds to simulate some business logic which may be calling out to an external service before updating the order status. Instead of the function writing to a database, each status update message received will be written to an Azure Table storage to create an audit log of when a status update message was processed.
Below is the source code for the function which will process the messages on the service bus using sessions. Note the IsSessionEnabled property is set to true on the ServiceBusTrigger input binding. The randomiser is to simulate some business logic that could vary in time to process a message.
Azure Function using sessions
public static class MsgOrderingSessions
{
[FunctionName(“MsgOrderingSessions”)]
[return: Table(“OrdersSession”, Connection = “StorageConnectionAppSetting”)]
public static OrderEntity Run([ServiceBusTrigger(“orders”, “OrdersSession”, Connection = “SbConnStr”, IsSessionsEnabled = true)]
Message sbMesssage, ILogger log)
{
log.LogInformation($”C# ServiceBus topic trigger function processed message: {Encoding.UTF8.GetString(sbMesssage.Body)}“);
Random random = new Random();
int randNumb = random.Next(1000, 10000);
System.Threading.Thread.Sleep(randNumb);
return new OrderEntity { PartitionKey = $”{sbMesssage.SessionId} – {DateTime.Now.Ticks}“ , RowKey = Guid.NewGuid().ToString(), Text = Encoding.UTF8.GetString(sbMesssage.Body) };
}
}
Below is the source code for the function which does not use sessions. Here the IsSessionEnabled is set to false.
Azure Function no sessions
public static class MsgOrderingNoSession
{
[FunctionName(“MsgOrderingNoSessions”)]
[return: Table(“OrdersNoSession”, Connection = “StorageConnectionAppSetting”)]
public static OrderEntity Run([ServiceBusTrigger(“orders”, “OrdersNoSession”, Connection = “SbConnStr”, IsSessionsEnabled = false)]
Message sbMesssage, ILogger log)
{
log.LogInformation($”C# ServiceBus topic trigger function processed message: {Encoding.UTF8.GetString(sbMesssage.Body)}“);
Random random = new Random();
int randNumb = random.Next(1000, 10000);
System.Threading.Thread.Sleep(randNumb);
return new OrderEntity { PartitionKey = $”{sbMesssage.SessionId} – {DateTime.Now.Ticks}“, RowKey = Guid.NewGuid().ToString(), Text = Encoding.UTF8.GetString(sbMesssage.Body) };
}
}
Below is the settings for the service bus topic which has 2 subscriptions and one of them has Requires Session checked.

Running the console app creates 400 messages on both subscriptions, 4 status update messages per 1 order.

Conclusion
The Azure function which had the ServiceBusTrigger, IsSessionsEnabled = false inserted the rows out of order due to multiple function instances competing for the next message on the service bus.

Now the Azure Function which had IsSessionsEnabled = true and read messages from a service bus subscription which also had the Requires Session flag enabled, the messages were processed in the correct sequence as they were placed onto the service bus.

When using sessions, there is a slight performance hit depending on the number of function instances executing. In this example both functions where running under the consumption plan which spun up 6 instances. As you can see the number of messages waiting on each of the subscriptions below, the subscription which had sessions disabled are processing the messages a lot faster.
When sessions are used, each function instance places a locked on all messages having the same session Id which are processed one after another. As there were only 6 instances available, only a maximum of six orders could be processed at one time.

Enjoy…
August 29, 2019
Using an Azure APIM Scatter-Gather policy with a Mapping Function
This is a follow up from a previous blog “Azure APIM Scatter-Gather Pattern Policy” where I wrote about using the Wait policy to create a scatter-gather pattern. A few colleges were asking about being able to map the inbound request to the different schemas required by each of the Microservices.
A high level design is shown below using two “Wait” polices and an Azure Function for the mapping. The first policy ‘Translation’ sends the request to the mapping function and when completed the second policy ‘Scatter’ is executed to send the mapped request to each of the Microservices.

The internals of the Azure Function that maps the incoming request is shown below as an example. Here I am using a route on the supplier name and a simple If-Then statement to select which static translator method to call.
public static class MappingService
{
[FunctionName("DataMapping")]
public static async Task Run(
[HttpTrigger(AuthorizationLevel.Function, "post", Route = "Pricing/{suppliername}")]
HttpRequest req,
string suppliername,
ILogger log)
{
log.LogInformation("C# HTTP trigger function processed a request.");
string requestBody = await new StreamReader(req.Body).ReadToEndAsync();
dynamic response = null;
if (suppliername.Equals("Supplier1", StringComparison.OrdinalIgnoreCase))
response = Translator.TranslateSupplier1(requestBody);
else if (suppliername.Equals("Supplier2", StringComparison.OrdinalIgnoreCase))
response = Translator.TranslateSupplier2(requestBody);
return response != null
? (ActionResult)new OkObjectResult(response)
: new BadRequestObjectResult("Invalid message.");
}
}
Below is the code for the Translation Policy which calls the two Azure function resources in parallel that accepts the inbound price request message. The function access code is stored as a named-value pair in APIM called “functionapkey”.
<wait for="all">
<send-request mode="copy" response-variable-name="res_SupplierMap1" timeout="120" ignore-error="false">
<set-url>https://mapsvc.azurewebsites.net/api/...
<set-method>POST</set-method>
<set-body>@(context.Variables.GetValueOrDefault<string>("requestPayload"))</set-body>
</send-request>
<send-request mode="copy" response-variable-name="res_SupplierMap2" timeout="120" ignore-error="false">
<set-url>https://mapsvc.azurewebsites.net/api/...
<set-method>POST</set-method>
<set-body>@(context.Variables.GetValueOrDefault<string>("requestPayload"))</set-body>
</send-request>
</wait>
The code for the Scatter Policy is shown below which is similar to the original blog post. However it uses the mapped outputs from the Translation policy that are stored in the res_SupplerMap1 and res_SupplerMap2 context variables instead.
<wait for="all">
<send-request mode="copy" response-variable-name="response_1" timeout="120" ignore-error="false">
<set-url>{{serviceendpoint_1}}</set-url>
<set-method>POST</set-method>
<set-body>@(((IResponse)context.Variables["res_SupplierMap1"]).Body.As<string>())</set-body>
</send-request>
<send-request mode="copy" response-variable-name="response_2" timeout="120" ignore-error="false">
<set-url>{{serviceendpoint_2}}</set-url>
<set-method>POST</set-method>
<set-body>@(((IResponse)context.Variables["res_SupplierMap2"]).Body.As<string>())</set-body>
</send-request>
</wait>
The last policy checks the status of each of the pricing services and returns the results as a composite message if there were no errors encountered. This is similar to the original blog post but instead of returning a JObject I am now returning a JArray collection.
<choose>
<when condition="@((int)((IResponse)context.Variables["response_1"]).StatusCode != 200)">
<return-response response-variable-name="response_1" />
</when>
<when condition="@((int)((IResponse)context.Variables["response_2"]).StatusCode != 200)">
<return-response response-variable-name="response_2" />
</when>
<otherwise>
<return-response>
<set-status code="200" reason="OK" />
<set-header name="Content-Type" exists-action="override">
<value>application/json</value>
</set-header>
<set-body>@{
JArray suppliers = new JArray();
suppliers.Add(((IResponse)context.Variables["response_1"]).Body.As<JObject>());
suppliers.Add(((IResponse)context.Variables["response_2"]).Body.As<JObject>());
return suppliers.ToString();
}</set-body>
</return-response>
</otherwise>
</choose>
The completed policy for the method looks like this below. Take note the request payload is stored in the variable named “requestPayload” initially to avoid locking body context in the policies.
<policies>
<inbound>
<set-variable name="requestPayload" value="@(context.Request.Body.As<string>(true))" />
<wait for="all">
<send-request mode="copy" response-variable-name="res_SupplierMap1" timeout="120" ignore-error="false">
<set-url>https://mapsvc.azurewebsites.net/api/...
<set-method>POST</set-method>
<set-body>@(context.Variables.GetValueOrDefault<string>("requestPayload"))</set-body>
</send-request>
<send-request mode="copy" response-variable-name="res_SupplierMap2" timeout="120" ignore-error="false">
<set-url>https://mapsvc.azurewebsites.net/api/...
<set-method>POST</set-method>
<set-body>@(context.Variables.GetValueOrDefault<string>("requestPayload"))</set-body>
</send-request>
</wait>
<wait for="all">
<send-request mode="copy" response-variable-name="response_1" timeout="120" ignore-error="false">
<set-url>{{serviceendpoint_1}}</set-url>
<set-method>POST</set-method>
<set-body>@(((IResponse)context.Variables["res_SupplierMap1"]).Body.As<string>())</set-body>
</send-request>
<send-request mode="copy" response-variable-name="response_2" timeout="120" ignore-error="false">
<set-url>{{serviceendpoint_2}}</set-url>
<set-method>POST</set-method>
<set-body>@(((IResponse)context.Variables["res_SupplierMap2"]).Body.As<string>())</set-body>
</send-request>
</wait>
<choose>
<when condition="@((int)((IResponse)context.Variables["response_1"]).StatusCode != 200)">
<return-response response-variable-name="response_1" />
</when>
<when condition="@((int)((IResponse)context.Variables["response_2"]).StatusCode != 200)">
<return-response response-variable-name="response_2" />
</when>
<otherwise>
<return-response>
<set-status code="200" reason="OK" />
<set-header name="Content-Type" exists-action="override">
<value>application/json</value>
</set-header>
<set-body>@{
JArray suppliers = new JArray();
suppliers.Add(((IResponse)context.Variables["response_1"]).Body.As<JObject>());
suppliers.Add(((IResponse)context.Variables["response_2"]).Body.As<JObject>());
return suppliers.ToString();
}</set-body>
</return-response>
</otherwise>
</choose>
</inbound>
<backend>
<base />
</backend>
<outbound>
<base />
</outbound>
<on-error>
<base />
</on-error>
</policies>
Using the tracing feature in APIM, you can see the initial price request message below. This will be sent to the mapping function Pricing method.

Below is the trace output from APIM showing the two different messages returned from mapping function and assigned to the res_Supplier variables.

Below is the composite message returned from APIM as an JSON array containing each supplier.

In conclusion, using the two polices to send multiple requests in parallel yields a request/response latency of around 200ms on average in this scenario. Also instead of using an Azure Function to map the incoming request, you could replace it with a couple of “Transformation” policies.
Enjoy…
August 6, 2019
Azure APIM Scatter-Gather Pattern Policy
Recently I have been reading about some of the advanced policies available in APIM and the one that caught my eye was the “Wait” policy found here https://docs.microsoft.com/en-us/azure/api-management/api-management-advanced-policies. This policy will execute child policies in parallel and will wait until either one or all of the child polices have completed before continuing.
I was pondering on a good use case for this policy and the first one came to mind was a scatter-gather pattern shown below. I could easily create this pattern without having to provision any other required Azure services.

The Scatter-Gather pattern is created by exposing a REST endpoint through APIM which will accept a JSON payload. When a request comes into APIM, a custom policy will forward this request onto the service endpoints defined in the policy and wait until they have all responded before continuing on with the rest of the statements in the parent policy. Once all the destination endpoints have responded, the return status code on each service is then checked for success or an error. If an error does occur, then the error is returned immediately otherwise the message from each service is combined into a composite JSON message which is returned back to the caller as the response message.
For the scenario, I will be sending a price request for a product to 3 suppliers simultaneously. In Azure APIM, I created a method which will accept a JSON price request message as shown below.

Then I added an Inbound processing policy to that method which is broken down into two parts. Below is the first part of the policy where it sends the inbound request to multiple endpoints in parallel using the tag. Named values are used for the service endpoint address defined in the {{serviceendpoint_xxx}} tags. The response from each service call is inserted into the variable response-variable-name=”response_xxx” which is used in the second part of this policy.
<set-variable name="requestPayload" value="@(context.Request.Body.As<string>(true))" />
<wait for="all">
<send-request mode="copy" response-variable-name="response_1" timeout="120" ignore-error="false">
<set-url>{{serviceendpoint_1}}</set-url>
<set-method>POST</set-method>
<set-body>@(context.Variables.GetValueOrDefault<string>("requestPayload"))</set-body>
</send-request>
<send-request mode="copy" response-variable-name="response_2" timeout="120" ignore-error="false">
<set-url>{{serviceendpoint_2}}</set-url>
<set-method>POST</set-method>
<set-body>@(context.Variables.GetValueOrDefault<string>("requestPayload"))</set-body>
</send-request>
<send-request mode="copy" response-variable-name="response_3" timeout="120" ignore-error="false">
<set-url>{{serviceendpoint_3}}</set-url>
<set-method>POST</set-method>
<set-body>@(context.Variables.GetValueOrDefault<string>("requestPayload"))</set-body>
</send-request>
</wait>
After the closing tag, the response code from each of the services is checked inside a block. If its not equal to 200 then the response is immediately returned, otherwise each of the responses is wrap inside a JSON object and returned as the composite response message.
<choose>
<when condition="@((int)((IResponse)context.Variables["response_1"]).StatusCode != 200)">
<return-response response-variable-name="response_1" />
</when>
<when condition="@((int)((IResponse)context.Variables["response_2"]).StatusCode != 200)">
<return-response response-variable-name="response_2" />
</when>
<when condition="@((int)((IResponse)context.Variables["response_3"]).StatusCode != 200)">
<return-response response-variable-name="response_3" />
</when>
<otherwise>
<return-response>
<set-status code="200" reason="OK" />
<set-header name="Content-Type" exists-action="override">
<value>application/json</value>
</set-header>
<set-body>@(new JObject(
new JProperty("service_1",((IResponse)context.Variables["response_1"]).Body.As<JObject>()),
new JProperty("service_2",((IResponse)context.Variables["response_2"]).Body.As<JObject>()),
new JProperty("service_3",((IResponse)context.Variables["response_3"]).Body.As<JObject>())
).ToString())</set-body>
</return-response>
</otherwise>
</choose>
Below is the whole policy for the method. More service endpoints may be added or removed from this policy as desired.
<policies>
<inbound>
<set-variable name="requestPayload" value="@(context.Request.Body.As<string>(true))" />
<wait for="all">
<send-request mode="copy" response-variable-name="response_1" timeout="120" ignore-error="false">
<set-url>{{serviceendpoint_1}}</set-url>
<set-method>POST</set-method>
<set-body>@(context.Variables.GetValueOrDefault<string>("requestPayload"))</set-body>
</send-request>
<send-request mode="copy" response-variable-name="response_2" timeout="120" ignore-error="false">
<set-url>{{serviceendpoint_2}}</set-url>
<set-method>POST</set-method>
<set-body>@(context.Variables.GetValueOrDefault<string>("requestPayload"))</set-body>
</send-request>
<send-request mode="copy" response-variable-name="response_3" timeout="120" ignore-error="false">
<set-url>{{serviceendpoint_3}}</set-url>
<set-method>POST</set-method>
<set-body>@(context.Variables.GetValueOrDefault<string>("requestPayload"))</set-body>
</send-request>
</wait>
<choose>
<when condition="@((int)((IResponse)context.Variables["response_1"]).StatusCode != 200)">
<return-response response-variable-name="response_1" />
</when>
<when condition="@((int)((IResponse)context.Variables["response_2"]).StatusCode != 200)">
<return-response response-variable-name="response_2" />
</when>
<when condition="@((int)((IResponse)context.Variables["response_3"]).StatusCode != 200)">
<return-response response-variable-name="response_3" />
</when>
<otherwise>
<return-response>
<set-status code="200" reason="OK" />
<set-header name="Content-Type" exists-action="override">
<value>application/json</value>
</set-header>
<set-body>@(new JObject(
new JProperty("service_1",((IResponse)context.Variables["response_1"]).Body.As<JObject>()),
new JProperty("service_2",((IResponse)context.Variables["response_2"]).Body.As<JObject>()),
new JProperty("service_3",((IResponse)context.Variables["response_3"]).Body.As<JObject>())
).ToString())</set-body>
</return-response>
</otherwise>
</choose>
</inbound>
<backend>
<base />
</backend>
<outbound>
<base />
</outbound>
<on-error>
<base />
</on-error>
</policies>
For testing purposes, I just created 3 simple logic apps triggered by a HTTP request which returned some static data. Using Postman, I sent the following message.
The response message from APIM is shown below.

Enjoy…
May 25, 2019
ARM Template for Provisioning an Azure Function App with a Key Vault
Late in 2018, Microsoft announced you can now store sensitive application setting values in an App Service to an Azure Key Vault without any changes to the function code. The only requirement was to update the value settings with “@Microsoft.KeyVault(SecretUri=secret_uri_with_version)” to reference the Key Vault and enabling an identity account of the App Service to access the Key Vault.
This is a great leap forward having this feature baked into an App Service, however trying to create an ARM template to provision an App Service, Storage Account and a Key Vault by following these instructions https://docs.microsoft.com/en-us/azure/app-service/app-service-key-vault-references#azure-resource-manager-deployment proved to be rather challenging. After several hours of getting the versions correct and getting the dependencies in the correct order, I managed to create a working template to provision all 3 artefacts.
The template creates the App Service and uses the system-assigned managed identity account to access the Key Vault with Get only permissions. The primary key for the Storage Account and the Application Insights key are stored in Key Vault. These are then referenced by the AzureWebJobsStorage, WEBSITE_CONTENTAZUREFILECONNECTIONSTRING and APPINSIGHTS_INSTRUMENTATIONKEY names in the application settings of the Function App Service.
Updating the parameters file with the required artefact names and deploying the template, provisions the following services in Azure. Only thing left is to deploy your Function into the newly provisioned App Service.

If you try and view the Secrets in Key Vault, you will encounter an authorisation error shown below. If you wish, you may update the ARM template to add your ID to the access policies collection of the Key Vault.

To add your account using the Azure Portal, navigate to Access Policies and then click Add new. Notice the App Svc account has already been added by the ARM template.

Then click on Select principal and type in you login address into the Principle blade to find your name and then click the select button.
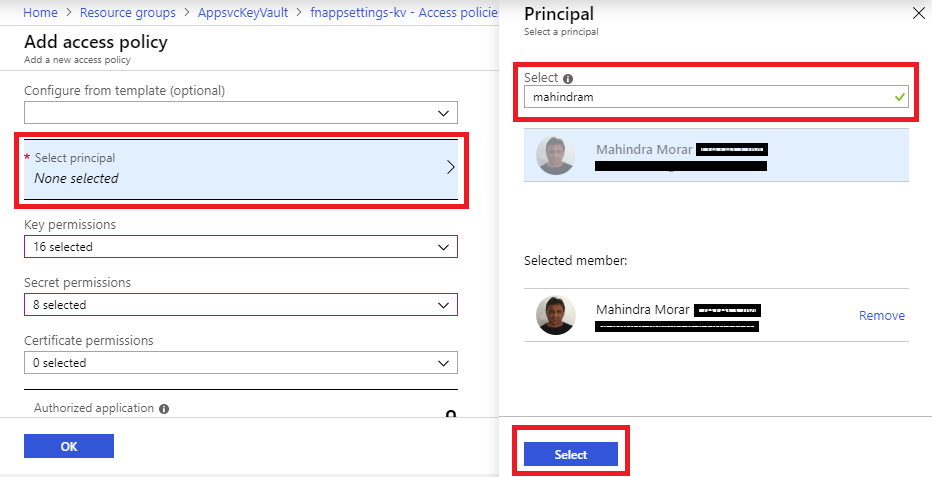
Once your login name has been added, you can then select the required permissions.

Now you can view the keys added by the ARM template.

Below are the Application settings under the App Service showing references to the Key Vault for the values.

The code for the ARM Template can be downloaded from here: https://github.com/connectedcircuits/azappsvc. I have added comments into the template so you should be able to modify it to suit your requirements.
Enjoy…
April 24, 2019
Always subscribe to Dead-lettered messages when using an Azure Service Bus
I typically come across solutions that incorporate a service bus where monitoring of the dead-letter queues are simply ignored. Upon questioning the reason, the normal excuse for not monitoring the DLQ (dead-letter queue) is quote “I don’t require it because I have added exception handling therefore no messages will end up on the DLQ”. From experience there will be scenarios where the exception logic did not capture an edge case scenario and the message will end up onto the DLQ without anyone knowing about.
A simple solution is to have a single process to monitor all the DQL messages and raise an alert when one occurs. Below is one of my building blocks which a typically incorporate when there is a service bus involved in a solution.

To use the DLQ building block to centrally capture any DLQ message, simply set the “ForwardDeadLetteredMessagesTo” property on each of the messaging queues to a common DLQ handler queue as shown below.

Now when a message gets dead lettered, it will end up in this common queue which is monitored by an Azure Function. Note the current NuGet version v3.0.4 of the ServiceBus DLL has the DeadLetterSource property and is not currently available in the Logic App Service Bus connector. The function writes the DLQ meta data, any custom properties and the message payload to a blobstore file. By using an Azure Storage Account V2 for the blobstore, a new blob creation event will be fired to any interested subscribers which in this case is a Logic App.
Azure Function Code
Below is the code for the Azure Function. Here I am using the IBinder interface to allow me to set the folder path and file name imperatively. The connection strings (ServiceBusConn, StorageAccountConn) are defined in the Application settings of the Azure App Service.
Code Snippet
using Microsoft.Azure.ServiceBus;
using Microsoft.Azure.WebJobs;
using Microsoft.Extensions.Logging;
using Newtonsoft.Json;
using System;
using System.Collections.Generic;
using System.IO;
using System.Threading.Tasks;
namespace ServiceBusDLQMonitoring
{
public static class Function1
{
[FunctionName("Function1")]
public static async Task RunAsync([ServiceBusTrigger("dlq-processor", Connection = "ServiceBusConn")] Message dlqQueue,
Binder blobBinder,
ILogger log)
{
log.LogInformation($"C# ServiceBus queue trigger function processed message: {dlqQueue.MessageId}");
//set the filename and blob path
var blobFile = Guid.NewGuid().ToString() + ".json";
var path = string.Concat("dlq/",DateTime.UtcNow.ToString("yyyy/MM/dd"),"/" ,dlqQueue.SystemProperties.DeadLetterSource,"/", blobFile);
var dlqMsq = new DLQMessage
{
DeadletterSource = dlqQueue.SystemProperties.DeadLetterSource,
MessageId = dlqQueue.MessageId,
SequenceNumber = dlqQueue.SystemProperties.SequenceNumber,
SessionId = dlqQueue.SessionId,
UserProperties = dlqQueue.UserProperties,
DeadLetterReason = dlqQueue.UserProperties["DeadLetterReason"].ToString(),
EnqueuedDttmUTC = dlqQueue.SystemProperties.EnqueuedTimeUtc,
ContentType = dlqQueue.ContentType,
DeliveryCount = dlqQueue.SystemProperties.DeliveryCount,
Label = dlqQueue.Label,
MsgBase64Encoded = Convert.ToBase64String(dlqQueue.Body, Base64FormattingOptions.None)
};
var blobAttributes = new Attribute[]
{
new BlobAttribute(path),
new StorageAccountAttribute("StorageAccountConn")
};
using (var writer = await blobBinder.BindAsync(blobAttributes))
{
writer.Write(JsonConvert.SerializeObject(dlqMsq,Formatting.Indented));
}
}
}
public class DLQMessage
{
public string DeadletterSource { get; set; }
public long SequenceNumber { get; set; }
public string MessageId { get; set; }
public string SessionId { get; set; }
public string Label { get; set; }
public string DeadLetterReason { get; set; }
public DateTime EnqueuedDttmUTC { get; set; }
public int DeliveryCount { get; set; }
public string ContentType { get; set; }
public IDictionary<string,object> UserProperties { get; set; }
public string MsgBase64Encoded { get; set; }
}
}
Logic App Implementation
A Logic App is used to the retrieve the message from the blob store when it is triggered by the EventGrid HTTP webhook. The basic workflow is shown below and can be expanded to suit your own requirements.

The expression for the ‘Get blob content using path’ action is @{replace(triggerBody()[0][‘data’][‘url’],’https://dqlmessages.blob.core.windows...’,”)}. Here I am just replacing the Domain name with an empty string as I only want the resource location.
The Parse JSON action has the following schema. This makes it easier to reference the properties downstream.
{
"properties": {
"ContentType": {
"type": [
"string",
"null"
]
},
"DeadLetterReason": {
"type": "string"
},
"DeadletterSource": {
"type": "string"
},
"DeliveryCount": {
"type": "integer"
},
"EnqueuedDttmUTC": {
"type": "string"
},
"Label": {
"type": [
"string",
"null"
]
},
"MessageId": {
"type": "string"
},
"MsgBase64Encoded": {
"type": [
"string",
"null"
]
},
"SequenceNumber": {
"type": "integer"
},
"SessionId": {
"type": [
"string",
"null"
]
},
"UserProperties": {
"type": "any"
}
},
"type": "object"
}
The last action ‘Set variable MsgBody’ has the value set to: “@{base64ToString(body(‘Parse_JSON’)?[‘MsgBase64Encoded’])}”
Blob creation event configuration
Next is to setup a subscription to the Blob creation event. Click on Events under the Storage account for the DLQ messages as shown below.

Then click on the +Event Subscription to add a new subscription.

Setup the subscription Basic details with a suitable subscription name and the blob storage account resource name. Uncheck the ‘Subscribe to all event types’ and select Blob Created event. Set the endpoint details to Web Hook and the URL of the Logic App Http trigger endpoint address.

Under Filters, enable subject filtering. Add the following prefix ‘/blobServices/default/containers/’ to the name of the DLQ container (in this example its called ‘dlq’) and add it to the ‘Subject Begins With’ textbox. Then in the ‘Subject Ends With’, set it to the filename extension ‘.json’. Now click the Create button at the bottom of the page to create the subscription.

Sample Logic App output
Once everything is wired up and if there are any messages that have been placed onto the DLQ, you should see some logic app runs. Below is an example of the outputs from the last two actions.

All you need to do now is extend the Logic App to deliver the DLQ alert to somewhere.
Enjoy…
Always subscribe to Dead-lettered messages in an Azure Service Bus
I typically come across solutions that incorporate a service bus where monitoring of the dead-letter queues are simply ignored. Upon questioning the reason, the normal excuse for not monitoring the DLQ (dead-letter queue) is quote “I don’t require it because I have added exception handling therefore no messages will end up on the DLQ”. From experience there will be scenarios where the exception logic did not capture an edge case scenario and the message will end up onto the DLQ without anyone knowing about.
A simple solution is to have a single process to monitor all the DQL messages and raise an alert when one occurs. Below is one of my building blocks which a typically incorporate when there is a service bus involved in a solution.
To use the DLQ building block to centrally capture any DLQ message, simply set the “ForwardDeadLetteredMessagesTo” property on each of the messaging queues to a common DLQ handler queue as shown below.
Now when a message gets dead lettered, it will end up in this common queue which is monitored by an Azure Function. Note the current NuGet version v3.0.4 of the ServiceBus DLL has the DeadLetterSource property and is not currently available in the Logic App Service Bus connector. The function writes the DLQ meta data, any custom properties and the message payload to a blobstore file. By using an Azure Storage Account V2 for the blobstore, a new blob creation event will be fired to any interested subscribers which in this case is a Logic App.
Azure Function Code
Below is the code for the Azure Function. Here I am using the IBinder interface to allow me to set the folder path and file name imperatively. The connection strings (ServiceBusConn, StorageAccountConn) are defined in the Application settings of the Azure App Service.
Code Snippet
using Microsoft.Azure.ServiceBus;
using Microsoft.Azure.WebJobs;
using Microsoft.Extensions.Logging;
using Newtonsoft.Json;
using System;
using System.Collections.Generic;
using System.IO;
using System.Threading.Tasks;
namespace ServiceBusDLQMonitoring
{
public static class Function1
{
[FunctionName("Function1")]
public static async Task RunAsync([ServiceBusTrigger("dlq-processor", Connection = "ServiceBusConn")] Message dlqQueue,
Binder blobBinder,
ILogger log)
{
log.LogInformation($"C# ServiceBus queue trigger function processed message: {dlqQueue.MessageId}");
//set the filename and blob path
var blobFile = Guid.NewGuid().ToString() + ".json";
var path = string.Concat("dlq/",DateTime.UtcNow.ToString("yyyy/MM/dd"),"/" ,dlqQueue.SystemProperties.DeadLetterSource,"/", blobFile);
var dlqMsq = new DLQMessage
{
DeadletterSource = dlqQueue.SystemProperties.DeadLetterSource,
MessageId = dlqQueue.MessageId,
SequenceNumber = dlqQueue.SystemProperties.SequenceNumber,
SessionId = dlqQueue.SessionId,
UserProperties = dlqQueue.UserProperties,
DeadLetterReason = dlqQueue.UserProperties["DeadLetterReason"].ToString(),
EnqueuedDttmUTC = dlqQueue.SystemProperties.EnqueuedTimeUtc,
ContentType = dlqQueue.ContentType,
DeliveryCount = dlqQueue.SystemProperties.DeliveryCount,
Label = dlqQueue.Label,
MsgBase64Encoded = Convert.ToBase64String(dlqQueue.Body, Base64FormattingOptions.None)
};
var blobAttributes = new Attribute[]
{
new BlobAttribute(path),
new StorageAccountAttribute("StorageAccountConn")
};
using (var writer = await blobBinder.BindAsync(blobAttributes))
{
writer.Write(JsonConvert.SerializeObject(dlqMsq,Formatting.Indented));
}
}
}
public class DLQMessage
{
public string DeadletterSource { get; set; }
public long SequenceNumber { get; set; }
public string MessageId { get; set; }
public string SessionId { get; set; }
public string Label { get; set; }
public string DeadLetterReason { get; set; }
public DateTime EnqueuedDttmUTC { get; set; }
public int DeliveryCount { get; set; }
public string ContentType { get; set; }
public IDictionary<string,object> UserProperties { get; set; }
public string MsgBase64Encoded { get; set; }
}
}
Logic App Implementation
A Logic App is used to the retrieve the message from the blob store when it is triggered by the EventGrid HTTP webhook. The basic workflow is shown below and can be expanded to suit your own requirements.
The expression for the ‘Get blob content using path’ action is @{replace(triggerBody()[0][‘data’][‘url’],’https://dqlmessages.blob.core.windows...’,”)}. Here I am just replacing the Domain name with an empty string as I only want the resource location.
The Parse JSON action has the following schema. This makes it easier to reference the properties downstream.
{
"properties": {
"ContentType": {
"type": [
"string",
"null"
]
},
"DeadLetterReason": {
"type": "string"
},
"DeadletterSource": {
"type": "string"
},
"DeliveryCount": {
"type": "integer"
},
"EnqueuedDttmUTC": {
"type": "string"
},
"Label": {
"type": [
"string",
"null"
]
},
"MessageId": {
"type": "string"
},
"MsgBase64Encoded": {
"type": [
"string",
"null"
]
},
"SequenceNumber": {
"type": "integer"
},
"SessionId": {
"type": [
"string",
"null"
]
},
"UserProperties": {
"type": "any"
}
},
"type": "object"
}
The last action ‘Set variable MsgBody’ has the value set to: “@{base64ToString(body(‘Parse_JSON’)?[‘MsgBase64Encoded’])}”
Blob creation event configuration
Next is to setup a subscription to the Blob creation event. Click on Events under the Storage account for the DLQ messages as shown below.
Then click on the +Event Subscription to add a new subscription.
Setup the subscription Basic details with a suitable subscription name and the blob storage account resource name. Uncheck the ‘Subscribe to all event types’ and select Blob Created event. Set the endpoint details to Web Hook and the URL of the Logic App Http trigger endpoint address.
Under Filters, enable subject filtering. Add the following prefix ‘/blobServices/default/containers/’ to the name of the DLQ container (in this example its called ‘dlq’) and add it to the ‘Subject Begins With’ textbox. Then in the ‘Subject Ends With’, set it to the filename extension ‘.json’. Now click the Create button at the bottom of the page to create the subscription.
Sample Logic App output
Once everything is wired up and if there are any messages that have been placed onto the DLQ, you should see some logic app runs. Below is an example of the outputs from the last two actions.
All you need to do now is extend the Logic App to deliver the DLQ alert to somewhere.
Enjoy…
Mahindra Morar's Blog

- Mahindra Morar's profile
- 1 follower

