
Heather Hepler's Blog, page 3
October 10, 2011
Week Eleven -- Whoopie Pies
I cheat. I do and I admit it. I actually make my whoopie pies in a muffin pan and then slice them in half and fill them. I am sure whoopie pie purists out there are shuddering reading this, but frankly it is just a whole lot easier. We made the classic chocolate cake and vanilla filling pies. There are a lot of variations out there. I also love pumpkin with cream cheese filling or gingerbread with vanilla. My son likes chocolate with chocolate filling. But, we decided to stick with chocolate and vanilla. You really can't beat that.
Chocolate Cake
1 ½ cups all-purpose flour
1 cup sugar
1 tsp. baking soda
Pinch of salt
3 T cocoa (heaping if you want them extra chocolate-y)
1 tsp. Real vanilla extract
5 T vegetable oil
1 T white vinegar
1 cup water
Mix the drys together and then make little depressions in it for the oil, vanilla, and vinegar. Then pour the water over the whole thing. It will feel like you're making a mud cake, but stick with it. Pour into an unlined (but greased) muffin tin. Fill each well about ¾ full. Bake at 350 degrees for 18 –22 minutes. Let cool then slice them in half horizontally.
Vanilla Filling
4T softened butter
4 T vegetable shortening
1 cup marshmallow fluff
Pinch of salt
Tsp of vanilla
3 cups confectioner's sugar
Mix everything together, adding more sugar if needed. If it's humid, you'll need a bit more. Put icing (a lot or a little) on half of the pie and cover with the other half. Eat.
Yum!
What to do with your leftover Marshmallow Fluff.... make Fluffernutter Sandwiches. Just substitute fluff for the jelly in a peanut butter and jelly sandwich. Yum.


September 26, 2011
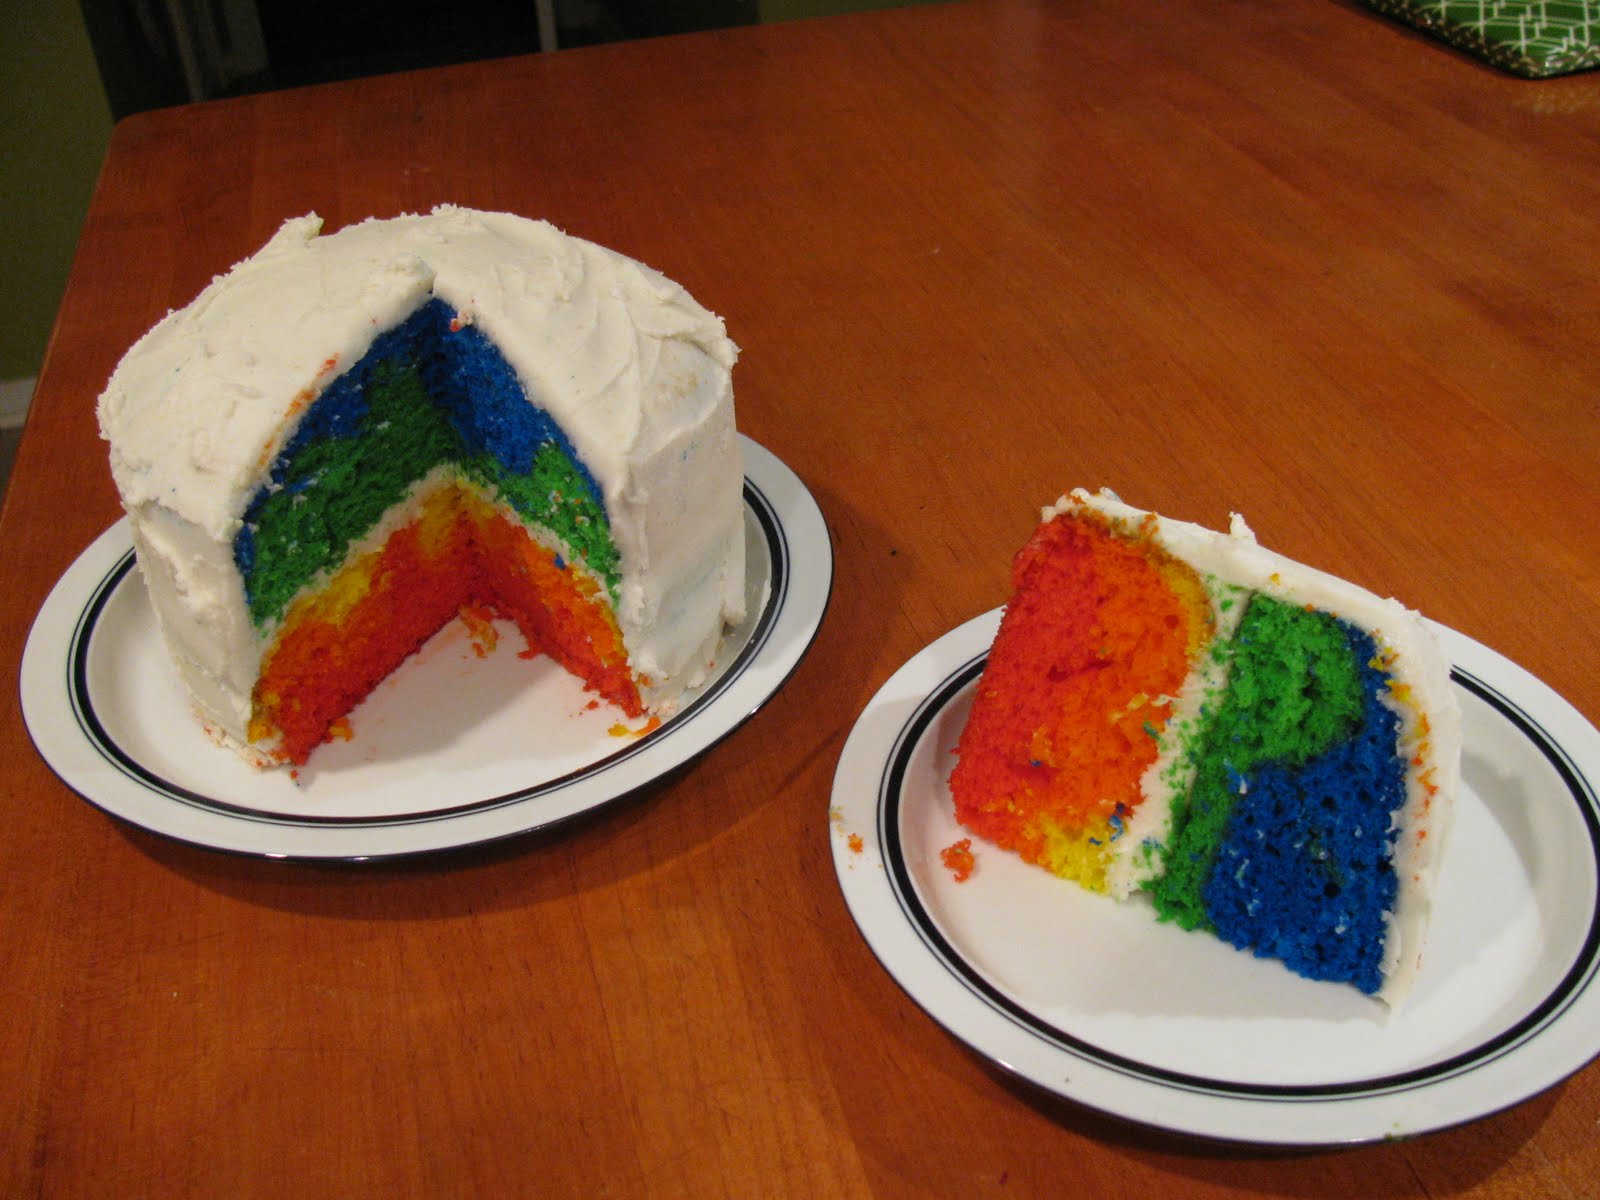
Week Nine -- Rainbow Cake
We actually opted to bake a rainbow cake instead of rainbow cupcakes, reasoning that the effect would be multiplied exponentially in a layer cake.
Ingredients:
• One box of white cake mix
• Ingredients needed for the mix. In our case, 3 egg whites, 3 T of vegetable oil, and water.
• Food colors (We used Wilton gel colors for their lack of flavor and their bright colors.) Red, yellow, and blue.
• Either two cans of white frosting or a batch of homemade white frosting.
• Two eight or nine inch round cake pans.
Directions:
• Prepare the cake mix according to the package instructions.
• Separate the mix into six (or seven if you're a rainbow purist) bowls.
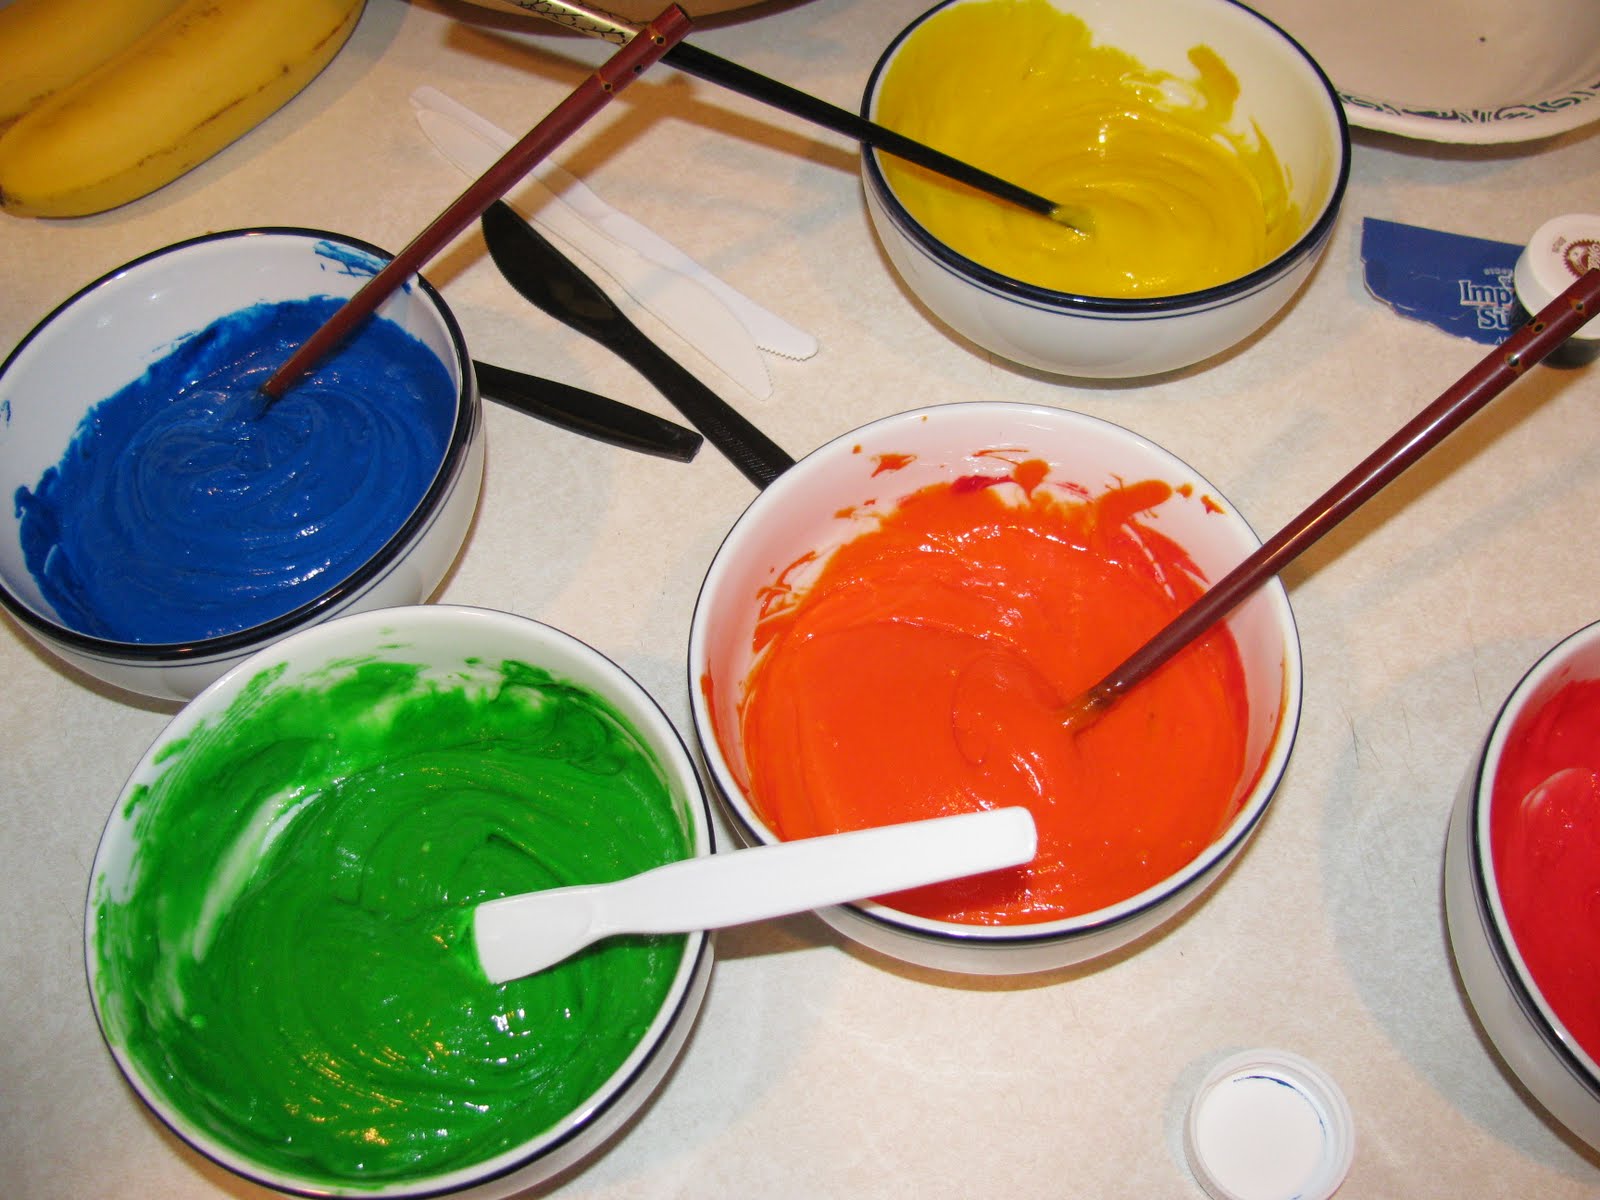
• Using a toothpick (or in our case chopsticks) add a small amount of the appropriate dye to each bowl, keeping in mind that you can always add color, but you can't take it away (see our notes below). We ended up with red, orange, yellow, green, blue, and vomit. I'm sorry, but there it is. Our purple just went south fast and kept getting worse the more we messed with it.
• Layer the colors carefully in your pans. If you are making layer cakes as we were, layer one with red, orange, and yellow (in that order) and the other with green, blue, and purple (or in our case just green and blue).
• Bake according to package directions, being careful not to over bake.
• Remove from the oven and let your layers cool. This is a good chance to mix up your icing, clean up all those bowls, and poke around for decorations (if you want to use them). We didn't this time, but I think next time we might have to go bigger.
•
 Once your layers are cool, slice them horizontally if you like into two layers each (for a total of four), or just use them whole.
• Ice your cake, being careful to cover all the color with your white icing. Your goal is to have a completely white cake when you are finished. This makes the reveal that much cooler. You can, at this point, use some of your frosting to make 'clouds' on top of the cake. You might also look for Sour Punch X-tremes to use as decoration. I see us
 ing them as mini rainbows on top or as a border around your cake.
• Slice into your cake and enjoy.
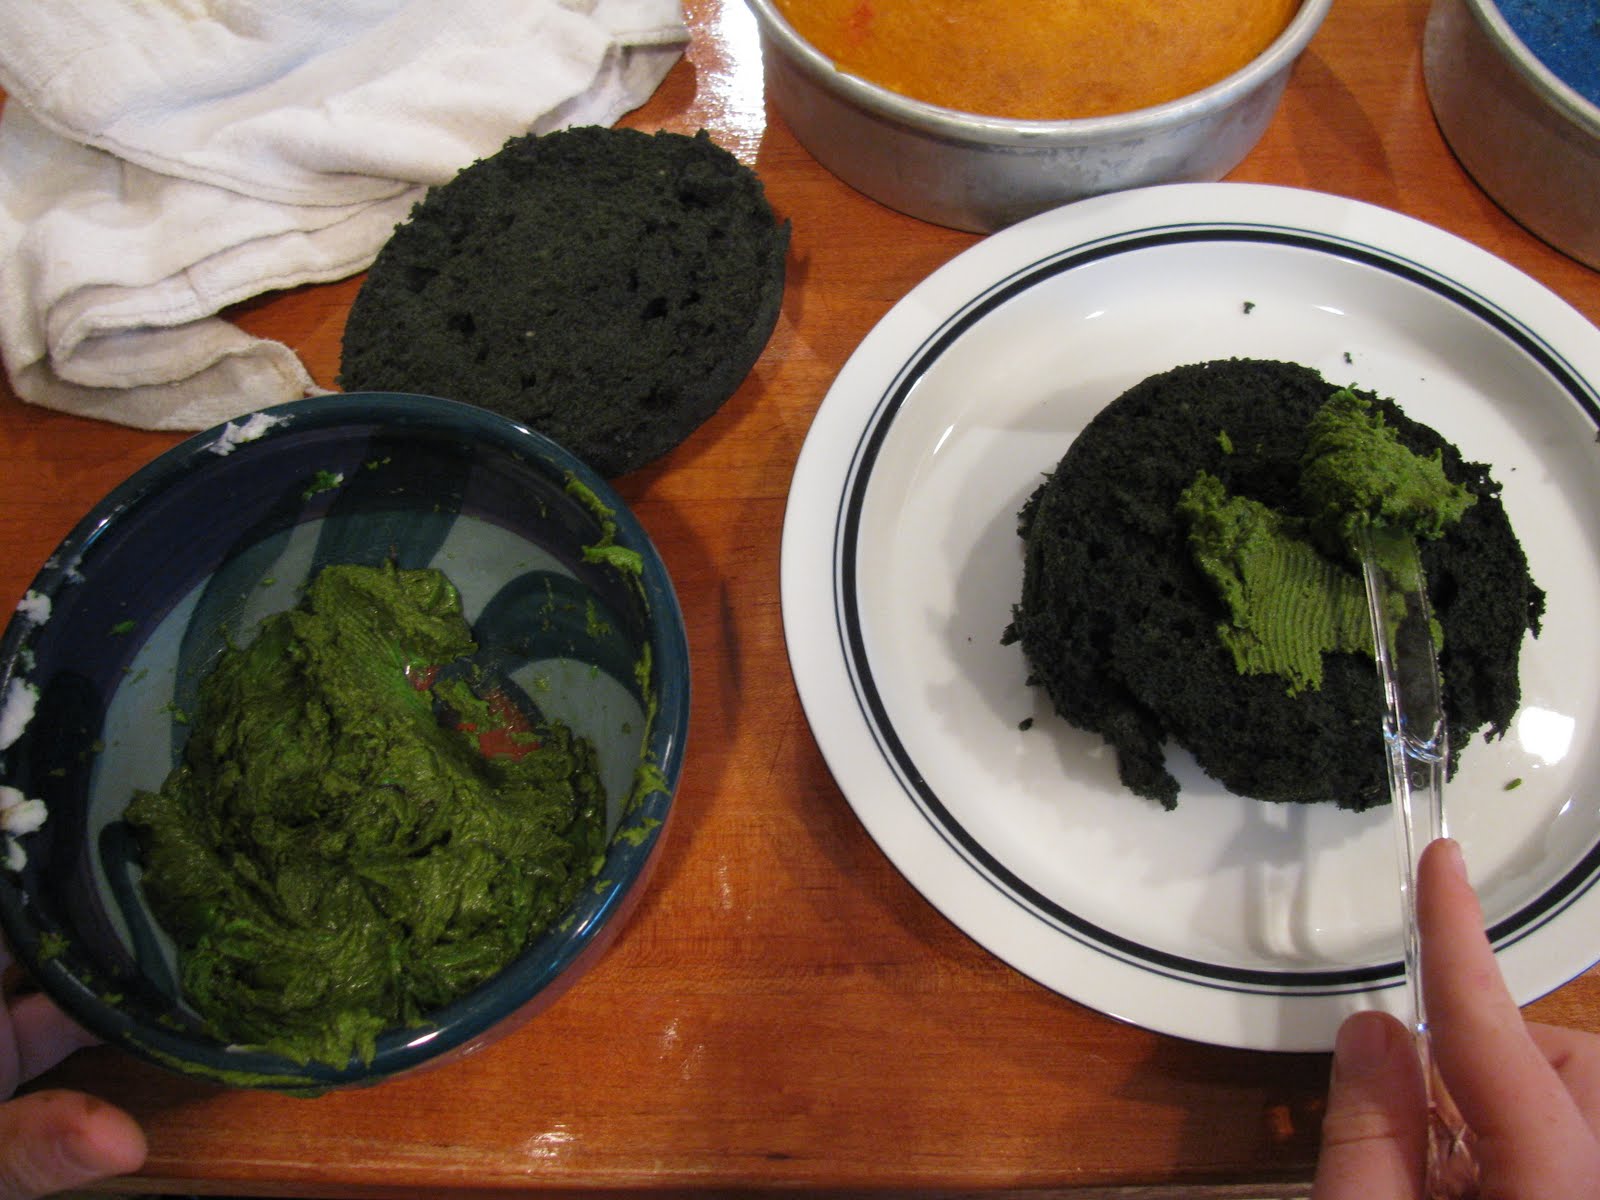 Notes on a Barf Cake: Okay, we ended up with vomit colored cake batter, so we decided to make a second (smaller cake) with it. Then we dyed some of our frosting rotten avocado green. My son called it barf cake. It's true. And the thing is, I think the barf cake actually ended up being the highlight. Anyone can make a be
 autiful rainbow cake which everyone will ooh and aah over. Who can say the same about our barf cake?
September 19, 2011
Week Eight -- Apple Pie and Bubble Junk

I will confess that I wasn't all that creative with one of our projects this week (yes, we did two, but one isn't edible… I mean, I guess it is, but you wouldn't want to.) The first was inspired by the amazing pyramids of apples that showed up last week in our grocery store. I promise not to bore you with my memories of picking apples in Maine. (Sigh… it's just more romantic than picking apples at Brookshire's here in Tyler.) I know I've already done an apple project, but please forgive me. I haven't made apple pie in a while… so…. Here goes. My recipe is my own and of course it's sort of flexible because I don't know what kind of apples you are using or how sweet those apples are. I used McIntosh, which I know is some sort of culinary felony in some circles. I've been told (pinch your nose and read this aloud) "McIntosh are not for cooking. They are for eating out of the hand." Whatever. I'm not a pomologist, (http://americanpomological.org/) so I pretty much just eat apples that I like (Honey Crisp, Jazz, Northern Spy, MacIntosh, Ambrosia, Winesap, Pink Lady, Pippen, and Black Gilliflower) This last one I've only had once and I include it because it's amazing and I love the name and well, it's black. Very cool. For a complete guide of registered apples go to: http://www.allaboutapples.com/varieties/
So, apple pie is about the easiest thing you can do… seriously. And listen, if you are afraid of the crust, just go buy one for heaven sake. No one will know...unless you tell them or unless you are having Martha Stewart over for dinner. And if Martha is coming over, you've got bigger fish to fry than to worry about whether your pie crust is flaky enough.
Texas Size Apple Pie
The crust: (Or Pate Brisee if you are feeling fancy pants)
Ingredients:
P.S. If you bought your dough… congratulations… you can skip all this business.
2 1/2 cups all-purpose flour, plus extra for rolling
1 cup (2 sticks or 8 ounces) unsalted butter, very-cold, cut into 1/2 inch cubes
1 teaspoon salt
1 teaspoon sugar
4 to 8 Tbsp ice water
1. Place flour, salt, and sugar in the bowl of a food processor fitted with the metal blade. Zip it around for a few seconds. Add the butter pieces; process until mixture resembles coarse meal, about 10 seconds. You can obviously do all of this by hand, but it's easier with the for processor because you won't' have to worry about the dough getting too warm from your hot little hands.
2. Add the ice water in a slow, steady stream through the feed tube with the machine running, just until dough holds together. Use that fun pulse button on your food processor for this so you don't get that nasty flour gluten all worked up. (That will make your crust tough and Martha won't like that.) Test by squeezing dough; if it is still crumbly, add a bit more water. REMEMBER! You can always add water… you can't take it away!
3. Dump out the dough onto some plastic wrap. Divide the dough in two pieces. Pat each into a flat disk. Wrap the dough in the plastic and chill for at least an hour.
Apple Filling
Ingredients:
• ½ cup all-purpose flour, plus more for rolling
• Crust (Sorry Pate Brisee)
• 5 ½ pounds apples (about 12-14) Zip it… I know this seems like a lot of apples, but trust me.
• Juice of 2 lemons
• 1 cup sugar This will vary depending upon your apple proclivity
• 2 teaspoons ground cinnamon
• ½ t nutmeg
• 3 tablespoons chilled unsalted butter cut into small pieces.
Directions:
1. Preheat oven to 400 degrees. Roll out your chilled dough (or unwrap your store-bought dough). You need to roll it out to about 15 inches so that you have enough to pinch the edges closed when you're finished. Line your DEEP DISH pie pan with this. You can do a regular 9 incher, but you might have enough apples for almost two pies if you do this.
2. Peel, core, and slice apples. Put the slices in a bowl and sprinkle with the lemon juice, flour, cinnamon, nutmeg and part of the sugar. Toss the apples to mix. Taste the apples… add more sugar if you like.
3. Dump apples into you crust-lined pan. Dot with your butter chunks.
4. Place other pie crust (which you've either rolled out or unwrapped – if you roll it out, make it a little larger than the other.. .maybe 18 inches.) on top and seal the edges. Use your thumb and forefinger to make little pinches all the way around the edge so it looks nice and it holds all the hot apple bubbly goodness inside.
5. Cut vents in the top crust. This will allow the steam to exit your pie without blowing a hole in it.
6. Now, you can brush the crust with egg wash (egg yolk mixed with a little cream or milk) and sprinkle it with sugar, but it's fine without. Note: if Martha is coming over, definitely do this. If I'm coming over, don't bother.
7. Put your pie on either a baking sheet or foil to catch any overflow of the juices. That way you won't have to buy a new oven when you're finished.
8. Place the pie in the oven and bake for approximately 15 minutes. Then turn down the oven to 350 degrees and bake for an additional 45 minutes.
9. Cool before you eat it. I know…but it will be all dribbly and juicy otherwise. Trust me. Let the filling thicken….
Bubble Junk
This might not even be on your radar, but if it's not maybe you shouldn't be so sophisticated. There is something so soothing about making giant bubbles and watching them float up into the sky. Even better if you live in an upper floor of a building or live near a body of water. But, the best is when I lived in Alaska… the bubbles don't burst in the winter, they shatter. Weird, right? Yep… bubble junk plus 50 below equals breakable bubbles.
So, here you go… this is best recipe for bubble junk.
1 cup dishwashing liquid… Blue Dawn is the best. (I don't know why)
12 cups water
¼ cup glycerin (or corn syrup – but glycerin is better… less messy and you won't attract bees.)
Mix it all together and let it sit for an hour or overnight. It just gets better.
If you have one of the giant bubble thingies that you can buy from Klutz… awesome, but a big can (like a coffee can) with both ends taken off it works great too.
Go eat pie and play. Life is too short to just sit at your computer.

September 12, 2011
Week Seven - Applesauce
 We had to make these, both because apples were on sale at the grocery store and because we are feeling very homesick for someplace where there actually is fall. My mother wrecked me and I'm wrecking my son. I never ate that weird tan stuff they call applesauce that you can buy at the grocery store. I even remember looking suspiciously at the yellowish blob of the stuff on my lunch tray in elementary school. The menu listed applesauce. It was only vaguely apple-y and only marginally edible in my mind… not because it was terrible. It was just not that good compared to the homemade stuff I grew up on.
Okay… you are likely saying to yourself. "That crazy woman! I don't have time to make homemade applesauce." But, don't despair… it is EASY! And so worth it. The apple jelly is optional, but I highly recommend it. I mean, what else are you going to do with all that juice? And lest you think this is like those little packs of jam that they serve at diners… let me tell you quickly that like homemade applesauce, homemade jelly is an entirely different beast. A delicious beast.
The recipe is sort of vague, but I think you'll get it pretty easily.
First, before you do anything… do you have a food mill? If you don't, you should, but you can still make this recipe, it just won't be quite as easy. Go buy a food mill. You can pick them up for about five bucks at an antique store like I did. I'm sure you can buy them new too, but probably not for five dollars.
Applesauce
Ingredients:
Apples (duh) I usually won't make applesauce unless I have at least five pounds, but this time I had ten. As for the kind? Get what you like. I love Macintosh, so if they are available, I buy them. A close second is a Jonathan apple or other thin-skinned apple. But, you can throw in whatever apples you like. You can even use the bruised ones… it doesn't matter. And you may be able to get your produce person to give them to you for cheap or free because otherwise they'll just throw them out.
Water
Sugar
Lemon juice
Cinnamon
Nutmeg (optional)
If you have a food mill, congratulations. This will be easy. Just quarter the apples and chuck them into a pot filled with about an inch of water.…. Yes, seeds, stem, those maddening little stickers and all. If you don't (I'm sorry), you'll have to peel and core them then put them in the pot. See? The food mill is the way to go.

Cover and let simmer until they are soft. This usually only takes about fifteen minutes tops. Keep an eye on things and add water if everything starts getting dry. It just depends on how juicy your apples are at this point.
Let cool for a bit. You can uncover them to help them cool. Don't be alarmed. They look gross.
Use a slotted spoon to scoop some into your food mill (or a blender or food processor). I guess you could mash them by hand with a potato masher, but I've never tried this.
Whirl everything around until your mill is empty. Repeat until you've used all the apples.
Add the juice of half to a whole lemon and a bit of sugar and cinnamon. Keep tasting it until you like the flavor. You can use artificial sweeteners or agave or stevia in place of some or all of the sugar, but I'm sort of a purist… or nonpurist, depending on your point of view.

Also, your applesuace will be brown, whether you add cinnamon or not. This is the natural color... that other junk is bleached or something. ;)
Apple Jelly
Now, you still have a pot of juice. You will need to strain this. You can use either a fine mesh strainer or cheese cloth. Shhh. This isn't hard.
Then pour the juice or drip it into a clean pot (a medium one).
Eyeball your juice (I told you this isn't exactly scientific) and add ¾ to 1 cup of granulated sugar for each cup of juice. You can't use anything artificial here…. Sorry.
Place over a low flame and stir it until the sugar is dissolved. Let it simmer for about five minutes. You may need to skim off any foam on the surface. I don't know what this is… it's best not to ask.
Now, let it boil gently until it begins to thicken. Use your spoon to judge this. Once it is about the consistency of honey, you're ready to pour it into jars or some other heatproof container.
Let it cool and eat it. If it isn't as firm as you like, just tell everyone it's apple honey or apple syrup. If they still give you a hard time, tell them to shut it. Or just snatch it back from them and say "Too bad. More for me." That'll teach them.

September 5, 2011
Week Six-- Cherry Pickles
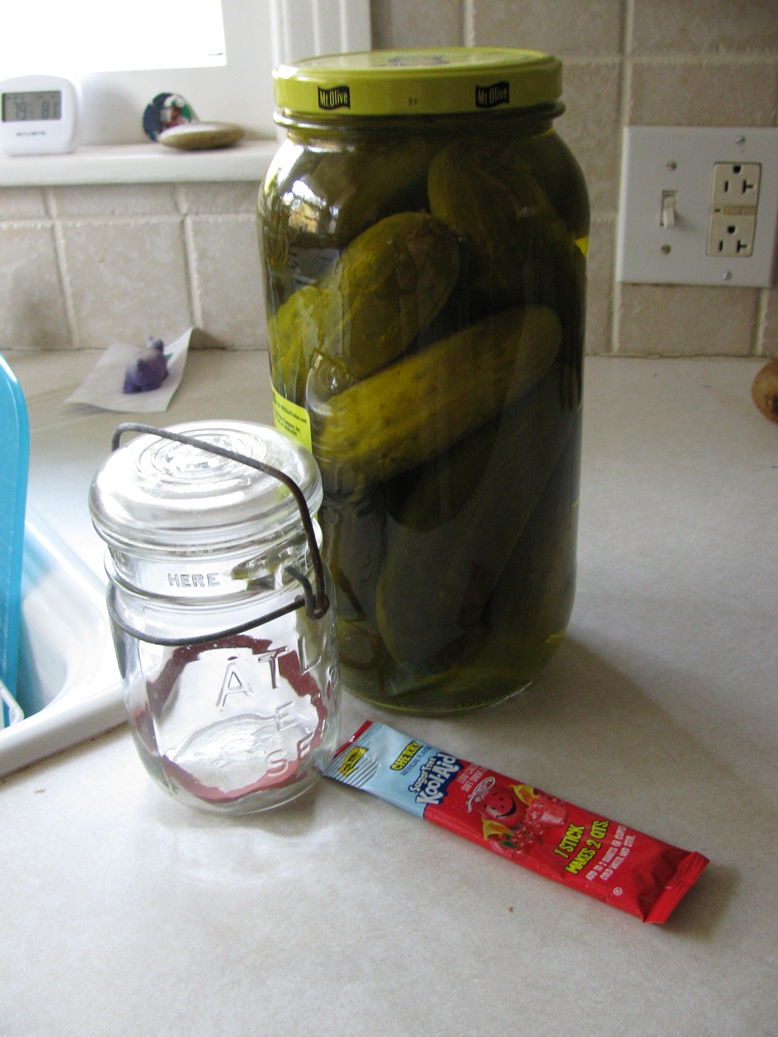
Yes, you read that right. Cherry Pickles. Obviously this is a very simple project, made even simpler by the fact that we used prepared pickles. I'm sure that you could make your own pickles, but for the sake of this project, I can't imagine why you'd go to that trouble.
Ingredients:
Dill pickles.
Cherry Koolaid mix -- we used sugar free, but you could probably just use the regular mix without the sugar mixed in. Results may vary, however.
A jar
What you do:
The original recipe called for turning a whole jar of pickles into cherry pickles, but I thought that maybe we'd just start with three. Besides, three was all my jar would hold.
1.Pour some of the pickling liquid into an empty jar. Don't fill it more than half full or you'll risk a flood of brine.
2.Add the cherry Koolaid mix. I used enough to make around a quart. Obviously far more than needed to make my liquid cherry-y, but I figured we might as well go for it.
3.Put the lid on the jar and shake.
4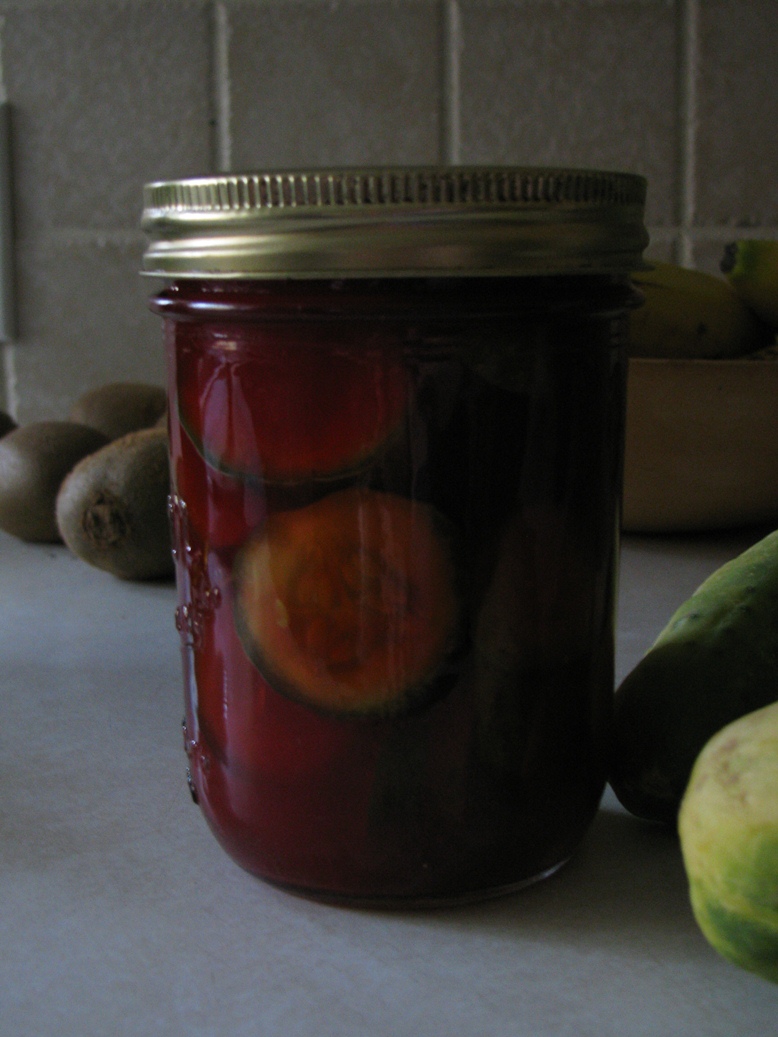 . Slice up as many pickles as you can fit into the jar. I used three for my pint jar.
5. Put the pickles in the jar. Put on the lid and let sit in the refrigerator for, well, as long as you can stand to wait. I figure about a week should do it.
I have no idea if these will be good, but I'll post our results. Stay tuned.

August 29, 2011
Week Five -- Serious Cookies
I realize that two weeks in a row of cookies is probably a faux pas, but I see last week as more of an experiment -- I mean, come on -- cookies from a mix. These are the real deal. Cookies are so often maligned as being only for an afternoon snack or just for kids, but I'm tired of going to dinner at someone's house or to a restaurant and having some fancy-shmancy nonsense that some people call dessert served to me simply because it's fancy or complicated. I have decided to start a movement that will hopefully help elevate cookies to their appropriate place in the culinary world. And I'm pretty sure that these cookies will go a long way toward making this happen.
Before you start these cookies, you must understand a few things. At the risk of channeling Martha Stewart, I do have to say that if you start messing around with either the ingredients or the method, you will not have the same results that I have had with these. For instance, if you decide to replace the butter with margarine, beware that these will not be the same…meaning they won't be as delicious. Unless you have a dairy allergy or are a vegan, stick with the butter. Not only does it taste better, but it really is better for you. So, here goes… this recipe is infinitely malleable as long as you follow the principle recipe and the method. Really, your only limit is your own imagination here.
Serious Cookie Master Recipe
2 sticks butter softened (use REAL butter)
1 ½ cups DARK brown sugar
1 egg
1 t REAL vanilla extract
1 ½ cups whole wheat flour (you can also use graham flour with excellent results)
1 t baking soda
Pinch salt
1 ½ cups rolled oats
1. Preheat your oven to 350 degrees.
2. Cream butter and sugar until it is fluffy. You can do this either by hand or with a mixer.
3. Add egg and vanilla. Cream again.
4. Sift together flour, soda, and salt or just use your hands to fluff them together in a separate bowl. Add to the wet mixture. Now, here is where things can go wrong. Only mix this until it comes together… do not over mix. If you start working the flour too much, you will develop the gluten. This is desirable in bread… not in cookies.
5. Add oats and whatever mix-in's you choose. Mix gently.
6. If you are working in a cool kitchen, you can go straight from here. If it's a bit warm, chill your dough first.
7. Drop spoonfuls of dough onto a parchment or Silpat lined baking sheet.
8. Bake 10-12 minutes for 2T size mounds of dough.
a. These also can be made into monster cookies… Reduce oven temperature to 325 degrees. Use the 1/3 cup measure or even the ½ cup measure. You should flatten the dough blobs slightly with your fingers if you do the monster cookie method. This will help them bake evenly.
Cookie Mix-in Options:
Cherry Toffee Chocolate Chip
1 cup dried cherries
6 oz chocolate chips
1 cup toffee pieces
Toffee Pecan –
1 cup toffee pieces
1 cup chopped TOASTED pecans – Don't be lazy. Toast your nuts first on a sheet pan in a 350 degree oven. Check them often. They will burn quickly. (You can substitute any nut… walnuts, almonds, etc.)
Coconut Almond
1 cup toasted slivered almonds
1 cup toasted sweetened coconut
Snickers
1 cup milk chocolate pieces
1 cup chopped toasted peanuts
1 cup toffee pieces
Traditional Oatmeal
1 cup raisins
1 tsp. cinnamon
½ tsp. nutmeg
Other mix-in options: citrus zest, candy pieces (such as MnM's, chopped up candy bars, bashed up candy canes), chopped dried fruit, crystallized ginger, caramels (add a little sprinkle of sea salt just before baking).

August 22, 2011
Week Four -- Car Cookies
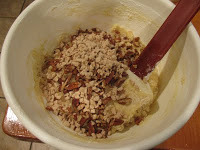
It has been a HOT summer here in Texas. Of course my son and I just returned from six weeks in Maine, inviting much ridicule and dirty looks from frie nds and family. I decided not to mention that we were wearing fleece coats on a couple of particularly chilly evenings. I'm pretty sure that might have sent them over the edge. But in homage to the heat, we've decided to embrace it for this week's project. The weather forecast for Saturday here in Tyler is 107 degrees. I've lived in the Mohave Desert, where it can reach 125 degrees and up on a summer day, but 107 is plenty hot. We are attempting to bake cookies in our car. The USDA website states that eggs should be cooked to 160 degrees for safety. So, in addition to checking the temperature of the car, I'm going to check the temperature of the cookies themselves. I've elected to use a mix. (I know – hush), but I don't want to spend a bunch of money on fresh ingredients if ultimately we can't even eat them. If we're successful, perhaps we'll try again with real cookies.
What You'll Need:
• One package of cookie mix. (We are using Betty Crocker Peanut Butter.)
• The ingredients for your cookie mix. (In our case: one egg, 3T of cooking oil, and 1T of water.)
• One pack of Reese's peanut butter cups. (A last minute addition).
• A car
• A wicked hot day.
• A thermometer – we are using a regular inside/outside thermometer and a candy thermometer. Make sure your thermometers go up past 120 degrees. Many don't.
• A cookie sheet.
• Parchment (optional)
Directions:
· Place your thermometer on the dashboard. Then seal up the car. No cracked windows here.
· Prepare cookie dough following the package directions.
· Place mounds of cookie dough on your lined baking sheet. We then flattened the cookies. I thought this might help them bake more evenly.
Wait until your car temperature reaches at least 130 degrees. Then place the cookie sheet on the dashboard of the car, angling them to get the most sunlight.
· Check on your cookies after 45 minutes and then every fifteen minutes or so. Use a hot pad.
 The pan will be much hotter than you think. We topped out our thermometer which reaches 160 degrees. Our candy thermometer showed that it was well past 170 by the time our cookies were baked. At that temperature, it took about 90 minutes to fully bake the cookies.
· Take them out, let them cool, and eat them.
· A surprise bonus…. Your car now smells invitingly of fresh-baked cookies.
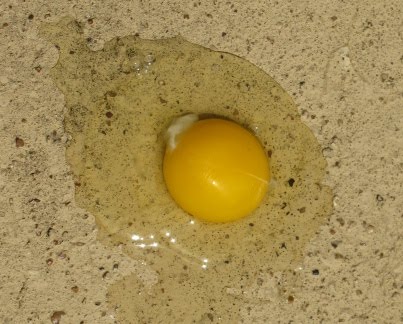
Just for fun we fried an egg on the pavement. It took seven minutes.

August 20, 2011
Week Three - Applesauce
We had to make these, both because apples were on sale at the grocery store and because we are feeling very homesick for someplace where there actually is fall. My mother wrecked me and I'm wrecking my son. I never ate that weird tan stuff they call applesauce that you can buy at the grocery store. I even remember looking suspiciously at the yellowish blob of the stuff on my lunch tray in elementary school. The menu listed applesauce. It was only vaguely apple-y and only marginally edible in my mind… not because it was terrible. It was just not that good compared to the homemade stuff I grew up on.Okay… you are likely saying to yourself. "That crazy woman! I don't have time to make homemade applesauce." But, don't despair… it is EASY! And so worth it. The apple jelly is optional, but I highly recommend it. I mean, what else are you going to do with all that juice? And lest you think this is like those little packs of jam that they serve at diners… let me tell you quickly that like homemade applesauce, homemade jelly is an entirely different beast. A delicious beast.
The recipe is sort of vague, but I think you'll get it pretty easily.
First, before you do anything… do you have a food mill? If you don't, you should, but you can still make this recipe, it just won't be quite as easy. Go buy a food mill. You can pick them up for about five bucks at an antique store like I did. I'm sure you can buy them new too, but probably not for five dollars.
Applesauce
Ingredients:
Apples (duh) I usually won't make applesauce unless I have at least five pounds, but this time I had ten. As for the kind? Get what you like. I love Macintosh, so if they are available, I buy them. A close second is a Jonathan apple or other thin-skinned apple. But, you can throw in whatever apples you like. You can even use the bruised ones… it doesn't matter. And you may be able to get your produce person to give them to you for cheap or free because otherwise they'll just throw them out.
Water
Sugar
Lemon juice
Cinnamon
Nutmeg (optional)
If you have a food mill, congratulations. This will be easy. Just quarter the apples and chuck them into a pot filled with about an inch of water.…. Yes, seeds, stem, those maddening little stickers and all. If you don't (I'm sorry), you'll have to peel and core them then put them in the pot. See? The food mill is the way to go.
Cover and let simmer until they are soft. This usually only takes about fifteen minutes tops. Keep an eye on things and add water if everything starts getting dry. It just depends on how juicy your apples are at this point. Let cool for a bit. You can uncover them to help them cool. Don't be alarmed. They look gross. Use a slotted spoon to scoop some into your food mill (or a blender or food processor). I guess you could mash them by hand with a potato masher, but I've never tried this. Whirl everything around until your mill is empty. Repeat until you've used all the apples.Add the juice of half to a whole lemon and a bit of sugar and cinnamon. Keep tasting it until you like the flavor. You can use artificial sweeteners or agave or stevia in place of some or all of the sugar, but I'm sort of a purist… or nonpurist, depending on your point of view.
Also, your applesuace will be brown, whether you add cinnamon or not. This is the natural color... that other junk is bleached or something. ;)
Apple Jelly
Now, you still have a pot of juice. You will need to strain this. You can use either a fine mesh strainer or cheese cloth. Shhh. This isn't hard. Then pour the juice or drip it into a clean pot (a medium one).Eyeball your juice (I told you this isn't exactly scientific) and add ¾ to 1 cup of granulated sugar for each cup of juice. You can't use anything artificial here…. Sorry.Place over a low flame and stir it until the sugar is dissolved. Let it simmer for about five minutes. You may need to skim off any foam on the surface. I don't know what this is… it's best not to ask.Now, let it boil gently until it begins to thicken. Use your spoon to judge this. Once it is about the consistency of honey, you're ready to pour it into jars or some other heatproof container. Let it cool and eat it. If it isn't as firm as you like, just tell everyone it's apple honey or apple syrup. If they still give you a hard time, tell them to shut it. Or just snatch it back from them and say "Too bad. More for me." That'll teach them.
August 15, 2011
Week Three -- Pecan Pie (The South)

This week's project and next week's project are an homage to both of my homes… I was born in the north, but I've lived in Texas longer than I've lived anywhere else. So, clearly I am neither a Yankee nor a Texan, but a little of both. Pecans are falling from the trees (or rather, the squirrels are chucking them at us whenever we get too close to the pecan treee in our backyard.)here in Texas, so I had to whip together a classic pecan pie. For the pie…. There are probably twelve thousand recipes for pecan pie. Some fancy (add bourbon and bittersweet chocolate and candied orange peel) and some not… corn syrup and store-bought crust. I have my own recipe. It's (in my opinion) the best pecan pie. It focuses more on the pecans and less on the moodge that holds them together…. Now, for my Yankee friends… here in Texas you say, pee-can, (emphasis on the 'pee') not pe-con and never peck-ann.
Deep Dish "PEE-can" Pie
Ingredients:
1 cup light corn syrup
1 cup dark brown sugar
1 t pure vanilla extract
Pinch of salt
3 eggs lightly beaten
3 T melted butter (cooled)
3 cups toasted pecans. (These can be halves or pieces or both)
Pie dough for a single crust pie. (Either buy this or use a half recipe of the pate brisee that I listed in the apple pie recipe. )
1. Combine the corn syrup, sugar, butter, vanilla, and salt. Add lightly beaten eggs and half of the pecans.
2. Pour mixture into unbaked pie shell. Then add remaining pecans, pressing down slightly to sink them into the pie base. (This makes certain that you have lots of delicious pecan goodness on the top of the pie. )
3. Place pie pan on a cookie sheet and bake in a 350 degree oven for approximately 50 minutes. Check periodically and cover with foil if the edges of the crust or the pecans become too dark. Tap center surface of pie lightly - it should spring back when done.
4. Cool for at least an hour.
5. Serve plain or with a scoop of vanilla ice cream.

August 8, 2011
Week One -- Doughnuts
I should start by admitting that I have never actually deep fried anything. It's sort of the whole idea of food swimming in oil, but it's also the mess that has been prohibitive. But, I have decided to be fearless this year. We've made baked doughnuts. I bought a doughnut pan from King Arthur Flour last year, thinking we'd be baking doughnuts all the time, but the truth is, we've only used it once. The doughnuts were okay, but they definitely weren't the puffy bits of heaven that we buy down the street.
I poked around in my cookbooks and online and found what I think is an excellent recipe. (We'll see.) It's from Alton Brown's show, Good Eats. I picked it because it's simple and also because I really do think Alton Brown is cool in a geeky, smart way. Other reasons for picking this recipe: no lard (we're vegetarians) and no off-the-wall ingredients (sweet potato, bananas, avocado???).
Mixing the dough was easy. I didn't even bother to haul out the stand mixer. I just did it by hand. And honestly even though I spent three years as a professional baker, it makes me crazy sometimes to have measurements given by weight. I have a scale, but again… hauling it out is a pain, so I just went by feel. I added flour little by little until the dough became soft and not too sticky. (One note: this recipe makes a mountain of doughnuts! We ended up freezing half of it to use later… maybe cinnamon rolls or something.) The first rise was about an hour.
 We rolled it all out and then I set my son cutting it. At first he was bummed that we didn't have a doughnut cutter, but he rallied. We also used some dough to make impromptu twists. Then it was one more rise for thirty minutes. I took that time to make the two glazes... vanilla and chocolate... and heat up the oil. This last bit was sort of scary. I had images of kitchen fires and emergency rooms in my head. I also only used about two inches of oil. I didn't see the need for more. (And that was a good choice). I used a candy thermometer on the oil, which was a good choice as I had to keep adjusting the flame under the pot. After the oil hit 365.... which my son monitored, I slid the first few rounds of dough into the pot. They puffed immediately... which made both of us very happy. The recipe says that it takes about 1 min for each side, but it was more like 20-30 seconds. I used a long metal fork to flip everything. And then it was another 20-30 seconds before I took them out.
We drained everything on paper towels and let them cool (a bit). Then we dipped them in the glaze. The twists I sprinkled with cinammon sugar. I liked the twists the best, but my son preferred the chocolate. (Duh...) Like I said, it made a ton, so we ended up giving most of them away, but they were really, really good.... fresh eggs, good milk, good chocolate... yep, probably a bit better quality than your normal doughnut shop.

Making doughnuts was fun, but really messy and now I have a pot of oil on my stove and I'm not sure what to do with it. Yikes. But… they are wicked good. I have to say that these doughnuts beat any store-bought doughnuts hands down.
Yeast Doughnuts
recipe courtesy of Alton Brown (Good Eats, 2004)
Ingredients
• 1 1/2 cups milk
• 2 1/2 ounces vegetable shortening, approximately 1/3 cup
• 2 packages instant yeast
• 1/3 cup warm water (95 to 105 degrees F)
• 2 eggs, beaten
• 1/4 cup sugar
• 1 1/2 teaspoons salt
• 1 teaspoon freshly ground nutmeg
• 23 ounces all-purpose flour, plus more for dusting surface
• Peanut or vegetable oil, for frying (1 to 1/2 gallons, depending on fryer)
Directions
Place the milk in a medium saucepan and heat over medium heat just until warm enough to melt the shortening. Place the shortening in a bowl and pour warmed milk over. Set aside.
In a small bowl, sprinkle the yeast over the warm water and let dissolve for 5 minutes. After 5 minutes, pour the yeast mixture into the large bowl of a stand mixer and add the milk and shortening mixture, first making sure the milk and shortening mixture has cooled to lukewarm. Add the eggs, sugar, salt, nutmeg, and half of the flour. Using the paddle attachment, combine the ingredients on low speed until flour is incorporated and then turn the speed up to medium and beat until well combined. Add the remaining flour, combining on low speed at first, and then increase the speed to medium and beat well. Change to the dough hook attachment of the mixer and beat on medium speed until the dough pulls away from the bowl and becomes smooth, approximately 3 to 4 minutes. Transfer to a well-oiled bowl, cover, and let rise for 1 hour or until doubled in size.
On a well-floured surface, roll out dough to 3/8-inch thick. Cut out dough using a 2 1/2-inch doughnut cutter or pastry ring and using a 7/8-inch ring for the center whole. Set on floured baking sheet, cover lightly with a tea towel, and let rise for 30 minutes.
Preheat the oil in a deep fryer or Dutch oven to 365 degrees F. Gently place the doughnuts into the oil, 3 to 4 at a time. Cook for 1 minute per side. Transfer to a cooling rack placed in baking pan. Allow to cool for 15 to 20 minutes prior to glazing, if desired.
Vanilla Glaze (my personal favorite)
Ingredients
• 1/4 cup whole milk
• 1 teaspoon vanilla extract
• 2 cups confectioners' sugar
Directions
Combine milk and vanilla in a medium saucepan and heat over low heat until warm. Sift confectioners' sugar into milk mixture. Whisk slowly, until well combined. Remove the glaze from the heat and set over a bowl of warm water. Dip doughnuts into the glaze, 1 at a time, and set on a draining rack placed in a half sheet pan for 5 minutes before serving.
Chocolate Glaze (Harrison's favorite)
• 1/2 cup unsalted butter
• 1/4 cup whole milk, warmed
• 1 tablespoon light corn syrup
• 2 teaspoons vanilla extract
• 4 ounces bittersweet chocolate, chopped
• 2 cups confectioners' sugar, sifted
Directions
Combine butter, milk, corn syrup, and vanilla in medium saucepan and heat over medium heat until butter is melted. Decrease the heat to low, add the chocolate, and whisk until melted. Turn off heat, add the powdered sugar, and whisk until smooth. Place the mixture over a bowl of warm water and dip the doughnuts immediately. Allow glaze to set for 30 minutes before serving.

Heather Hepler's Blog

- Heather Hepler's profile
- 273 followers

