
General Craft & DIY discussion
Miscellaneous Crafts
>
Models
message 1:
by
Jim
(new)
Nov 07, 2012 05:39PM
 Are you building a model? Tell us about it here.
reply
|
flag
I think models are worth crowing about. My father used to make metal car models that were awesome. He made vintage cars like an old Duesenberg or Packard. I made a very intricate boat model once & used to love model rockets. My sons & I did one just 3 Xmases ago. Had lots of fun shooting it up into the air, too.
 Once for a while as a kid I lived in a town where occasionally I could make $2 raking a neighbors yard and then run to the drugstore and buy a model. Never had the money for paint, and that period didn't last long, but what I learned has helped me immensely over the years.
I learned about cars. Back then the kits would label the parts, such as "alternator", instad of crrent trend of "part # 51". I learned patience. You gotta let the glue dry BEFORE you play with them. I learned attention to detail. The wheels won't turn is you're not careful.
Once "grown up" (debateable) I still occasionally delve into models, though $2 barely buys the glue now. I've actually made money building things like dynamic landscapes to demonstrate good water conservation and spaceships with fancy lights. I never had an opportunity to go to Hollywood, but modeling is big business there.
Now I still enjoy making a model once in a while. I'm still learning things, like with the current model residing on the kitchen table (See Photo). I'm learning how a Monster Truck is put together. And I buy challenging models, so there's no small amount of problem solving, (especially when I ignore the insructions) which keeps my dull mind lubricated.
So to summarize my "crowing" about models, there is so much a person can learn that transfers to becoming successful learning other crafts that I think every parent should take away the video games once in a while and make their kid build a model.
Thanks Jim for adding computer encryption referring to the photo... I forgot to mention the photo was in the group "Photo" place.I thought of one more reason I still enjoy models. Whether one is ten years old or sixty life can often present problems that seem insurmountable. Indeed, as I get older there are far too many problems that can never be solved... relationships that can never be healed, or illnesses that can never be cured, and sometimes I need a small victory.
Doesn't hurt of course is that when I succeed I can play with my new toy car!
Foxtower wrote: "...sometimes I need a small victory. ..."LOL! So true.
When building Erin's barn, I didn't really do things to perfect scale, but I did to some extent. Using a scale is a good skill to have. I used one quite a lot when building new homes - had to estimate materials for the job from the blueprints.
In the Dec2012 issue of the American Science & Surplus catalog, they have siege & DaVinci models on page 19. They all look interesting. Small catapults or trebuchets might make a great toy for the kids this year.I try to make the kids a toy every year that we can all play with. Last year I turned top spindles on the lathe & glued old hard drive platters to them. I made handles so we could use a string to really get them moving & then we had 'battling top' contests on the dining room floor. Some of them spun for incredibly long times. The secret is a bit of super glue on the tip of the spindle.
Anyway, back to siege engines... A friend of ours has a Halloween party every year & one of the activities is a pumpkin throwing contest. Each year we'd try to build a better catapult. I'm thinking a cool toy would scaled down models. Maybe they can throw frozen peas. The dogs would love to clean them up & that should add to the excitement. All of the kids have dogs, so if we get everyone together (doubtful) we'd have 10 dogs & 2 cats in the house. That should be enough Christmas Chaos for anyone.
;-)
I did some Internet research on Trebuchets today. I found a couple of cool sites.The Grey Company Trebuchet Page
http://members.iinet.net.au/~rmine/gc...
is excellent on how they work. Especially this page:
http://members.iinet.net.au/~rmine/ho...
Wicked How-To's
How to do weird stuff (and occasionally something useful)...
http://wickedhowtos.com/index.php/200...
is pretty cool, but their plans are for a big one. They do have some great links at the bottom.
- In a real trebuchet, the sling end of the arm is about 4 times as long as the weighted end, but that might change with a small model since there might not be enough weight. i'm thinking a spring might be a possibility, too.
- The sling is about the same length as the sling arm side.
- When the sling releases describes the arc of the load.
I worked on the last item first. I made an arm 1/2"x1" (because that's the size oak scrap I had) a foot long. In the end, I made a 3/16" slice about 1" long & put in a round piece of wood with a finger on it. That finger is now adjustable so controls when the sling releases.
I made up the base, too. I made it long, about 6"x16". This will allow me to have plenty of space for moving things around as needed. Once I figure out a decent design, I'll make a shorter, permanent base. While I'll reuse the arm, much of this is going to be tossed.
I'm stuck on how I want to do the trigger; a string over the arm held by a pin or a pin through an eyelet. Some will depend on the amount of pressure the arm will exert. A pin through an eyelet will probably bind if there is much. Any ideas?
I'll try to post some pictures tomorrow.
Sounds like a fun little project!I can't imagine at that scale where you would have any problem with a pin trigger as opposed to a "rope" trigger where you cut the "rope" to trigger the action like some of the full scale versions.
...and when it's done you can lay seige to hornets nests!
I got a working model put together, but the weight doesn't seem to give it much of a push. It's throwing things about 6'. That's not far enough. I want it strong enough to sting at that distance, not flop. I left the arm long on the weight end & moved the weight an inch further down. That helped a bit, but not much. It was time to come in, so I haven't tried the last hole, yet.I still haven't worked out a trigger since I'm not sure of the finished height yet. I'm using my finger. That works just fine, so maybe I won't make one.
More weight? I always wondered how efficient the sling release would be... is it possible to change the angle of release to get that nice high parabola?
And yet in the real world the weekend is over... do you need to put it off to drive kids to school and regret you didn't get it stinging good for those those grumpy customers, or can you continue to play?
I'm going to try more weight, moving it around on the end of the arm, & possibly a spring. While I found a paper on the math governing how a trebuchet works, it uses too much trig & calculus for me. I could probably work through it in time (I've studied both, but it's been a lot of years.) but practical experimentation has always been more to my liking.More weight probably won't make a lot of difference simply because I'm so limited in the amount I can add due to space. I'm kicking myself for getting rid of all my lead when we moved here. I'll have to see if I can find some decoy weights or something. Right now I have a basket made of 1/2" hardware cloth filled with iron plugs.
How about a logic check?
Gravity only accelerates at 32 ft/sec2 & the weight just doesn't have far to fall, so the speed of the throwing arm is going to be limited by that.
- A heavier weight closer to the fulcrum should make it fall faster due to the way a lever works, within limits, of course.
- By moving the weight further out, I'd lengthen the time of the fall, but lose so much mechanical advantage that it would probably be slower.
Am I think correctly there?
The sling release is quite efficient. I can see a big difference depending on where I have the release finger pointing.
I like math! I just have very little aptitude for it. I use algebra and trig regularly, but in college I flunked out when I got to multivariate calculus and linear algebra. However beautiful the math was my feeble brain couldn't get around the language...When I built my thresher I needed to calculate the spring strentgh but couldn't get enough information on the possible springs available to complete accurate equations, yet with the understanding of the math I could understand what trial and error results meant.
No, your reckoning is off. Gravity is constant whether the weights are near the fulcrum or away from it, and being away will increase the "moment" giving you MORE!
Are you using bushings on the fulcrum? The less friction you have... well you know!
I always had an aptitude for math, just don't remember much after so long since I never use any except for simple Euclidean geometry & some simple algebra.I know gravity is a constant, but ... well, it might not matter. I just re-read the explanations again & the square-cubed law plays hobb with the weight. I may have to go to a spring assist. A 3' arm is the smallest model I've seen that has any real power to it.
I'm not too worried about friction on the arm. That seems to be about negligible. If it does become an issue, I have the spindles for old hard drives to use. I can slip them in without much trouble.
They were never meant to produce ballistic speeds... just throwing a heavy object effectively....(I'm a MAN, I need more POWER!!!)
I GOT MORE POWER!!! The fix was a longer arm - it's now 26". The weight as close to the end is best, BUT lengthening the throwing arm by moving the axle back towards the weight makes a huge difference, too. I got my best throws when I moved the axle from 16" from the finger end to 18". I'm now getting it to throw 20' across the shop easily & hitting mid wall instead of a measly 6'. Now that's what I was after!
Here are some pictures of my test machine.
Here's the finger end. I still haven't made a trigger, so the white cord holding it down is just for show. The yellow is the actual sling.
Here's the weight. It's about 1.25lbs & easy to make.
Of course, this is just a test model, as you can tell by the clamp holding it together & all the ugly scraps. Still, now I have a good idea of how to make a pretty one.
It is. There are some minor kinks to work out. The sling is made of thin leather, but I need to find something softer & thinner. I think I have some old deer hide from one of my grandmother's that she made gloves out of. That might work best.I may make it narrower, with the ability to snap together, too. The kids will have to travel with it or I'll have to ship it to them. The trigger is still a mystery. Right now I just pinch the sling. Still, now that I have the basics figured out, the rest is just window dressing.
I see science and surplus has a model trebuchet.... Meanwhile back on the farm the end is near. Finally getting the last pieces on the model car, proceding slowly as the non-toxic glue dries slowly. Even a ready made model has challenges, like figuring out how to clamp things in place with string, toothpicks etc. All skills that translate to full scale if you've ever had to devise a clamping arrangement with rope and wedges on a large piece of furniture.
..and then I can play "monster truck show" all over the old model cars!
LOL! Boys & their toys. Have you ever fiddled with remote controlled stuff or model airplanes? I never have, but my oldest did some. We never really had the money for it. It's expensive.
Too expensive for me too, especially the learning curve on airplanes. It's like me and cooking... I can't succeed at a craft that requires me to eat my mistakes! Its like one person I knew who build rc planes, I couldn't afford to rebuild enough planes to become skillful at flying them and NOT crashing!
I was just having this conversation with another guy about RC helicopters. They have some that seem fairly inexpensive & have rechargeable batteries. I got one for my son. As the battery loses charge, the flying characteristics change & they're wrecked too often. By the time you start getting the hang of them, they're usually broken. They should be sold in lots of 3 -5. Then we might actually get to really play with them.
Speaking of play... the monster truck was great fun... a little silicone on the axles and it "runs" great. Alas I'm already on to the next project... just haven't figured out if it's classified as painting or woodworking....
Josh, Erin's BF came up today for the holidays. Besides going for a ride (the girls were off at a riding lesson) we went out to the shop & played with the trebuchet. He thinks it's pretty cool. It's really whipping those cedar blocks. He came up with a good idea. We could soak the blocks in lighter fluid & light them, then throw. That would be awesome at night, wouldn't it?
I'm glad you're enjoying the holiday!
 Jim wrote: "I was just having this conversation with another guy about RC helicopters. They have some that seem fairly inexpensive & have rechargeable batteries. I got one for my son. As the battery loses c..."
I flew RC models for 5 years or so. I was never real terrific at it. Finally the WORK to load all my junk into the car, drive to our field, unload, fly 3 times, reload car, drive home, unpack seemed like it was more work than fun. Also you need to enjoy rebuilding them as they are all 'built to crash'. I flew glow-fuel engines about .46cc. Never made the jump to electric or helicopters. A couple enthusiasts who were darn good built a couple home-made real simple electric models which they would fly and fly till they crashed, rubber-band them back together and just start flying again. This would be ideal I think. The biggest problem for old men is depth perception. We are always running into trees we thought were either in the forefront or the background and, in fact, were dead even with the model. Flying 'in-close' in your backyard is much more difficult than flying them high and far out, needs better hand-eye coordination. I bought most of my kits and ARFs (almost ready to fly) from Tower Hobbies.
Helicopters are much more technically challenging, interesting than aircraft. Reputedly harder to fly. Definitely more expensive. I don't know how 'cheap' they've become but I can't imagine a good one will be cheap enough to crash. Also I was always put off by standing within 30 yards of them running, with those 3' sabers whirling and ready to come off and flicker your way.
I'm with you on the dangers of the rotors, Earl. The cheap little electric one was scary enough. I'd be very worried about a gas one. I've seen what the airplane propellers can do to a finger.
I finished the trebuchet model for James. Here's a picture of it.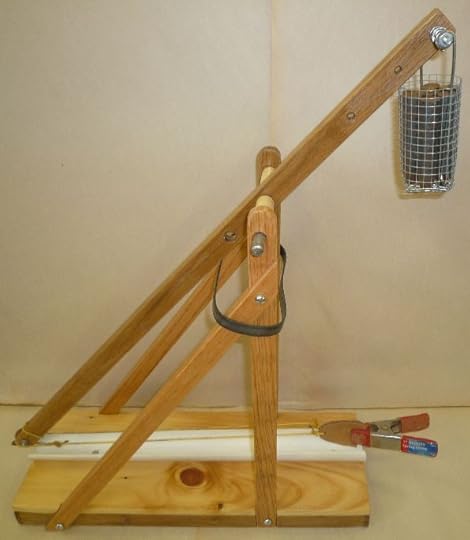
The rubber band around the top is an old bandsaw tire & does an amazing job of minimizing the vibration. I cut a piece of steel that would fit in the base to do the same thing, but decided not to use it. On the highest power settings, it does buck a bit, but that's kind of fun.
I found the best way to launch it is to put my finger on the finger end of the throwing arm. That gives you a free hand to load the sling & keeps you to the side. It also gives more consistent results over holding the sling.
Cool! Nice finshished look! But where are the wheels??
No wheels. I tried to keep this as simple as possible. I meant to video it in action, but forgot & packed it up already. Here is a YouTube video of a table top model with a long winded explanation. If you go to 3 minutes, there are some stills of it in motion & that minute is probably all you need to see.http://www.youtube.com/watch?v=DYskeE...
Mine is better than the one in the video, though. The main thing I did was make the sling release finger at the end adjustable. That allows the sling to release at different times which varies the arc. I also put extra weight holes & a pivot hole so the differences in leverage are easy to find. It's pretty amazing the difference between the two pivot holes. There's not as big a difference where the weight goes, but still a fair amount. The middle weight hole is the typical 1:4 ratio when it's on the back pivot hole.
For a trigger, I decided just to use a finger on the end. Ammo is 28 pieces of 3/4" blocks of red cedar, but I sent his girlfriend an email to pick up some frozen carrot slices. That should amuse the dogs, too. It should give James plenty of fiddling.
I tried a spring catapult last night. Didn't work. The spring wasn't tight & strong enough, so it twisted up. I was trying to hold one end through an upright, put the other through a pipe just a bit bigger than the spring. Two holes in the pipe allowed the catapult arm through. I'll have to see if I can find a tighter wound spring. This one was too open, I think. If I even stick with this design. I'm not sure I will. I didn't think winding the string up would be all that good, although nylon has a lot of give to it. Any ideas?
My thresher is composed of spring catapults! The long kind with a loop on either end, though they don't open very far (yet they shoot beans around the inside of the thresher real good!) (When you start beating your plowshare into a sword I'm gonna have to report you to the top dog marg!)
Super idea! I can drop by Southern States on the way home. I'll bet my neighbor has some old springs for a hay rake. Thanks!I did get the pipe & spring idea to work pretty well last night with a tighter, smaller spring. It doesn't look very good, though.
Now wait a minute... they didn't have springs (or rubber bands) way back when they needed catapults... what ever did they do? (I got a couple old rake tines if you really need them!)
Those twisted ropes HURT if the scrap holding them in place on a clamp lets go! I can't imagine how that translates into a catapult...?
Imagine nylon, if hemp is that strong. We used to repel using nylon ropes & if you did a slack Aussie, you could really get some bounce going. That's where you put your D ring behind you, dump a bunch of rope, & jump off like Superman with arms spread. When the rope starts running through your hand & the D ring, you pull your arm across your body to stop it. I never measured it, but it looked like we could get 5' or so of bounce out of 40 or 50' of rope. That's a lot of spring.The only bad thing about string is that it has to be slackened in between times. That's another layer of complexity to build in properly. I have some ideas, though. Probably ratchets on both sides.
Now see, if you can pull off a catapult operated by twisted fiber THAT would be amazing!
I used some cord I salvaged off of an old set of blinds today & twisted it up on some dowels for a catapult. Wow! The difference between it & the steel spring is amazing. It very easily twisted up & the first time I snapped it, the piece of scrap pine I'd been using as a test arm broke when it hit the stop. Definitely the way to go.
WOW! Thats awesome!! The American Science and surplus one uses wood "springs"... very lame and unrealistic. It sounds like you're on the right track!
I didn't get much further on this over the weekend. Lots of looking & thinking, trying to decide on how to build it so that it will look good & stay stable. The twisted string creates a lot of tension so when pulling the arm back, I have to hold the base down. Ditto when I let fly. It actually shoots 1/2" cedar blocks so hard & fast, they'll curve & I can see wind resistance slowing them up. I'll bet a marble would really hurt. Cool.
I'm almost done with the catapults. I just put the 2d coat of poly on them this morning.I like to finish wood with polyurethane, one of the best finishes around, IMO. I have it in latex & oil based. I only use the latex on very light, almost white woods. All others get the oil base where the amber cast makes the wood pop better. I use Minwax fast drying gloss finish, which is very thin.
I put the first coat on with a poly brush. I buy the 1" brushes in boxes of 40 direct from the manufacturer for under $10/box delivered. A lot cheaper than getting them from the hardware store. The brush puts on the poly fairly thick.
After it dries completely - a full 24 hours, not the 2 hours they say you can do - I sand it with 220 grit sandpaper. Then I put a thin, second coat on with a Viva paper towel. They have less dust in them than a regular paper towel & are finer. I can put on a thin enough coat that it's dry to the touch in an hour, although I usually let it go at least 12, if not 24 before touching the project again.
Then I'll lightly go over the project with 320 sandpaper just to knock off anything that pops a bit & apply a light spray coat of satin finish poly. I don't like a high gloss finish, but the gloss stands up better than the satin. The latter is inherently less durable because it creates the finish by microscopic bubbles in it.
I've worked this process out over the years & while I'll vary the number of coats depending on how much I have to fill - end grains can take an extra coat or two on porous woods - I've found that it's the easiest, most efficient way to get a good looking finish on most projects.
Poly stands up to a lot of abuse, too. It won't stain if someone sets a wet glass on it, for instance. You can scrub it with soap & water, something we appreciate since the dogs often come in & shake mud all over. The kids used to be worse. (Ever try to clean a VCR after it's had a candy bar put in it? Or a crayon?)
Gee Jim.. I think you're trying too hard!Acrylic poly yellows over time and eventually will get that nice golden cast.
When I use alklyd based poly I mix it with thinner so it flows without bubbles when I slap it on. I sand lightly between two or three coats with whatever worn sandpaper or sanding sponges are about, and for gloss I just let the last coat be (professional brush in dust free zone) or for satin I finish buffing it to a soft lustre with a green scrubbie.
Second and third coats are already going to be thinner by virtue of the fact the first coat has sealed the substrate. With cheap brushes... you get what you pay for! I can go from latex paint, to poly to bin shellac sealer and back to latex paint with the same brush... endlessly! (I wear out the bristles but never lose a brush because it's become a club)
In my experience the gloss finish isn't any more durable than the glossy. It's more personal preference I think.
Ten years in business and whether is was natural furniture or protecting faux finishes I never had a problem!
Actually, it's easy as pie & the paper towels work much better for thin coats on the bowls than a brush. I never use anything with color in it for sanding though. I love aluminum oxide sandpaper. It never shows up in voids even when I miss some.I think you meant gloss isn't any more durable than satin, not gloss & glossy, right? It's supposed to be & gives me the choice, but I wouldn't place any money on it. Depending on the grain, sometimes I do leave the gloss.
Funny, sad story about exterior & interior polyurethane: I was doing some remodeling at a plant that packaged paints & stuff for big companies locally. They'd get tanks of stuff & then put it in the little paint cans we buy at the hardware store.
I saw the conveyor running cans of Exterior Poly, then cans of Interior Poly. They never changed the drum that was feeding the cans, though. Same stuff. I happen to know at that time, that size & brand, the exterior sold for $1 more per can.
Truth in marketing? Never happen.
I finished the catapults tonight & got them all packed up. Forgot to take pictures. Drat. Made up one of those 3 lb coffee containers of 3/4" cubes to split between the boys for ammo. The girls are going to want my hair.;-)
Here are the pics of one of the catapults. I cranked one up a bit tonight & they will toss a 3/4" cube of oak 20' across the shop & hit the wall hard & high enough to bounce off a good 6'. Yeah, buddy! 

 Thats awesome Jim! nice detail on side blocks!
I take it you hold the lever down while cranking? It would have been neat to have a little catch release, but then I don't have one in front of me to see if it's a working notion or not.

