Obsessed with OCC: How to Apply a Lip Tar

Lip Tars are awesome, but they are also tricky little beasts.
There’s an ease to traditional bullet style lipsticks or even to lip glosses, where a wand applicator is included. Though there is some skill involved to getting darker shades perfectly even; true. Generally speaking, however, traditional lip products are easily accessible to all: open it up, swipe it across the lips until you build it up to your desired opacity, and wah-la; you’re done!
Not so with Lip Tars, my friends. Nuh-uh; no way. First of all, Lip Tars require that you use a seperate applicator (in this case, a brush) to apply them. You cannot just squeeze the product out of its little tube on to your lips; you’ll wind up with far, far too much product, that will smear all over, creep into every little lip line, and–in general–make an unholy mess. To make matters more complicated, they aren’t really a one-and-done kind of product either. To really get a pigmented lip that lasts and lasts all day, without transfering or smudging, there is a step-by-step process to getting them set juuuuuuuust right.
So, let’s take a look at the steps of Applying a Lip Tar.
What You Need For Good Lip Tar Application
A lip liner
A lip brush
A palette
Your Lip Tar(s) of choice
Got all that?
Good.
But, wait! Before you reach start squirting product all over that palette and your hot little hands reach for your lip brush, let’s talk amount of product necessary. The teeniest, tiniest bit of Lip Tar is really all you need for a single application. I’m talking a truly miniscule amount here. (I rarely get it right myself; even the gentlest squeeze of the tube gives me double the product I really need!)
See that right there?

Too much. Waaaaaaaaaay too much. I’m serious; that’s enough product for a dozen sets of lips!
This, here?

That’s closer to what you want. Honestly, even that is probably too much and you might still find that you have product left over, even after applying a second layer. Make peace with the fact that you may well be wiping away excess product after every application. Its really hard to get a little enough product at a time that there is no waste but, considering how much Tar you get in each tube and how little you really need, that “waste” isn’t the worst thing in the world.
Oh! One more slight deviation before we get down to the nitty gritty. Let’s address on of the biggest questions, when it comes to lip products: To Prime or Not To Prime.
While I am most definately a supporter of priming the lips before a lipstick application, I’m actually not a fan of using primers before a Lip Tar. I’ve tried it both way, folks, and I have to tell you… I have yet to find a primer out there worth adding to this already lengthy process.From my MAC Prep n’ Prime to my Too Faced Lip Insurance, I don’t think they add anything to the party.
OCC does sell a clear Tar they call a primer as well, but I honestly think its pretty useless in that regard. I didn’t like how it sheered out the color of the tar I applied over it (even after a 30 minute “dry down”), and it didn’t seem to make a lick of difference when it comes to smoothness/lasting power of any of my Lip Tars. I love that clear Tar as a shiny top coat or a mid-day moisture refresher–but as a pre-application primer? Nope; no thanks.
So, I don’t prime. (Beyond the previously discussed exfoliation/hydration of my lips.) But, you may find that you–personally–prefer to prime. Its really up to you. But since I don’t, I won’t be including that step in here. While is why we’re going to jump on in, sans primer, and start with…
The Lip Tar Application Process
 1. Line Those Lips. Take those freshly exfoliation and prepped lips and line them with the liner of your choice.
I highly suggest you do not skip this step. I was never much of a liner-gal myself, until I started wearing Lip Tars. Their thin, liquid-y formula tends to make them feathery–especially if you have any vertical lips lines (like myself), and the only way I’ve found to truly prevent that is to line your lips prior to application.
Which liner, you may ask? Honestly, any ol’ one will do. I’d say, feel free to use just about any liner you prefer. I’ve found no problem combining Lip Tars with any other brand’s liners so far, often preferring MAC or Too Faced ones myself. OCC also makes some wickedly awesome Cosmetic Colour Pencils that make amazing liners (with fabulously pigmented colors matching some of their iconic shades, like Grandma, NSFW, and Black Dahlia). I reviewed them last week, if you’d like to check them out.
If you don’t feel like using a colored liner to “match” whatever lip color you are going for (or just can’t find a colored liner that , I recommend a clear, anti-feathering liner. This is what I use. Many high end brands make great ones (such as Urban Decay’s Ozone liner or No Cosmetics No Bleeding liner), but I think that the cheap, easy-to-find Milani Anti-Feathering Liner is just as good–and its something like a quarter of the price at my local CVS!
Since I am using a clear liner in this demo, my lips look pretty naked, but I assure you–anti-feathering liner was applied!

2. Dispense Product. Now that your lips are fully prepped, lined, and ready to go, give your (closed!) tube of Lip Tar a good, hard shake. The product tends to separate over time, with the pigment falling out of suspension in the Tar’s oils. Luckily, they are easily mixed and after a minute or so of shaking or gently manipulating the tube, everything should be all mixed up again.
 Unscrew the cap and gently squirt out the tiniest bit of Tar. If you are mixing multiple shades to create a custom color (something we will discuss at length in a later post), now is the time to do so. I find that it is much easier to mix the products on your palette, with either a toothpick of the tip of your brush, than it is to try and combine them evenly on the lips!
For today’s demo, we are using Trollop, and aiming to get a similar amount of product to that shown in picture two above on our palette.
3. Pick Up Product. Dab the tip of your lip brush into the color, being careful to pick up as little product as possible. Its always better to build up with a Lip Tar; starting out with too much product will make a mess. When you have too much Lip Tar on the lips, it slips and slides all over as you try to apply it, making it really, really difficult to get an even application.

4. Apply the First Layer of Lip Tar. Apply the first dab to the center of the lower lip and gently work it outward with the flat surface of your lip brush.
 Starting in the center gives you the opportunity to evenly spread the product out across the lips, and it keeps it from “bunching up” at the corners. I like to turn the brush on its side to use the thinner edge as I approach the edge of the lips, getting it right up against the outline of my lips/lip liner.
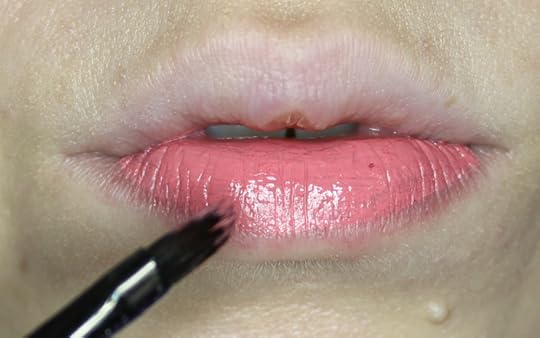
Once my bottom lip is evenly coated, I press my lips together so that the excess product transfers to my upper lip.

Once some of the product has transferred on to my upper lip, I take my brush and smooth that transferred product out as evenly as I can before dipping my brush back in to the Lip Tar on my palette.
With that second dip, I fill out the rest of my upper lip.
 5. Blot. Take a clean tissue and gently blot down the product. I first do a “between the lips blot,” to get off any excess from the inner area, and then a secondary “kiss blot,” blotting the entire surface of my lips. (Excuse the nails; I was overdo for a fill-in.)

6. Apply the Second Layer of Lip Tar. I find that my Lip Tars perform and last much better when applied in sheer, multiple layers; blotted down in between each application. When I try to apply them more thickly, they become messy or uneven; when I try to get away with a single layer, the color is more sheer than I’d like.
So, I layer, and I suggest you give it a try too. (Unless, of course, you want sheer color or happen to like the way the single layer looks. I’ve done that a time or two myself, with some particular colors. If you prefer it that way, skip the rest of this step and proceed to Step 7!)
You can really repeat steps 5 and 6 as many times as you like, until you build up the opacity that you prefer, but I find two layers usually does it for me; sometimes three, if I’m going for a really intense color!

7. Let It Set. Lip Tars do not set immediately. They take their sweet ol’ time settling down once applied. Sad, but true. This is probably my least favorite part of Tar application, but I’ve grown used to it. To give your Tar ample time to dry down and set so that it is long-lasting, transfer proof, and matte (if you are using one of the matte formulas), give it a good 30 minutes without eating or drinking.
And that’s it!
After that time, it should be good and dry; settled in for the long haul. And I mean–come on–look at that color. Isn’t it worth the effort?
I certainly think so!
Hope this helped you navigate the tricky world of Lip Tar application. Come on back next week, when we start review OCC products and discussing the fun custom color options their products give you!