Supply Tips from the Art Prof: Charcoal Drawing

This post, which will go into detail about materials for charcoal drawing is inspired by what I saw last week while reviewing portfolios from my RISD Pre-College students. From what I saw, it is apparent to me that the majority of high school students are taught to draw exclusively with pencil. In my freshman drawing class at RISD, I don’t even use pencil with my students. Over the course of the semester, I have my students work with charcoal, wet charcoal, india ink, and lithographic crayon. This diversity of different materials gets the students to loosen up and experiment with a tremendous range of drawing approaches.
Charcoal is an effective material for developing various approaches to drawing because of its versatility and flexibility. Charcoal is a relatively fast drawing material, and encourages students to draw in a bolder, more aggressive manner. The range of contrast you can achieve in charcoal is unrivaled, and there is no limit to the kinds of marks you can make. There’s a strength and body to charcoal that will never be present in pencil, which as a medium is inherently more grey and weaker in tone.

While this post will not be a step-by-step tutorial on how to create a charcoal drawing start to finish, I will discuss my recommendations for specific supplies, as well as the various nuances of each tool, which is a significant part of learning and understanding the medium.

Below are my supply recommendations for drawing with charcoal. I’ve spent over a decade troubleshooting various brands in my drawing classes at RISD, and these are the most effective supplies I’ve come up with. The brand that you buy really does matter for these materials; there are many brands that are such poor quality that they will actually cause problems for you.
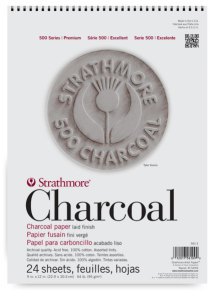
Charcoal paper
Since charcoal is so powdery, it will not adhere to the smooth surface of regular drawing paper very well. Charcoal paper has a slight texture to it, which allows the powder of the the charcoal to grip the surface of the paper more effectively. I recommend Strathmore 500 Series Charcoal paper pads. You can buy a roll of Strathmore drawing paper if you want to work on a larger scale.
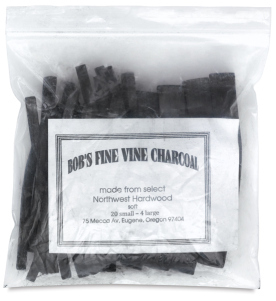
Vine charcoal
Vine charcoal is an excellent charcoal material for the initial stages of a drawing because it is very soft and easy to erase. Therefore, it’s a great tool when you are in the very beginning of a drawing, and you want to be able to sketch lightly and make many changes to your drawing quickly. If you draw lightly enough, you can erase the vine charcoal with just a wipe of your hand which is very convenient. In that way, vine charcoal is very forgiving and easy to get rid of.
However, I don’t recommend using vine charcoal beyond the first 20% of your drawing. Ultimately, the majority of your drawing should be made of compressed charcoal. Once you establish the fundamental composition of a drawing with vine charcoal, move on to compressed charcoal and don’t add any more vine charcoal at that point. One of the major drawbacks of vine charcoal is that it is an incredibly fragile material; even the slightest touch of a finger will mess up an area of vine charcoal. There is also a limit to how dark vine charcoal can get, no matter how hard you press, vine charcoal will never compete with compressed charcoal in terms of achieving a deep, black tone. I find that most students limit themselves to drawing exclusively vine charcoal, and consequently, their drawings are too grey and lack the permanence a drawing with compressed charcoal has.
I recommend buying Bob’s Fine Vine Charcoal pack. The sticks in this pack are very soft with all different sizes of sticks, with some sticks that are very large and wide. When you need to cover a large area of your drawing, the large sticks make this task very quick and efficient. Some of the other brands have vine charcoal sticks that are way too skinny, making this task difficult and time consuming.
I like to start my charcoal drawings by toning my entire paper with vine charcoal. Get a giant stick of vine charcoal and color the whole paper in, and then finish it off by wiping your hand over the entire sheet of paper to create a smooth, even tone of grey. This middle grey tone creates a foundation from which you can add charcoal or remove charcoal to create highlights with erasers. Because the grey tone is already present before you start drawing, the drawing will develop much faster than if you started with a white sheet of paper.

After toning the paper all grey, you can do a line sketch on top of the grey tone with vine charcoal. Because the paper is toned grey, you can easily wipe away the line sketch with your hand, and the line sketch will quickly disappear into the grey tone. I encourage my students to keep wiping away at their initial sketch until they’re satisfied, most of my students will wipe out their initial sketch at least 7 or 8 times. This toned paper technique gets students over their fear of the white paper. Since the paper is already full of vine charcoal, students don’t feel that they can make noticeable blunders, and if they do, mistakes are very easy to get rid of with a quick wipe of your hand. Below is a torso drawing by one of my RISD freshman drawing students that was started by toning the paper grey with vine charcoal, the drawing has a very loose, painterly appearance.

Compressed charcoal
Many students are afraid of compressed charcoal, it is a very dark, powerful piece of charcoal that is blunt and permanent. You can definitely lighten an area of compressed charcoal with an eraser, but only to a degree. Once the paper has been touched with compressed charcoal, you can never go back to the perfect white of the paper. While drawing with compressed charcoal is certainly a bigger commitment, the advantages of compressed charcoal are huge. Compressed charcoal has a wonderful strength and body to it, and there is nothing more dramatically black than an area of deep compressed charcoal.
For this reason, it’s a good idea to lay out the fundamentals of a drawing with vine charcoal first. When you feel confident about that initial sketch, you will want to transition to compressed charcoal, and stop using the vine charcoal altogether at that point. Many students run into problems because they refuse to transition to the compressed charcoal, resulting in grey drawings that are dull with low contrast. Ultimately, your drawing should be about 20% vine charcoal for the beginning stages, with the compressed charcoal being used for the last 80% of the drawing.
Break your compressed charcoal stick so that it is is about 1″ long; this will allow you to draw with the side of the compressed charcoal. Drawing with the side of the charcoal allows you to block in areas of tone. Most students limit themselves to drawing with only the tip of the compressed charcoal, which is slow and will make your drawings flat and too reliant on outlines. When blocking out areas of tone, exert very little pressure with your hand and build up the darkness of the compressed charcoal slowly. If you start by adding pure blacks everywhere, you’ll have to do a lot of backtracking later with your erasers.
There are many brands of compressed charcoal, and I find that most of them are far too stiff. Read the packaging carefully and don’t buy black “soft pastels”, these are not the same thing and will not provide good results. I recommend Art Alternatives Charcoal Drawing Sticks. These sticks are strong and dark, but also soft enough that when you draw with them, the sticks can create a soft powder.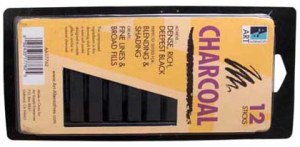
Charcoal pencil
Charcoal pencils should be reserved for the final stages of a drawing, when you need to articulate small areas and details. Frequently, I see students starting with charcoal pencil far too early, and they start working on details before the fundamentals of the drawing have been established. Charcoal pencils can also be effective for cross-hatching techniques, which can be layered and embedded on top of tonal areas. The portrait below has a significant amount of cross-hatching which has been done with charcoal pencil over a layer of vine charcoal tone.

Charcoal pencils come in a range of hardness, but I can say that I have never enjoyed using the hard pencils. The soft pencils are so much more flexible and easy to work with. I recommend General’s charcoal pencils. To sharpen a charcoal pencil, do not put the pencil in an electric or manual pencil sharpener. The charcoal inside the pencil is so fragile that it will always break. Instead, use a utility knife or razor blade to sharpen the charcoal pencil by hand. Position your thumb behind the knife or blade, and push it upwards on the pencil to slice off shavings of the pencil.
Erasers
Most people think of erasers as tools whose sole purpose is to remove mistakes from their drawings. Instead, see your erasers as drawing tools, commanding just as important a role as your sticks of charcoal. If you tone your paper entirely with vine charcoal (as mentioned above), you can use your erasers to block out dramatic highlights out of the grey tone of the paper. This approach really makes you feel like you are drawing with white paint because the eraser marks are so visible in the toned paper.
Many students draw white chalk into their charcoal drawings in order to create bright highlights. I don’t recommend this approach, because the white of the chalk never matches the white of the paper. Inevitably, either the paper or the chalk always looks more yellow than the other, and having two different whites in your charcoal drawing looks sloppy and inconsistent. The white chalk is too noticeable and looks like you’re trying to clean up mistakes in the drawing.
If you really want a very bright, luminous area of white in your drawing, plan in advance which areas of your drawing you want to remain the white of the page, and leave those areas completely untouched by the charcoal. Remember, once the vine or compressed charcoal touch the paper, you will never ever get the paper back to it’s original brightness. Planning in advance is a win-win situation; if you ultimately decide you don’t need those areas to be so bright, it’s easy to cover them with charcoal.
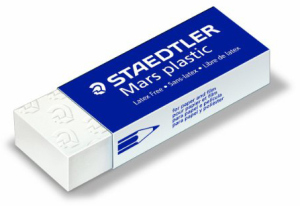
White plastic eraser
A white plastic eraser is terrific in the beginning stages of a charcoal drawing when you are trying to block out dramatic areas of highlight. These erasers are very strong and can create bold passages of light in the vine charcoal tone. If you tone your paper grey with vine charcoal, you do have to put a lot of muscle when removing from the vine charcoal tone with the white plastic eraser. Without fail, at every drawing class, there is always one student who complains that their white plastic eraser doesn’t work for removing the vine charcoal tone. Actually, it means that the student is being wimpy and not putting enough pressure into the eraser.
I recommend Staedtler Mars white plastic eraser, don’t use the Pink Pearl erasers which are awful for charcoal drawing.
Kneaded eraser
Kneaded erasers are great to use once you’ve blocked out the brightest highlights with the white plastic eraser. A kneaded eraser is not as strong and stiff as a white plastic eraser, so it is better when you want to make more subtle changes in the tones of your drawing. Because you can mold the kneaded eraser into any shape, it is also very versatile in terms of the variety of marks it can make.
Many students over smudge their charcoal drawings with their fingers. While smudging with your fingers can sometimes be effective, I find most students rely on smudging as a crutch. Students often times end up buffing their drawing to death and everything in the drawing ends up looking too smooth, giving the drawing a fake, artificial look. Smooth areas are not inherently better, in fact, creating a variety of textures in drawing is just as important. Employ your kneaded eraser to do most of the work, smudge with your fingers in moderation. With the kneaded eraser, you’ll have much more control over your marks, and your marks will have more energy and tension. The kneaded eraser can help you move the charcoal across the surface of the paper.
When you buy a new kneaded eraser, remove the packaging, and then stretch it out several times as if it were a piece of gum. After you use the kneaded eraser, it will appear to have tons of charcoal in it. The eraser will absorb the charcoal and clean itself if you simply stretch it out a few times. Eventually, the eraser will absorb so much charcoal that it won’t self clean anymore, and it will look like a big black ball of gum. At that point, purchase a new eraser.
I recommend Sanford Design Kneaded Rubber Art Eraser, although I have rarely encountered a kneaded eraser that was ineffective. You probably can’t go wrong in terms of buying this material.
Eraser stick
The eraser stick is a great tool when you are putting the finishing touches on your drawing. I don’t recommend using an eraser stick too early in a drawing, it will cause you to tighten up and focus on details before you’re ready. The cross-hatching marks in this drawing below were done entirely with a charcoal pencil and eraser stick. The multiple layers of cross-hatching give the drawing a rich, substantial look.

I recommend Papermate “Tuff Stuff” eraser stick, this is by far the best eraser stick I have encountered. Some of the other eraser sticks are no good because the tip is too wide and you won’t be able to get thin enough lines. You can even buy refills for the Papermate eraser stick, although the stick does last for a while.
Fixative
Charcoal drawings are very fragile, and thus are susceptible to damage. Even a slight smudge of a finger can ruin a carefully drawn area. One option is to use fixative, a material you can spray over the surface of a charcoal drawing to make the charcoal adhere more permanently to the paper. Always spray fixative on your drawings outdoors, the fixatives have chemicals that are dangerous to breathe. Some people use hairspray instead of fixative, which I do not recommend. If you are at all concerned about your drawing lasting long term, hairspray is a bad choice because it is not an archival material.
There are two kinds of fixative: there is workable fixative which allows you to go back in and work on the drawing even after spraying it. There is permanent fixative, which you cannot work back into.
I personally have never been a fan of fixatives; while they do make charcoal drawings more resistant to damage, you will notice that your charcoal drawings will darken slightly after spraying it with fixative. The darkening is not that dramatic, but it’s enough that I definitely notice the difference in my drawings. A compromise is to gently place a sheet of newsprint of tracing paper over your charcoal drawing when you store it, and know that you might have to do some last minute touch ups before displaying the work.
Layering & Mixing tools
Finally, the two most crucial principles in charcoal drawing are 1) layering and 2) thoroughly mixing all of the above tools together into a cohesive whole. The chronic problem I see in students is when students limit themselves to only using 1-2 charcoal supplies. If you are failing to see the importance of one of the above listed supplies, then you need to start experimenting with that supply and figure out what it’s good for. In this drawing below, the student only used vine charcoal and did not take any initiative to add compressed charcoal or engage with the erasers. Consequently, the drawing has a very thin, washed out look because the range of tones is so limited.

Another common issue is students isolating each supply into one area of the drawing. For example, in this portrait drawing below, it’s evident that the student only used charcoal pencil in the hair, and used a lot of smudging of compressed charcoal in the face. These two areas are drawn so differently from each other, that they fail to integrate within the drawing, giving the drawing a fractured appearance.

Layering is critical in a charcoal drawing, most students only do 1 layer of charcoal in their drawings and stop working prematurely. For a charcoal drawing to demonstrate a significant sense of depth, texture, and substance, a minimum of 4-5 layers of charcoal marks on top of each other is necessary. In a charcoal drawing, you’ll remove and add to each area repeatedly, this builds a visual history for your drawing that will show a rich feeling of depth in the marks.