Scrivener Layout and Shortcuts Explained

New to Scrivener? Download a trial.
Why Scrivener?
Scrivener is a powerful writing tool unlike any other I have used. Chances are, like me, you’re familiar with either Microsoft Word, Google Docs, or maybe Open Office’s word processor. All these are great tools in their own right, but may fall short of your needs.
Many turn to Scrivener because it’s more like a creative suite than a plain word processor. For example, one of my favorite features, the cards and corkboard functionality make outlining and moving story elements around a cinch. You can’t do that in regular word processors—and that’s just one of the powerful things Scrivener can do.
Where Scrivener is so different than your average word processor, you should expect a bit of a learning curve. So, to use Scrivener to the fullest extent, I personally found it helpful to become familiar with the format of the interface, and its various tools and shortcuts. This blog post will teach you some of those things.
Scrivener Screen Layout Explained
Click for Larger Image
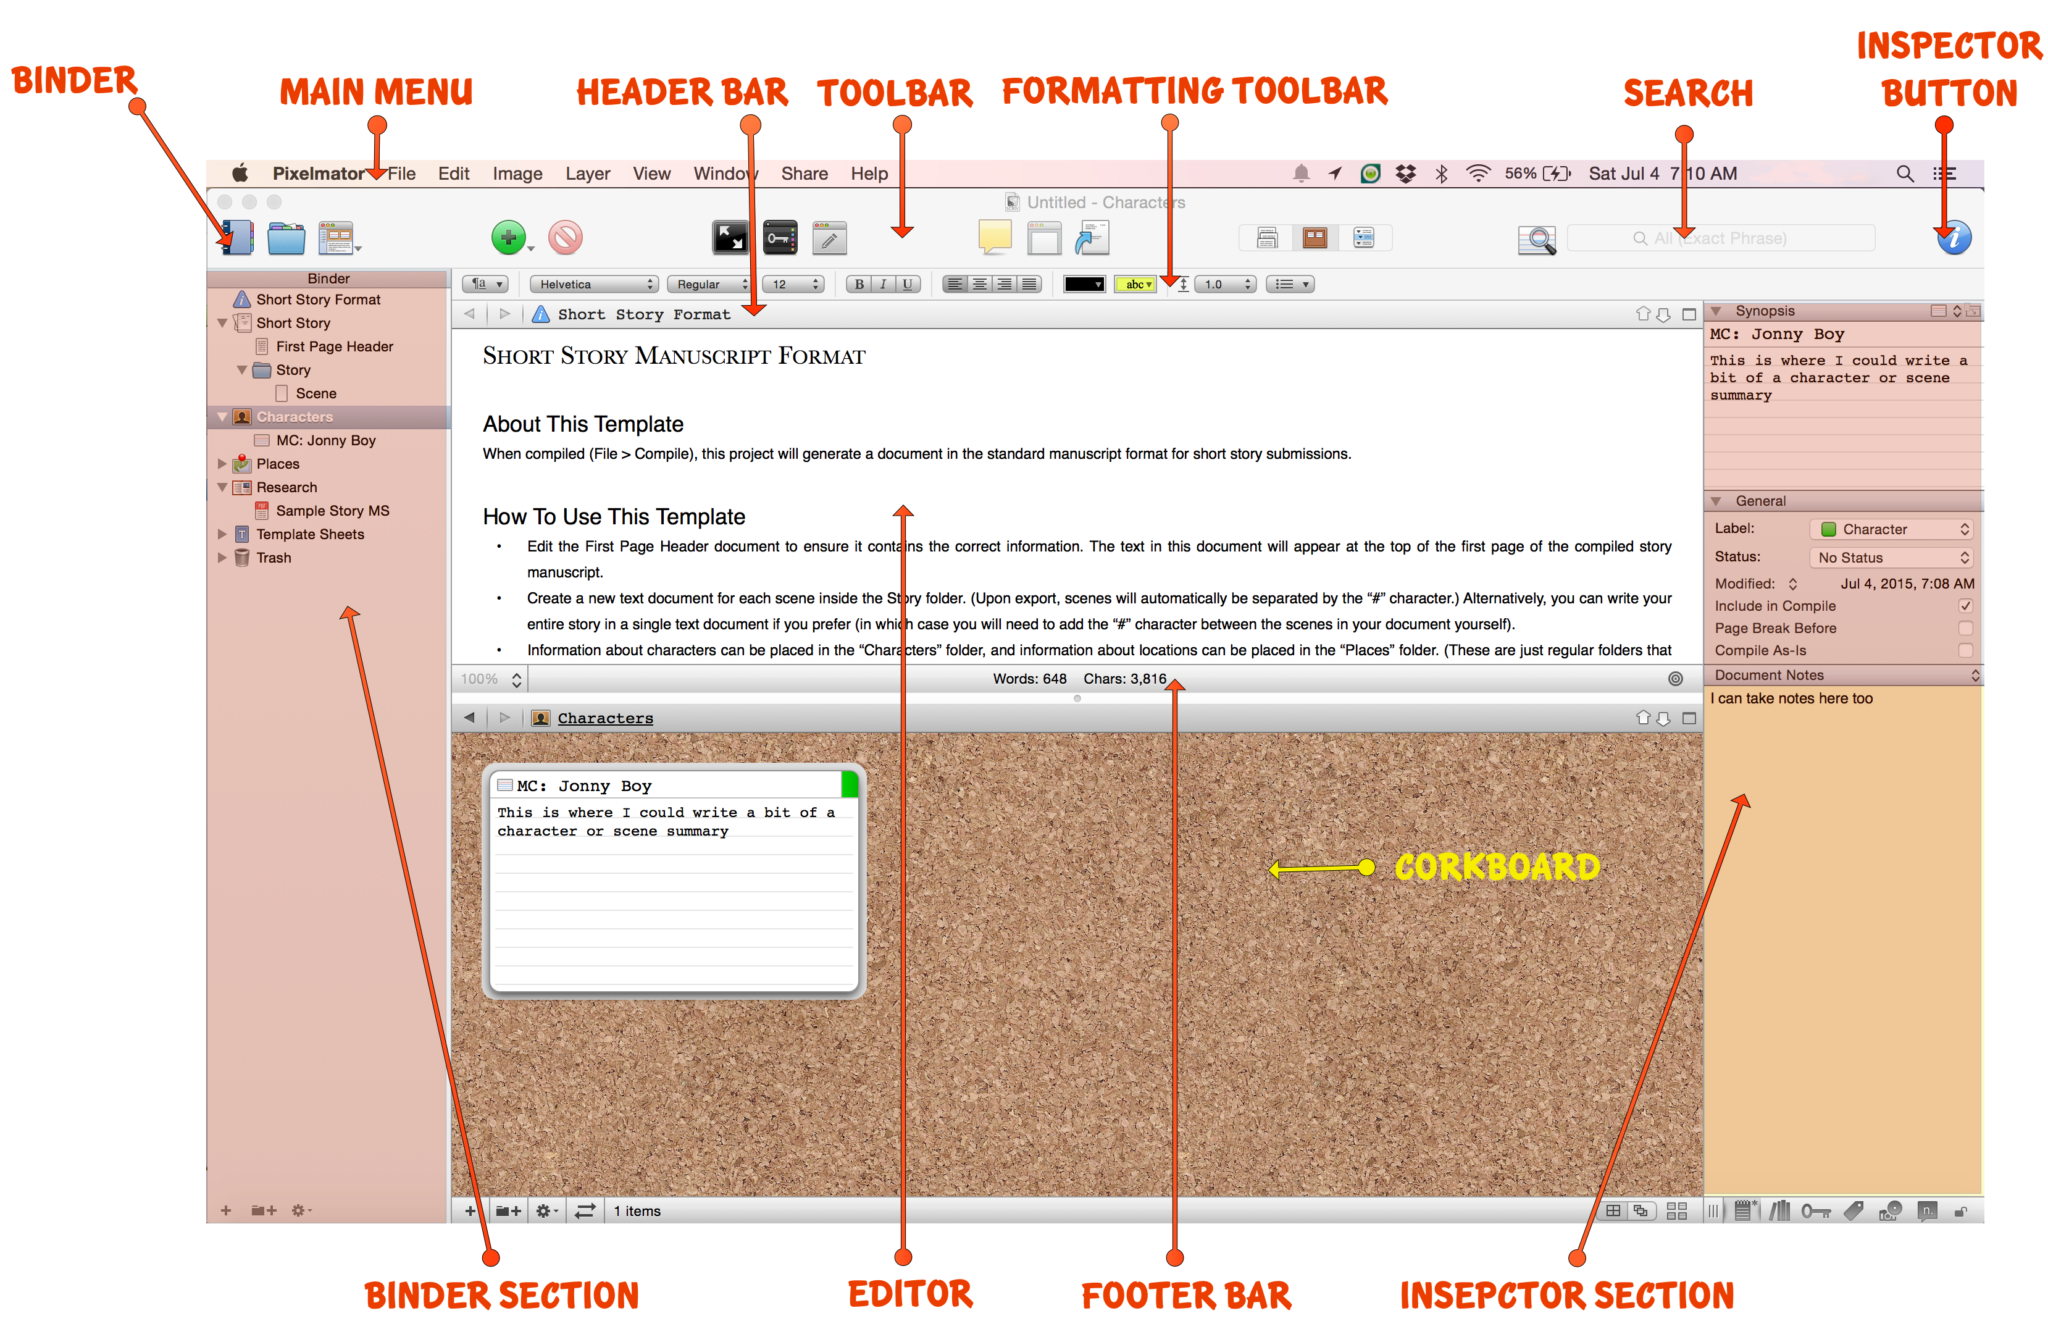
Binder Section: The binder displays the hierarchy for your writing (like a binder, hence the name). It’s the structural representation of your writing. It enables the dragging and dropping of your cards, and provides the 20,000 ft view of your project.
Editor Pane: The window pane where you read, write, and edit your work. Images are acceptable here as well.
Corkboard: A hierarchical view of your writing elements, or cards. Allows for easy, drag and drop reordering of the elements.
Footer Bar: Displays the word and character counts, for your document. It also shows the word count target and allows for quick zooming in/out.
Inspector Section: Shows the extra metadata you’ve included in a writing element, or card. Labels, notes, and other data can be displayed along side the writing.
Binder Button: Clicking this button toggles the Binder view ON or OFF.
Main Menu Bar: This is the standard menu bar on all apple applications. You’ll find your preferences, file saving, and help options here, among other useful settings.
Header Bar: Shows the name of the active document in the binder. Also allows for navigating through the binder, as well as splitting editor panes for multitasking, and comparing work.
Toolbar: A row of icons/buttons that give you quick access to popular features so you don’t have to navigate the menus to find them. You can edit the buttons displayed by right clicking and customizing the toolbar.
Formatting Toolbar: Offers you the quick view of your current text formatting, and provides shortcuts for quick changes to the same.
Search Bar: Allows you to search text in your project’s documents.
Inspector Button: Clicking this button toggles the Inspector view on or off. The Inspector gives you quick access to notes, and other labeling and metadata you assign to your writing.
Fullscreen Shortcuts
When you are in fullscreen mode you can bump your cursor (mouse) against the top of the screen and have the standard toolbar fly out (I won’t bother putting a screenshot because you know what that looks like because its in the screenshot above.) That said, you can also bump your cursor against the bottom of the screen in fullscreen mode, and when you do, Scrivener will give you a toolbar with a bunch of handy options. Here is a screenshot of what the fly-out toolbar looks like when you bump the cursor against the bottom of the screen in fullscreen mode. After the screenshot I’ll show a matrix of what options the toolbar gives you and their definitions.

Fullscreen Feature
What it Does
Text Scale
Quickly scale up or down the size of your text.
Paper Position
Justify (set the position) of your text against the backdrop. Left, Center, Right.
Paper Width
Determine how much of the screen is covered by your text vs. showing your background image.
Keyword
Allows for you to create metadata keywords that are searchable, and to associate them with the different documents you create in scrivener.
Inspector
Let’s you get a pop-up of the inspector without having to leave fullscreen mode. A drop down menu on that pop-up will let you select the different inspector elements (comments, keywords etc.)
Go To
Gives you a view of the hierarchy of your project (what’s typically in the binder) from the fullscreen mode.
Word Count
Shows the word count of the document actively displayed in fullscreen mode
Character Count
Shows the character count of the document actively displayed in fullscreen mode
Paper Fade
A slider that let’s you adjust the opacity (solid vs transparancy) of the text on top of the background image.
Fullscreen Toggle
A button to return back to the normal view (exit fullscreen mode)
Scrivener Keyboard Shortcuts
Just as the toolbar helps you not have to navigate the menus to get something done, its helpful to know a few shortcuts in Scrivener so that you never have to take your hand off the keyboard to use the mouse.
The simplest command, and perhaps the most useful, is the save command. If you want to save your document on a Mac, for example, you press the command key on the keyboard, and while holding that key down, also press the letter “S,” for save. This is represented in the “Shortcut for Mac” column below as “Command key + S.” Note, in some cases, there are three or more keys that must be pressed simultaneously to achieve the action you wish.
Desired Outcome/Action
Shortcut for Mac
Shortcut for Windows
Save Project
Command key + S
Ctrl + S
Project Statistics
Shift + Option + Command key + S
Ctrl + . (Period)
Text Statistics
Shift + Command key + T
Ctrl + / (Forward Slash)
Show Project Targets
Shift + Command key + T
Ctrl + , (Comma)
Show or Hide the Binder
Option + Command key + B
Ctrl + Shift + B
Show or Hide the Inspector
Option + Command key + I
Ctrl + Shift + I
Enter Composition Mode (Full Screen Mode)
Option + Command key + F
F11
Scrivenings Mode / Document View
Command key + 1
Ctrl + 1
Script Mode for Screenplays
Command key + 8
Ctrl + 4
Typewriter Scrolling (Auto Scrolling)
Control + Command key + T
Windows + Control + T
Preferences / Options
Command key + , (Comma)
F12
Show Project Keywords
Shift + Option + Command key + H
Ctrl + Shift + O
Metadata Settings
Option+Command key+, (Comma)
Ctrl + Shift + M
Corkboard View
Command key + 2
Ctrl + 2
Outline View
Command key + 3
Ctrl + 3
Compile Project (Ebook, for Example)
Option + Command key + E
Ctrl + Shift + E
Scrivener Shortcuts for Files
Desired Outcome/Action
Shortcut for Mac
Shortcut for Windows
Create a Text Element/Doc
Command key + N
Ctrl + N
Create a Folder
Option + Command key + N
Ctrl + Shift + N
Merge
Shift + Command key + M
Ctrl + M
Take a Snapshot
Command key + 5
Ctrl + 5
Take a Snapshot with Title
Shift + Command key + 5
Ctrl + Shift + 5
Split at Selection
Command key + K
Ctrl + K
Split with Selection as Title
Option + Command key + K
Ctrl + Shift + K
Import Files
Shift + Command key + I
Ctrl + Shift + J
Export Files
Shift + Command key + E
Ctrl + Shift + X
Scrivener Keyboard Shortcuts (Formatting & Editing)
Desired Outcome/Action
Shortcuts for Mac
Shortcuts for Windows
Find
Command key + F
Ctrl + F
Copy
Command key + C
Ctrl + C
Cut
Command key + X
Ctrl + X
Paste
Command key + V
Ctrl + V
Paste & Match Style
Shift + Option + Command key + V
Ctrl + Shift + V
Underline
Command key + U
Ctrl + U
Bold
Command key + B
Ctrl + B
Italic
Command key + I
Ctrl + I
Footnote
Option + Command key + 8
N/A
Inline Footnote
Shift + Command key + F
Ctrl + Shift + F
Comment
Shift + Command key + 8
N/A
Annotation
Shift + Command key + A
Ctrl + Shift + A
Scrivener Shortcuts Links
.et_bloom .et_bloom_optin_30 .et_bloom_form_content { background-color: #ededed !important; } .et_bloom .et_bloom_optin_30 .et_bloom_form_container .et_bloom_form_header { background-color: #ffffff !important; } .et_bloom .et_bloom_optin_30 .carrot_edge .et_bloom_form_content:before { border-top-color: #ffffff !important; } .et_bloom .et_bloom_optin_30 .carrot_edge.et_bloom_form_right .et_bloom_form_content:before, .et_bloom .et_bloom_optin_30 .carrot_edge.et_bloom_form_left .et_bloom_form_content:before { border-top-color: transparent !important; border-left-color: #ffffff !important; }
@media only screen and ( max-width: 767px ) {.et_bloom .et_bloom_optin_30 .carrot_edge.et_bloom_form_right .et_bloom_form_content:before, .et_bloom .et_bloom_optin_30 .carrot_edge.et_bloom_form_left .et_bloom_form_content:before { border-top-color: #ffffff !important; border-left-color: transparent !important; }
}.et_bloom .et_bloom_optin_30 .et_bloom_form_content button { background-color: #a153e0 !important; } .et_bloom .et_bloom_optin_30 .et_bloom_form_content button { background-color: #a153e0 !important; } .et_bloom .et_bloom_optin_30 h2, .et_bloom .et_bloom_optin_30 h2 span, .et_bloom .et_bloom_optin_30 h2 strong { font-family: "Open Sans", Helvetica, Arial, Lucida, sans-serif; }.et_bloom .et_bloom_optin_30 p, .et_bloom .et_bloom_optin_30 p span, .et_bloom .et_bloom_optin_30 p strong, .et_bloom .et_bloom_optin_30 form input, .et_bloom .et_bloom_optin_30 form button span { font-family: "Open Sans", Helvetica, Arial, Lucida, sans-serif; }
Get Email Updates
Congrats! You did it. Your free eBook will be sent soon!
The post Scrivener Layout and Shortcuts Explained appeared first on Justin Swapp.