Working With Web Page Content in Scrivener
Scrivener is a powerful writing tool. I write about it weekly with tips and usage ideas. To read more of my posts click the Scrivener tag or category at the end of the page.

Clip Art Image Copyright by Microsoft. Clip Art Used by Permission of Microsoft
A while back one of the readers of this blog suggested I write a post about importing and saving web files. Honestly, I’d never thought about it since it’s just not something that I do that much. However, there are many writers out there that use features of Scrivener more often than I do writing non-fiction or using their research on a wide scale.
So here I am giving it a good try to describe how web files can be imported and saved in Scrivener. There are several points to understand about this process before we go much further and part of that is understanding what a web file is. Simply put it is a file which is encoded with html language for use on webpages whether these be public or private.
Next, why would anyone want to import a web file? Many people want to import their content to be edited and revised.
Last, why save content as a web file? Many people use this to make webpages for their websites. Personally I just copy and paste my blog content rather than compiling a web format – the WordPress.com tools are just more conducive to making the simple data transfer. I still have to add media but I’ve found that it’s easier than importing to my website. However, while many people use the WordPress software on their sites, they are hosted elsewhere so posting is different than what I do and it makes sense to compile a blog or page to html format first.
So why the difference? It has most to do with Scrivener’s editor which is admittedly not as robust as Word (Scrivener’s strength lies in its organizational and developmental features). The editor does not allow wrapping around photos like Word. So if you want to save the content as a web document and it has photos or illustrations in it you may still need to edit it in Word to get the wrapping effects that you prefer. I use WordPress.com’s features to wrap text so it makes sense for me to transfer to content and then add media.
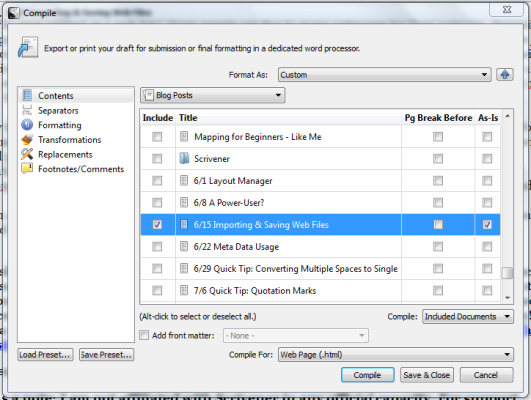
So with all that in mind here’s how to save your content as a web document. First you must compile your finished document to html by clicking on File and then Compile to open the compiler:
Next, if you have multiple documents in the project but only want to compile one use ALT + Click (that’s press the ALT key and click) on a checkbox. Then select the individual document. Next, in the file format choose Web Page (.html) and click Compile. Select the location to save the file and there you have it.
It you have pictures and other media in the document but want them wrapped (or want to add them), just use word – you can edit a webpage from Word. From there you post your content/document according to your hosting requirements.
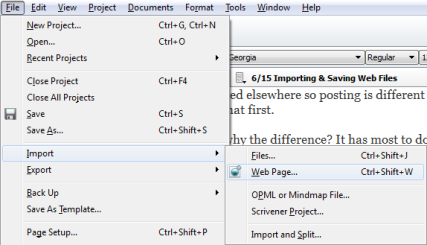
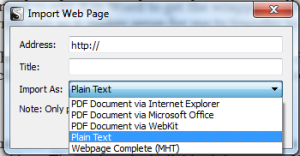
As a final note, you can import a web document as a .MHT which you must then save as a .PDF to view in Scrivener. To edit webpage content, it must first be imported as text. To do this, click on File, go to Import and choose Web Page as noted in this screenshot:
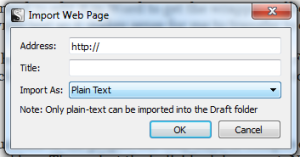
Next you have the Import window and here are screenshots of that with options for the available file formats:
There’s a bit more to this that begins to relate to MML (Multi-Markup Language) which gets into a different subject altogether and too much information for this post.
Please share your thoughts and ideas in the comments section. I’d also love to connect with you over social media so check my Contact page for that information. I’ve updated the site with a new landing page starting today but you can still view the News page for announcements. As part of the changes, new email subscribers will receive my free new guide, 15 Must Have Apps for Self-Publishing Authors. Sign-up today! I’ve added a new sign-up tab on my FaceBook page to simplify the process. Also, the cover of my book, The Bow of Destiny, was revealed recently so take a look.
Follow Blog via Email
Enter your email address to follow this blog and receive notifications of new posts by email.
Just as a note: I am not affiliated with Scrivener in any official capacity. For support questions, pricing and other concerns please contact the vendor.
Filed under: Blogging, Creativity, Editing, Indie Publishing, Pinterest, Planning, Scrivener, Self-publishing, Social Media, The Black Bag, The Bow of Destiny, Tips, Twitter, Writing Tagged: blogging, creativity, Editing, Facebook, Formatting, Goals, Indie Publishing, P. H. Solomon, Planning, Scrivener, Self-publishing, Social Media, The Black Bag, The Bow of Destiny, writing


