Strategic Usage of Snapshots in Scrivener
Scrivener is a powerful writing tool. I write about it weekly with tips and usage ideas. To read more of my posts click the Scrivener tag or category at the end of the page.
 I don’t normally write about Scrivener more than once a week so I won’t bore everyone with the same topic. But a situation arose that I thought I should really address.
Yesterday, someone who reads this blog asked for assistance with a Scrivener problem via Twitter. I was very humbled to be asked so I responded with a few suggestions as to what might be the fix (not knowing the precise details). In the end, the issue was resolved on the other end which was great.
 However, the problem brought up a subject I had planned on addressing in the near future regarding snapshots. Basically, the snapshot function works as a point in time backup of a document in which you are working. While Scrivener does make backups when you exit (unless you change this setting) and you can make backups whenever you want, a snapshot serves a more immediate purpose – a quick backup of current work to which you can easily rollback if necessary.
So, if you are going to make big changes to a document it might be worth your while to make a snapshot before doing so in order to get back to where you were without much trouble. Likewise, when adding blocks of content or trying to fix a problem it might be wise to make a snapshot to prevent lose of any current work.
Follow Blog via Email
Enter your email address to follow this blog and receive notifications of new posts by email.
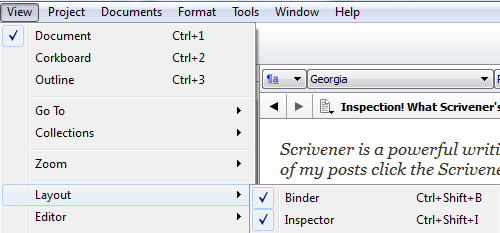
So how does it work? First turn on the Inspector by clicking on View, sliding to Layout and clicking on Inspector in the flyout menu. You can also turn it on via your keyboard with this command: Ctrl + Shift + I. The Inspector will appear on the right side.
There are six buttons on the lower border, click on the second one from the right the get to Snapshots.From there you click on the + button to add a snapshot of the document in which you are working. It will show the snapshot with a date/time stamp. This is important should you make more than one snapshot. Before attempting to fix a problem it  might be good to take a snapshot. Should the fix work a second snapshot might also be good to have just in case it is needed. In that case you would use the – button to remove the oldest snapshot after highlighting it. Finally, you can use the Rollback button to go back to a previous document version.
So next time you’re about to make major document changes, take a snapshot. Then if something unexpected happens you don’t need to panic, just rollback to the original version.
 Please share your thoughts and ideas in the comments section. I’d also love to connect with you over social media so check my Contact page for that information. See the News page for announcements and remember to sign-up to receive news and posts by email. I’ve added a new sign-up tab on my FaceBook page to simplify the process. New followers can download The Black Bag via free coupon today! Also, the cover of my book, The Bow of Destiny, was revealed recently so take a look.
Follow Blog via Email
Enter your email address to follow this blog and receive notifications of new posts by email.
Filed under: Blogging, Cover Reveal, Creativity, Editing, Indie Publishing, Scrivener, Self-publishing, Social Media, Tech Tips, The Black Bag, The Bow of Destiny, Tips, Twitter, Writing Tagged: Backup, Coverart, creativity, Facebook, Fixes, Indie Publishing, P. H. Solomon, Problems, Scrivener, Self-publishing, Snapshots, Social Media, The Black Bag, The Bow of Destiny, Twitter, Usage, writing


