Configuring You Document Templates in Scrivener
Scrivener is a powerful writing tool. I write about it weekly with tips and usage ideas. To read more of my posts click the Scrivener tag or category at the end of the page.
I had a question from a new follower to the blog in the comments section about formatting a document template. She wanted to know how to work with the document template to retain formatting. I’ve answered the question but I thought I’d go a little further with it in a post to add more details.
Follow Blog via Email
Enter your email address to follow this blog and receive notifications of new posts by email.
As for formatting a document template there are any number of ways to accomplish this to suit your needs. You may simply want to add specific content, fonts, spacing, etc. Depending on what your needs are there are several points to discuss.
1. If you desire the font to be formatted consistently this is a straightforward matter. While clicked into the document template (cursor blinking like you’re ready to type), you can change the font settings from the Format Bar that is usually turned on by default. If yours isn’t turned on click on Format and slide down the menu and click on Format Bar. It will appear at the top of the editor. From here you can change what the font is, the size and whether it’s set to Bold, Itlacs or Underline (or any combination of the three). Additionally, you can also set the alignment and any other miscellaneous settings available.
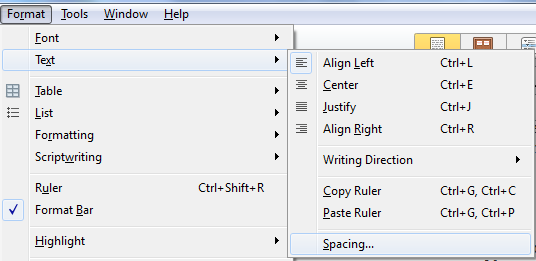
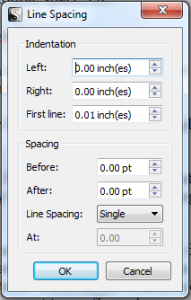
2. If you want specific space formatted you’ll need to access that by clicking on Format, sliding to Text to get the fly-out menu and click on spacing. From the window that appears you can configure spacing for indention, single/double space, etc.
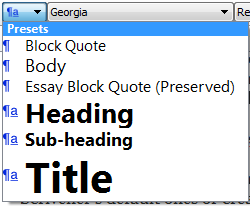
 3. If you work with presets (which appear in the left end of the Format Bar), you can choose one of Scrivener’s default ones or create a new one yourself.
4. If you are adding a table or list to your document template you can format these from the Format Bar
5. Explore other settings in the Format menu or the Format Bar – these may not be needed for a document template since many are for changing formatting in existing documents (more on these another day).
6. Add re-usable content such as a common introduction or ending for a blog post to the document template. Remember what you add as content or formatting to your document template will be automatically in any new documents you create using it. With this fact in mind, be aware of what you add and format. Can you add more content? Think about what you click to change whenever you create a new document – that’s what you want to configure in your document template.
 What do you configure or add in you new documents? Can you add put these changes into your document templates? Please share your thoughts and ideas in the comments section. I’d also love to connect with you over social media so check my Contact page for that information. See the News page for announcements and remember to sign-up to receive news and posts by email. I’ve added a new sign-up tab on my FaceBook page to simplify the process. New followers can download The Black Bag via free coupon today! Also, the cover of my book, The Bow of Destiny, was revealed recently so take a look.
Follow Blog via Email
Enter your email address to follow this blog and receive notifications of new posts by email.
Just as a note: I am not affiliated with Scrivener in any official capacity. For support questions, pricing and other concerns please contact the vendor.
Filed under: Blogging, Cover Reveal, Creativity, Editing, Indie Publishing, Marketing, Non-fiction, Pinterest, Planning, Scrivener, Self-publishing, Social Media, The Black Bag, The Bow of Destiny, Tips, Twitter, Writing Tagged: blogging, Coverart, creativity, Document Template, Editing, Facebook, Formatting, Indie Publishing, P. H. Solomon, Pinterest, Planning, Scrivener, Self-publishing, Social Media, The Black Bag, The Bow of Destiny, Tips, Twitter, writing


