Splitsville: Using Scrivener to Split Content
Scrivener is a powerful writing tool. I write about it weekly with tips and usage ideas. To read more of my posts click the Scrivener tag or category at the end of the page.
 For some reason Thursdays are becoming Scrivener question days that translate into a Friday blog post. However, that’s fine with me, I can re-arrange my schedule and go with the pitch. I received a question via Twitter asking how to split one chapter into two within Scrivener. It’s a good question so I thought I’d share it today.
First of all, as with all major changes to your manuscript, I advise making a snapshot so you can rollback easily. It’s a small detail but it can really save you some stress if you make a mistake.
Follow Blog via Email
Enter your email address to follow this blog and receive notifications of new posts by email.
Scrivener basically recognizes individual folders as a chapter and the sub-documents as scenes. So there can be several ways to organize a chapter. You may have one chapter’s content in a single document. You may also have several documents within your chapter-folder representing several scenes.
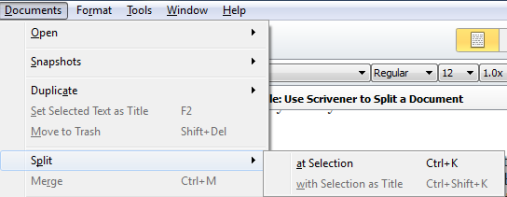
In the first scenario you can use this procedure to split the chapter. Click to the location in the content where you want to split the chapter so that the cursor is blinking – presumably at the beginning of a paragraph. Next, click Documents slide down the menu to Split and choose “at Selection” off the fly-out menu. This will give you a new document with the content split.
At this point, if you want the new document to be a folder that’s easily done. Just click Documents again, slide to Convert and choose Convert to Folder from the fly-out menu. The folder will be at the same level as the original document so make sure to move it to the left in the Binder (right-click on the folder, got to Move on the context-menu and choose Left).
In the second scenario where you have several scenes, you basically want to re-arrange your manuscript some. Create a new folder at the same level in the Binder as your other chapter folders and name it accordingly. Then just drag individual scene-documents into the new folder. If you need to split a scene-document use the same procedure as the first scenario to do so. However, don’t convert this split scene into a new folder, just drag it into the new chapter-folder you’ve created.
If you make a mistake – and assuming you’ve made your snapshot – just rollback to the original and start over. Remember, the Binder is your basic organizational tool in Scrivener and it’s what makes this software so incredible – you can make structural changes like these very easily.
Could the Split command be the answer to a major change in your manuscript? What tips do you have to re-structure in Scrivener? Please share your thoughts and ideas in the comments section. I’d also love to connect with you over social media so check my Contact page for that information. See the News page for announcements and remember to sign-up to receive news and posts by email. I’ve added a new sign-up tab on my FaceBook page to simplify the process. New followers can download The Black Bag via free coupon today! Also, the cover of my book, The Bow of Destiny, was revealed recently so take a look.
Follow Blog via Email
Enter your email address to follow this blog and receive notifications of new posts by email.
Just as a note: I am not affiliated with Scrivener in any official capacity. For support questions, pricing and other concerns please contact the vendor.
Filed under: Blogging, Cover Reveal, Editing, Indie Publishing, Planning, Scrivener, Self-publishing, Tech Tips, The Black Bag, The Bow of Destiny, Tips, Twitter, Writing Tagged: blogging, Coverart, creativity, Editing, Facebook, Indie Publishing, P. H. Solomon, Planning, Scrivener, Self-publishing, The Black Bag, The Bow of Destiny, Twitter, writing


