Raspberry-Covered Devil's Food Cake


I'd like to introduce you to my favorite Devil's Food Cake recipe - or perhaps you've already met. You may recognize it from my cookbook (in a different kind of heart shape) or from this recent post on Food52. It's soft yet substantial and deeply chocolate with a velvety texture. The recipe yields exactly one 9-inch round cake, but I also bake it in an 8x8-inch square brownie pan. I used the latter to make this cake.

This cake revealed itself to me while I was sketching on my tablet. I've been recording some of my cake sketches, and I thought it might be fun for you to see one. More often than not, this is where my confections begin - on a drawing board. You can find a short video below (or here, for email subscribers).
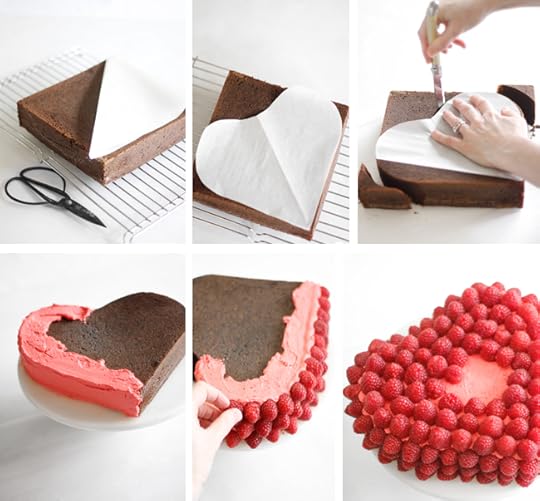
Believe it or not, after years of curating a specialty cake pan collection (an accidental one), I've never splurged on a heart-shaped cake pan. It's just so darn easy to cut your own heart-shaped cake from a template! Just trace the bottom of the cake pan onto a piece of parchment paper, cut out the shape, fold the paper in half and then cut into a heart.

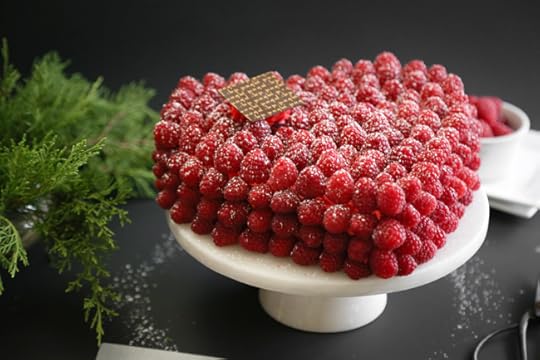
Trimming the cake into a heart is easy-peasy, just lay the template on top of the cake and cut around it with a serrated knife. The rest comes together rather quickly - just spread on a layer of frosting and go crazy with the berries.
It's important to make sure you have enough berries to cover the entire cake, so don't leave the grocery store with less than 3 pints of fresh raspberries.

Check out the inside of this cake. It's seriously dark and rich and so delicious with tart raspberries.

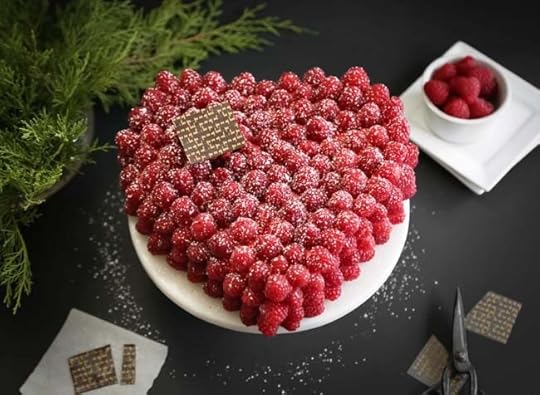
To be completly and utterly cheesy, I added a little chocolate love note badge top of the cake. I made it with a chocolate transfer sheet (similar here) and a handful of chocolate chips. If you'd like to see how the transfer sheets work, then you can find my tutorial here. Otherwise, a little square of Ghiradelli or Scharffen Barger would look nice, too.
I hope you'll give the cake a try, because it is literally tops in my (cook)book!
Raspberry-Covered Devil's Food Cake [click for printable version]
Yields one 8 or 9-inch cake layer
I use LorAnn
 raspberry flavoring oil in the frosting to boost the berry flavor. I recommend using it if you can find it, but the cake is just as lovely with vanilla flavored frosting. If you prefer vanilla frosting, omit the flavoring oil and add 1 teaspoon pure vanilla extract.
 Devil’s Food cake1/2 pound unsalted butter, softened1 1/2 cup light brown sugar, packed2 eggs6 tablespoons unsweetened cocoa powder1 1/2 teaspoon baking soda1 teaspoon vanilla extract1/4 teaspoon salt1 1/2 cup all-purpose flour2/3 cups sour cream1/2 cup hot coffee
Buttercream and berries1 cup unsalted butter, softened4 cups confectioners’ sugar1/2 dram bottle (about 1/3 teaspoon) raspberry flavoring oilLiquid red food color3 pints raspberries, rinsed and driedConfectioners’ sugar for dustingDecorative square of chocolate or chocolate transfer*
Preheat the oven to 350° F. Grease and flour an 8 x 8inch square cake pan.Using an electric mixer beat the butter in a large bowl until smooth. Add the sugar and eggs; beat until lightened in color. Add the cocoa, baking soda, vanilla extract, and salt; mix well. Beat in the flour in 3 additions, alternating with the sour cream (begin and end with the flour). Add the hot coffee and mix until a smooth batter forms.Pour the batter into the prepared pan. Bake until a toothpick tester comes out clean, approximately40 to 50 minutes. Cool the cake in the pan for 10 minutes before inverting and cooling completely on a wire rack. Level the top with a serrated knife, if needed. This cake usually doesn’t crown much (that means it doesn’t get the bump on top when it bakes) and I rarely have to level it.Trace the bottom of the 8x8-inch square cake pan on a piece of parchment paper. Cut out the shape and fold in half diagonally. Conservatively trim away two corners with scissors to create a heart shape. Lay the paper heart on the cake and, holding a serrated knife vertically, cut the cake around the paper using gentle sawing motions. Save the extra cake pieces as ice cream crumbles, or have a few bites for a pick-me-up while you frost the cake.
For the frosting, combine the butter and confectioners’ sugar in a mixing bowl. Beat with an electric mixer until smooth and fluffy. Add the raspberry flavoring oil and a few drops of the liquid red food color. Beat until combined. Add red food color a little at a time until a red-raspberry color is achieved. Spread the frosting onto the cake with an off-set spatula. Make sure you get at least 1/4-inch thickness of icing on the sides of the cake, otherwise the berries will not stick!Starting at the pointed end of the heart, line the raspberries around the bottom edge of the cake. Pack them together closely so as little of the frosting shows through as possible. Travel upward with your berry rows until the entire cake is covered in raspberries. If you see any icing lines showing through, dab a little frosting on a berry and place it over the exposed icing. Use a little frosting to adhere the chocolate square in the upper left hand corner of the cake. Store the cake in the refrigerator. Remove it about 1 hour before serving so that the cake loses its chill. Dust with powdered sugar and cut into slices. Store the leftovers in the refrigerator.
*For chocolate transfer instructions, see this post.
Published on January 29, 2015 08:16
No comments have been added yet.


