iPhone Login Form Implementation Tips using Swift
One of the most common scenarios is to implement login forms. In this post, I will show my thoughts regarding implementing a usable iPhone login form in iOS using Swift. Let’s check them one by one.
Moving up login elements when keyboard is present
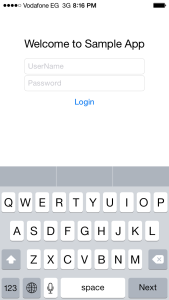
One of the nice to have things is to move up the login elements when the keyboard is present after focusing on a text field as shown in the screenshot below.
In order to implement this behavior, you need to do the following:
Creating a Center Y alignment constraint on your login form and add it as an outlet as follows:
@IBOutlet var centerConstraint: NSLayoutConstraint!
Creating observers for "keyboardWillShow" and "keyboardWillHide" (that will be executed when the iPhone keyboard is shown or hidden):
NSNotificationCenter.defaultCenter().addObserver(self, selector: Selector("keyboardWillShow:"), name:UIKeyboardWillShowNotification, object: nil);
NSNotificationCenter.defaultCenter().addObserver(self, selector: Selector("keyboardWillHide:"), name:UIKeyboardWillHideNotification, object: nil);
Implementing keyboardWillShow function to update the Center Y alignment constraint using the keyboard size as follows:
func keyboardWillShow(notification: NSNotification) {
var info = notification.userInfo!
var keyboardFrame: CGRect = (info[UIKeyboardFrameEndUserInfoKey] as NSValue).CGRectValue();
UIView.animateWithDuration(0.1, animations: { () -> Void in
self.centerConstraint.constant = self.formCenterOriginal + (keyboardFrame.size.height / 2);
});
}
As shown above, you can get the keyboard frame from userInfo, and then the Center Y alignment constraint is updated with keyboardFrame.size.height / 2.
Implementing keyboardWillHide function to restore the Center Y alignment constraint’s original value as follows:
func keyboardWillHide(notification: NSNotification) {
self.centerConstraint.constant = self.formCenterOriginal;
}
Note that self.centerConstraint.constant is saved in formCenterOriginal attribute during viewDidLoad().
var formCenterOriginal: CGFloat = 0;
override func viewDidLoad() {
// ...
// Save the center constraint for using it later ...
self.formCenterOriginal = self.centerConstraint.constant;
}
Hiding keyboard when touching outside of text fields:
In order to hide the keyboard when touching outside of the form text fields, all what you need to do is to override touchesBegan function as follows.
override func touchesBegan(touches: NSSet!, withEvent event: UIEvent!) {
self.view.endEditing(true);
}
Calling view.endEditing(true) hides the keyboard.
Form Fields Navigation and Changing the text of “Done” button
It will be nice to change the text of the "Done" button based on the current text focus. This means that if the user name text field is focused then the "Done" button will be renamed to "Next". When the user clicks "Next" button, the password text field will be focused.
If the password text field is focused then the "Done" button will be renamed to "Go". When the user touches "Go" button, the keyboard will hide and the login logic will be executed.
In order to implement the form field navigation, we need to implement the UITextFieldDelegate protocol’s textFieldShouldReturn(theTextField: UITextField!) -> Bool function in our ViewController. Note that userNameText and passwordText delegate should be set to self during viewDidLoad().
override func viewDidLoad() {
// ...
// Override username and password events.
userNameText.delegate = self;
passwordText.delegate = self;
}
func textFieldShouldReturn(textField: UITextField!) -> Bool {
if (textField == self.passwordText) {
textField.resignFirstResponder();
// call the login logic
login();
} else if (textField == self.userNameText) {
self.passwordText.becomeFirstResponder();
}
return true;
}
The previous code means that if the user name text field is focused and the user touches "Done" button then the password text field will be focused by calling self.passwordText.becomeFirstResponder(). if the password text field is focused and the user touches "Done" button then the keyboard be hidden by calling textField.resignFirstResponder() and after this we can call the login logic.
Note: both passwordText and userNameText are outlets for the text fields.
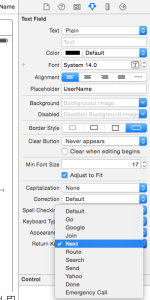
For changing the the text of "Done" button for passwordText and userNameText text fields, this can be done by changing the Return Key value in the text field properties as shown in the figure below.
Implementing the login logic
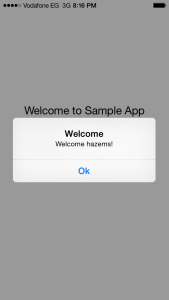
Finally, we can implement the login logic which is simply mocked by an Alert message as shown below.
func login() {
let alertController = UIAlertController(title: "Welcome",
message: "Welcome" + ((userNameText.text == "") ? "!" : " " + userNameText.text + "!"),
preferredStyle: UIAlertControllerStyle.Alert);
alertController.addAction(UIAlertAction(title: "Ok", style: UIAlertActionStyle.Default,handler: nil));
self.presentViewController(alertController, animated: true, completion: nil);
}
If the user name is specified in the login form then it will be displayed in the Alert as shown in the figure below.
The following code shows the complete code of ViewController class.
import UIKit
class ViewController: UIViewController, UITextFieldDelegate {
var formCenterOriginal: CGFloat = 0;
@IBOutlet var userNameText: UITextField!
@IBOutlet var passwordText: UITextField!
@IBOutlet var centerConstraint: NSLayoutConstraint!
override func viewDidLoad() {
super.viewDidLoad()
// Create keyboard observers.
NSNotificationCenter.defaultCenter().addObserver(self, selector: Selector("keyboardWillShow:"), name:UIKeyboardWillShowNotification, object: nil);
NSNotificationCenter.defaultCenter().addObserver(self, selector: Selector("keyboardWillHide:"), name:UIKeyboardWillHideNotification, object: nil);
self.formCenterOriginal = self.centerConstraint.constant;
// Override username and password events.
userNameText.delegate = self;
passwordText.delegate = self;
}
deinit {
NSNotificationCenter.defaultCenter().removeObserver(self);
}
override func didReceiveMemoryWarning() {
super.didReceiveMemoryWarning()
// Dispose of any resources that can be recreated.
}
@IBAction func loginTouchDown(sender: AnyObject) {
login();
}
func keyboardWillShow(notification: NSNotification) {
var info = notification.userInfo!
var keyboardFrame: CGRect = (info[UIKeyboardFrameEndUserInfoKey] as NSValue).CGRectValue();
UIView.animateWithDuration(0.1, animations: { () -> Void in
self.centerConstraint.constant = self.formCenterOriginal + (keyboardFrame.size.height / 2);
});
}
func keyboardWillHide(notification: NSNotification) {
self.centerConstraint.constant = self.formCenterOriginal;
}
override func touchesBegan(touches: NSSet!, withEvent event: UIEvent!) {
self.view.endEditing(true);
}
func textFieldShouldReturn(theTextField: UITextField!) -> Bool {
if (theTextField == self.passwordText) {
theTextField.resignFirstResponder();
login();
} else if (theTextField == self.userNameText) {
self.passwordText.becomeFirstResponder();
}
return true;
}
func login() {
let alertController = UIAlertController(title: "Welcome", message: "Welcome" + ((userNameText.text == "") ? "!" : " " + userNameText.text + "!"), preferredStyle: UIAlertControllerStyle.Alert);
alertController.addAction(UIAlertAction(title: "Ok", style: UIAlertActionStyle.Default,handler: nil));
self.presentViewController(alertController, animated: true, completion: nil);
}
}
This is all about. If you have any questions or concerns, please feel free to comment.
Full source code
The whole project is available in the following GitHub URL:
https://github.com/hazems/swift-sample1


