
Yet Another Yarn Post, guest post by Jodi Meadows
A continuing epic adventure of socks and spindles and fanciness
Part three: THE WHEELING
Alternate title: In which I finally regain control of my numbering system.
Previous posts in this series: The Yarning, The Spindling, another The Spindling, another another The Spindling.
About a year and a half ago, I bought a spinning wheel and promised Robin a guest post about it. Upon guest post delivery, she asked a million and a half questions that would require several more posts to explain. And so this series was born.
Finally, I'm getting to the post I offered to write in the first place. :P
Okay, so I mentioned I liked yarn and spinning, right? Well, one day, I finished spinning the singles* of a lovely wool/silk mix called Cottage Rose. With the singles finished, I was ready to ply them together to finish the yarn.
And ply.
And ply.
It took a week. For a long time, it looked like I had the same amount of yarn ready to be plied as I did when I started. And honestly, plying isn't bad, but it's not thrilling. Some have even called it boring, because all the drafting** is over.
So I made sad faces at my husband, Jeff, and he bought me a spinning wheel. Conveniently, I'd already done a ton of research on spinning wheels and decided which features mattered to me, and which ones didn't. When the box of spinning wheel goodness arrived on my doorstep (glee!), I immediately opened it and put it together, instead of waiting for help.
I'm glad I did this, actually. It was tricky, but I learned a lot about how the wheel works and what makes it go. My wheel isn't the most complicated of them all (it's actually very uncomplicated), but doing this myself taught me a lot. (I did get Jeff to tighten a few bolts when he arrived.)
This is Bob the Spinning Wheel the day he was born.
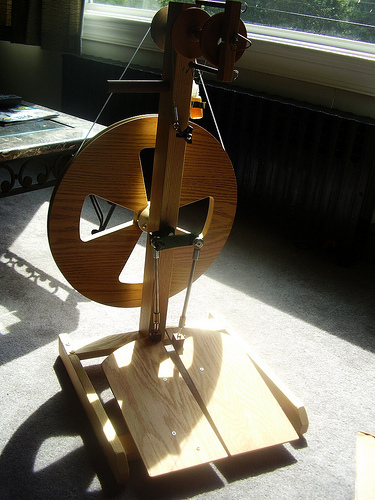
You will notice a few key parts. There's the drive wheel — the big wheel in back — the treadles on the bottom, and the flyer on top, which is shadowed here, but don't worry because I have a zillion more photos of it. These are the things that make the spinning wheel work.
We'll do this "the foot bone's connected to the leg bone" style.
The treadles are what you put your feet on. Sometimes there's one treadle, sometimes there are two. I like two, but it's perfectly acceptable to like one. The treadles are connected to a pair of rods called the footmen.
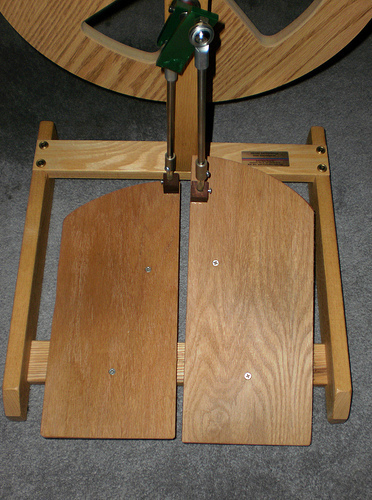
See the metal rods? There's a green thing just on top of them. That connects to a shaft that goes through the wood into the drive wheel. It turns the wheel.
Glance up at the first shot of the wheel again. You can see a band that wraps around the drive wheel and connects to a set of whorls behind the flyer. This is basically a gear system, like on a bike. Every time the drive wheel turns once, the whorl turns five times. Or nine times. Or eighteen times. (There are several whorls back there and you can select which one to use by moving the band a little.)
So. Treadles turn the wheel. The wheel turns the whorl. The whorl turns…the flyer. It's that horseshoe shaped thing at the top.
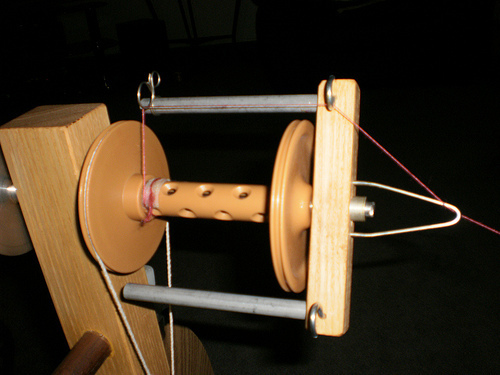
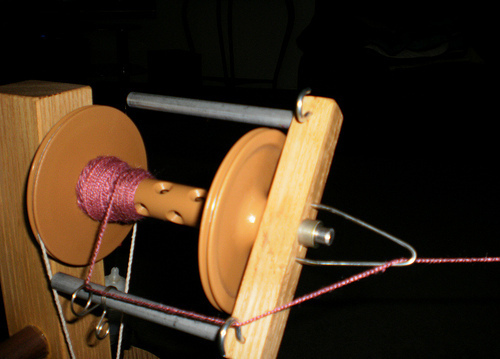
This part is a little more complicated. The silvery thing on the very left holds the whorls. Connecting to that, there's a rod that goes through the wooden piece and all the way to the front of the flyer. The bobbin (plastic thing with holes) sits on that shaft, and then the flyer (wood piece with metal arms) sits in front of that. The flyer is locked onto the shaft pretty securely. When the shaft turns, the flyer turns.
In this photo, I've threaded the flyer already. The triangle thing in front is called a delta orifice.*** The yarn goes from there, around the hooks, and sticks to the velcro at the back of the bobbin.
When I treadle, all the turning things turn, including the flyer. It adds twist to the yarn I'm holding.
I can draft out fiber and treadle at the same time. And because of something called a brake band — the white band around the back of the bobbin — the bobbin turns at a slower rate than the flyer. It pulls the newly twisted yarn in through the orifice, around the hooks, and wraps it around the bobbin.

From there, you can move the yarn guide**** to fill up the bobbin evenly.
What happens when you've spun all the singles? Here, I have two bobbins of singles in this yarn. I want to ply them together.
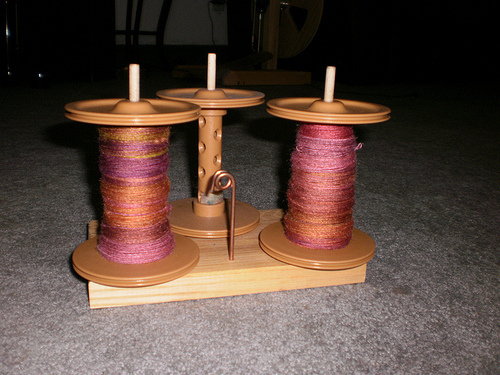
(They're sitting on something called a lazy Kate, which seems more practical than lazy to me. Basically it allows the bobbins to turn without you needing to fuss with them.)
When plying, you will need to turn the wheel (or spindle — whichever you're using) the opposite way you used to spin the singles. (I believe I covered the direction you should spin things in my last post.) So if you spun your singles clockwise, you will ply counter (anti) clockwise. This way, the finished product will be balanced.
The spinning wheel will go whichever direction you tell it to. There's no need to fiddle with that. The only thing different you will need to do is thread the yarn so it will wrap in the other direction.
See how the guide is on the other arm now? And the yarn, which was wrapping clockwise in the other pictures, is now going counter clockwise? (If you do it the wrong way, you will mess up your twist. It won't be pretty. Trust me.)
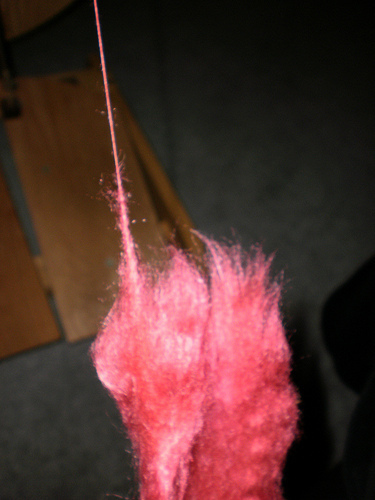
As for how you get both singles in there at the same time — easily! Remember the bobbins on the lazy Kate? In this photo, I'm holding a piece from each bobbin, and then guiding them together so they feed into the orifice at the same time. The wheel is turning, twisting them together, and the only thing I have to do is treadle at an even rate (so one part isn't super twisty and another part is super not twisty) and remember to move the yarn guide.
Yay! It's yarn!

–
*Reminder: Singles are the single strand of yarn. It's definitely yarn, but often spinners will ply one single with another. (Or more. You can have as many as you can stand.) This helps structure, stability, strength…and maybe some other things that don't start with the letter S.
**Reminder: Drafting is the act of drawing out a little fiber into the twist area.
***Most orifices are holes (as the name implies) and require a hook to thread. This one you can take care of quickly with your fingers, which was one of the things I knew I wanted in a spinning wheel.
****I have a yarn guide. Another thing I required of my spinning wheel. Lots of wheels have a series of hooks along the arms instead of the sliding yarn guide. The reason I like the guide is because it allowed me to fill the bobbin more evenly, rather than getting a bunch of mountains where the hooks are, and valleys where the hooks aren't.


Robin McKinley's Blog

- Robin McKinley's profile
- 7242 followers

