
Social Media Monday—Google Plus for Writers—Part 1—Establish Google Authorship
by +EdieMelson @EdieMelson
 I promised you all a series about Google Plus, and today I’m beginning to make good that promise. Unfortunately, one post is not going to cut it. So I’ll be sharing all I’ve learned about this valuable network over the next few social media posts.
Google Plus, an IntroductionMany people are confused by Google Plus. So I think the best place to start on this definitive guide is an overview of what Google+ is and what it is not.
I’ve heard a lot of people say that Google+ is going to replace Facebook. Actually, I’ve said several times that this is my hope. BUT that doesn’t mean that Google+ is a copycat network.Far from it.
 The scope and use of Google+ goes far beyond Facebook.
Facebook is a network based on general social interactions. Google+ is a network based on commonality, or if you prefer, passions. Interactions are built on shared passions.
There is one thing that separates Google+ from all the rest of social networks, and I’m surprised at the number of people unaware of this. This is a network that’s intimately tied into search engines. This means that if you do a search for a person or topic, Facebook and Twitter posts won’t often appear. Google+ posts will.
This is reason enough to be a part of this valuable network. You can see the value of posting regularly on Google+ if you’re in the process of building or solidifying an online platform.
Google AuthorshipThe first and most important thing you need to now about using Google+ is Google Authorship. To establish Google authorship you must link your content to your Google+ account.
There are two ways to do that.
The first option is through your email address. To establish authorship this way, your Google+ email address must be tied to the site where you post. For example, I would have to have the email address ediemelson@thewriteconversation.com to tie me to The Write Conversation. The trouble with that choice for me is that I don’t have that email address.
There is a second way to establish authorship. You can also embed a line of html code in your website (or blog). This is a complicated process, and for those of us unfamiliar with the inner workings of code, one that is ripe for fatal errors.
Edie's Third WayI have discovered a work-around for this second option that doesn’t require delving into the inner workings of my blog. If you look at the top of this post, you’ll notice my byline (By +EdieMelson @EdieMelson) in both instances, my name is a hyperlink. The first is a link to my Google+ profile and the second is a link to my Twitter profile.
But the Google+ link doesn’t just link to my profile, it also contains the html code that Google MUST have to verify authorship. I discovered I can embed that code by using the html option when I compose my blog posts. I did it once and now just copy and past it into every post I write.
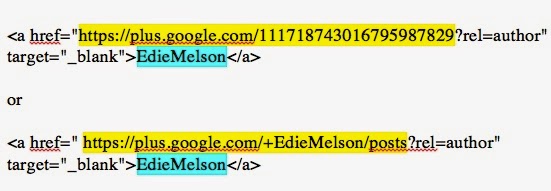
Here’s the general code: google+profile?rel=author" target="_blank">google+name
You must insert your Google+ profile URL for the words highlighted in yellow.You must insert your Google+ profile name for the words highlighted in blue.
This is how the code appears for me (see screenshot below):
 Your Google+ URL may be a series of numbers. like the code at the top, or it may be your name, like the second code. Either code will work.Step-by-step InstructionsThere are two conditions that must be met to establish Google+ authorship using this method.You must have a Google+ accountYour blogging platform must allow you to compose a post in html. Most, including WordPress and Typepad, as well as Blogger will allow you to do this.
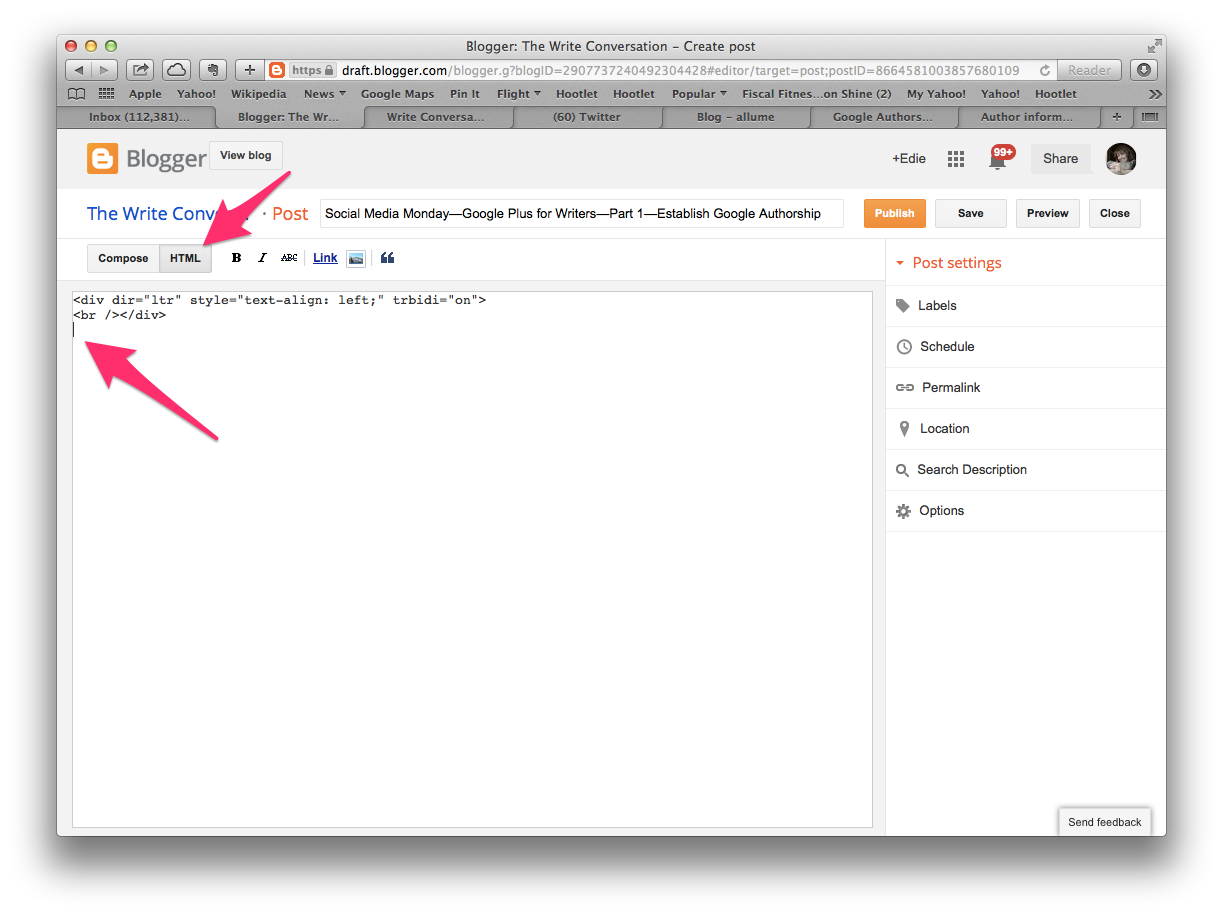
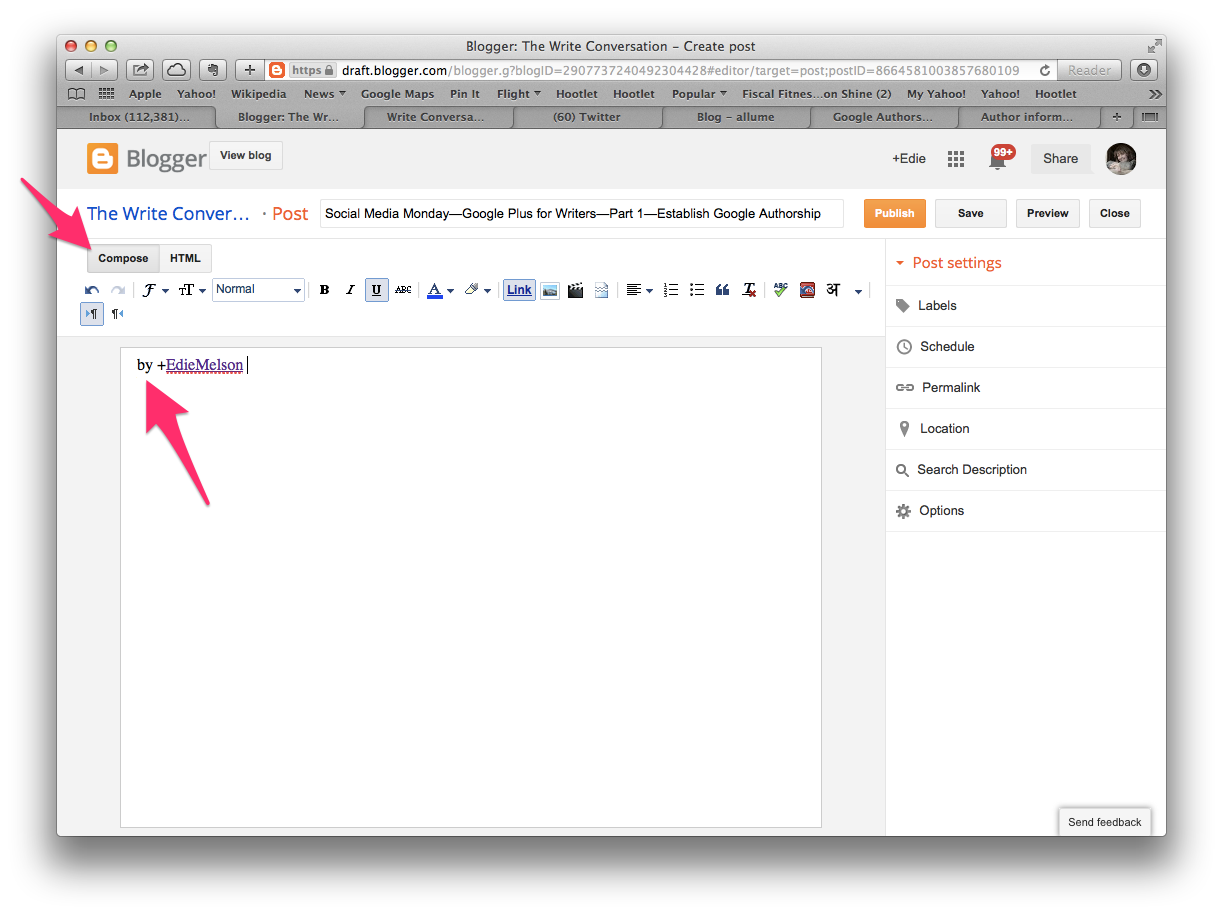
1. Open your compose window and choose HTML (first arrow on the screenshot below). Place your cursor below the code already in place (second arrow on the screenshot below). IMPORTANT NOTE: sometimes there's not already html code in the window. If there's no code, just paste the code at the top of the window.

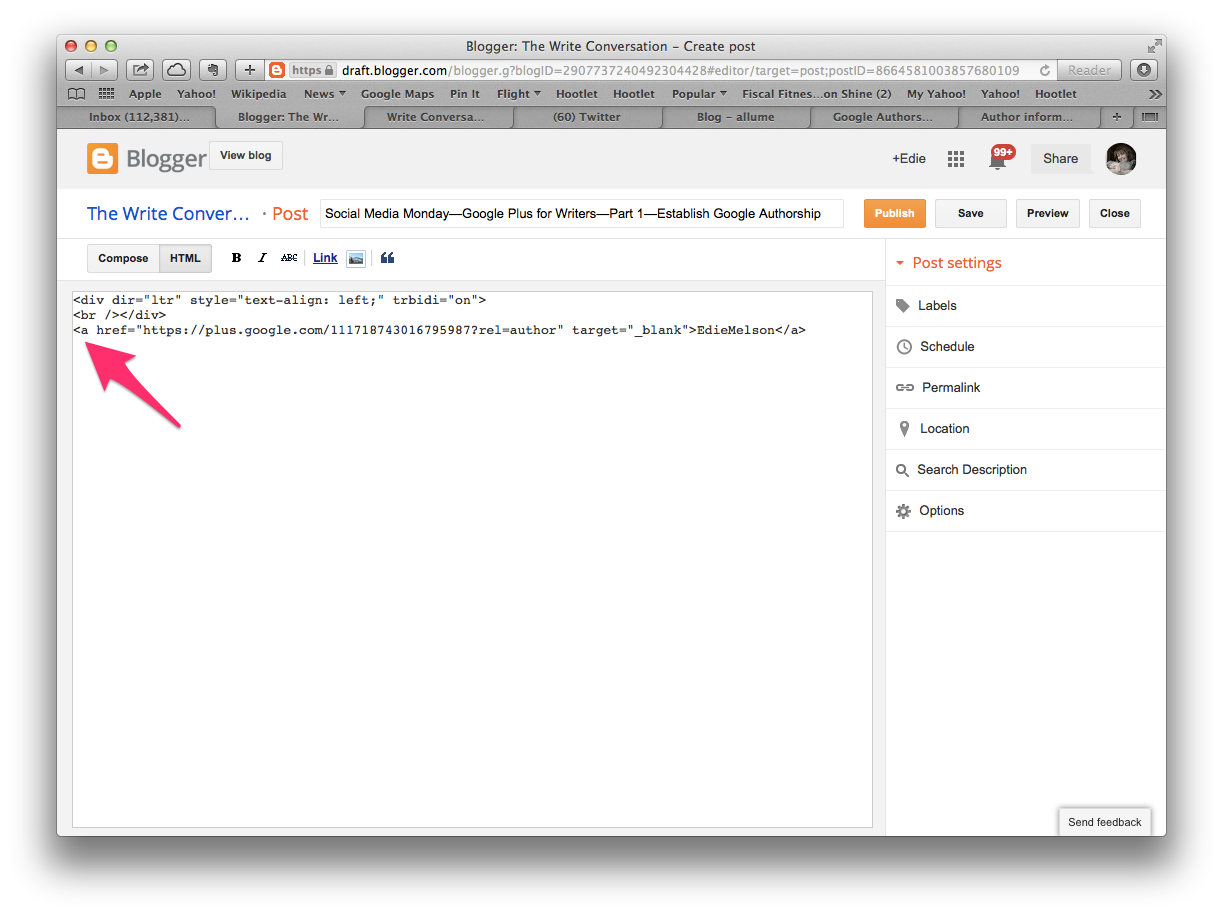
2. Insert your personalized code. (See screenshot below.)

3. Change your compose window back to the regular compose mode and THEN add the word BY and the Plus Sign (+) to let people know this is a link to your Google+ Profile. (See screenshot below.)

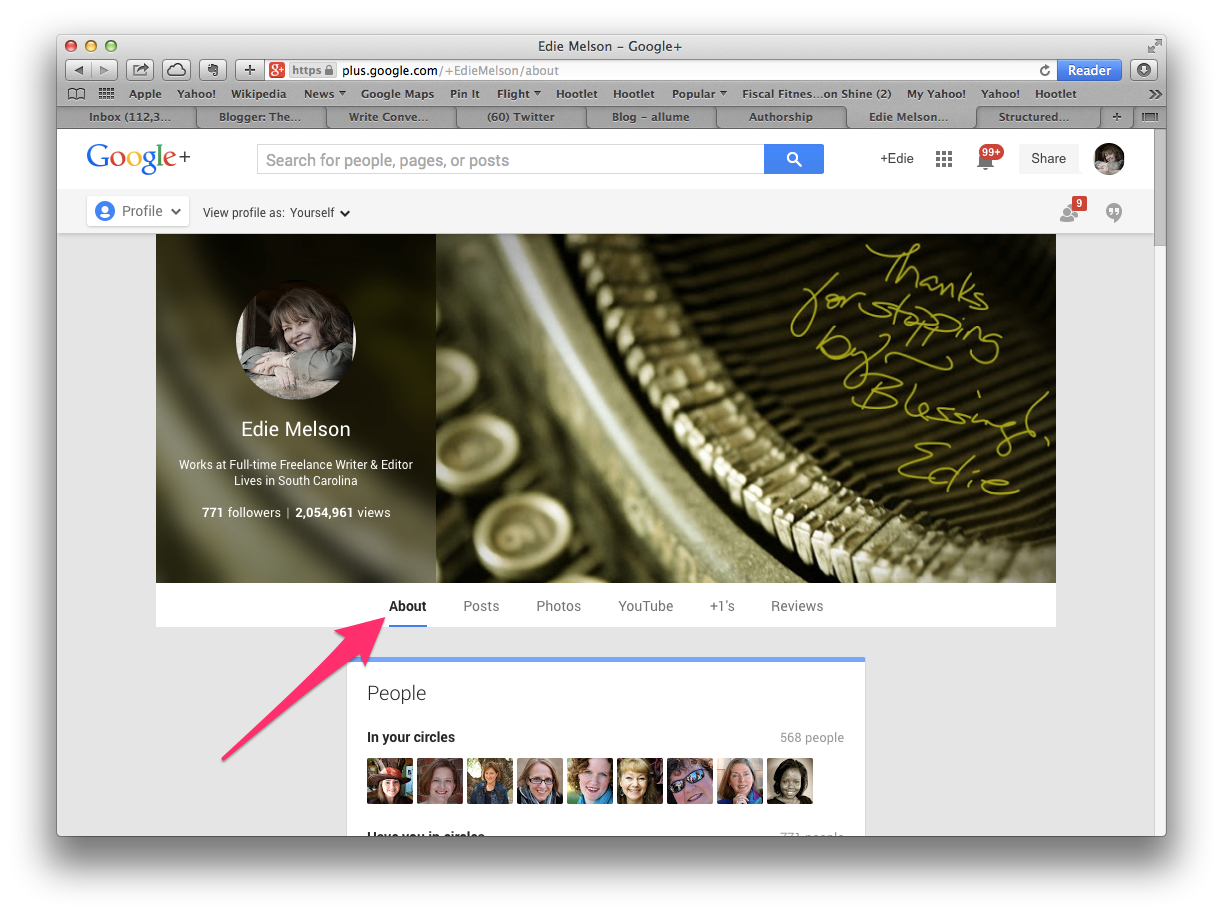
4. Now you’re going to have to modify your Google+ account. Go to your Google+ profile and click on ABOUT (see screenshot below).

5. Scroll down until you come to LINKS, then click on edit. Make sure that your blog is listed on the contribute to list (see screenshot below).

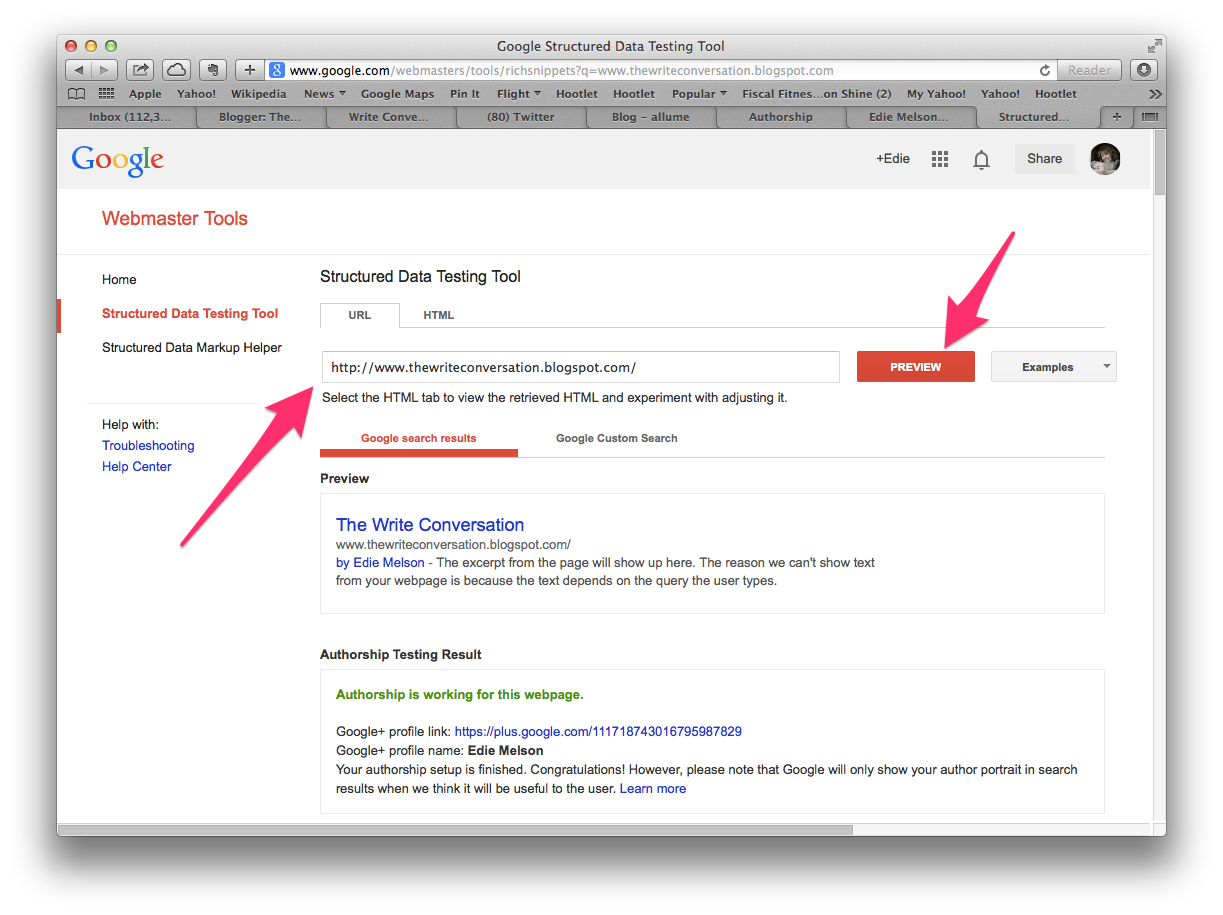
6. The last thing you’ll want to do is verify that your Google+ authorship is working. Visit this site, plug in your blog’s URL and click PREVIEW (see screenshot below). This will only work once you have PUBLISHED the post with your Google+ link. It won’t work until you have published your blog.

This is just the beginning of utilizing this valuable network. In the posts to come I’ll be introducing you the best ways to use Circles, how to work Video Hangouts and even how to Broadcast a Hangout.
But for now, I’d like to hear from you. What questions do you have about Google Plus. I want this series to be valuable for you, so don’t be shy about asking questions. Your comments will dictate, to a large extent, what I cover here.
Don’t forget to join the conversation!Blessings,Edie
TWEETABLESA series on #Google+ for writers! Today #SocialMedia Mentor @EdieMelson covers ways to establish Google Authorship (Click to Tweet)
Are there benefits to #Google+ for #writers ? #SocialMedia Mentor @EdieMelson has a new series to help you decide (Click to Tweet)
 I promised you all a series about Google Plus, and today I’m beginning to make good that promise. Unfortunately, one post is not going to cut it. So I’ll be sharing all I’ve learned about this valuable network over the next few social media posts.
 Google Plus, an IntroductionMany people are confused by Google Plus. So I think the best place to start on this definitive guide is an overview of what Google+ is and what it is not.
I’ve heard a lot of people say that Google+ is going to replace Facebook. Actually, I’ve said several times that this is my hope. BUT that doesn’t mean that Google+ is a copycat network.Far from it.
 The scope and use of Google+ goes far beyond Facebook.
Facebook is a network based on general social interactions. Google+ is a network based on commonality, or if you prefer, passions. Interactions are built on shared passions.
There is one thing that separates Google+ from all the rest of social networks, and I’m surprised at the number of people unaware of this. This is a network that’s intimately tied into search engines. This means that if you do a search for a person or topic, Facebook and Twitter posts won’t often appear. Google+ posts will.
This is reason enough to be a part of this valuable network. You can see the value of posting regularly on Google+ if you’re in the process of building or solidifying an online platform.
Google AuthorshipThe first and most important thing you need to now about using Google+ is Google Authorship. To establish Google authorship you must link your content to your Google+ account.
There are two ways to do that.
The first option is through your email address. To establish authorship this way, your Google+ email address must be tied to the site where you post. For example, I would have to have the email address ediemelson@thewriteconversation.com to tie me to The Write Conversation. The trouble with that choice for me is that I don’t have that email address.
There is a second way to establish authorship. You can also embed a line of html code in your website (or blog). This is a complicated process, and for those of us unfamiliar with the inner workings of code, one that is ripe for fatal errors.
Edie's Third WayI have discovered a work-around for this second option that doesn’t require delving into the inner workings of my blog. If you look at the top of this post, you’ll notice my byline (By +EdieMelson @EdieMelson) in both instances, my name is a hyperlink. The first is a link to my Google+ profile and the second is a link to my Twitter profile.
But the Google+ link doesn’t just link to my profile, it also contains the html code that Google MUST have to verify authorship. I discovered I can embed that code by using the html option when I compose my blog posts. I did it once and now just copy and past it into every post I write.
Here’s the general code: google+profile?rel=author" target="_blank">google+name
You must insert your Google+ profile URL for the words highlighted in yellow.You must insert your Google+ profile name for the words highlighted in blue.
This is how the code appears for me (see screenshot below):
 Your Google+ URL may be a series of numbers. like the code at the top, or it may be your name, like the second code. Either code will work.Step-by-step InstructionsThere are two conditions that must be met to establish Google+ authorship using this method.You must have a Google+ accountYour blogging platform must allow you to compose a post in html. Most, including WordPress and Typepad, as well as Blogger will allow you to do this.
1. Open your compose window and choose HTML (first arrow on the screenshot below). Place your cursor below the code already in place (second arrow on the screenshot below). IMPORTANT NOTE: sometimes there's not already html code in the window. If there's no code, just paste the code at the top of the window.
2. Insert your personalized code. (See screenshot below.)
3. Change your compose window back to the regular compose mode and THEN add the word BY and the Plus Sign (+) to let people know this is a link to your Google+ Profile. (See screenshot below.)
4. Now you’re going to have to modify your Google+ account. Go to your Google+ profile and click on ABOUT (see screenshot below).
5. Scroll down until you come to LINKS, then click on edit. Make sure that your blog is listed on the contribute to list (see screenshot below).

6. The last thing you’ll want to do is verify that your Google+ authorship is working. Visit this site, plug in your blog’s URL and click PREVIEW (see screenshot below). This will only work once you have PUBLISHED the post with your Google+ link. It won’t work until you have published your blog.
This is just the beginning of utilizing this valuable network. In the posts to come I’ll be introducing you the best ways to use Circles, how to work Video Hangouts and even how to Broadcast a Hangout.
But for now, I’d like to hear from you. What questions do you have about Google Plus. I want this series to be valuable for you, so don’t be shy about asking questions. Your comments will dictate, to a large extent, what I cover here.
Don’t forget to join the conversation!Blessings,Edie
TWEETABLESA series on #Google+ for writers! Today #SocialMedia Mentor @EdieMelson covers ways to establish Google Authorship (Click to Tweet)
Are there benefits to #Google+ for #writers ? #SocialMedia Mentor @EdieMelson has a new series to help you decide (Click to Tweet)


No comments have been added yet.


