
How To Find Speaker Coverage In One Step
In sound system design, step one is to define speaker coverage. Lucky for you, Daniel Lundberg and I have created a great new speaker coverage calculator that makes this initial step quick and easy. The calculator will give you a consistent coverage result for any scenario, but unfortunately it’s not very smart. It doesn’t know about walls and other speakers, so it works best for single-speaker applications like balconies, side fills, and smaller venues.
Consistent coverage means that SPL will not vary more than 6dB. So if the highest measured level in the audience is 100dB SPL, then no part of the audience may be lower than 94dB SPL. This calculator is designed to give you the least amount of level variation across the listening area, but there are many more variables at play here. With that in mind, let’s proceed.
Step 1 And Done
Put your measurements into the Speaker Coverage Calculator above. That’s it! Listen to my conversation with Lundberg for a more details on how it works.
Example 1 – Balcony
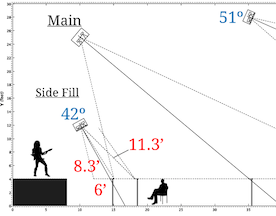
Let’s take the room from How To Tune A Sound System In 15 Minutes, add a balcony, and raise the ceiling. I used visual aids to show a four-foot seated audience height covered by four speakers: Main, Balcony, Sidefill, and Under Balcony. Download my MAPP Online Pro project to follow along.

Put your measurements into the speaker coverage calculator above. It recommends a nominal vertical coverage of 51° and a UPQ-1P aimed 25.3° above the front. You can manually work out the angle in MAPP, or use the speaker coverage calculator. Input the angle of your architectural guide (the one showing distance to front) and the calculator will tell you exactly what to put into the Rotation About CDRM box in MAPP. I put in a 139° front angle and got -15.7° for the speaker aiming angle.

Here’s a prediction at 8kHz. Did we meet our criteria for consistent coverage? Just looking at the graph I would say there’s no more than a 3dB difference from on-axis to off-axis, and consulting the virtual SIM I see there is no difference in average SPL and only about a 4dB difference in the high end. Great success!

Example 2 – Side Fill
 The speaker coverage calculator recommends a UPA-1P aimed 21.2° above the front. Virtual SIM tells me that there is about a 8dB difference from on-axis to off-axis. This doesn’t meet our requirements, but I found that if I aim it lower I can can get more even coverage and meet the crossover point with the main speaker.

Example 3 – Under Balcony
 With limited height, it’s going to be hard to cover this listening area with one speaker. The speaker coverage calculator recommends subdivision, but it also keeps recommending a giant JM-1P (see prediction below). Now I know how Dr. Frankenstein feels: I asked for consistent coverage and I got it, but I also got a mob of angry townspeople. I tried a UPM-2P here aimed at the last row and that worked a lot better.

Example 4 – Small Venue
Let’s take a look at Ashkenaz, one of the first music venues I worked at when I moved to Berkeley. When I first put the triangle lengths into my speaker coverage calculator (9.5′, 28.5′, 25′), it gives me some crazy results and recommends that I subdivide the array. Let’s assume that I use a down fill to cover the first ten feet of the audience. With new results, I try a UPQ-1P and see that it provides even coverage. I also observe that aiming it further down will get me less consistent coverage, but will let me send more of those expensive decibels into the audience, providing more bang for the buck.

To Subdivide or Not To Subdivide
How do we determine when we need to subdivide our coverage into more than one segment? Here’s a nice rule of thumb that I learned from Bob McCarthy’s seminar: measuring from the speaker, take the ratio of the distance from the first row to the last and subtract one. So in our example the first row is 9.4ft from the speaker array and the last row is 28.5ft from the same array. That’s a ratio of 1:3. 3 – 1 = 2. So a two-segment array would probably work better for this coverage area. How many speakers in each segment? That’s up to you and your budget. For a much better explanation of this topic, read McCarthy’s article, Array Or Not To Array.
Finding Speaker Coverage When Front And Back Are Equal
The horizontal coverage plane of a sound system often looks like an isosceles triangle (two equal sides and angles) and the loudspeaker nominal coverage can be found with basic trigonometry. Remember soh cah toa from trigonometry? No?! Me neither. Lets watch this video! To find speaker coverage angles in the field, find the lengths of the triangle for the area you are trying to cover and solve for the inside angles. There are also plenty of free triangle solvers online and iPhone apps.
Please test this out the speaker coverage calculator and send me your results! If you have suggestions for a better calculator, let me know in the comments below. After I get some more comments and suggestions I’ll publish a second version and Daniel and I will do another podcast with a better explanation and more case studies.
The post How To Find Speaker Coverage In One Step appeared first on Sound Design Live.


