
How To Tune A Sound System In 15 Minutes
 Even professionals often skip sound system setup and go straight to mixing, because there just isn’t enough time. Here’s a secret: you can measure and optimize a sound system in 15 minutes. How? It’s simple.
Simple Sound System Goals
The goal for tuning a sound system is very simple: provide the same sound in every seat. Setting the master EQ at the mix position does not meet this goal. Instead, we need an order of operations to help us make changes that will benefit the entire listening area, or at least mitigate this damage. That includes:
Driver functionality and polarity
Speaker aim and splay
Speaker level and crossover
Phase/delay
Filter/EQ
It might seem like you don’t have 15 minutes to spare to check all of this, but remember this universal rule: if we verify every element of the sound system, nothing will go wrong, but if we skip any one part, it will fail and hysteria will spread.
Measurement Equipment: dual channel analyzer (SIM, SMAART, SATLive, EASERA); laser; protractor.
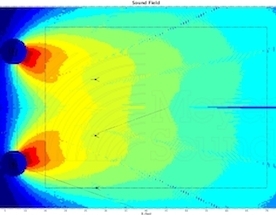
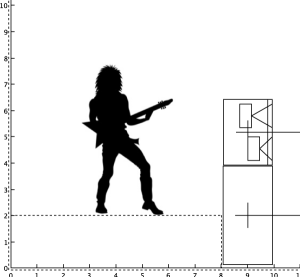
Sound System: (2) CQ-1, (2) 650-P in an uncoupled symmetrical point destination array (see diagram below). This is the most common professional sound system setup that I run into; it is not ideal by any means. One CQ-1 flown above downstage center would match the room. Both subs together on one side or in the corner would help our low-end coverage. These things almost never happen, and I could complain about it and waste your time, but those speakers will still be sitting there, bored as hell.
One thing I often like to do in this situation is to mute one of the subs and apply high-pass filters to the tops. This technique usually gets more even coverage below 100Hz. One of the subs ends up being a fancy speaker stand, but no one notices. Download the MAPP online project if you would like to follow along with each step.
Disclaimer: This is a highly simplified recipe to give you an idea of the structure for verifying and calibrating a professional sound system. There are many factors at play and details that I do not cover, like how to operate an analyzer. For a more in-depth analysis of this subject, listen to my interview with Bob McCarthy and buy his book.

Professional Sound System Setup
0-4min: Driver Functionality & Polarity
Do you think a lighting technician starts running a show without making sure that all of their instruments work? No! Better make sure all of your speakers are playing what they are supposed to play.
Set all outputs to unity.
Play pink noise and isolate one speaker at a time. In this setup we are unable to solo individual drivers, but do it if you can.
Is output X playing from speaker/driver X? If not, track it down. Many times it’s just a case of faulty patching. If you’ve got lines wrong inside of a closed box, you’re going to need more than 15 minutes. You may need to get your head close and listen to each one. This is best done with an assistant to guard and operate the mixing board. Repeat for each speaker/driver.
Measure phase response on your dual channel analyzer at the on-axis point of each speaker/driver. If the phase trace is around 0°, that’s normal phase. If it’s at 180°, that’s inverted. Is output X phase response what you expected? Polarity inversion is often cause by an improperly wired cable or by the use of a gender turn-around.
I spend the most time on this step because it’s the most important. It will be a sad dance party if your subs aren’t working — don’t make the frat boys cry.
4-8min: Speaker Aim & Splay
As Steve Bush from Meyer Sound likes to say, “Put sound where there are people.”
Using a protractor and a laser on top of speaker A, show horizontal coverage towards the (house) left wall. If you can avoid the wall completely, great, but in situations like this where the room is too long and speakers too wide, shoot for about halfway down the audience area.
Point the laser on-axis and find the spot where it crosses the middle of the audience. Halfway from there to your speaker is OnAx A.
Measure and record OnAx A.
Find the edge of the audience (house left), equidistant from the speaker. This is easy since the delay from the speaker shown on your analyzer should be exactly the same. This should be OffAx A.
Measure OffAx A. Pay special attention to the HF region. It should be close to -6dB from OnAx A. If it is not, adjust speaker position and aim.
Copy final aim to speaker B
8-10min: Speaker Level & Crossover
Return to OnAx A. Record level at spectral crossover frequency (100Hz in my case).
Without moving the microphone, measure OnAx C. Adjust output C to match A at spectral crossover frequency (-1dB in my case).
We’ll get to speaker B in a minute.
10-12min: Phase & Delay
Observe the phase response difference of OnAx A and OnAx C around the spectral crossover frequency without changing the compensation delay of the analyzer. Are they matched?
If not, measure OnAx C while adjusting it’s output delay to match OnAx A at the spectral crossover frequency.
Once they match, combine A and C and check for uniform response.
Note: In cases like this where the subs are very close to the tops, you will often have matching phase response. The manufacturer has designed them that way.
12-15min: Filter & EQ
Set EQ of OnAx A.
Add speaker C and EQ.
Compare with OffAx A. Make tough decisions (-4dB between 250 and 500Hz to compensate for pink shift in my case).
Now for speaker B.
Measure OnAx B and match level, delay, and EQ to OnAx A.
Combine A, B, & C and check OnAx B and A again.
This was a very basic example. If you would like this kind of step-by-step instruction for different system setups, let me know and I can produce more of them.
These are some of the methods I’ve come up with to deal with this all-too-popular professional sound system setup. What are some of your tuning tricks for this scenario?
The post How To Tune A Sound System In 15 Minutes appeared first on Sound Design Live.


