
How to Make a Colorful Fall Wreath for Under Five Bucks
Creative Fall Wreath

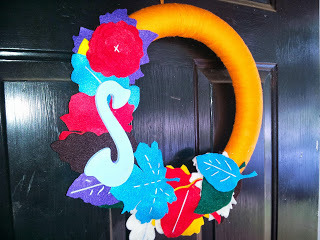 Festive Fall Wreath made by Cheryl Seagraves
I love the fall! There is something so cozy about the autumn leaves and warm colors of the ever changing fall season. The sun touches everything and a light breeze rustles the orange and red leaves that fall to the ground in my front yard. That is when I know it’s time to start preparing the house for the months ahead, when we all spend more time together in the comfort of our home. I wanted to make my home appear more inviting this year and for me the most inexpensive and crafty way to do that is by making a pretty welcome wreath for my front door.
The best thing about the cooler months is the prospect of waking up in a sunshiny room with just enough nip in the morning air to make you wanna wrap up in an old quilt with your little one and watch cartoons all morning. I made a wreath with those moments in mind that is creative, funky, and says this house is a home to you too, come on in!
I have four kids, so I don’t like to spend a lot of time shopping. Most of the stuff I used were things I already had around the house. I knew that we wouldn’t be swimming anymore for several months, so I got a pool noodle that’s just taking up space in the garage. My handy dandy glue gun and made my wreath form. Pssst... don’t tell anyone, but I saved myself a solid eight bucks by doing that ! The rest is easy peasy; all you need is assorted colored felt pieces which you can get in a bundle or for as low as twenty nine cents a piece , a bundle of yarn or two small bundles, a wooden letter for your last name, and some scissors.
After I wrapped the yarn around the pool noodle wreath form I drew out some leaf patterns, but you can find templates from a simple Google search. It takes a while to wrap the wreath, so the thicker the yarn the better. During an episode of Duck Dynasty I sat with the family and wrapped the yarn around the wreath until it was completely wrapped up and no red noodle was showing through.
I cut out the leaf shapes. To add a little detail I used some of my daughter’s embroidery thread to stitch some defining lines on the leaves and little flower. Then I just started hot gluing the leaves onto the wreath. I wanted them to look scattered, and I made sure to layer each new leaf going up along the side on top of the previously glued leaves.
I found a wooden S at the local craft store for less than a dollar and painted it a light blue with acrylic paint. After it was dry I glued it on the left side of the wreath and voila! For less than five bucks my door is properly decorated for the most festive time of year!


No comments have been added yet.


