Matcha-Almond Layer Cake with Meringue Mushrooms
I've been having disorganized pantry shame for a few months now, so last Friday I decided to do something about it. I went in armed with a roll of garbage bags and an indiscriminate attitude (let's get rid of it all!), but soon found that my pantry was more like an archaeological dig into the past two years of my life.
Cake boards and tuile stencils (once lost) were found flattened against a wall. A binder of dessert sketches and scribbles lay open with bent pages under a pile of cookbooks. A grocery bag held gold plastic eggs for an Easter post that never happened. Flattened cupcake papers would surface every now and again, along with stocking stuffers that never made it to the mantel at Christmastime. Last unearthed, a box of miscellany; cookie cutters, ribbon, rock candy and chocolate transfer sheets.

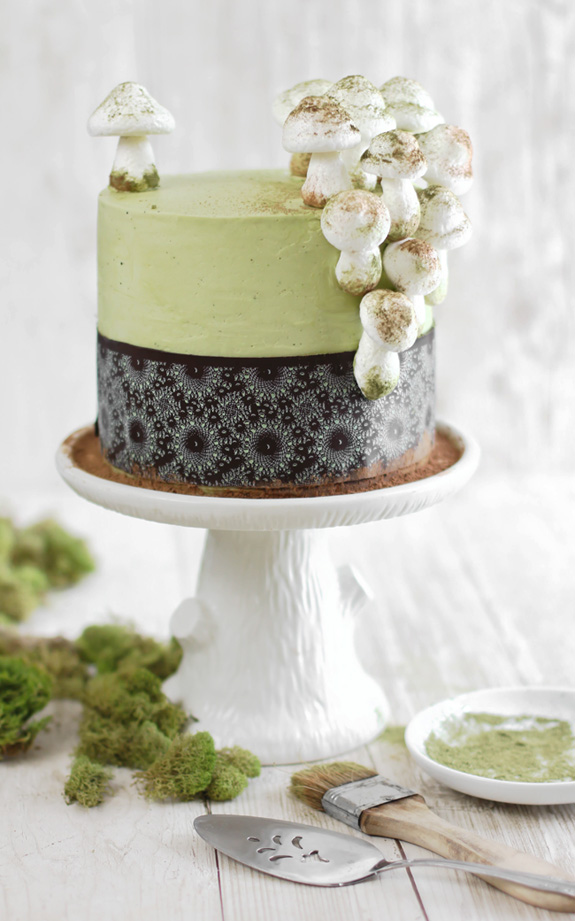
After everything was considerably more organized (though not much diminished), I pulled out a chocolate transfer sheet that had caught my eye. The delicate pattern was almost indistinguishable with airy spirals and green flecks... but what I managed to see reminded me a little of mushroom spore prints - an art-slash-science project I'd had fun with as a kid.
That's all it took. I spent the rest of the day with my head in the clouds. I was dreaming of my own species of mushroom (Boletus saccharo - sugar mushroom?) and sketching ideas for a cake teeming with them.


It's been ages since I've made meringue mushrooms. I first made them for this Buche de Noel, in my early blogging days, but who says you have to wait until Christmas to make these guys? They are delightful any time of year!

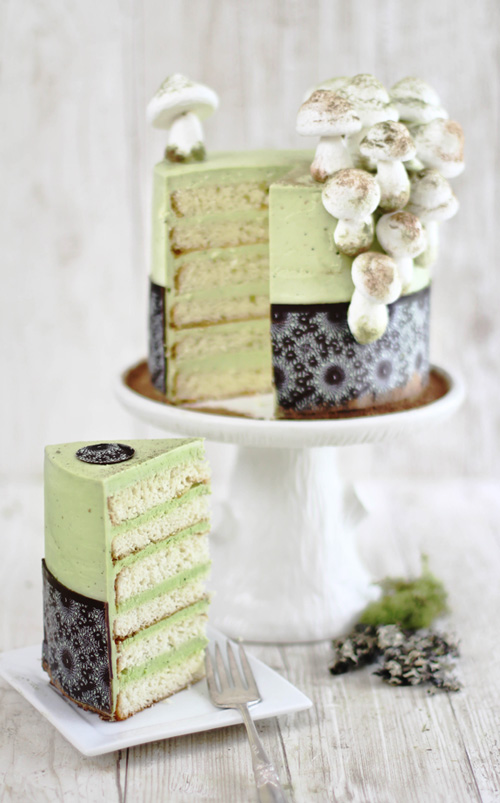
It's also been a while since I've made anything with matcha tea powder, which is surprising because it's one of my favorite ingredients of all time. It's really perfect for this cake - not bitter at all, especially when paired with almond - and with just a hint of earthiness. I whipped these flavors into silky Swiss buttercream to coat layers upon layers of almond-scented butter cake.
If you're a newbie at using transfer sheets, you can find additional instructions here and here. I usually find my transfer sheets at Fancy Flours, though some may be found locally at specialty cake shops.
I had so much fun immersing myself in every aspect of this cake, albeit the inspiration was a little weird and unconventional (spores, mushrooms... who makes a cake with that in mind?). In the end it turned out pretty cute and woodsy-looking, but above all - it's mighty tasty.
Matcha-Almond Layer Cake with Meringue Mushrooms
[click for printable version]
Yield: 8-10 servings
Recipes adapted from the SprinkleBakes book
Prep 2 hours 30 minutes; total time about 5 hours
Cake
1/4
pound (1 stick) butter, softened
1 3/4
cups (350g) sugar
3
eggs, at room temperature
2
teaspoons (8g) vanilla extract
1/2 teaspoon
(2g) almond extract
2 1/4
cups (270g) all-purpose flour
3 1/2
teaspoons (10g) baking powder
1
teaspoon (7g) salt
1 1/4
cups (292g) full fat sour cream
Swiss
buttercream frosting/ chocolate transfer
6 egg
whites
1 cup
(118g) sugar
Pinch
of salt
1 1/4
pounds (5 US sticks) unsalted butter, cubed, at room temperature
2
teaspoons (8g) vanilla extract
1/2
teaspoon (2g) almond extract
1
tablespoon (10g) matcha green tea powder
1 1/2
tablespoons (22g) hot water
4 oz.
semisweet chocolate chips
Chocolate
transfer sheet of your choice
Meringue
mushrooms
2 egg
whites, at room temperature
1/4
teaspoon (1g) cream of tartar
1/2
cup (100g) granulated sugar
4 oz.
chocolate chips or candy coating
2
tablespoons (20g) cocoa powder
2
tablespoons (20g) matcha green tea powder
Make the cakes. Preheat
the oven to 350°F. Grease the bottom and sides of three 7-inch springform pans (if
you don’t have 3, you can reuse the ones you have or use two 9-inch pans). Line
the bottom and sides with parchment paper, and then grease the paper.
In
the bowl of a standing mixer fitted with the paddle attachment, cream the
butter and sugar together. Add
the eggs, vanilla and almond extracts, and beat until combined. Combine
the flour, baking powder, and salt and add to the mixer bowl in three batches, alternating
with the sour cream and beginning and ending with the flour mixture. Scrape
down the bowl and beat on high speed for 3 minutes. Divide the batter evenly into
pans, or if reusing a pan, fill each pan two-thirds full.
Bake
for 25 to 30 minutes, or until a toothpick comes out clean when inserted into
the middle of the cakes. Let
the cakes cool slightly in the pans. Remove and let them cool completely on a
wire rack. Level cakes with a large serrated knife or cake leveler. Torte each
cake so that there are six layers.
For
the matcha-almond Swiss buttercream, set a
saucepan filled one-third full of water over medium-high heat and bring to a
simmer.
Whisk
together the egg whites, sugar, and salt in a large heatproof bowl. Set over
the simmering water and whisk until the mixture is hot to the touch and the
sugar has dissolved.
Transfer
the mixture to the bowl of a stand mixer fitted with the whisk attachment.
Beat
on low speed for 2 minutes. Increase to medium-high until stiff peaks are
formed.
Continue
beating at medium-high speed until the mixture is fluffy and has cooled (the
mixing bowl should feel cool to the touch).
Turn
the mixer off and switch from the whisk attachment to the paddle. Turn the
mixer on medium-low and add the butter, a few cubes at a time, beating until
well incorporated before the next addition. The egg whites will deflate and thin
with the first few additions – don’t let this discourage you – keep going. It may also look curdled, but don’t fret. Beat
on high speed when all the butter has been added. The mixture will thicken and
become smooth after several minutes of beating. Beat in the vanilla and almond extracts.
Place matcha tea powder and hot water in a small bowl and stir until a smooth
paste forms. If mixture is very thick, add additional hot water until it is
very smooth but not too liquid. Add the matcha paste to the batter and beat
until the frosting is completely smooth and consistently green.
Reserve
1/4 cup frosting for later use. Place a cooled cake layer on a cake stand and
top with 1/3 cup frosting; top with another cake layer and repeat frosting with
remaining layers. Cover cake with a thin coat of frosting (crumb coat) and
refrigerate until firm, about 15 minutes. Remove cake from refrigerator and coat
cake in a thick even layer with the remaining frosting. Refrigerate until firm.
For
the chocolate transfer, measure and cut a 4x16-inch band from the transfer
sheet. Place it smooth-side-down on a large piece of parchment (you should be
able to feel the raised chocolate pattern on the side facing upward). Melt
chocolate at 30 second intervals until it can be stirred smooth. Place a large spoonful of melted chocolate at
one short end of the cut transfer sheet band, and smooth it over using an
off-set spatula. Try to smooth the chocolate over the entire area in one fluid stroke;
this will decrease the chances of the pattern shifting. Holding the coated transfer
sheet at both ends, press the middle of the sheet onto the cake and wrap the
ends around the cake. Refrigerate until the chocolate is firm, about 15
minutes. Once the chocolate is firm, remove the acetate coating. Measure and cut another piece of the transfer
sheet to fill in the remaining gap. Coat with chocolate, and press onto cake as
before. Let chill and remove acetate when the chocolate is firm.
For
the meringue mushrooms, prepare
two baking sheets by lining them with parchment paper. Preheat the oven to 200
degrees.
Place
room temperature egg whites in the bowl of an electric mixer fitted with a
whisk attachment. It is important that the bowl and whisk both be very clean,
so that the egg whites whip properly. Begin
beating the egg whites on medium speed. Once they are very frothy, stop the
mixer and add the cream of tartar. Start the mixer again and continue to beat
the egg whites. Once they form soft peaks, increase the speed to high and
gradually add the sugar, a tablespoon at a time. Beat the whites until they are
very shiny and hold stiff peaks, but are not dry or crumbly.
Spoon
the meringue into a large pastry bag fitted with a 1/2-inch round tip. First,
pipe the mushroom caps: hold the pastry bag at a 90-degree angle about 1/2 inch
from the parchment paper. Using firm and even pressure, squeeze out a round
meringue disc about 2 inches in diameter and 1 inch high. Stop squeezing, then
twist the bag and lift it from the meringue to get a clean break from the cap.
Repeat in regular intervals on the baking sheet until you have approximately 2
dozen mushroom caps. The mushroom caps will most likely have peaks on top, so smooth
the tops by wetting your index finger and lightly pressing the peaks down into
the caps.
Next,
pipe the mushroom stems. Again position the bag perpendicular about 1/2-inch
from the baking sheet. Begin squeezing the bag to form a 1-inch round base.
Continue to squeeze as you slowly and evenly draw the bag up, then release
pressure (causing a break) to form a tapering stem about 2 inches tall. The
stems will have peaks on top, but do not smooth them down as before with the
caps. Use the remaining meringue to pipe as many stems as possible—allow some
stems to tilt and collapse to the side, these mushrooms will be applied to the
side of the cake in a “climbing” manner.
Bake
the meringues at 200 degrees for about 90 minutes, turning them halfway through
the cooking time to ensure an even bake. The meringues should be hard and dry
to the touch, and you should be able to easily lift one from the parchment.
Once the meringues are done, let them cool completely before assembling. If
time allows, you can also turn off the oven and let them sit in the oven for
several hours or overnight.
To
assemble the mushrooms, melt the chocolate in a small bowl in the microwave,
stirring after every 30 seconds to prevent overheating. Use a toothpick to carve
a small hole in the bottom of a mushroom cap. Dip the top (pointed end) of a
stem in the chocolate, and stick the chocolate-covered stem top in the carved hole
of the mushroom cap. Place the mushroom on a baking tray and leave to set, and
repeat with remaining caps and stems.
Place
the cocoa and matcha powder in separate small bowls. Dip the bottoms of the mushroom stems in the matcha
powder, then in the cocoa; tap to remove excess powders. Load a dry pastry
brush with the matcha powder and brush the caps. You may also use a sifter to
sift matcha and cocoa over the mushrooms.
Use
the reserved 1/4 cup frosting to attach the mushrooms to the side of the cake.
Group them together as tightly as possible. Place a group of mushrooms standing upright on
top of the cake. Randomly place one or two mushrooms away from the groups of
mushrooms on top of the cake.
Store
cake loosely covered at room temperature for up to 24 hours. To increase longevity,
store cake loosely covered in the refrigerator. Mushrooms will most likely
wilt, but the cake will keep for a few days longer refrigerated. Bring to room temperature before serving.
Note: Mushrooms can be stored for up to a month in an airtight container in a cool,
dry room. Humidity can make the mushroom soft and they will collapse. Mushrooms
will become soft after 12 hours on the cake at room temperature, but they
should still hold their shape relatively well. Do not assemble mushrooms on cake more than 24
hours before serving.


No comments have been added yet.