How to put a picture in a WordPress Post
Haven’t you wondered how other people manage to put pictures in their posts exactly where they want them?
Is manipulating pesky pictures not in your bag of tricks? Let’s see if I can help you wrangle those pictures into place.
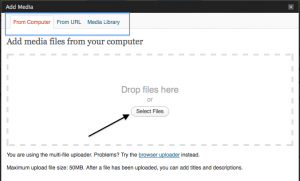
To initially place a picture in a post, click to place your cursor where you want the picture to appear. Click on the Upload/Insert words indicated by the arrow. The Add Media window will pop up (see graphic below)
As you can see the Add Media window gives you three choices of where to find the picture that you are inserting. You can find a picture on your computer’s hard drive, from a URL, or from your media library. For this exercise, we are going to assume you will be finding the picture on your hard drive. To do this, click on the Select Files button (or drop the file directly onto this window.)
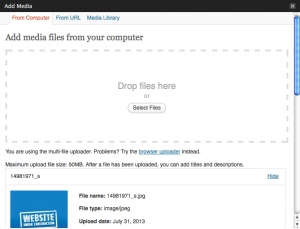
Once you have chosen the graphic that you want to use and it has uploaded, your screen will look like the screenshot above. At this point you can choose the size of the picture and the orientation (left, center, right) or just click on the insert into post button.
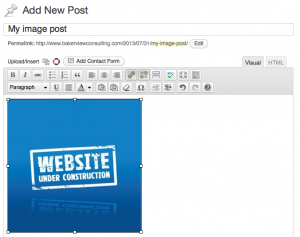
Your picture will be inserted as you see above. Let’s say you now decide that the picture should be centered or smaller, or you need to add a caption. The picture can be edited from this point. To do this, click once on the picture and the edit button will appear over the picture (looks like a mountain picture). click on it and the following graphic will appear:
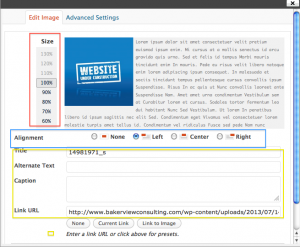
As you can see in the graphic above – The red box shows where you can change the size of the picture by percentages (ie. make it 60% of it’s current size) This change will keep the width and height in proportion as it changes. The blue box in the graphic above shows where the alignment can be changed.
Pictures should all have Titles and Alternative Text, but that is the subject for another post. The yellow box indicates where that information as well as caption can be filled in. Let’s say you want someone to be able to click on the picture and they be taken somewhere – maybe Amazon because the graphic is of your book cover. If you remove the information that is in the Link URL field and enter the Amazon direct URL, the reader can be taken to Amazon when they click on the picture.
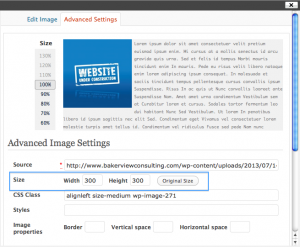
There are more things that you can do with the picture! If you look at the top of the above graphic you’ll notice that there are two tabs – “Edit Image” and “Advanced Settings”. The “Edit Image” tab comes up first, but you can click on the Advanced settings tab see the graphic above. You’ll notice that the changing the size of the picture by percentages is still visible, but you can also change the size of the picture in number of pixels. (see the blue box) This allows you to enter numbers for the width and height – keep in mind that the proportions will not be kept doing this, and you can easily distort the picture.
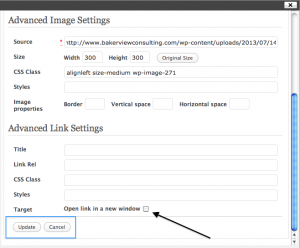
As you can see in the above graphic, much of the same information is available to be changed on this part of the edit screen. The one point that I want to draw your attention to is right down at the bottom of this graphic – indicated by the black arrow. If you want your readers to click on your picture and go to a different site, make sure that that site opens in a new window. This way your reader can easily navigate back to your site when they are finished buying your book 
The last step is to click on Update (see blue box) and your picture should look exactly like you want it to look!
Good luck and have fun with pictures!
Author information
 adminSocial Media and Wordpress Consultant Barb Drozdowich has taught at Colleges, trained technical personnel in the banking industry and, most recently, used her expertise to help hundreds of authors develop the social media platform needed to succeed in today’s fast evolving publishing world. She owns Bakerview Consulting and manages the popular blog, Sugarbeat’s Books. Her first book is now available on Amazon - The Author's Guide to Working with Book BloggersTwitterFacebookGoogle+


