
Scrivener Writetip: Using the Cork Board
by Mary Sutton / @mary_sutton73
 Note: I am using Scrivener for Mac. If you are using Windows, please allow for differences.
Okay, okay. So writers are not supposed to write about, um, writing. Or writing tips at least. But my earlier posts on Scrivener continue to get hits and I continue to get asked questions, so perhaps it's time for a little "Scrivener writing tip" post.
At a retreat last fall, the presenter talked about a storyboard as a great tool for plotting a story. And I could see that. A storyboard allows you to visually lay out scenes in each chapter/section, move things around, make lists of possibilities, etc. You might get the same results from an outline, but a storyboard strikes me as slightly easier to use regarding lists of possibilities (e.g., "in this scene, I might...). A storyboard is also slightly more visual, if you use something like note cards - and it's easier to move a note card than constantly copy/paste in an outline (and fight Word's "helpful" outline reformatting - but I digress).
But what if the thought of transcribing scene synopses to index cards gives your fingers cramps? And the thought of changing those synopses as the plot evolves makes you think you might need to take stock in an company that makes 3x5 cards? Well, enter Scrivener.
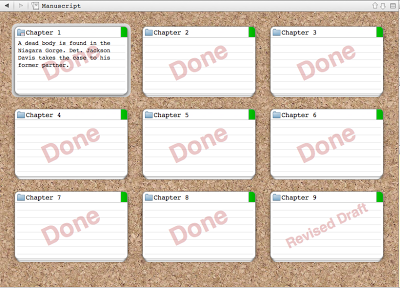 The Scrivener cork board viewThe cork board is one of those features that, when I did the tutorial, I didn't see a use for. However, as I explored the concept of a storyboard, I realized that by doing just a few things, I could build a virtual storyboard relatively quickly.
The first step, is to create your chapters and scenes. It will be particularly helpful if you can put a brief description of the chapter/scene in the Synopsis field. For example: Chapter 1 - upon coming home, Jenny Smith discovers the dead body of a stranger in her bedroom. You would then write similar scene descriptions. The idea here is not to jam in all of the information that is in the chapter/scene. You just want something descriptive enough to jog your memory ("oh, that's the scene where I introduce the love interest").
By the way, at this point, it is also helpful to use labels so you know if something on the cork board is a chapter or a scene.
Once all of those chapter/scene cards are laid out, select the Manuscript node in the tree view (this will be the top-most node in the tree). Choose View - Cork board or press CMD+2 (CTRL+2 in Windows, I believe). Voila! You'll see a picture of a cork board with all of your cards.
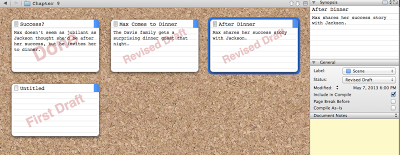 The cork board for a single chapterYou can drill down the cork board to see the storyboard for individual chapters, too. Just select that chapter in the tree view.
Now, from here you can do all sorts of things. Realize that the third scene in chapter 3 needs to be the second scene in Chapter 1? No problem. Just drag and drop that scene - either on the cork board or in the tree view (or in outline view - whichever works best for you, but I like working on the cork board).
You'll have to fix transitions, of course (rarely is it true that you can move scenes around without adjusting the transition in and/or out of the scene), but this drag-and-drop is so much easier, for me at least, than "find selection in Word, cut, find new insertion point, paste, rewrite."
Decide that the contents of a scene need to change? Instead of writing out a new note card, you can edit the synopsis of the virtual card - either by viewing the scene or right there from the cork board.
You can also use the cork board to measure progress. For example, can't remember how many scenes still require editing in Chapter 5? Use the cork board. First, make sure you are using Status labels for all of your scenes. Next, choose View - Cork board Options - Show Stamps. Each "card" on your cork board will display the appropriate status label. This allows you to view the storyboard for a chapter and instantly see which scenes are finalized, which have been edited, and which are still in first draft stage.
Okay, now, I'll admit - if you like big pieces of poster board with note cards, translating what you see in Scrivener to physical cards is going to be a bit of work. I haven't yet tried to print the contents of the cork board, so I'm not sure how it can be done, or even if it's possible. However, I'm not that big on having pieces of paper lying around. Too easy to get ripped, have something spilled on it (by me or one of my kids), and my house simply isn't big enough to keep lots of big posters. Plus, the adhesive on Post-it notes wears off after a while, and it's not always possible to cleanly move index cards adhered with tape.
Of course, not everybody works this way. Some people may not care about storyboards. Some people may really, really be attached to the physical paper. But at least using Scrivener, you can complete (or mostly complete) all the initial writing/rewriting/arranging/rearranging without waste of cards before committing your story to paper.
Have you tried using the cork board? What do you think?


No comments have been added yet.


