
Techie Tuesday: Bookmarks on a Cheap Budget

Today’s Techie Tuesday if a bit of a mix between tech and art. For authors, popular promotion can come in many forms. Tee-shirts, lip balm, trading cards, shot glasses, etc. Bookmarks are also popular, but they can be expensive. If you’ve got a little artistic flare you’ve already won half the battle. I made up bookmarks (the first time I’ve traveled into such waters) for an upcoming convention and through a few hit and misses, I found something that works. And I only paid around 10 cents a bookmark.
Since I have some design experience, I knew I wanted to design the artwork myself instead of paying someone (which just drives up the cost). I use Vistaprint for a lot of my paper promotion because, if you catch them on a good day, you can get some very good deals. I’ll walk you through my process for making a special run of bookmarks and you’re welcome to replicate it yourself (I’ve even provided the templates). Image heavy post ahoy!
First I needed a template. I picked the vertical, oversized item from Vistaprint and they’re kind enough to provide a template, however, since I don’t use one of the programs they provide the template for, I had to make one of my own. (you can download the template here for your own use, it’s a png format. Keep in mind it is white, so if you just click to open the file, it will look like a blank page).
Next, now that I had my overall size template, I needed to divide it equally into three parts. You can download the template for that here for your own use, png format, or simply divide it out yourself.)
Now that I had my template, the magic could begin! I’m not the quickest designer, so for this particular case it took me a few days on and off of working on them to get what I wanted.

 Remember, you only have to design one bookmark. You then replicate the design twice to fill the space. Or, design 3 different bookmarks. I added a black line around the edge of the template for display purposes here.
Now that the front is complete, I needed to design a back. The important thing to remember there is the back has to match the front in terms of dimensions. If you use the same template for the front, it should align on the back without issue.

 For this run, the back of the bookmarks will be black and white, so color doesn’t matter, even though there is some. You can order full color back sides with Vistaprint, it simply adds a little to the price.

Now all that is left to do is load the images to Vistaprint, make sure everything looks okay and wait for them to ship!
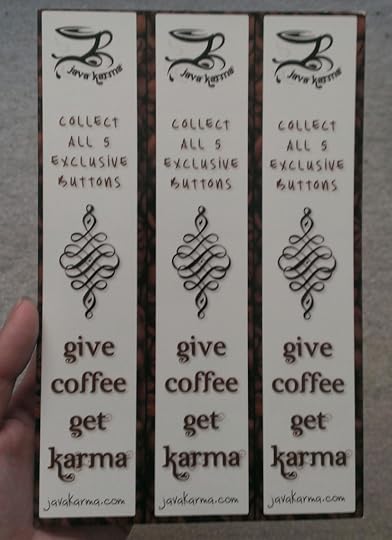
The finished product arrives and I get to gaze up my creation.
Alas, my work is not done. I ordered the oversized postcard and what you see is above – three bookmarks on one sheet. But for 10 cents a piece, I’m more than wiling to expend a little elbow grease. I pull out my trusty paper cutter (available at most office supply stores around around 20 bucks (or more depending on how much you want to invest)) and start cutting away.
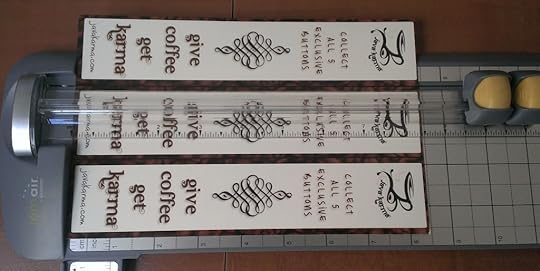
After a few precision cuts, I’m left with the finished product, three separate bookmarks. I flipped one of them over so you can see how the back fits along with the front.

Now just to repeat the cutting process about a gazillion times. Okay, not really, I’m making the last part up. But 100 postcards, with 2 cuts a piece? Busy, busy! I also have a run of shorter, wider bookmarks that I’ve done, but I’ll put that together for another post. The process is similar, but the templates are different (obviously).
I’ve got another similar paper promotion on a budget post in the works for another Techie Tuesday, this time for making your own promo booklets. Not sure when it will go live, I’m still nailing down the process to make sure I have it fine tuned enough.


