TUESDAY TIP Removing Hidden Bookmarks in MS Word #howto #indie #selfpub #pubtip @markcoker
Welcome to my last Tuesday Tip blog for a while. For more on why that is, see the "What's Next..." section at the end of the post. To all my regular readers, thank you for your ongoing support.
Since my 30,000 Hit Giveaway in December, I've averaged about 5,000 hits a month and am at just under 45,000 Hits now. I'm surprised, flattered and blessed to have such a devoted following.
I hope you know I shan't go away entirely. I'll be posting on the Webbiegrrl Writer Facebook Page or filling the
Today I'll illustrate for you one last useful tip every Indie Author must have: how to rid your book of the ever-annoying "Hidden" bookmarks in Microsoft Word. Click through the jump break for the full monty ^)^
The Problem
When a new Indie Author uses Microsoft Word, they will experience something untoward without even knowing it. Microsoft will "helpfully" add all sorts of hidden bookmarks to their document. Why? I suppose there might be a Software Engineer at the Microsoft Campus in Redmond who knows a feasible reason, but the bottom line is, these "Hidden" bookmarks are just for the software's internal use. They do not add anything to the reader experience and they certainly do not help your Word document become an eBook.
Why Should You Care?
This is an especially critical step if you plan to generate an ePub format because the "Hidden" bookmarks will utterly confuse your NCX file (the "Navigation Control file in XML or an internal reference list like your Table of Contents, or TOC). Even if you plan to submit your book only to Amazon's Kindle Direct Publishing (KDP) platform, you'll want to remove all the myriad of "Hidden" bookmarks before they trip you up.
The "Hidden" bookmarks will "translate" into HTML and XML as navigation that does not actually exist. Not only will they potentially hijack your true navigational system, but they might bloat your eBook file to the point Amazon tells you it's too large. See? It's not always your cover image file making the eBook bloated.
The Solution - The Hard Way
As with everything in life, there's an easy way and a hard way. Here's the hard way first. Mark Coker, founder of Smashwords, generously outlines this Troubleshooting tip in Step 20d of his Smashwords Style Guide, which is priced at free!!
Here's a screen shot from that section of the Style Guide showing what these "Hidden" Bookmarks look like--but be warned, this is a little misleading and in a kind of critical way: you cannot select multiple bookmarks from this dialog box :-(
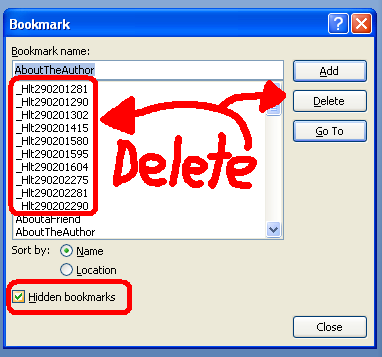
In Step 20d of the Smashwords Style Guide, Mark explains how to remove the "Hidden" bookmarks prior to submitting your Word document for conversion into an eBook by doing it one at a time--the hard way. I'm going to explain to you an easier way. Even if it seems a little daunting at first, trust me, automation is easier than thelong, drawn out tedious process of selecting one "Hidden" bookmark at a time and clicking delete for each and every one of them. You may have 100 or more of these buggers hiding in your document!
The Solution - The Easy Way
Behind the scenes of your Word document, Microsoft is creating an XML file, a file in the markup language similar to what's used to create web sites. Your document is like a miniature web site. As such, the document has a fairly standard structure, following the rules of how XML says to structure a web site or web page.
In addition, since early on in the history of Microsoft Word, Microsoft has allowed users to access this XML (was a slightly different markup language back then, called SGML) using a programming language Microsoft created and defined: Visual Basic. They let you record what you're doing in Microsoft Word and "save" those steps in something called a "Macro." Then, later, you can do all of those steps again - automatically, with one click! - by simply "running" the Macro.
As you can guess, there is a way to run a Macro to remove all "Hidden" bookmarks in one click. In fact, the Microsoft Office support page at http://support.microsoft.com/kb/184041 has free code to do it for you. I've used it and can attest that works just great. All you have to do is get it into your document and "run" it. That's where many of you might not know what to do and what I'll cover in the rest of this Tuesday Tip (after the code snippet).
If you already know how to setup and run a Macro in Microsoft Word, here's the code to use to remove only the "Hidden" bookmarks (not "all" bookmarks). Your bookmarks for your TOC will remain just as they were but I suggest you run this Macro before you setup your TOC, just to be safe.
Code to Strip Hidden Bookmarks from an MS Word DocumentSub StripHiddenBookmarks()
Dim stBookmark As Bookmark
ActiveDocument.Bookmarks.ShowHidden = True
If ActiveDocument.Bookmarks.Count >= 1 Then
For Each stBookmark In ActiveDocument.Bookmarks
If Left(stBookmark, 1) = "_" Then
stBookmark.Delete
End If
Next stBookmark
End If
End Sub
Now, for those of you who do not know how to setup and run a Macro, here are the steps - with pictures! ^)^
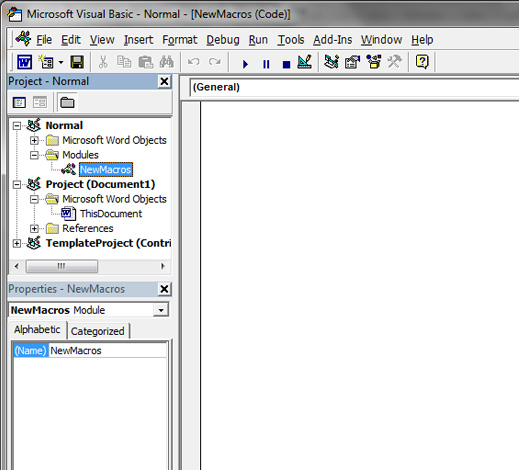
Step 1: Open the Visual Basic Editor
On the Tools menu, select Macro and then the submenu for Visual Basic Editor. The Visual Basic Editor will open in a new window.
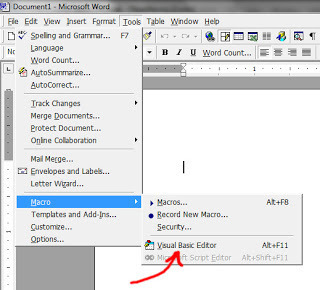
Shortcut: You can also just press Alt-F11 from anywhere in the document to open the Visual Basic Editor in a new window.

Step 2: Copy/Paste the Code
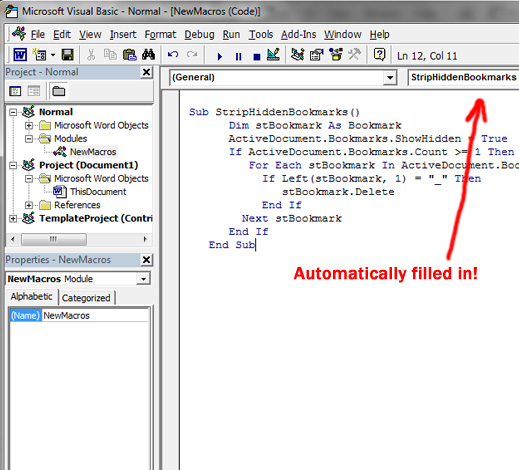
Highlight the code shown above (only the preformatted text, not the heading) and paste it into the empty Visual Basic Editor window (the one in the screen shot with "(General)" above it). Now your screen should look like this:
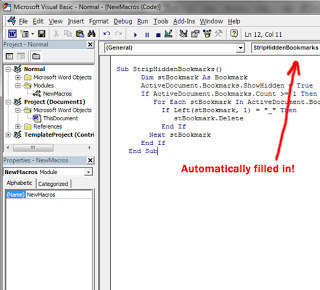
Notice that the title of the code "StripHiddenBookmarks" will get automatically filled into the little pulldown list on the right (which was previously blank).
Step 3: Save Your Macro
You need to save the code in your document. This will add it to your Normal.dot Template so it'll be available in all future documents you create, too. Click the disk icon OR choose "Save Normal" from the File menu OR just press Ctrl-S.
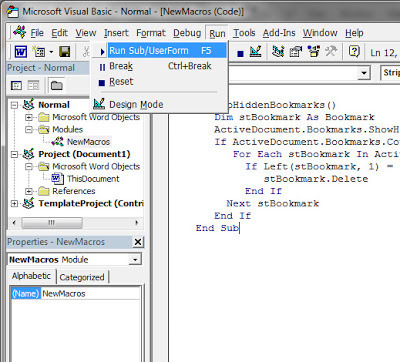
Step 4: Run Your Macro
You can run the Macro from the Visual Basic Editor OR you can run it later from inside your Word doc. First let's run it now while it's right there in front of you. Choose the Run menu and select "Run Sub/UserForm" or just press Ctrl-F5 to run it. Since the "StripHiddenBookmarks" macro is the only one you have, it will be the default one to run if you press Ctrl-F5.
To confirm for yourself and see that your document is free of "Hidden" bookmarks, go to the Insert menu and select Bookmarks... then uncheck and recheck the "Hidden bookmarks" checkbox. If you had any before, you won't now. It's just that easy.
Although it is unlikely you will ever want to remove all bookmarks (versus just the annoying "Hidden" ones), Microsoft provided the following second snippet of code on the same page so I'm providing it to you also. To use it, just follow the same steps as above, replacing the "StripHiddenBookmarks" code with the following:
Code to Strip All Bookmarks from an MS Word DocumentSub StripAllBookmarks()
Dim stBookmark As Bookmark
ActiveDocument.Bookmarks.ShowHidden = True
If ActiveDocument.Bookmarks.Count >= 1 Then
For Each stBookmark In ActiveDocument.Bookmarks
stBookmark.Delete
Next stBookmark
End If
End Sub
Don't forget to save and run it after you copy/paste it into the Visual Basic Editor! I hope you found today's Tuesday Tip helpful. In case you haven't already figured it out, you can actually use these steps to add other macros to your documents to do other things. There are programmers out there who write--and give away free--code to do all kinds of things. Now that you know how to get it into your document, give it a try.
Just be careful to only use macros from trusted sources . As you might be able to guess, a macro is a great way to trick you into running malicious code on your computer--sabotaging yourself! If you don't know or trust the source, don't use their macros. The Microsoft Office Support site has a great "knowledge base" (kb) of helpful macros for typical tasks you might need to perform in the normal creation and preparation of documents. Get fancy at your own risk!
What's Next....Closing for the Haggim and Beyond
Right now, we're in the midst of the spring Jewish Haggim (High Holy Days). The Jewish calendar has a series of Haggim twice a year, in the spring and in the fall. In the fall, Rosh Hashanah, Yom HaKippurim and Sukkot cover a period of about 3-1/2 weeks. In the spring, Purim, Pesach (Passover), Lag B'Omer and Shavot cover a period of about 10 weeks. Although I am not right-wing religious, I've decided to take some time out for spiritual reflection. I need to examine my life and life choices--plus, at the end of the Haggim (around Memorial Day) I'll have to move residences again. It seems like a good time to do a little focusing and re-evaluation.
On top of that I've been wanting to give the blog a major overhaul, moving the content off of Google's Blogger and onto a Wordpress site, since I already own one. When I do "come back online" it'll be with a new site and a new look. I hope I see you then, but I'll understand if many of you drop off the follower list during the transfer.
If you're already following me via the Webbiegrrl Writer Facebook Page, you don't have to do anything. If you're not, be sure to "like" the Page and pull down the "like" button to select "Show in Newsfeed" and you'll see my posts.
Thanks for stopping by!
-sry
@webbiegrrl
Since my 30,000 Hit Giveaway in December, I've averaged about 5,000 hits a month and am at just under 45,000 Hits now. I'm surprised, flattered and blessed to have such a devoted following.
I hope you know I shan't go away entirely. I'll be posting on the Webbiegrrl Writer Facebook Page or filling the
Today I'll illustrate for you one last useful tip every Indie Author must have: how to rid your book of the ever-annoying "Hidden" bookmarks in Microsoft Word. Click through the jump break for the full monty ^)^
The Problem
When a new Indie Author uses Microsoft Word, they will experience something untoward without even knowing it. Microsoft will "helpfully" add all sorts of hidden bookmarks to their document. Why? I suppose there might be a Software Engineer at the Microsoft Campus in Redmond who knows a feasible reason, but the bottom line is, these "Hidden" bookmarks are just for the software's internal use. They do not add anything to the reader experience and they certainly do not help your Word document become an eBook.
Why Should You Care?
This is an especially critical step if you plan to generate an ePub format because the "Hidden" bookmarks will utterly confuse your NCX file (the "Navigation Control file in XML or an internal reference list like your Table of Contents, or TOC). Even if you plan to submit your book only to Amazon's Kindle Direct Publishing (KDP) platform, you'll want to remove all the myriad of "Hidden" bookmarks before they trip you up.
The "Hidden" bookmarks will "translate" into HTML and XML as navigation that does not actually exist. Not only will they potentially hijack your true navigational system, but they might bloat your eBook file to the point Amazon tells you it's too large. See? It's not always your cover image file making the eBook bloated.
The Solution - The Hard Way
As with everything in life, there's an easy way and a hard way. Here's the hard way first. Mark Coker, founder of Smashwords, generously outlines this Troubleshooting tip in Step 20d of his Smashwords Style Guide, which is priced at free!!
Here's a screen shot from that section of the Style Guide showing what these "Hidden" Bookmarks look like--but be warned, this is a little misleading and in a kind of critical way: you cannot select multiple bookmarks from this dialog box :-(

In Step 20d of the Smashwords Style Guide, Mark explains how to remove the "Hidden" bookmarks prior to submitting your Word document for conversion into an eBook by doing it one at a time--the hard way. I'm going to explain to you an easier way. Even if it seems a little daunting at first, trust me, automation is easier than thelong, drawn out tedious process of selecting one "Hidden" bookmark at a time and clicking delete for each and every one of them. You may have 100 or more of these buggers hiding in your document!
The Solution - The Easy Way
Behind the scenes of your Word document, Microsoft is creating an XML file, a file in the markup language similar to what's used to create web sites. Your document is like a miniature web site. As such, the document has a fairly standard structure, following the rules of how XML says to structure a web site or web page.
In addition, since early on in the history of Microsoft Word, Microsoft has allowed users to access this XML (was a slightly different markup language back then, called SGML) using a programming language Microsoft created and defined: Visual Basic. They let you record what you're doing in Microsoft Word and "save" those steps in something called a "Macro." Then, later, you can do all of those steps again - automatically, with one click! - by simply "running" the Macro.
As you can guess, there is a way to run a Macro to remove all "Hidden" bookmarks in one click. In fact, the Microsoft Office support page at http://support.microsoft.com/kb/184041 has free code to do it for you. I've used it and can attest that works just great. All you have to do is get it into your document and "run" it. That's where many of you might not know what to do and what I'll cover in the rest of this Tuesday Tip (after the code snippet).
If you already know how to setup and run a Macro in Microsoft Word, here's the code to use to remove only the "Hidden" bookmarks (not "all" bookmarks). Your bookmarks for your TOC will remain just as they were but I suggest you run this Macro before you setup your TOC, just to be safe.
Code to Strip Hidden Bookmarks from an MS Word DocumentSub StripHiddenBookmarks()
Dim stBookmark As Bookmark
ActiveDocument.Bookmarks.ShowHidden = True
If ActiveDocument.Bookmarks.Count >= 1 Then
For Each stBookmark In ActiveDocument.Bookmarks
If Left(stBookmark, 1) = "_" Then
stBookmark.Delete
End If
Next stBookmark
End If
End Sub
Now, for those of you who do not know how to setup and run a Macro, here are the steps - with pictures! ^)^
Step 1: Open the Visual Basic Editor
On the Tools menu, select Macro and then the submenu for Visual Basic Editor. The Visual Basic Editor will open in a new window.

Shortcut: You can also just press Alt-F11 from anywhere in the document to open the Visual Basic Editor in a new window.
Step 2: Copy/Paste the Code
Highlight the code shown above (only the preformatted text, not the heading) and paste it into the empty Visual Basic Editor window (the one in the screen shot with "(General)" above it). Now your screen should look like this:
Notice that the title of the code "StripHiddenBookmarks" will get automatically filled into the little pulldown list on the right (which was previously blank).
Step 3: Save Your Macro
You need to save the code in your document. This will add it to your Normal.dot Template so it'll be available in all future documents you create, too. Click the disk icon OR choose "Save Normal" from the File menu OR just press Ctrl-S.
Step 4: Run Your Macro
You can run the Macro from the Visual Basic Editor OR you can run it later from inside your Word doc. First let's run it now while it's right there in front of you. Choose the Run menu and select "Run Sub/UserForm" or just press Ctrl-F5 to run it. Since the "StripHiddenBookmarks" macro is the only one you have, it will be the default one to run if you press Ctrl-F5.

To confirm for yourself and see that your document is free of "Hidden" bookmarks, go to the Insert menu and select Bookmarks... then uncheck and recheck the "Hidden bookmarks" checkbox. If you had any before, you won't now. It's just that easy.
Although it is unlikely you will ever want to remove all bookmarks (versus just the annoying "Hidden" ones), Microsoft provided the following second snippet of code on the same page so I'm providing it to you also. To use it, just follow the same steps as above, replacing the "StripHiddenBookmarks" code with the following:
Code to Strip All Bookmarks from an MS Word DocumentSub StripAllBookmarks()
Dim stBookmark As Bookmark
ActiveDocument.Bookmarks.ShowHidden = True
If ActiveDocument.Bookmarks.Count >= 1 Then
For Each stBookmark In ActiveDocument.Bookmarks
stBookmark.Delete
Next stBookmark
End If
End Sub
Don't forget to save and run it after you copy/paste it into the Visual Basic Editor! I hope you found today's Tuesday Tip helpful. In case you haven't already figured it out, you can actually use these steps to add other macros to your documents to do other things. There are programmers out there who write--and give away free--code to do all kinds of things. Now that you know how to get it into your document, give it a try.
Just be careful to only use macros from trusted sources . As you might be able to guess, a macro is a great way to trick you into running malicious code on your computer--sabotaging yourself! If you don't know or trust the source, don't use their macros. The Microsoft Office Support site has a great "knowledge base" (kb) of helpful macros for typical tasks you might need to perform in the normal creation and preparation of documents. Get fancy at your own risk!
What's Next....Closing for the Haggim and Beyond
Right now, we're in the midst of the spring Jewish Haggim (High Holy Days). The Jewish calendar has a series of Haggim twice a year, in the spring and in the fall. In the fall, Rosh Hashanah, Yom HaKippurim and Sukkot cover a period of about 3-1/2 weeks. In the spring, Purim, Pesach (Passover), Lag B'Omer and Shavot cover a period of about 10 weeks. Although I am not right-wing religious, I've decided to take some time out for spiritual reflection. I need to examine my life and life choices--plus, at the end of the Haggim (around Memorial Day) I'll have to move residences again. It seems like a good time to do a little focusing and re-evaluation.
On top of that I've been wanting to give the blog a major overhaul, moving the content off of Google's Blogger and onto a Wordpress site, since I already own one. When I do "come back online" it'll be with a new site and a new look. I hope I see you then, but I'll understand if many of you drop off the follower list during the transfer.
If you're already following me via the Webbiegrrl Writer Facebook Page, you don't have to do anything. If you're not, be sure to "like" the Page and pull down the "like" button to select "Show in Newsfeed" and you'll see my posts.
Thanks for stopping by!
-sry
@webbiegrrl


No comments have been added yet.