
Easy Recycle: Candle Hacking
 So cozy, so warm.Candles are necessary to my sanity -- and to my writing. Their cheery little flames and randomness of their burning are one of the many little tricks I use to motivate myself. Yet at $10-15 a pillar, what am I to do?
I don't know much about wax futures or what goes into the industrial manufacture of sweet-scented conveyors of fire, but for some reason, the price of candles is skyrocketing. They've always been expensive at retail, but I, ever thrifty, knew the places to buy them dirt cheap. Places like thrift stores, dollar stores, and discount stores.
Alas, they've caught on to my schemes, and the price has shot up everywhere. Ikea still remains a decent place to get reasonable (not cheap) candles. And sometimes clearance at Rite Aid of all places. These are lucky finds, not dependable sources at all. [UPDATE: This is now a lie. Whatever caused candles to be expensive has changed again. Also, we now have Wal*Mart. These two concepts may be related.]
I also used to go to ridiculous lengths to make sure a candle burned as much wax as possible to avoid waste. Wasted wax hurt me inside.
Now there's a solution to both problems: Recycling.
Honestly, I wish I'd thought of this years ago, back when I could find those giant three-wick pillars for $10. Those were awesome except for the pound or two of wasted wax. There was never any way to get those little wicks to burn everything, and boy did I try. Some candles refuse to be manipulated. Now I know I could have made seven or eight recycled jar candles with all that wasted wax!
Craft candle-making can be an expensive affair. That is, if you buy blocks of wax from craft stores. But if you have plenty of left-over wax, and get creative on the other supplies, it costs very little to get started.
One of the big expenses in this craft is the stove-top or plug-in melter, and the other assortment of contraptions, metal pourers, molds, and scents that they get bored housewives to buy. And then you end up with yet another box full of trappings for yet another hobby, and who wants that.
 It's like an in-home meth lab.The good news is, you don't need any of that stuff. Here is all you need:
 Books not required.
I mean, you need books, just not for candle recycling.I already had a wax melter marketed for another purpose. You're supposed to buy scented wax and plop them in the ceramic dish. Wax heats up, room smells nice. Thanks to my marvelous discovery, wax heats up, you make candles. Fortunately, the DMCA doesn't outlaw reverse engineering in the real world. I'm sure the Candle Suppliers Lobby is working on that right now.
 Also known as an "Electric Tart Burner"...
 Wait, that gives me a more naughty idea!There are a couple of other small items you will need to buy. Like the melter, these are very inexpensive. You can buy them in bulk and they will last forever.
NOTE: There are lots of great reasons to recycle wax. Do it for fun. Do it to save money. Do it to be creative. But don't kid yourself - you're not doing this for the environment! The act of burning candles itself is terrible for carbon emissions.
WARNING: Candles catch fire. That's the point. Wax gets hot, and that is also the point. So stay safe and don't blame me if you set yourself afire or suffer third degree wax burns over half your body. Remember kids, wax play is edge play. Candle-making is an extreme craft - EXTREME!
 All this could be yours!
Supply List:
Links go to example supplies on Amazon, though as this post gets older, those links may fail. You'll also want to shop around for the best prices.
Electric wax melter, warmer, or "tart burner" with a removable, smooth texture bowl and a smooth-texture lip.Excess wax from used candlesSmall wide-mouth jars, like jelly jars, former candle jars, or glass vessels they sell at stores. Try drinking glasses. Experiment. Make mistakes. Have fun. MUST BE METAL OR GLASS. No wood, plastic, paper. Because fire. Smaller vessels work better than huge ones.A spool of wick, 24 ply will do.Wick clipsNeedle nose pliersScissorsUnseparated disposable chopsticksScents (optional)A smooth, clean surfaceFirst, take a bunch of old candle wax and put it in the melter and turn it on.
 Double, double toil and trouble; Fire burn, and caldron bubble!
Cackling is not optional.Don't fill it too full, because that makes it harder to pour. It also depends on how deep of a layer you want on this candle. On mine, I like to fill it a quarter to half full.
A note on scents. I buy scented wax intended for use with the wax melter. It's usually more potent than candle wax. To help re-scent used wax, I'll shave off a bit with a box cutter, and drop it in the mix. This step is totally optional.
Once it's all melted, you have a choice. You can use the melter as designed and leave the wax in there for a day or two to make the room smell nice, adding more scent as it runs out. Or you can pour it right away. But wait. You need something to pour it into.
Choose a jar.
 A Random Array of Independent Jars (RAIJ)The jar should be relatively clean, of course. If it has a label, it's a little less fun, because you can't see the multi-colored layers as they grow, although my Pumpkin Butter jar is hilarious because it's not really pumpkin butter. *giggle*
Set the jar on your clean, smooth work surface.
Take the wick spool and measure out a length.
 Witty caption needed. Apply within.
It should be long enough to touch the bottom of the jar, and stick about one inch out the top of the jar.
 So this string walks into a bar...Next we thread the wick clip. There are several ways to do this, and I mix it up each time because my forgetful mind forgets the best way. At this very moment, just for you, I will remember the best way so you can learn it.
The goal here is to have the entire wick coated with wax and have the wick clip clamped on the end, without covering yourself in wax. First, take that wick and dip most of it in the wax melter. Pull it out, hold it over the melter, and let it drip and dry for about 30 seconds.
 It helps to imagine you are boiling your enemies in oil.Once it's cool, dip the short, unwaxed end. Now thread the cooled end of the wick through the bottom of the wick clip.
 The hole in the bottom is wider, so start there.
You might be a Master at Needlepoint, but your skills will not help you here.Feed it all the way through until the newly-waxed end is flush with the bottom of the wick clip.
 My momma always taught me to flush.Now the wick clip is yours to command. Using the pliers, smush the small metal bit on the clip to trap the wick inside.
 I'm squishing your head!This can be tricky, because the round base of the clip will want to bend along with the nipple. (I didn't pay for highfalutin craft store classes, but I'm pretty sure that's the correct term.) The base should stay as flat as possible. You'll get the hang of it.
 Doubles as a pet wick. If you need a pet.The next step is optional. Sometimes it works and sometimes it doesn't. If it works, it makes things a little easier. Don't fret over failure. Remember, to fail is hilarious.
Dip the wick clip into the wax and...
 Now you get to boil your friends in oil!...immediately try to get it to stick to the center of the bottom of the jar while the wax is still wet.
 ...and the bartender says, "Hey! Are you a string? No strings allowed!"...The adhesion will be very fragile, if you manage to accomplish it. It makes it a little easier to keep everything straight for the next couple of steps.
Note: that melted wax tends to melt other wax, due to the Second Law of Thermodynamics. Congratulations, you are contributing to the heat death of the universe. So any adhesion you may get from the above step will be undone in later steps. The next few steps will be delicate work. Don't worry about screwing up though. It's just a candle.... made of fire... that wants to CONSUME YOUR HOUSE.
Next take the chopsticks. The goal of this step is to hold the wick straight in the jar. Notice the sticks are pinched together.
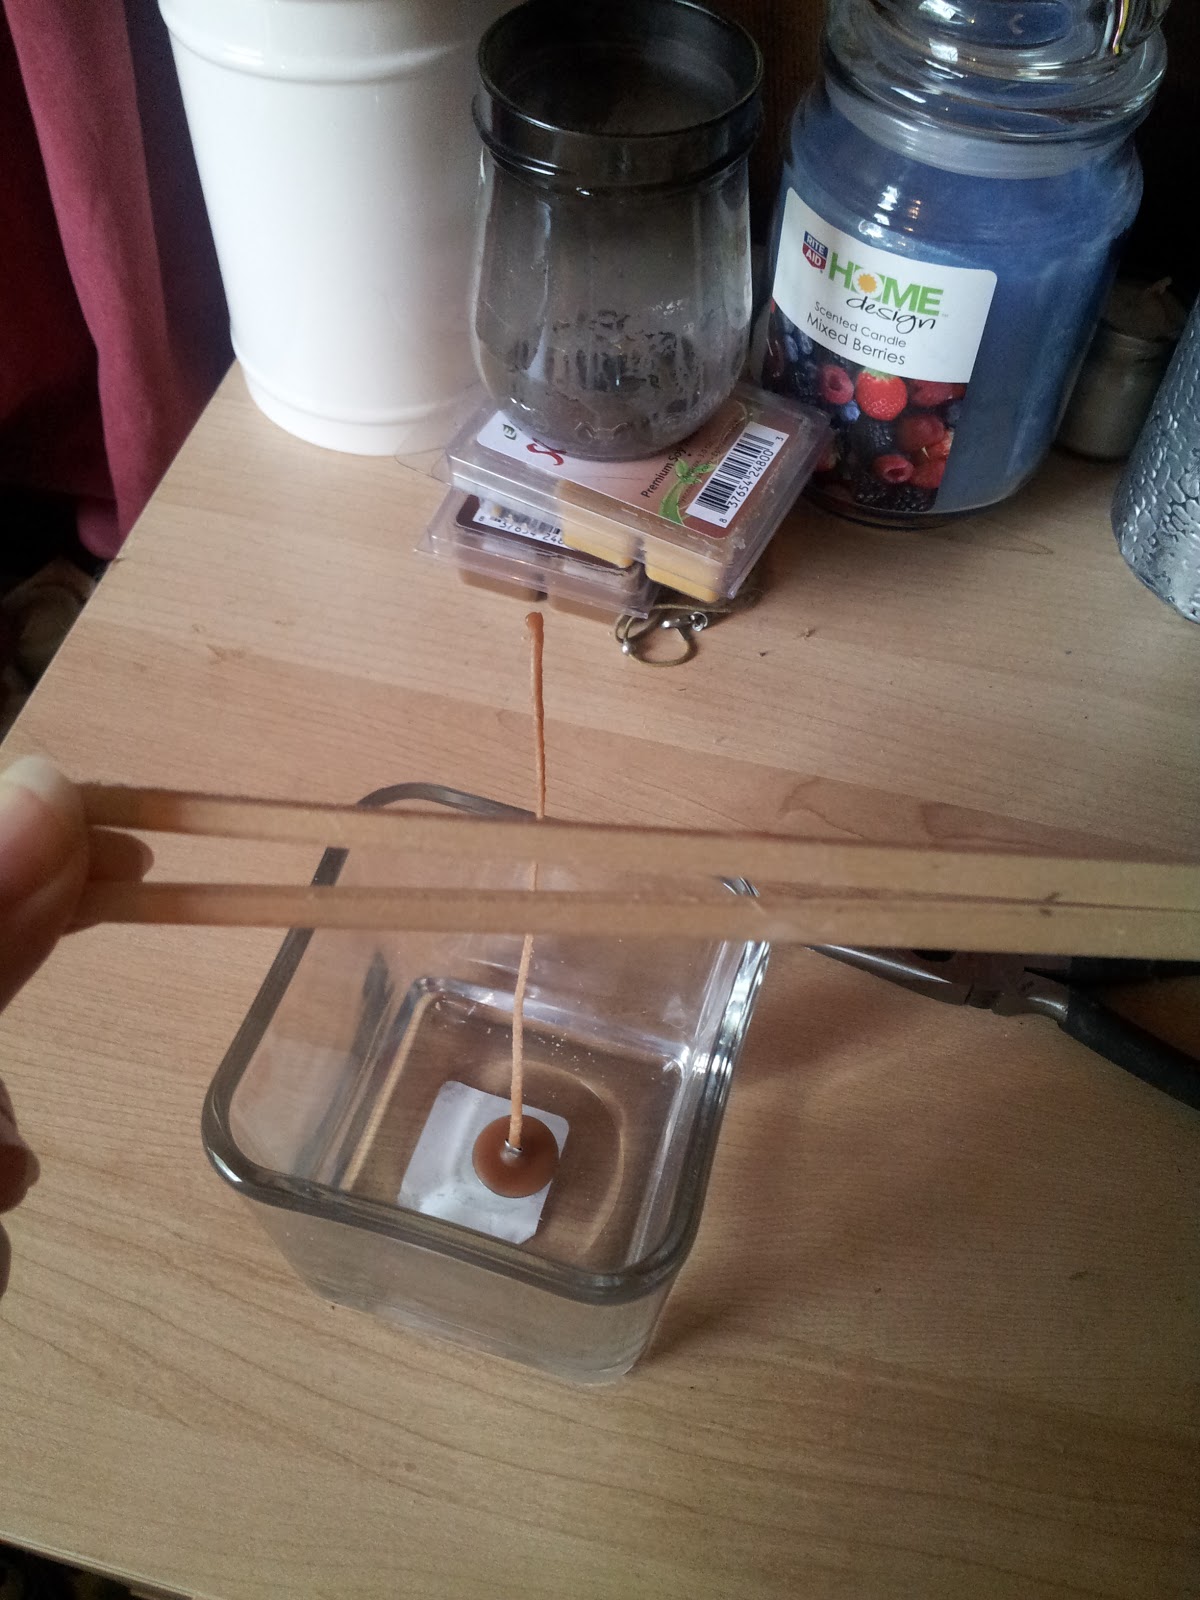 This is why we're using disposable chopsticks, and not, say,
 random sticks I found in the yard.The wick is going to go between those sticks, and the sticks are going to lay atop the jar with the wick as straight and centered as possible. Meanwhile that wick clip needs to be touching the center of the bottom of the jar, and hopefully stuck there with a tiny dollop of wax. This is tricky business. But fun, right? RIGHT??
 ...the string looks at the bartender, then twists around himself and untwists his ends...
 ...Then the string says, "Nope. I'm a frayed knot!"Okay, now for the cool part. After this step we can set aside the extreme delicacy and just go for "Careful don't burn yourself or spill wax all over grandma's antique quilt OH NO WHAT!"
Take the bowl off the wax melter. Careful, the bottom of it will be hot. The top edge should be cool enough to touch. (If not, you bought the wrong melter.)
 So dainty and delicate.Lift it with both hands (not shown) and, as though it is a leaking hover craft carrying a load of rotten eggs filled with mustard gas, carefully and swiftly move that sucker over to the jar. Make your dexterity roll, and pour it into the jar.
 Because I am not high enough dexterity
 to pour and take a pic at the same time.You did put that jar on a clean, smooth surface, right? A few things can go wrong here. You can totally fail your aim and the wax will get everywhere but in the jar. If you've got a smooth, clean surface, it's not a big deal. You can let it dry and scrape it off and start over. Except what got on the carpet and grandma's antique quilt. Good luck with that.
So yeah, don't crit fail your dex roll. Typically you'll only spill a little bit, until you get practice, and then you'll never spill.
Other things that can go wrong:
You get some wax on the chopsticks. The wick clip melts free, and under the tidal forces of the incoming wax, gets pushed to one side. You get wax on yourself and it burns. You get so distracted by the beauty of life symbolized by the scent of the wax and the miracle of creation that you have an epiphany, quit your job, leave your family, and go off to write a book.To repair any error, make subtle corrections in the now, and in the future try to avoid such mistakes again.
 I did not fail my dex roll.Now that you've poured, there will be a little bit of wax along the lip of the melter bowl. That's not good, because likely the bowl won't get warm enough to melt it way up there, and the frozen wax will later impede pouring attempts. Instead, wait for just a few seconds, just enough for it to set and still be soft. Take your fingernail, and gently peel it back down into the bowl.
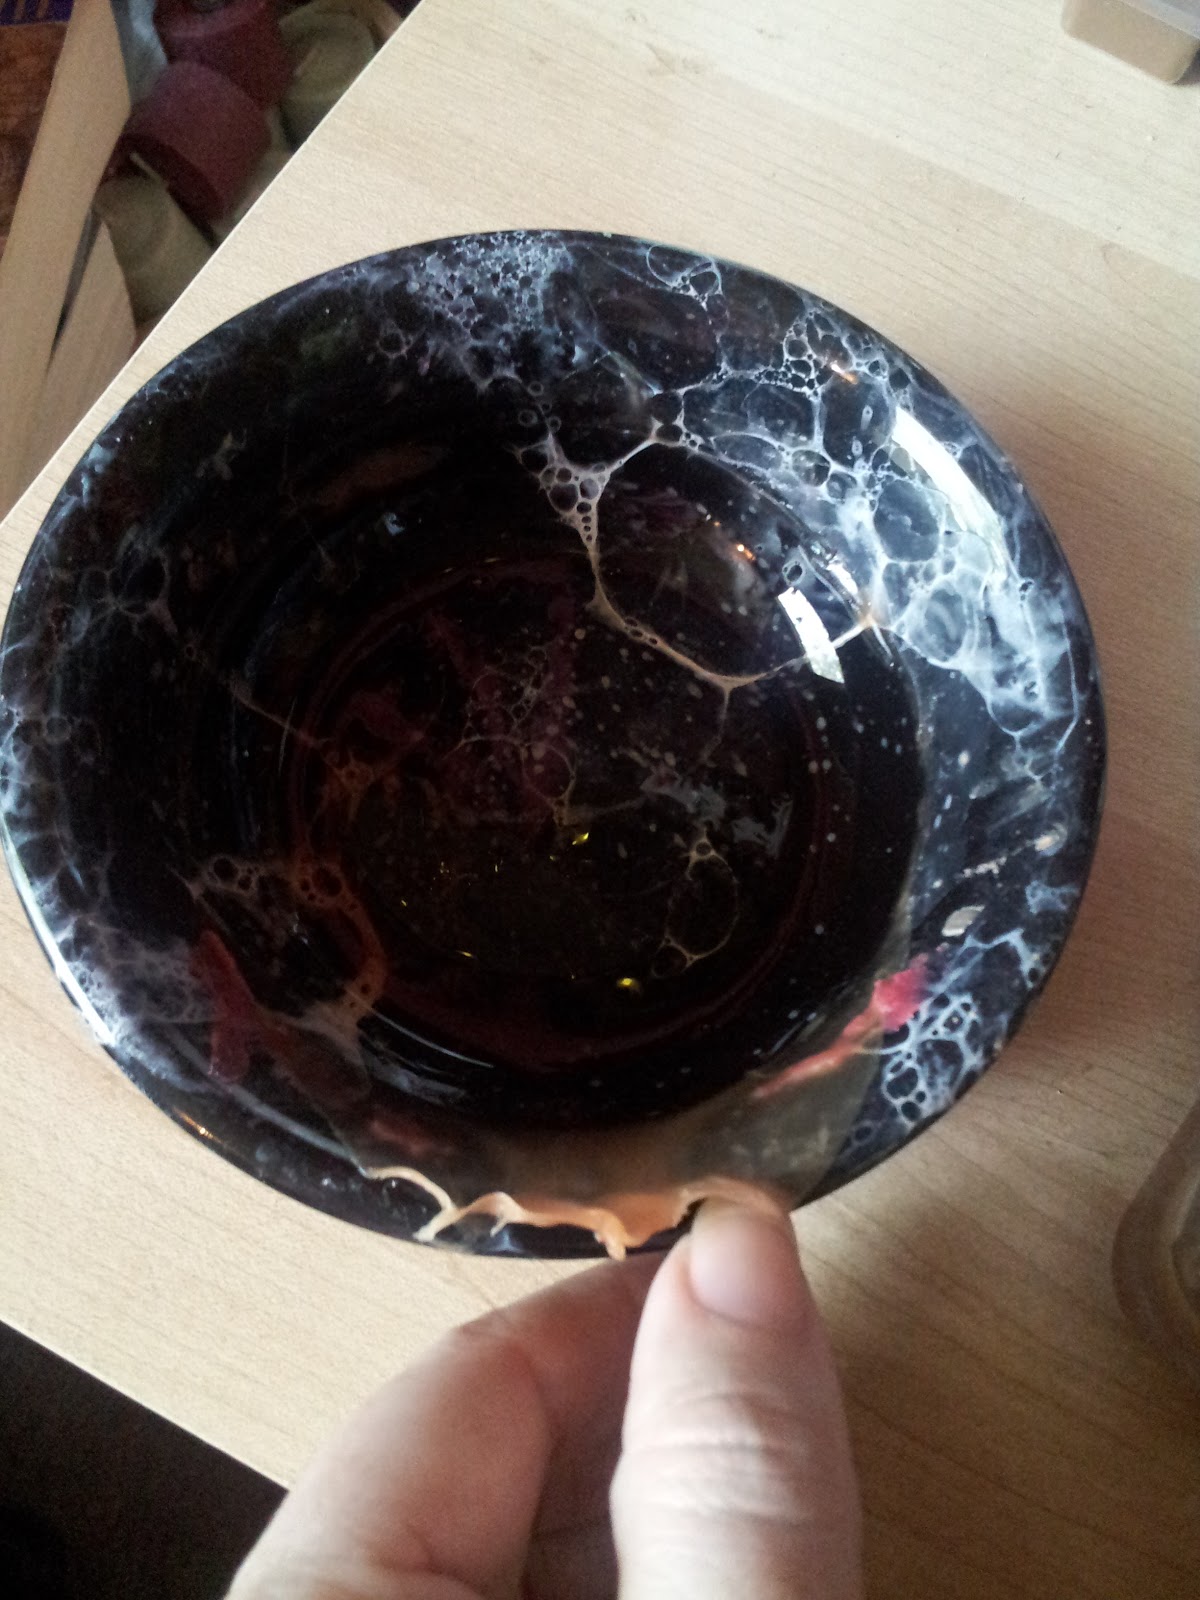 Wax off!Now you're pretty much set. Once the first layer in the jar dries, you have more freedom to adjust the chopsticks. If previously there was a little slack, now you can take it up without misaligning the wicked wick.
Rinse, repeat, until your jar is full. Don't literally rinse, that would get messy, as you can see in this wax-rinsing demonstration:
When your jar is all full of unrinsed frozen wax, snip the wick down to about 1/4" from the surface of the wax, then the best part: light that sucker on fire!
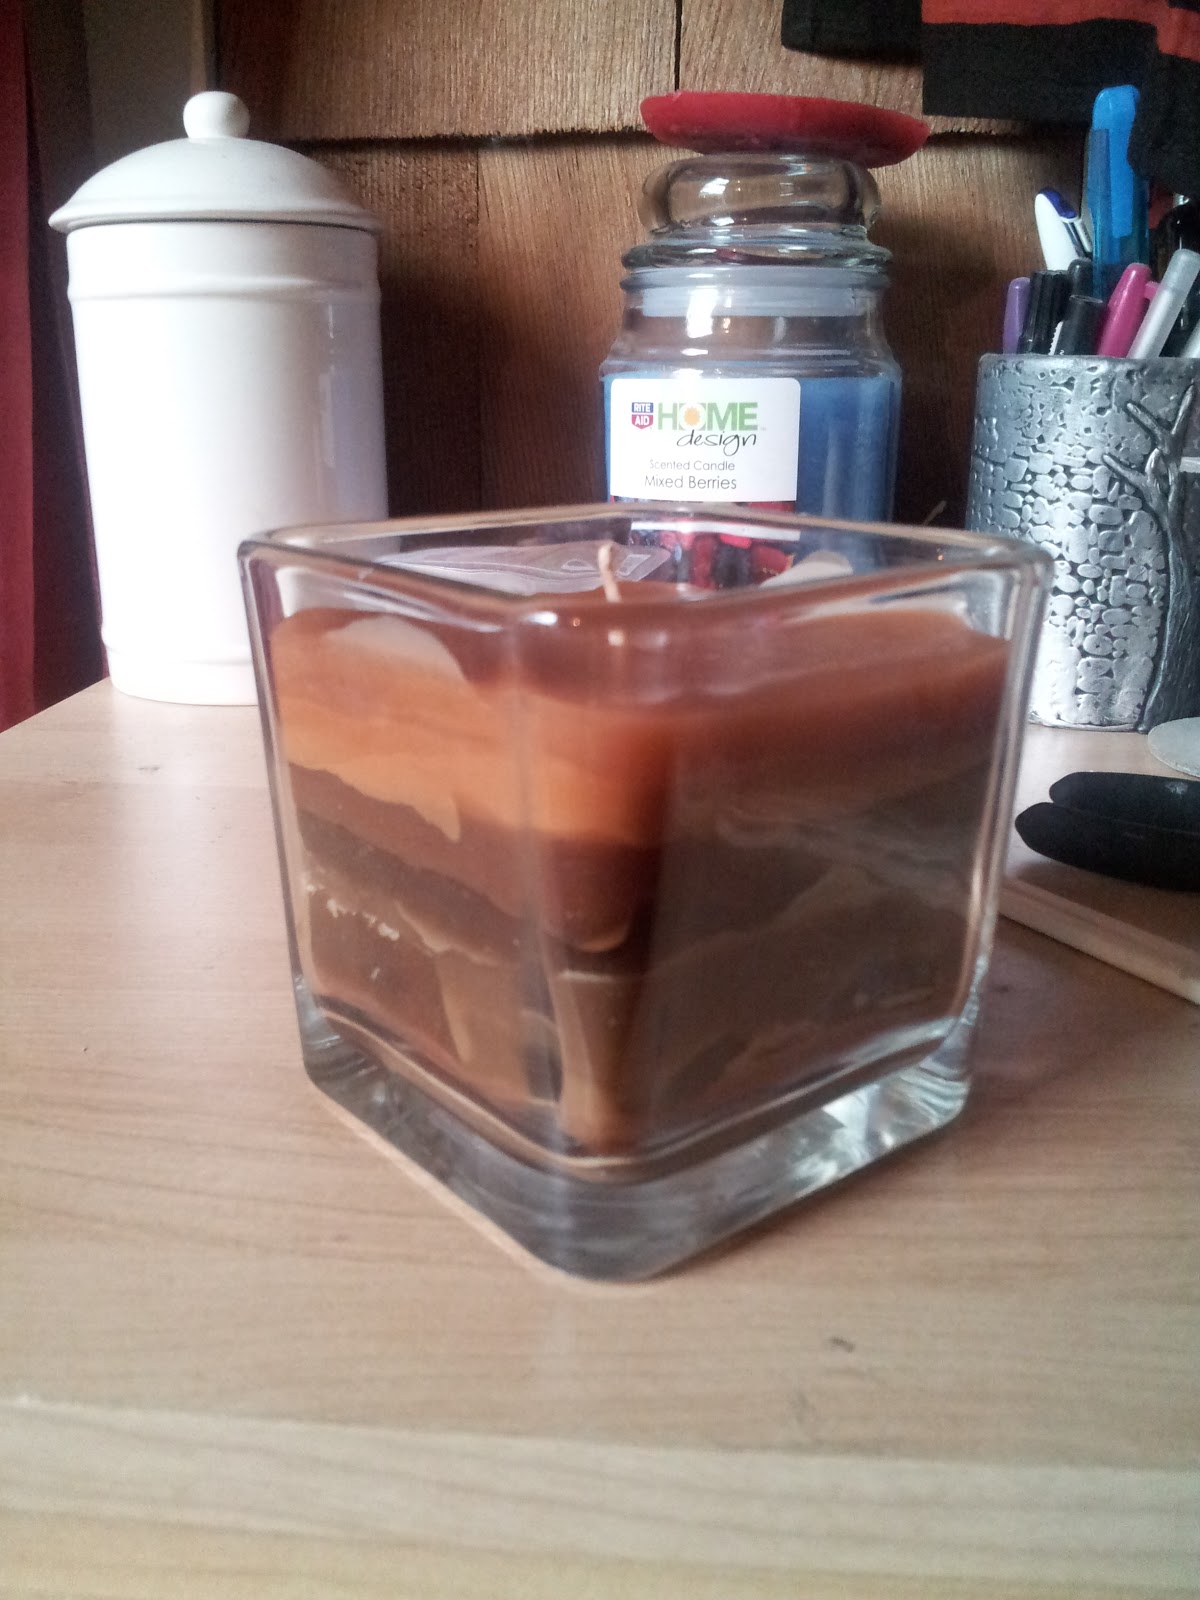 All done!
The world is full of producers and consumers. Now you can be both.Caveats and Special Circumstances:
Wax is like truth: It hurts. One special surprise is when you've melted some wax, let it harden in the melter, then turn the melter back on, get impatient after a while and poke the "solid" wax:
 Like a frozen lake, it looks solid enough......only to find it is a deceptive layer disguising the bog of boiling burns below. Don't poke the wax. This gets me every time. EVERY TIME.
 ...but underneath it's lava!When you don't have enough wax to do a whole layer, just store it in the melter.
 Just hanging out in wax prison awaiting their execution.To store lots of excess wax when you're not ready to make candles: Melt the wax in the melter. Then let it cool. When it's solid, turn on the melter for just a few minutes, to slightly melt the edge of the wax, freeing it from captivity. Pop it out and store in a tidy little wax-pie. Though it may smell delicious, DO NOT EAT.
To rescue wax stuck at the bottom of a jar, simply set the jar on the wax melter without the bowl. Once it's melted, pour into the bowl. Remove any wick clips and junk that is easy to remove.
For the junk that eventually accumulates on the bottom of the bowl: After pouring, it will tend to stay there in the bottom. Just take a tissue and wipe it out while it's still warm. Careful, no burns. Unless you like that sort of thing. In which case, call me.
Cleaning jars: You don't want to run a bunch of wax through your dishwasher. Some wax can be scraped off the inside of the jar with a fingernail. For the rest, let the jar warm on the melter. Then wipe it out with a bunch of Kleenexes. Or you can use warm water from the faucet or heated up on the stove. When dealing with any high temperatures, try not to burn yourself!
Finally, remember -- Wax is fluid BEND IT TO YOUR WILL.


No comments have been added yet.


