
BONUS Bready or Not: Lessons Learned from Ninjabread
You can read all the writing books in the world, but it won't make you a good writer. That's true of most things--study does a lot, but practice is what matters. This is certainly true of using royal icing for cookies.
To back things up a bit: I first tried royal icing two years ago. I didn't have any tips or fancy stuff--I just used a quart-size freezer bag with a corner cut off. It worked okay, though my lines were coarse and unsteady. I didn't try using any colors. I didn't try flooding. All that was too intimidating.
This year, I decided to be brave. Or stupid.

Fortunately, food bloggers exist. Real, hardcore food bloggers, who get publishing deals because of the awesomeness of their l33t cooking skillz. One such blogger is Bridget at Bake at 350, where she goes into immense detail on how to decorate cookies. She even recommends meringue and color brands. And, to the great comfort of scaredy-cats like me, she and others have videos at the University of Cookie depicting how to fill a piping bag and what the perfect consistency for flooding-icing looks like.
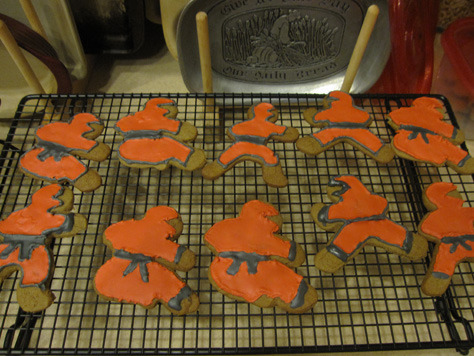
With all this data scrunched in my head, I set about making ninjabread men.
I used a brand new gingerbread recipe from Martha Stewart that was featured in the latest Reader's Digest. The dough tasted great, but the recipe described the dough as being very wet at the point it's formed into disc; mine was very... normal. This should have told me Something is Wrong. Because after I chilled the dough for four hours, my attempt to roll out the dough was an utter failure. It cracked and crumbled.
PANIC.
So I did what any panicking person does these days--I turned to Google. Google told me to add water by the teaspoon until the dough was malleable. Google is wise. The dough was saved. I chilled it and began my slicing and dicing ninja action. Martha Stewart advised that I chill the cookies after cutting them, and that enabled them to keep their shape while baking. I did several batches like that, and then had to let them cool completely before proceeding to the icing. Oh, the icing.
I bought my first Wilton tips, couplings, and disposable bags for this. I started out using the smallest tip for my outlining. MISTAKE. By the second cookie, my hand was already cramped and I was struggling to get the icing out. Fortunately, I bought couplings, so it was very easy to switch to a #4 tip. Much better! Even so, by the time I finished the outlining, my poor hand was tired, and I was very glad to continue with the flooding the next day.
This is where I discovered several cool things:
1) The directions at University of Cookie were excellent. It was easy to get the right consistency for flooding.
2) I LOVED flooding. It was very meditative, and reminded me of when I used to paint crafts. Really, it IS painting, just with icing and a toothpick.
Not cool thing:
1) My plastic squeeze bottle leaked out the top where it fastened on.
Cooler thing:
2) Instead of using the bottle, I just dipped the toothpick right in the bowl, palette-style. Worked even better! Less stuff to clean, too.
In all, I'm afraid to know how many hours I spent making this one batch of cookies. However, I still have about half a batch of icing left because I'm preparing to make more cookies this weekend--including some Portal cookies for Santa. I'm not looking forward to the outlining, but I am eager to do the flooding again.
Hrm. Sounds kind of like the rough draft and revision process, actually...
To back things up a bit: I first tried royal icing two years ago. I didn't have any tips or fancy stuff--I just used a quart-size freezer bag with a corner cut off. It worked okay, though my lines were coarse and unsteady. I didn't try using any colors. I didn't try flooding. All that was too intimidating.
This year, I decided to be brave. Or stupid.
Fortunately, food bloggers exist. Real, hardcore food bloggers, who get publishing deals because of the awesomeness of their l33t cooking skillz. One such blogger is Bridget at Bake at 350, where she goes into immense detail on how to decorate cookies. She even recommends meringue and color brands. And, to the great comfort of scaredy-cats like me, she and others have videos at the University of Cookie depicting how to fill a piping bag and what the perfect consistency for flooding-icing looks like.
With all this data scrunched in my head, I set about making ninjabread men.
I used a brand new gingerbread recipe from Martha Stewart that was featured in the latest Reader's Digest. The dough tasted great, but the recipe described the dough as being very wet at the point it's formed into disc; mine was very... normal. This should have told me Something is Wrong. Because after I chilled the dough for four hours, my attempt to roll out the dough was an utter failure. It cracked and crumbled.
PANIC.
So I did what any panicking person does these days--I turned to Google. Google told me to add water by the teaspoon until the dough was malleable. Google is wise. The dough was saved. I chilled it and began my slicing and dicing ninja action. Martha Stewart advised that I chill the cookies after cutting them, and that enabled them to keep their shape while baking. I did several batches like that, and then had to let them cool completely before proceeding to the icing. Oh, the icing.
I bought my first Wilton tips, couplings, and disposable bags for this. I started out using the smallest tip for my outlining. MISTAKE. By the second cookie, my hand was already cramped and I was struggling to get the icing out. Fortunately, I bought couplings, so it was very easy to switch to a #4 tip. Much better! Even so, by the time I finished the outlining, my poor hand was tired, and I was very glad to continue with the flooding the next day.
This is where I discovered several cool things:
1) The directions at University of Cookie were excellent. It was easy to get the right consistency for flooding.
2) I LOVED flooding. It was very meditative, and reminded me of when I used to paint crafts. Really, it IS painting, just with icing and a toothpick.
Not cool thing:
1) My plastic squeeze bottle leaked out the top where it fastened on.
Cooler thing:
2) Instead of using the bottle, I just dipped the toothpick right in the bowl, palette-style. Worked even better! Less stuff to clean, too.
In all, I'm afraid to know how many hours I spent making this one batch of cookies. However, I still have about half a batch of icing left because I'm preparing to make more cookies this weekend--including some Portal cookies for Santa. I'm not looking forward to the outlining, but I am eager to do the flooding again.
Hrm. Sounds kind of like the rough draft and revision process, actually...


No comments have been added yet.


