
Obsession: Taking Better Photographs, Part 3
My journey to become a better photographer continues. Part 1 here. Part 2 here.
Step 7: Get familiar with basic photo editing software.
Cropping is your friend. Even the simplest of apps – the Windows Microsoft Office Photo Gallery application enables cropping and provides basic light tools. Crop out stuff you don’t want. Lighten up a dark shot.
And I know this isn’t directly related to being a good photographer, but it makes you a good friend: If you’re planning to email your photographs around, learn to create smaller copies so you don’t jam up your friends’ mailboxes.
And learn more about what else you can do with photo editing software. Franklin Habit, photographer extraordinare, recommends The National Geographic Field Guide to Photography. I learned tons from this book about what you can do with photographs once they’re on your computer. Adobe Photoshop is the grand master at this stuff, but there are others.
Step 8: Take your camera everywhere.
I know, this one seems obvious, but just today I walked past an amazing garden thick with daisies, and I didn’t have my camera with me. The worst photo of all is the one you never took.
Other Tips To Improve Your Photography From The Very Wise
Buy a reflector Laura says it best. $14 and it’s like you’ve got your own lighting studio!
If you’re taking photos of your work, or posed shots, take your time: don’t expect to be able to create a really great posed shot in 5 minutes. Set aside time so that you can experiment. Sometimes, you won’t know if the photo is good or not until you’ve looked at it on your computer, and you may want to go back and reshoot.
Play with clever settings on camera I bet your camera has some clever pre-programmed settings. Mine has settings for sports (a fast shutter speed with shorter time between shots), for low-light shots, for shooting in fireworks, for shooting in snow (tweaks the colors so that the white doesn’t blow out the other colors). Play with them!
Learn from your camera: when in Auto mode, your camera display should tell you what settings it’s using to take a shot. Make note of those, switch your camera over to manual and recreate those settings. Take a few shots. Then change one of the settings and shoot again. And set the first one back and play with another setting. Take notes as you’re doing this so you know which settings you changed in which order. Then when you’re going through the photos later, you can compare the adjusted settings to see the differences.
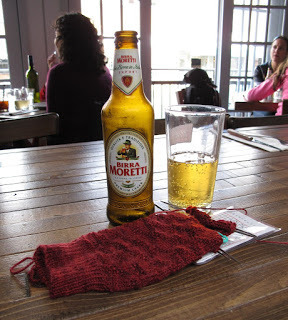
Fully automatic mode.
This is a tricky shot. Backlit, and it’s clear the camera wasn’t really sure what I wanted to emphasize more. And then I turned to manual mode and left everything the same but for the aperture, and what results is this:
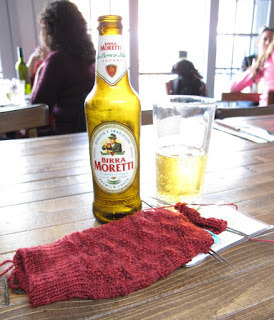
F-stop 2.8 for shorter depth of field (i.e. blurry background); lets in more light, too.
In the second one, the sock is better lit and I love the way the sunshine lights up the beer.
And Steps 9 through 1,000,000: Take Pictures!
Remember, you can’t get better if you don’t practice.


Mandy Moore's Blog

- Mandy Moore's profile
- 6 followers

