
Obsession: Taking Better Photographs, Part 1
I’ve never been confident with a camera. I’ve always had ‘point and shoot’ models – fully automatic cameras that make all the decisions for you – and I’ve never practiced enough to get a sense of how to compose and shoot a good photo.
Case in point:
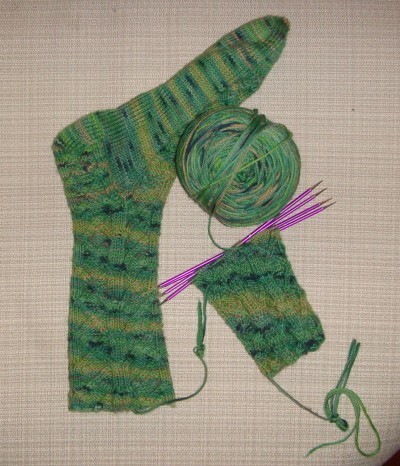
Poor framing; bad light; hard to see the sock detail; also boring.
Funny story: at Sock Summit last year, I took Franklin Habit‘s amazing photography class. I was such a novice that I didn’t even know whether my camera had most of the options he was talking about, let alone knowing how to use them. (Turns out my camera didn’t.)
I’m doing a lot of blogging and designing and I need to improve the quality of my photography. With help from some knowledgeable friends, I’ve dipped my toe into this exciting – and sometimes a bit scary – world.
The first issue for me was even learning what questions to ask and how to understand the answers. That took a bit of research, but once I had a bit of knowledge, it became a lot less daunting and a lot more fun. I suspect that there a lot of knitters out there in the same position I was, so I thought I’d share some of my learnings with you.
Step 1: Do Some Reading
Before I ventured into a camera shop, I did a bit of reading so I didn’t feel quite so silly.
Get familiar with the categories and price ranges: How to Choose the Perfect Digital Camera for Your Needs
Key concepts, explained beautifully: Photography’s Three Basic Tenets in Eight Bits and Nine Minutes.
There’s a ton of great stuff on the Lifehacker website photography section, (some of it from sister website Gizmodo, which is also wonderful) although it can be a little overwhelming.
Step 2: The Camera
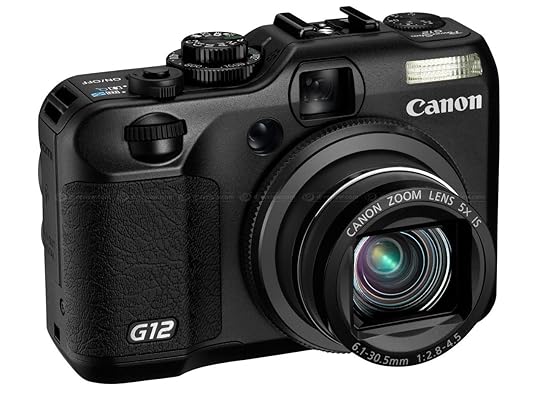
Just what I needed.
Up until now, I’d only owned fully automatic models. These are great cameras, and aren’t expensive, and are perfect for everyday snapshots and vacation pics and the like. Someone with a good eye can take great pictures with one, no question. What they lack is the ability to control how the camera takes pictures.
What I needed was a camera that could be automatic, but could also let me play with the various options – shutter speed, aperture, focus – to change the photographs I was taking.
I chose a Canon G12. Canon was the unanimous recommendation for photographers of my level – that is, someone looking to move up from a fully automatic. They’re very high quality cameras, and can be operated in fully automatic (i.e. the camera decides for itself what to do), fully manual (e.g. I know what the heck I’m doing and can set the exposure and focus myself), and various semi-manual modes. This allows me to learn to control one element at a time, to really understand it. It’s also got lots of clever pre-programmed modes for things like shooting fast-moving subjects (e.g. the dog at the park), in low light (e.g. knitting at night), and the one I’m most excited to use – for shooting fireworks!
There is a very similar model, the Canon S100, that’s a little newer a little smaller, and a little less expensive – but just as powerful. I definitely recommend that you look at both if you’re shopping. I ultimately chose the G12 because I like how it felt – more important than you might think! And I like that it’s operated with dials; the S100 is controlled more through the software. What became clear to me is that either choice was a very good one, the decision is entirely about how the camera feels to you. This means that when you’re shopping, it’s important to actually get your hands on the cameras. I can’t recommend highly enough that you get yourself to an actual camera shop, if at all possible. Go to a store with a knowledgeable staff and ask questions, and touch and feel.
When I was camera shopping, I took some knitting with me so that I could show the salesperson what I would be shooting, and so that I could see how the camera handled those kinds of shots.
Note: I learned pretty early on in my research that the term ‘point and shoot’ is a bit misleading. My G12 is considered a ‘point and shoot’ because it can be operated in a fully automatic mode. You’re looking for a camera that offers manual control in addition to automatic modes. (When I told the sales staff initially that I didn’t want a point and shoot camera, they pointed me to professional level multi-thousand-dollars cameras.)
Step 3: Start Taking Photos Immediately
I got the camera home, I charged the battery, I read the quick start booklet, and first thing the following morning I starting taking pictures. I had no idea what all the various buttons and dials were for, but that was ok: I made sure that everything was set to ‘automatic’ and starting taking pictures.
Sounds like a silly thing to do, but this was an incredibly useful exercise for a few reasons: it helped me get over my shyness about carrying a camera: I look ridiculous! They’ll think I’m a tourist! These photos will be terrible!
Yes, all of these things might be true: but so what? Carrying a good camera will make you look like a knowledgeable tourist. And if they think you’re a tourist they won’t judge if you spend twenty minutes taking pictures of a bike rack. And most important of all: you can’t take good photos until you’ve taken bad ones.
My first day with my new camera I took about thirty pictures of Dexter playing with his friend Daisy…
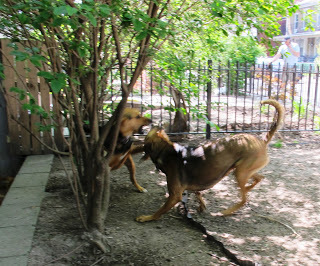
Not a great picture, but not a bad one.
To Be Continued
Next week, I’ll write more about my adventures and I’ll show you some more of the shots I’ve taken.


Mandy Moore's Blog

- Mandy Moore's profile
- 6 followers

