
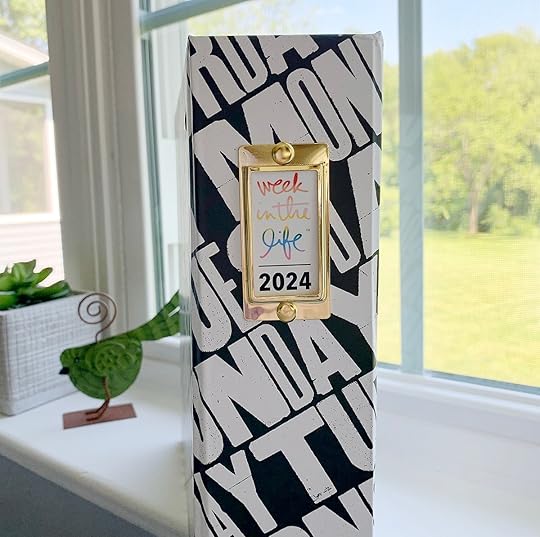
Week In The Life™ 2024 | Special Guest Shannon Flatley
Hello! My name is Shannon Flatley (@softdaystudios on Instagram) and I’m so excited to be here as a guest on the blog today to share with you some of the ideas I implemented into my 2024 Week in the Life™ Album.
This is my 8th year working on this project and during that time I’ve learned a few things about my process and what personally works best for me. The most important thing, for me, is getting as much of a jump on the creative things I want to do before the documenting period begins. That’s when I’m most excited about it and I need to harness that energy and make all the things. Soon after the documenting week my brain wants so badly to move on to the next project and if I put it away it’s more than likely not going to get finished. Like, ever. (Yup I’m talking to you, WITL 2017, 2019 and 2022.) I’m also motivated by an album that has “a start” — even if that means just having my page protectors in order, some things in the pockets, and post-it notes all over.
My Week in the Life albums typically do not have quite so much in them. But I was so inspired by this year’s collection and just wound up making a whole lot of things to go in my album — and it is therefore quite chunky. Below are some things I did before the community documenting week, which is also when I chose to participate, and then the things I did after the week was over. I didn’t do any work on the project during the week, I just took photos and journaled.
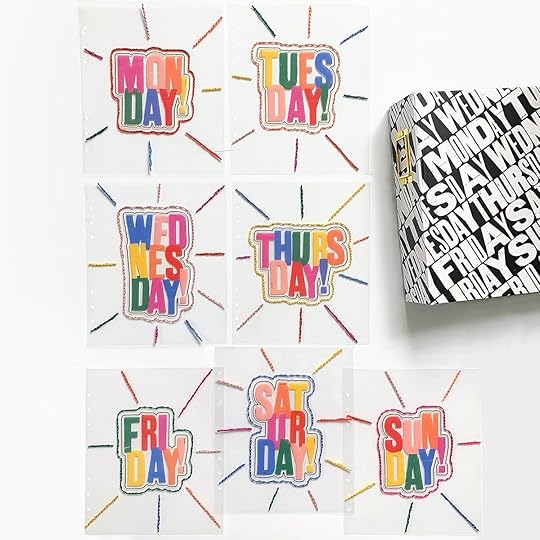
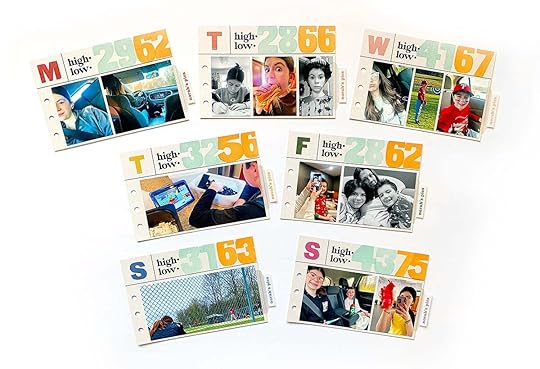
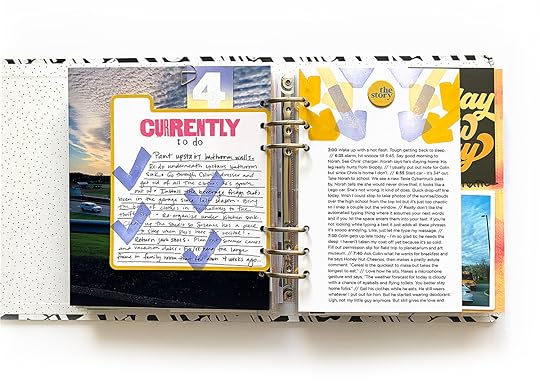
PRE DOCUMENTING WEEKSQUARE DAY OF THE WEEK CARDS:
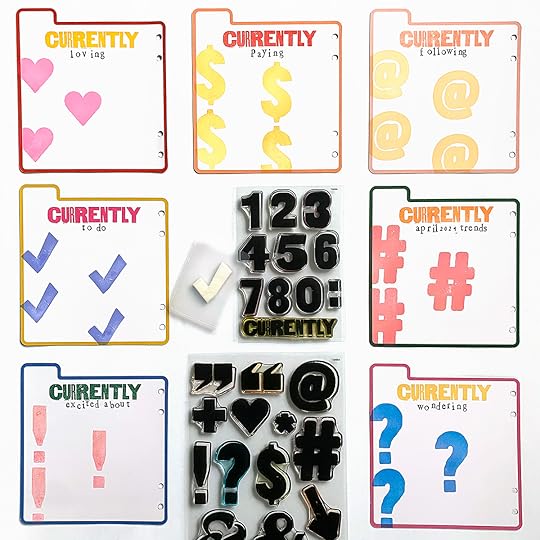
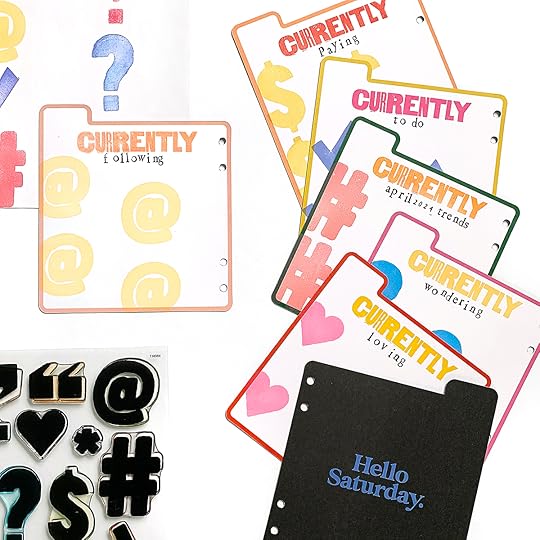
I decided to use the back of the square cards from the main kit as prompts for some details of life right now. I stamped each day with “currently” from the 4x6 WITL numbers stamp set, along with an icon from the 6x8 icons set. (The small black letters are from a very old wooden stamp set from my stash.)
During the week I intended to jot down things on a sheet I stamped with each icon, and then handwrite everything onto the cards when I put the album together. I also thought I’d use the technique Ali often uses which is to use different thickness of pens to differentiate between words/sentences/thoughts.
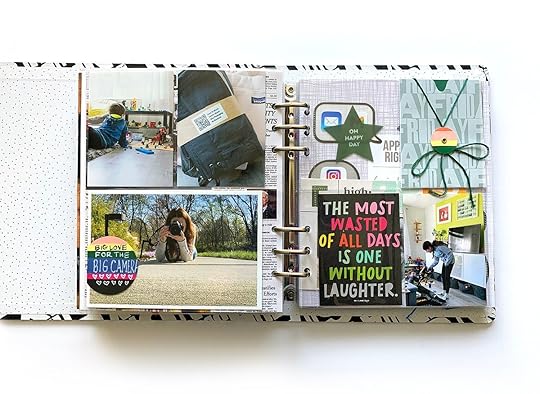
DAILY QUOTE PAGES:
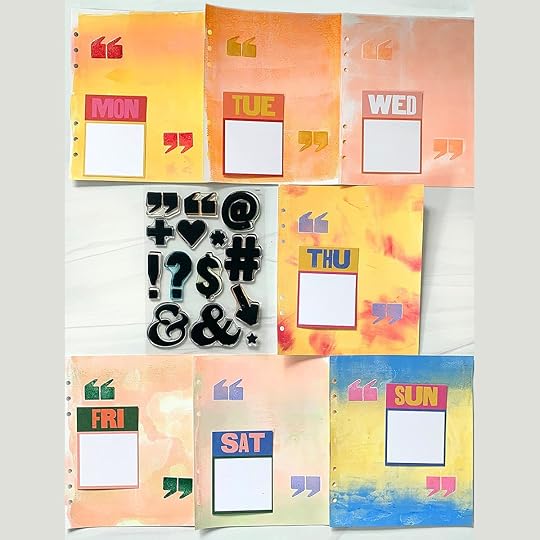
I made these Gelli print pages using the quotation marks from the icons stamp set from this year’s collection, in colors that coordinate with the main kit colors for each day. At this point I was planning to either stamp or handwrite on them, depending on the length of the quote.
MAKING A CHECK MARK STAMP TO COORDINATE WITH THE ICONS STAMP SETI was looking to have seven distinct prompt icons for my square cards project using the icons stamp set - but I was already using the quotes and arrow elsewhere and just couldn’t think of a prompt for the ampersand. I looked at the number 7 from the numbers stamp set when it was upside down and… hey, check mark! Here’s how I created it:
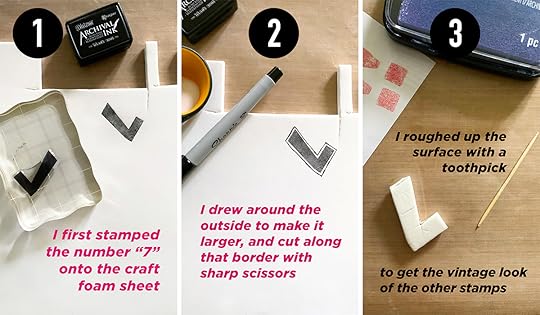
I had thick craft foam on hand to make the stamp, but the thin sheets could also be used by gluing several layers together. I used red line tape to adhere the foam to some thick plastic which I cut from an old paper divider.
*Tip - I wound up washing all the black ink and sharpie off before gluing to the base - it does not dry on the craft foam. And smears big time.
NUMBER BANNER/FLAG TAGS:
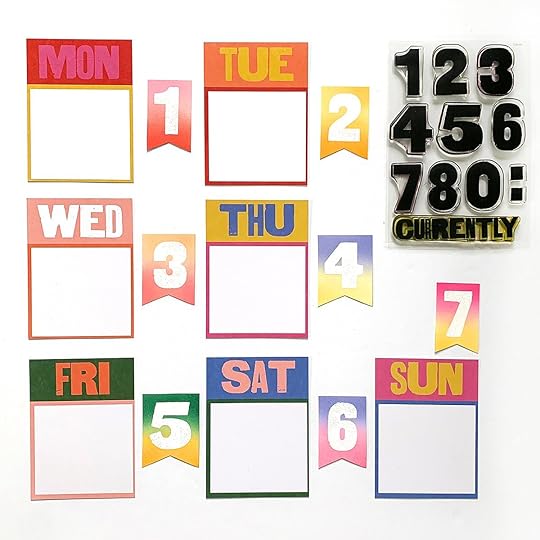
So much love for the coordinating colors of each day in this years kit and I couldn’t help but want more. I was super happy with how these little banners came out (flags? tags? still not sure what to call them…) using the WITL numbers stamp set.
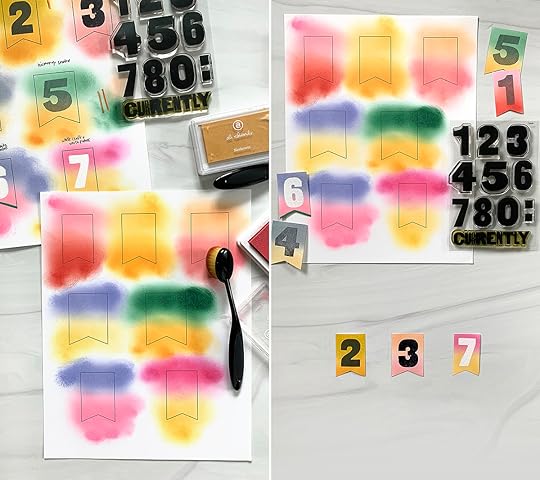
I blended ink colors together with a brush, stamped with white craft ink (or you could use clear ink like Versamark) and heat set with white embossing powder.
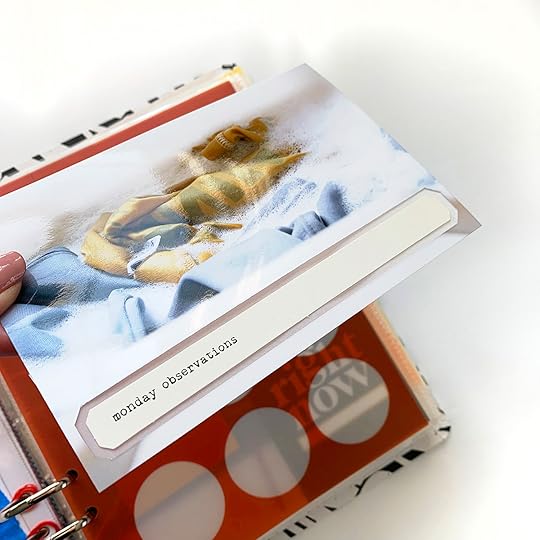
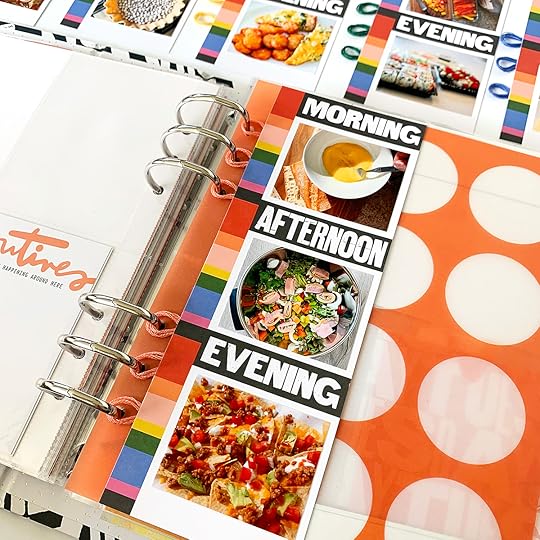
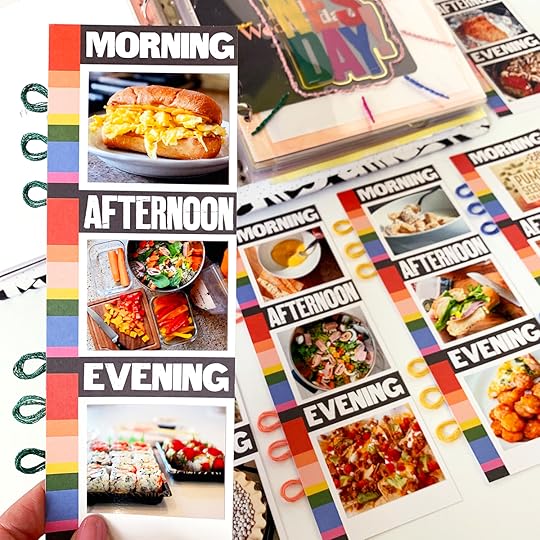
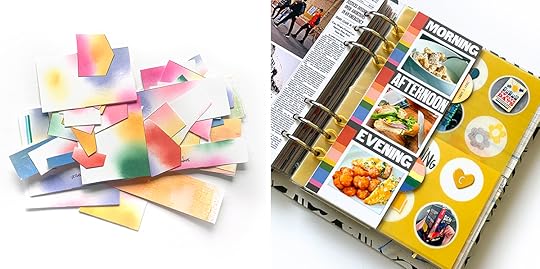
I love exploring different ways to use the products, and loved the look of these prompt label strips atop a layer of vellum. I used a template to trace, then cut a section out of back to back photos, layered vellum in between, and adhered the prompt labels strips on top.
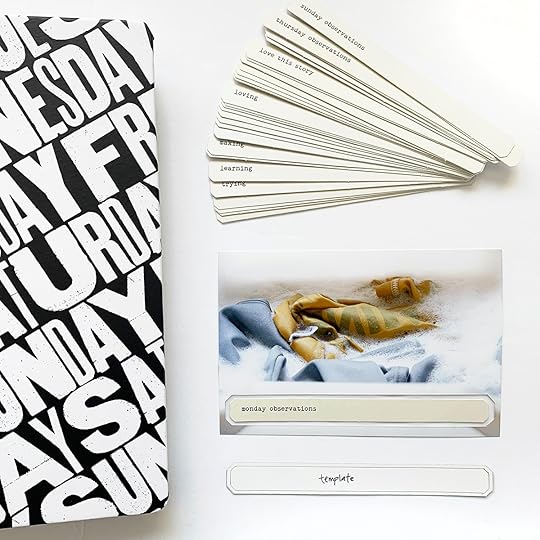
To make the template I simply traced one of the strips onto a scrap piece of chipboard, added about 1/16" to the outside, and trimmed. I did a test on a 4x6 photo from last year’s project… I always include white space in at least some of my photos each day so knew this would work well for 4x6 or 6x8 pics. Once I had my template made, doing this to the photo took about 5 minutes.
When I applied this idea to my 2024 photos I found it easiest to temporarily paper clip the photos together and cut through them at the same time. The openings line up best this way. However, you could just cut the opening on one photo first, then use that to trace the same opening onto the second photo using the top photo (with opening already cut) as a guide. Then adhere the vellum in between, and add a word strip on both sides. The trick is to keep the photos together as they will be in the pocket (i.e. back to back) so the openings line up properly.
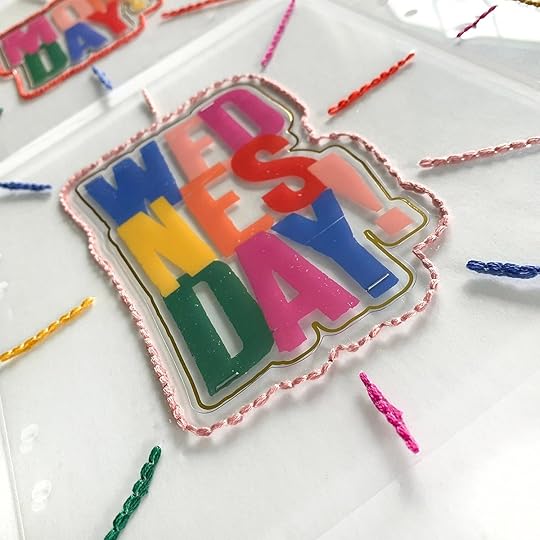
DAY OF THE WEEK DIVIDERS:
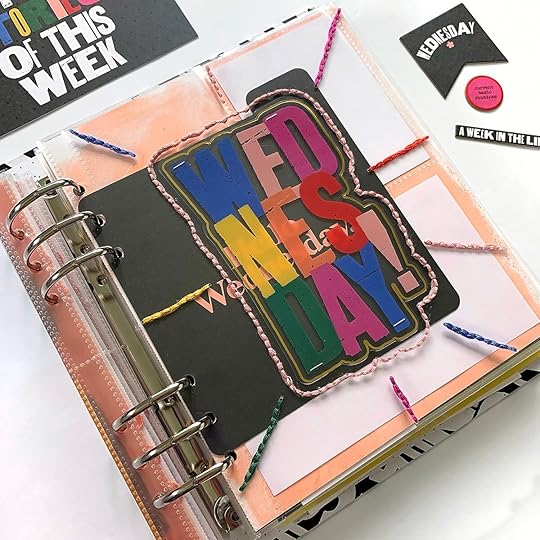
Ah, this project. So I had a fun idea to make dividers using the colorful plastic days from the main kit, and as much as I love them… I highly doubt I will do it again. I don’t know what made me think hand sewing embroidery floss through thick acetate would be quick and easy. They took a ridiculously long time and if I hadn’t already invested so much time in the first two I made, I likely would’ve shifted gears and done something else.
I wound up working on them over the course of a couple weeks - and even though they were so time consuming I really do love them and they are exactly what I envisioned. I punched all the holes using my Japanese screw punch, which is one of my favorite tools, but I had to stop to clean the plastic out of the bit every five holes or so, so it was very tedious work. Once I had all my holes punched I used a large needle and embroidery floss to sew.
I think if I were to tackle this in a different way I might use a page protector or something less rigid that I could run through my sewing machine? And then go around and around with colored thread to build up the border. It wouldn’t be the same look but would still be fun. I do like the precise border I created with the hand sewing.
I added colored loops (corresponding to the day’s color) to the 3x8.25 cards from the main kit, instead of punching holes to add them in the binder. It was a way for me to bring in more of the embroidery floss that I had used on my day of the week dividers. I used a page protector as a guide and the loops are just attached to the back with some painters tape. A photo on top would eventually cover that mess.
PAINTED STRIPES ON RECYCLED PACKAGING:
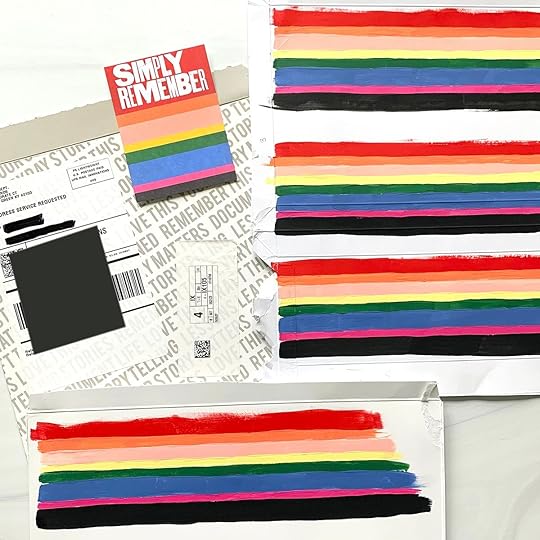
I decided to use acrylics to paint stripes, similar to those on the cards, onto some packaging. I save almost all my packaging and since these envelopes had labels adhered to them I utilized the backs. What’s great about this kind of packaging is that because it is white and coated, the paint will not seep through the cardboard, it’s not likely to warp, and the color will remain true. At this point I had no idea what I’d do with it, I just felt like painting!
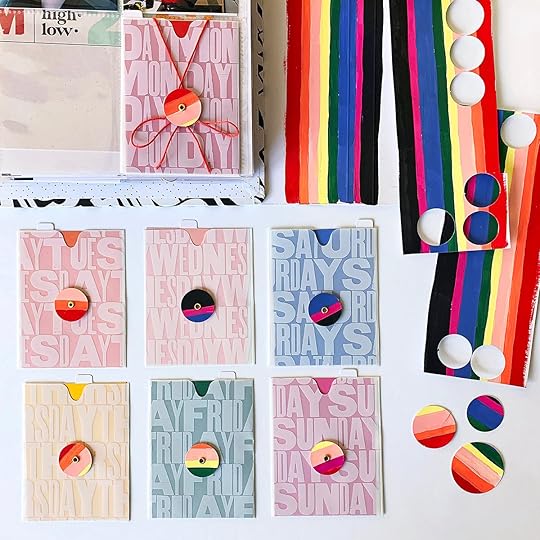
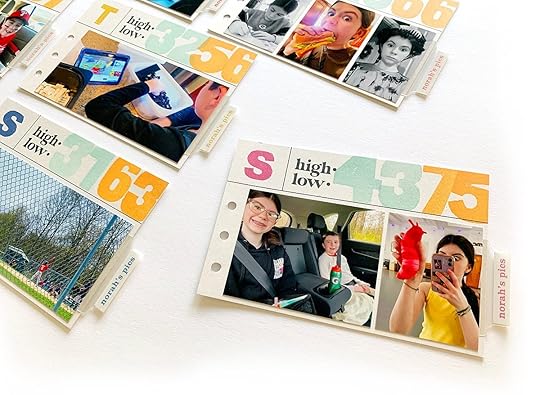
POST DOCUMENTING WEEKSQUARE DAY OF THE WEEK CARDS:
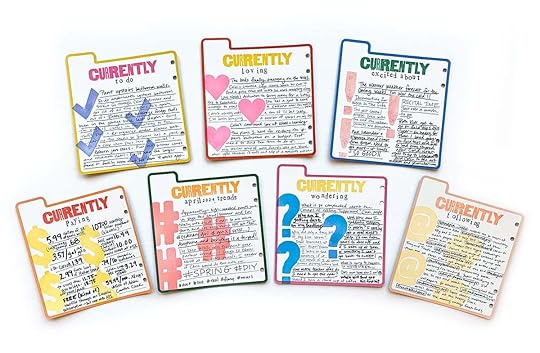
Here’s what my square cards wound up looking like. I didn’t write down a lot during the week which was totally fine. I did use different pens to try to keep sentences and thoughts sort of separated... I think I was more successful in some than in others.
DAILY QUOTE PAGES:
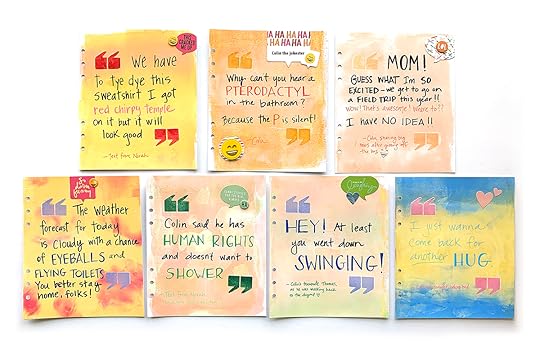
I ultimately chose to do handwriting only, using Sharpies and POSCA 1M paint pens. The texture of the prints caused the POSCA pen nibs to drag in such a way that paint sprayed all over some of them, but luckily the abstract backgrounds made those spots not so noticeable. Most of my quotes wound up being funny in nature so I also added some pieces I had from the Laugh Story Kit.
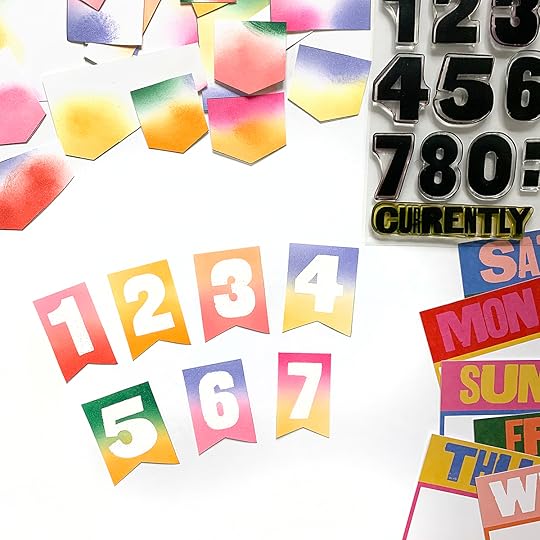
NUMBER BANNER/FLAG TAGS:

I had planned to use these on the top of full page photos and that’s what I wound up doing. I added a clip that is decoration only - the flag is stuck to the page.
COLORFUL EMBROIDERY FLOSS LOOPS:
I simply cropped & printed all the meal pics I took and put them onto the 3x8.25 cards. I added a photo onto the back and they were done! I did use a little red line tape on the photo where it would be touching the loops/painters tape for extra strength.
THOSE SCRAPS...
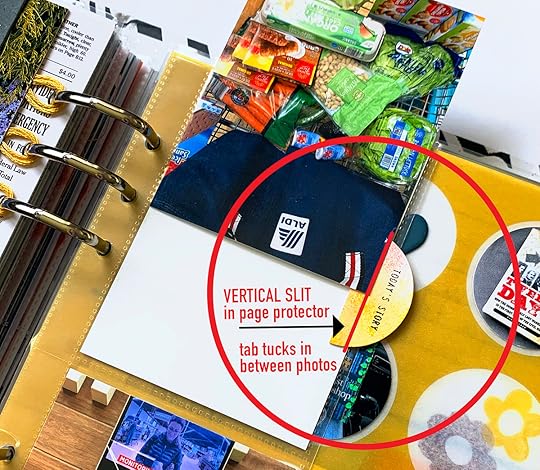
I kept my pile of scraps from the flag tags and Gelli prints and turned them into tabs for the sides of my 3x8.25 inserts. I punched circles and adhered them back to back, then cut them in half. I could easily insert one between the back to back 3x8.25 card/photos, but had to think of how to adhere it to the page protector insert in a way that made sense. I wound up slicing a small slit near the edge of the pocket (top layer only) the length of the straight edge of the half circle. I inserted my 3x4 photo that would be on the reverse first, then slid the tab in, adhering it very lightly to the back. I then put my top 3x4 photo in the pocket. It’s important to get the slit as close to the pocket edge as possible, because the top photo can only be as wide as where you make that cut.
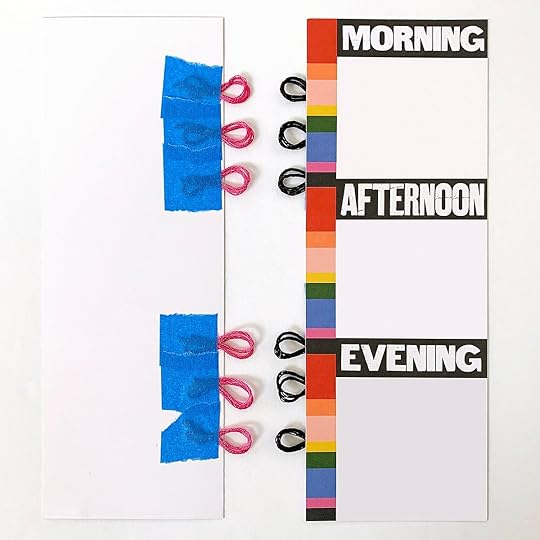
As I began to put my album together I thought it might be fun to punch circles to use as journaling spots, and thought they’d also work for an idea I had for the vellum pockets as well. I have some personal journaling for each day, so inspired by one of Ali’s Love Story layouts (she used bakers twine to hold down a flap, behind which was journaling) I thought I’d use the pockets to hold those thoughts and create a bit of a deterrent to keep it private. I used more of the embroidery floss I have throughout my album.
I’ve made my own button fasteners like this before - they are really easy to make if you have a circle punch (or just freehand cut) and eyelets. Since the pocket is already assembled, I’m just making it appear as if it goes through it - but it’s just adhered to the front.
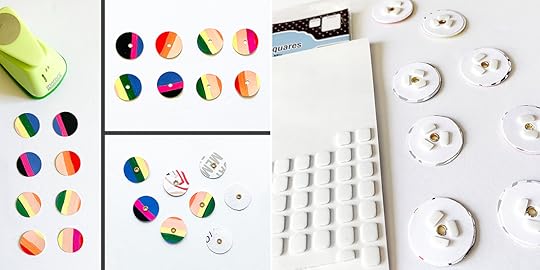
I punched 1” circles from the stripes, and punched a small hole from their centers. I decided on plain gold eyelets to break up all the color. After setting those (still old school - a handheld setter & hammer! ha) I glued another circle to the back (a hole also punched in the center) for stability, trimming them smaller so they wouldn’t show from the front.
I put a few foam dots near the eyelet (I use thin ones for less bulk, and cut the smallest size in half) This raises the circle up so I can easily slide the string around. I then attached those near the center of each vellum pocket.
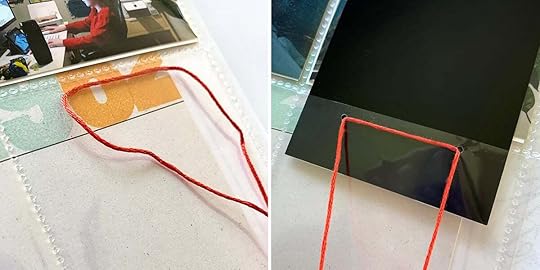
I punched two small circles at the top of the page protector pocket (not all the way through to the other side - just the front of the pocket), staying at least 1/8” away from the edge so I wouldn’t risk the hole tearing. I weaved the floss in from the front and through the back of the other side. Since the holes don’t go all the way through it doesn’t close the pocket, so you can still put a card or photo on the other side.
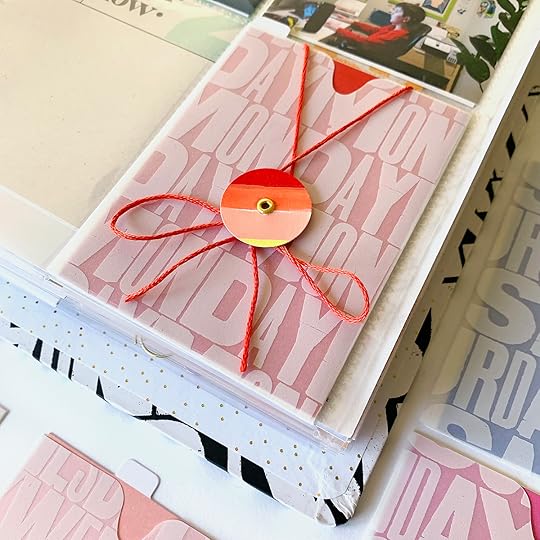
I attached the pocket to the front of the page protector with red line tape, brought the floss up over the pocket, down and around the circle then tied a bow. Repeat for 6 more days!
As mentioned above, I also used some of the punched stripe pieces to create the half circle tabs for my 3x8.25 inserts.
In addition, I made journal spots by punching large circles and used them throughout the album.
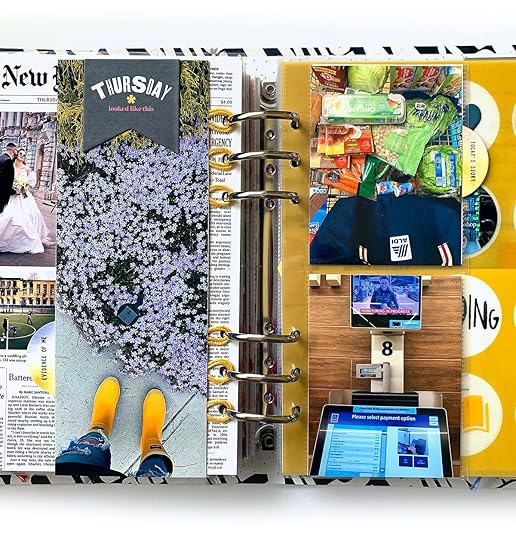
Before the documenting week I “hired” my daughter to take pictures for me throughout the week for the bargain price of $1 a day. She is saving for some add-ons to a trip we are taking in November and she’s very motivated by money right now! She sent me her photos at the end of the week and they were awesome.
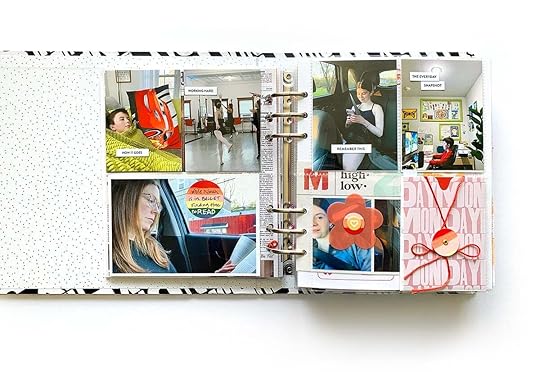
I decided to put them in the same spot each day, on the “high low” 4x6 cards. I added an Avery index tab to each, making paper inserts in Photoshop. I opened the Monday “high low” card from the digital main kit so I could use that background. On a new layer I made an outline the size of the insert (approximately 1.5"x.3125"), used the color eyedropper to pick up the color from the large M, and made my text in that color. I grouped those 2 layers, then copied 6 times. I opened each of the other high low cards, used the eyedropper to grab the initial’s color, and changed that day’s text to match. I love having these photos from her perspective.
VELLUM CIRCLE PAGES:
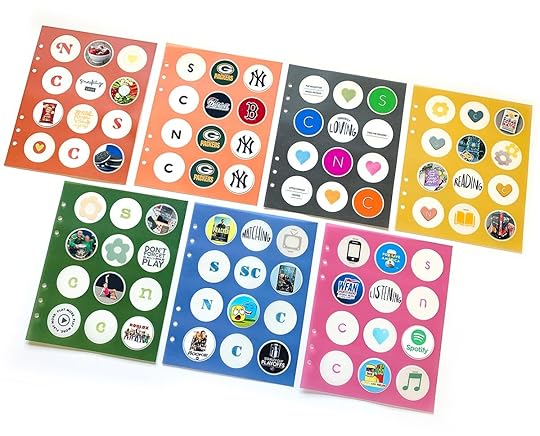
I used the vellum pages to highlight things related to me, my husband, and our two kids. I chose a theme for each day and picked one image for each of us based on that topic. I chose to highlight what we were reading, watching, playing, listening to, current favorite snack, favorite color, and favorite baseball/football teams. Love getting my family in my album in this way. My husband and son both have the initial “C”, but I think you can figure out which is which!
SPECIALTY PAGES:
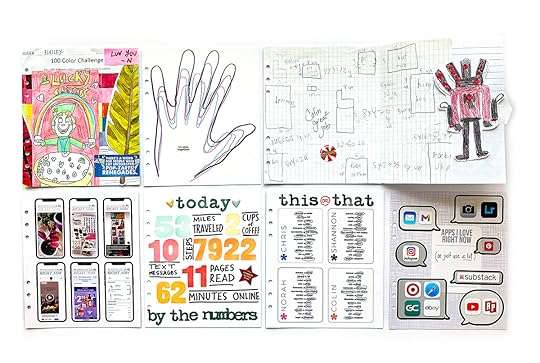
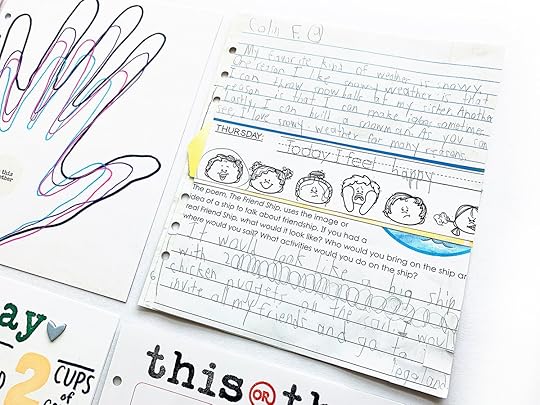
On the reverse side of the last full page photo for each day I made what I call a “specialty page.” Basically something that’s a little more than just a photo or journaling. This year I did two collages (one is a flip out) with some of my children’s art and school work, a page where I outlined all of our hands together, a page with some digital screenshots, a page showing apps I currently use most often, a “this or that” questionnaire, and a “by the numbers” type page.
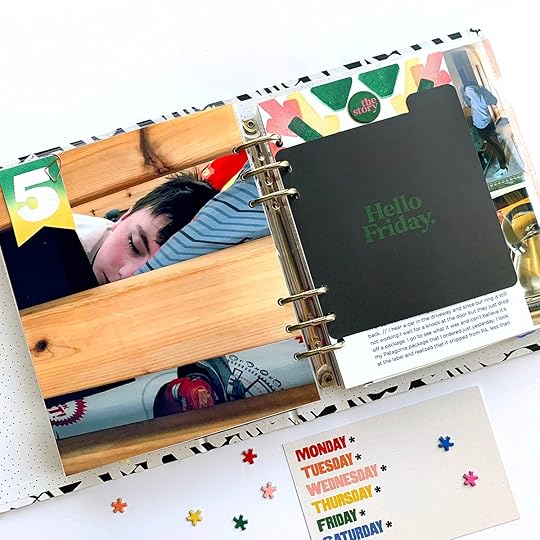
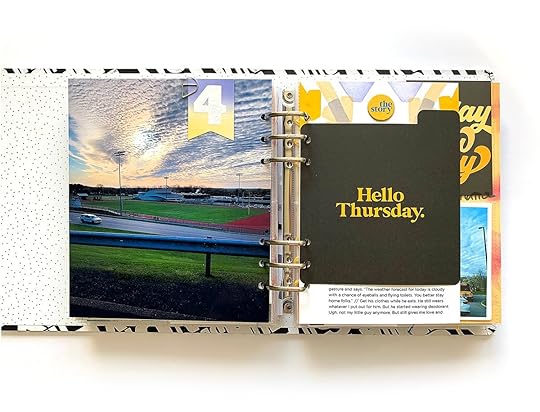
MAIN JOURNALING PAGES:
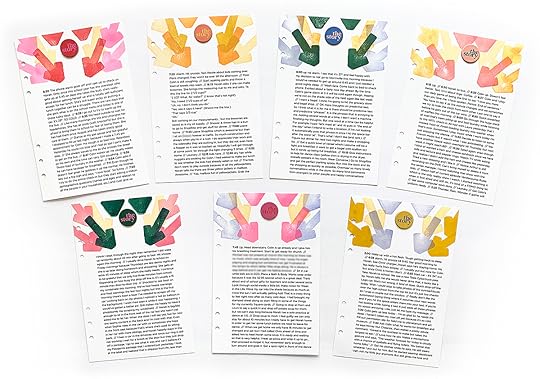
This year I chose to try something I’ve never done in WITL before and that’s putting almost all my journaling in one spot. I didn’t worry about complete sentences and just made it more of a stream of consciousness. I formatted it so that when printed it would be the same width of the square card. I began the text about 3 inches down the page and stamped multiple arrows pointing towards the words. I added the day’s “the story” chipboard circle above where the square card sits so it wouldn’t be covered by it.
That’s about it, friends! I know this was a long post but I wanted to pack as much detail in as possible. So thanks for checking it out. If you have any questions or are unclear about anything above please let me know in the comments. If you are just starting to work on your Week in the Life project, or are in the messy middle, I hope these ideas inspire you to keep going! Good luck!


