The Joy of De-Stashing
It's de-stashing day. The Craft Retreat, at 59th Ave. and Greenway Rd in Glendale (Northwest corner) AZ, rented 40 tables to people, and we are going to be selling the things we make or, in my case, de-stashing. Selling things from my studio that are still usable, but not by me. So I've got paints and inks and papers, ephemera packs and rubber stamps, pan pastels, pencil cases, and other stuff.

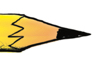
Parchment paper core to wrap papers around and samples taped on outside of mailing tube.
Come on by if you have the time. I'm also bringing a few of my books, which I'll sign, if asked.
I've spent the last week or so emptying boxes, piling up material, then making ephemera packs, labeling items and putting them in boxes.
Here are some thing I learned:
1. Open up three or four boxes at a time, sort them into piles–keep and go. Don't start making a "give away" and "maybe" piles or you will stiffen and collapse from indecision.
2. Open and sort boxes till you have a nice "go" pile. Put the "keeps" away, sorting them into boxes according to some sort of system, either by use (collage, painting, jewelry) or by type of item (paper, paints, inks.) If you have a lot of something (rubber stamps) you might want to sort them by topic (leaves, hearts), by holidays, by size or by mounted/unmounted. Anything that makes sense to you. That's important, because it's the only way you will ever find anything again. For example, I have a box marked "class" and it holds brushes, scissors glue sticks and items I use when teaching. If I had to assemble it every time I teach, I'd get cranky.
3. Storing papers is hard. I have a lot of papers that are large and need to be rolled and stored in mailing tubes. In order to roll them, you need a core, and I use parchment paper, scrunched up. You can see it in the photo, looking like a firecracker fuse. In order to remember what I have in each tube, I cut a piece of each kind of paper and tape it to the outside of the tube. In the one shown, all the paper as washi that have gold in them. I have another one for double-sided mulberry papers. Again, whatever system works for you. It's the only way you'll find anything.
4. Look at the go stack and sort in the way you will sell. In my case, I made ephemera kits–packages for collaging with a variety of papers and tickets, cards, and other papers in them.
5. Label them with a price. I used masking tape and wrote the price on it.
6. Make sure you take change (both bills and coins) and a method of selling. I'm a fan of the Square. It allows me to take credit cards using my iPhone.
7. Have a plan for the end of the sale. You don't want to bring the items back into the studio–your purpose is to make room. Know what you will do at the end of the day: Drop the unsold items off at a freecycle location. Drop them off at a Goodwill store. Phone a public school the week ahead of time, and ask if the art department needs supplies. Contact someone in your town to see if a homeless shelter, battered women's shelter, or other place that helps the under-served needs art supplies. Drop them off, don't expect anyone to come pick them up.
Hope to see some of you at the sale!
--Quinn McDonald is de-stashing. Just in time for house guests who will appreciate a roomier studio.
Filed under: Creativity, In My Life, Links, resources, idea boosts, Opinion Tagged: cleaning up, de-stashing, storing art papers