Let’s Talk Details Part 1
Every time I work on a book, I find out new things about formatting. It keeps me humble. As I know I’m not the only one who self-publishes out there, I try to share the tidbits I glean. So, you’ve been warned, this post is going to go into the nitty gritty about formatting a book, particularly one with lots of black and white pictures.
Everything I mention here pertains to Amazon’s KDP (Kindle Direct Publishing which allows both Kindle and paperback books) and IngramSpark as these are the two platforms I use. There are pros and cons to each, but that’s for another post. I also start with a Word document and save it over to PDF when I’m ready to upload the book.
I’ve heard there are easier ways to do this, but I’m terribly familiar with Word and haven’t convinced myself to branch out yet.
Anyway, for Discarded Dragons, I decided to throw myself a curve ball and try formatting the book with full bleed. A book with images printed all the way to the edge of the page has full bleed. That’s all it means. However, that throws in some interesting formatting between text and images. You need images all the way out to your edges but text that still follows your margins. One other side note, so far I’ve only set up the paperback for Discarded Dragons. A Kindle version would have different formatting than what I’m talking about here. (And full bleed wouldn’t even be a thing for Kindle).
General Page Formatting – Page SizeLet’s start with KDP. Thankfully, KDP is fairly simple. To get the full bleed, all I had to do was set a custom page size and margins. Here’s the steps for a 5×8 book:
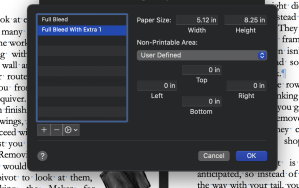 Go into File-Page SetupUnder Paper Size scroll down to Manage Custom SizesThis will open up a box like what you see in the pictureSet the paper size to something like 5.12×8.25Set the Non-Printable Area to all 0’s and hit okay
A few notes:
You may have noticed the paper size is set larger than 5×8. This is because when the book’s printed, they cut the edges and a slightly larger size helps you avoid getting weird white lines around your images. (As far as I understand anyway.) You will lose some of the outside edges of your images as well.Also, when you add page numbers, click into your header or footer and check the spacing from the edge of the page. I found my footer was set too small and I was going to lose my page numbers when it printed.General Page Formatting – Page Margins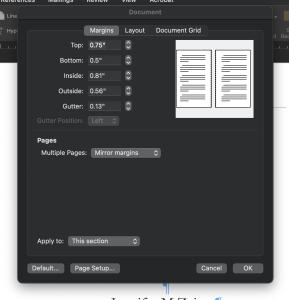 Now on to Margins. These also adjust some. I honestly can’t say how much because I simply play with the numbers until the manuscript looks right. Both IngramSpark and KDP have minimums for what they’ll allow. Here’s what I have. It works to my satisfaction for Discarded Dragons although a true formatting guru would probably cringe like crazy at my haphazard approach.
Another note:
Once I got my Page Setup, I found that when I put the full page images in, I couldn’t get them to expand all the way to the inside edge of the page. It kept stopping at my internal margin. Eventually, I figured out that I had to give the image a position under the Picture Format tab in Word and then I could move the image wherever I wanted.Wheew!
When I first started writing this post, I was going to cover both Amazon KDP formatting and IngramSpark….umm, bad idea. Even for me, I’m getting bleary-eyed with the tech heavy post. So I’m going to break this into two posts. Next week will build off of all this and talk about some of the stuff I learned for IngramSpark.
Thanks for stopping by! Hopefully this is helpful to someone out there and they don’t have to trouble shoot quite as much as I did =)
Until next time, blessings,
Jennifer
Other posts about formatting:
Formatting Learned from Quaking Soul
Ha! Kindle Figured (Formatting from The Adventure for Kindle)
(Discarded Dragons will be available September 1, 2021. Pre-orders will start sometime in August. I’ll give updates as things progress.)