The Direction of Force in Exercise Analysis
The direction of force applied by a person, during an exercise, determines which limb (and muscle) is loaded, and the degree to which that muscle is loaded…and the direction of force the person applies is dictated by the direction of resistance provided by each particular exercise.
Let’s say you (at a bodyweight of 200 pounds) are about to perform a Barbell Squat. You are in the standing position, with a 200 pound barbell on your shoulders. Without realizing it, you are pressing straight downward, against the ground, with 400 pounds. If you were to put a scale under your feet, this would be confirmed.
In turn, the ground is pushing back 400 pounds. This is called “ground reaction force”. The ground is not sinking under the 400 pounds of load, nor is it pushing back more than 400 pounds, in which case you would rise.
In physics, the ground reaction rule stipulates that an immovable brace (i.e., the ground) “pushes back” an amount equal to the amount pressing against it, and in the exact opposite direction. This means that the straight down (vertical) pressing of your bodyweight plus barbell, is producing a straight upward (vertical) direction of resistance.
That direction of resistance requires that you produce a straight downward direction of force—otherwise, you would fall off balance. The direction of force you produce determines which muscles are loaded, which muscle are not, and the degree of force each muscle is required to produce.
The image below-left shows what occurs during a Squat. The red “UP” arrow indicates the direction of movement you are causing with your downward direction of force (indicated by the red “DOWN” arrow). Notice that the femur is perpendicular with your direction of force, while the tibia is mostly parallel with your direction of force. Thus hip extension (produced by the glutes and other hip extensors) is required more than knee extension (produced by the quads), in order to produce this upward movement.
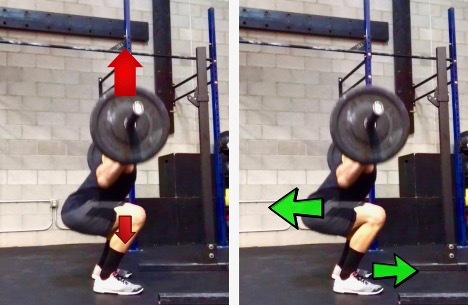
In the figure above-right, you can see what would occur if you emphasized knee extension (instead of hip extension)—thereby fully activating your quadriceps. Maybe you’d like to try this, as a test (kidding). Just be sure you have a soft cushion on which to fall, placed behind you.
Pushing your foot forward against the ground, would cause you to thrust your hips and torso backward (action / reaction), and you would fall off balance. The reason this does not happen when you perform Barbell Squats is because you do not fully activate knee extension (full quadriceps contraction), so that you can coordinate a straight upward movement.
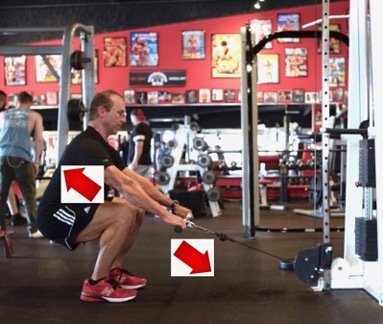
In the image below, I am performing a Cable Squat. It looks similar to a standard Barbell Squat, with the key difference being that the direction of resistance is now coming from a FORWARD-downward angle, instead of straight downward. The lower red arrow indicates the direction of resistance, which thus requires that I produce a force that is directly opposite (upper red arrow), or else I’ll fall forward. This new direction of force I must produce is significantly more perpendicular to my tibia, which therefore greatly increases the load to the quadriceps. It’s also worth noting that—when you do this—you can feel your feet sliding forward, toward the front part of your shoes, which indicates forward thrust by the tibia (“knee extension”). That does not occur with standard Barbell Squats.
Another way of ascertaining the degree to which each muscle (quads for knee extension or glutes for hip extension) is loaded / activated is to measure the “moment arm” of each limb / lever.
In the images below, you can see the difference between A and B. “A” indicates the moment arm of the femur (being operated by the gluteus), and “B” indicates the moment arm of the tibia (being operated by the quadriceps). The greater the moment arm, the greater the percentage of load that is placed upon the muscle that operates that limb.
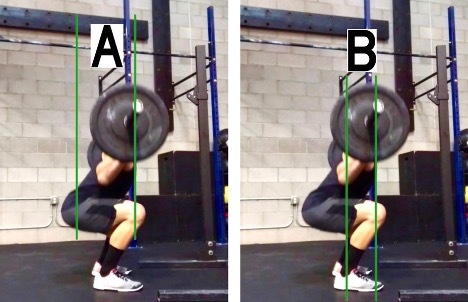
The reason why these lines are drawn vertically, is because that is the direction of the resistance. In the figure above—Cable Squats—the lines would not be drawn vertically. Cable Squat analysis would require that the “moment arm” lines be drawn parallel with that direction of resistance, which is diagonally (the cable). Thus, those lines would show a greater moment arm for the tibia.
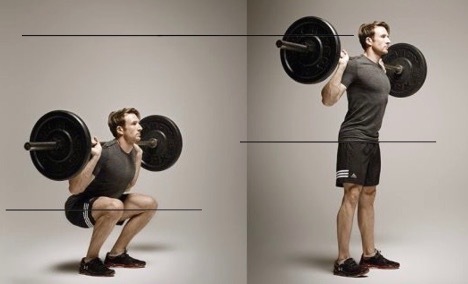
Further still, in the image below, notice the distance that must be traveled by the head and hips, in order to go from descended position to standing position. It’s a considerable distance. Thus, the question that must be asked is, “which limb/lever and muscle is producing most of that distance traveled?”.
In the image below, I’ve placed a protractor over each photo. I’ve also placed a red dot showing the beginning and ending location of the femur and the tibia. On the left image, you can see that the distal end of the femur must travel a full 90 degrees from descended position to standing position. Conversely, the tibia only needs to travel approximately 25 degrees, from descended position to standing position.
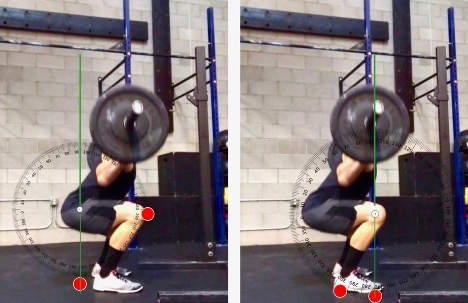
Which of these two limb angle changes are more likely to produce the degree of torso lift indicated in the previous image? Obviously, it’s the image on the left image: the femur—gluteus—hip extension that produces the majority of the upward rise of the torso.
When calculating force, one of the factors is “distance traveled”. The more distance that is traveled, the more force that must be produced by the muscle that is causing that degree of travel. This is directly associated with the length of the moment arm. The greater the moment arm, the greater the distance traveled. The shorter the moment arm, the less distance traveled.
These same rules apply to the Parallel Bar Dips, to which this person also eluded. Again, the direction of the force that the person is required to produce, determines the degree to which a participating muscle is loaded—and the direction of force the person must produce is mandated by the direction of resistance provided by the exercise.
In the image below-left, you can see what occurs during standard Parallel Bar Dips. The direction of resistance (“ground reaction force”) is straight upward, which therefore requires a straight downward direction of force applied by the person. That direction of force is mostly parallel to the forearm, which renders it mostly “neutral”—loading the triceps with only about 11% of the force. The front deltoid is most loaded, because it produces a tremendous amount of humeral movement—from starting position to ending position—in order to cause the torso to rise.
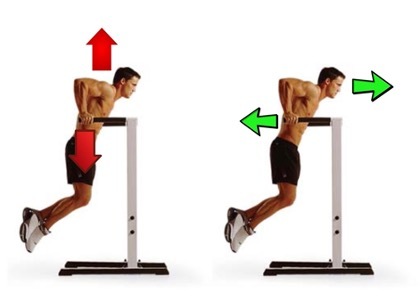
The image above-right shows what would happen if you were to forcefully activate elbow (triceps) extension, during Parallel Bar Dips. The arrow pointing left (hand pushing posteriorly) indicates the direction of your forearm “push”, which would produce a forward thrust of your torso—not an upward thrust. You can try this in your chair, with your hands on the arm rests and easily understand it.
It’s also worth noting that—when doing a Parallel Bar Dips—there is no “backward push” being produced by the hand, as occurs during Triceps Extensions. There is no sliding sensation on the hand, resulting from posterior “friction force” against the bar—as occurs in all effective triceps exercises (i.e., think Cable Pushdowns with a rope, or Dumbbell Skull Crushers with a hammer grip). “For every action there is an equal and opposite reaction”, so there would absolutely be a significant “backward push” occurring—against the bar, by your hand—if the triceps activation (during Dips) is as great as some people think it is. Yet, there is none of that during Parallel Bar Dips.
Below is yet another example of how the direction of force produced by the person, determines the degree to which a participating muscle is loaded.
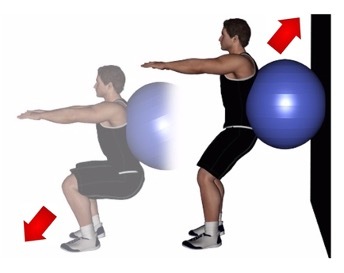
In this example, the person is leaning back against the ball. This “backward lean” thus changes the direction of force the person must produce. In this case, the person must produce a direction of thrust (with his legs) that is angled diagonally forward. He has no choice, and if the floor was oiled, his feet would slide forward. This forward direction of thrust automatically loads the quadriceps more. It does matter how vertical the tibia is—in this case—because the direction of resistance is no longer vertical. It has been altered by “friction force”, which is created by the feet pushing forward against the floor, influenced by the backward leaning against the Swiss Ball. The farther forward the feet are placed on the floor, the more forward “friction force” is produced, the more perpendicular that direction of force is with the tibia, and the more that loads the quadriceps.
The image below—Sissy Squat on a Sissy Squat Bench—shows a direction of force that similar to the Swiss Ball Squat above, but to a greater degree. As you can see, the body would fall backward if not for the brace in front of the ankle (similar to the friction force on the floor, above). Thus, the direction of the resistance is not vertical—it is now rotational—moving around the pivot that is created by the pad at the top posterior side of the tibia (just below the back of the knee). As you can see, his foot is not even touching the foot pad under it, proving there is zero downward force in this example.
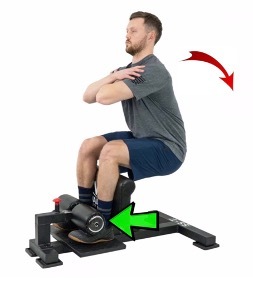
This rotational direction of resistance requires that the force you produce (by your tibia) be applied straight forward, against the ankle pad. This makes it an excellent quadriceps exercise. It does not matter that the tibia is vertical (i.e., which would be considered “neutral” only when the direction of resistance is also vertical). The direction of resistance is now essentially horizontal, and thus the direction of your force must also be applied horizontally, perpendicularly against the ankle pad.
The example above also highlights one more (very important) thing worth noting. As you can see, in this descended position, the hip joint is bent (“flexed”). So, when this person rises to the upright position, it will APPEAR as though the hip joint was actively extended by way of the gluteus muscle—but that is NOT the case. Rather, the hip is only passively extended.
To understand this, imagine the man above has no torso. The knees would extend (straighten) by way of quadriceps contraction, and—as a result—the femurs would rotate up to the vertical position. Anything that is placed at the upper end of those femurs—let’s say you taped a golf ball on the upper end of each femur—would also rise. Now, just replace the golf balls with his torso. The same thing would happen—the torso would simply rise by virtue of the upper end of the femurs rising. In other words, the torso is just “going for a ride”, carried upward by the rising femur. The hip extension muscles (the glutes, etc.) would not need to actively produce that angle change at the hip joint. Of course, the weight of the torso would load the quadriceps (knee extension) much more than the golf balls did, but that is a separate issue.
To further illustrate this, look at the two images below—showing a Supine Dumbbell Press.
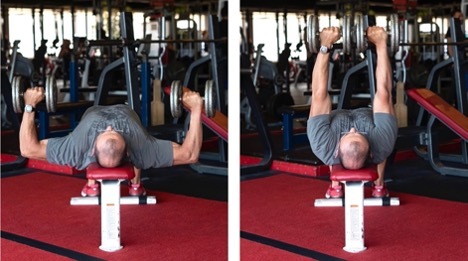
The insertion of the pectorals is on the upper end of the humerus. When the pectorals contract, they pull the upper arm from an outward (lateral) position, medially—toward the midline of the body. Now, imagine that you have had both of your forearms amputated. You manage to attach a weight directly to the distal end of your humerus, and you perform this exercise above. You would still effectively be loading your pectoral muscles, regardless of the fact that you don’t have forearms or hands.
Like the previous example (Sissy Squat bench), if you were to then place a forearm (with a hand and a weight) at the distal end of each humerus, that forearm (with attached weight) would also be carried upward by the rising end of the humerus. Thus, the elbow goes from bent to straight, passively—without (much) assistance from the biceps or the triceps—as long as that forearm stays in the vertical position…balanced over the elbow. This is because (in this case), “vertical” is the same as the direction of resistance, so the forearm is neutral—requiring no force from the biceps or triceps.
If you were to tilt your forearm “outward” (when in the descended position), you’ll engage your biceps to a degree (i.e., a small percentage—an amount equal to the degree of outward tilt). If you were to tilt your forearm “inward”, you’ll engage the triceps to a degree (i.e., a small percentage—an amount equal to the degree of inward tilt). This is due to the forearm leaning to either one side, or the other, of the “apex” (the neutral place).
Again, this proves that a joint can also be passively moved, and it may appear (to the untrained eye) as though that joint is being actively moved by one of the muscles that “could” move it. It depends on the direction of the resistance, and thus the direction of the force you are required to produce.
Below is a final example of this. You might think that—during any rowing exercise—the elbow is bending by virtue of biceps contraction, but that is not necessarily the case.
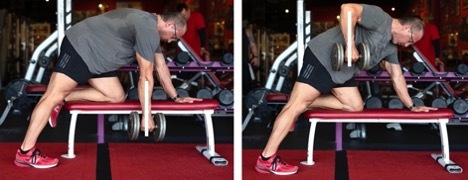
Imagine that you have no forearm, no biceps and no triceps. Instead, you’ve attached a rope to the distal end of your humerus, with a weight hanging on the other end. You would be able to perform the above exercise (One Arm Dumbbell Row) simply by contracting the muscles that move the shoulder joint (i.e., the “back” muscles), thereby raising the humerus from the lower starting position, to the ending upper position.
The rope (with the attached weight) would do the exact same thing the forearm is doing in these photos—hanging from the elbow, going along for the ride, rising simply because it is being pulled upward by the humerus.
Some people believe that rowing exercises function “perfectly well” as a biceps exercise, under the misguided belief that “since the elbow is bending, it must be like when we do Curls”. No—it’s not like Curls at all. When we do Curls, we allow the forearm to enter a perpendicular angle relative to the direction of resistance. When we row, the forearm stays mostly parallel with the direction of resistance—in the neutral position.
Of course, if you “pull” your forearm (the weight in your hand) toward your shoulder, when you Row, you’ll engage the biceps a little bit. If you were to “push” your forearm (the weight in your hand) toward your hips, when you Row, you’ll engage the triceps a little bit. But as long as that forearm stays vertical, neither the biceps nor the triceps would be engaged.
Again, the direction of resistance dictates the direction of force that you must produce.
If the direction of force you produce is mostly parallel with a limb, the muscle(s) that operate that limb are mostly neutral—not loaded much, if at all. If that direction of force produced by you is mostly perpendicular to a limb, the muscle(s) that move that limb will be very loaded.
It’s not merely a matter of a limb being “vertical” or “horizontal”. That’s just a simple way of identifying a percentage of load ONLY when the exercise is utilizing “free weight gravity” (vertical direction of resistance)—not when the direction of resistance has been altered by a cable, or a device that converts it into a rotational resistance, or by a machine, or by friction force / ground reaction force.
The post
The Direction of Force in Exercise Analysis appeared first on Doug Brignole.


