Assembly Tips for Custom-Size Studiobricks Booths
At my previous house, we constructed an additional 16′ x 19′ room in 2005 for my studio. I bought a 6′ x 8′ WhisperRoom which fit well in that space. I happily used it for 15+ years.
After moving to this house in 2018, my WhisperRoom seemed a little too large for the room I chose for the studio. I bought a 6′ x 7′ Studiobricks booth earlier this year. It was delivered in 2 large boxes on 11 May.
Drew and I had watched several assembly videos of standard booths and looked through the instructions from Studiobricks. We thought we were prepared and that the two of us could easily and quickly put the booth together. After all, we’d built the WhisperRoom at each house and disassembled it twice. In fact, Drew almost single-handedly disassembled it this last time for its sale.
Reader, we were not prepared, in large part because Studiobricks (SB) did not send the correct instructions for my booth! This article will outline things we learned through the trial and terror method over several weeks and tips for assembly of custom-size Studiobricks booths.
Before I continue, I do want to say that SB has been extremely responsive to our messages. However, I would have expected that a company that’s been in business for over 10 years would have all their documentation ready and wouldn’t piece-meal it to the customer as they run into problems. If we’d had all the correct guides at the beginning, we could have saved a lot of time and frustration.
1. Get some help to unload the boxes and assemble the booth.My 6′ x 7′ booth weighed 2500+ pounds when delivered in 2 boxes on wood pallets. The boxes were too tall to go in the garage, so they were left on our driveway. We needed to get the pieces in the garage quickly before rain came that afternoon.
Standard-size SB booths have small panels that one person can lift. This custom, double-walled booth has multiple 6-foot pieces that Drew estimates weighed 100-125 pounds. I was of very little help to Drew in unpacking the boxes into our garage. Thank heaven we have a hand truck!
We hired 2 people from College Hunks Hauling Junk to help Drew move everything from the garage to the lower level of the house and then again on another day to help him assemble the booth. I note that the safety instructions on page 2 of the 3rd version of instructions below recommend that 3 people assemble the booth due to its weight.
2. Ask Studiobricks for the most current assembly instructions that match your booth (or use my copies below).They initially sent us the SB Assembling Guide ONE- ONE PLUS -ONE PLUS XXL 2020 (vers. 1). Those booth sizes top out at 4′ x 6′, so most of the blocks pictured did not look like my booth configuration.
On its very first page, the document shows rubber disks that should be attached to the floor panels.
Drew emailed SB because he didn’t see any floor panels that were supposed to hold the Silent Blocks (black rubber disks) as pictured. He asked whether some of the floor panels have disks cut out in places to put the Silent Blocks.
At that point, they sent their SB Assembly Guide CUSTOMIZED Booth (vers. 2), which shows a different approach to building the floor.
Drew installed the booth up to the D level of panels. He wrote to SB with a number of questions. They replied with their SB Assembly Guide Custom Double Wall (vers 3) which is still undergoing English translation but is the most helpful for this booth.
Version 3 does a better job of explaining how to add the vertical and horizontal battens, among other things. We didn’t originally insert the battens as shown on page 9 because they weren’t easy to insert. Once Drew got this third set of instructions, he disassembled the almost-complete booth down to the floor.
However, the battens weren’t the only reason why he needed to start over. A loud floor creak concerned us, and Drew had asked SB about it.
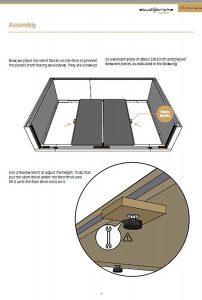
It turns out that we were supposed to add some Silent Blocks under the floor panels where they join per this assembly image that SB sent Drew in response to his question. It would have been very nice if we’d had this picture before he assembled the floor!
For this installation, you will need:
rubber malletthe flat wrench that comes with the booth parts — Mine was included in a ventilator box, so you might have to look around for it.phillips head screwdrivertorx screwdriver T20 (for ventilation kit only)stepladder or twoa hand truck if you don’t have 2 people who can carry the pieces2 window/tile suction cup lifters to help you lift the door if it has a window in ittape measurecarpenter’s spirit/bubble level (not a phone app for leveling)electric drill that can use a 6mm hex wrench/key (Allen wrench) — The booth comes with a little L-shaped one, but an electric one is so much easier to use.wood to prop the door up if you need to adjust the hinges — We used wood from the pallet the booth came on. See the door adjustment and build videos below.4. Test any electrical components before building the booth. Plan your installation so that anything plugged into outlets is accessible after you build the booth or will use extension cables, power strips, and/or surge suppressors.The ventilators shipped with SB booths are designed for 220V electrical systems to go with European systems. They are shipped with power converters to those of us the US.
I got 2 ventilators with this booth and put the converter for each on the floor, outside the booth. The ventilators are mounted inside the booth.
If you’re in the US, you must set the jumper on the back of the converter for 110-volt input. I’ve seen posts from many narrators who thought their ventilator wasn’t working, only to discover that they had missed this important step!
We found that one of my converters didn’t power the ventilator though it was configured correctly. Unfortunately, we hadn’t tested it before plugging it in to an outlet that was behind one of the walls, well out of our reach.
The company immediately sent us another one, but we had a difficult time pulling the cord out of the outlet since the booth walls were up. We decided to run an extension cord for the new converter around the baseboard to a more accessible outlet. We’ll cover that cable with a conduit and still hide the massive converter on the floor out of sight next to the booth wall.
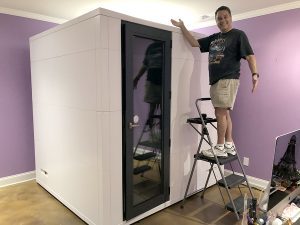
5. Position all the electrical cables so they are near the cable tunnels before you build the walls.When you were designing your booth with Studiobricks, you should have planned your space so that the cable pass-throughs are convenient to the electrical outlets on the wall. Since the booth must draw all electricity from the outside, you’ll need to make sure you can string the cables through the ports after the walls are built.
I need to run cables for my mic, headphones, and light from outside the booth. You can see my cables on the floor next to Drew’s stepladder in the picture above. They terminate next to my desk out of view from this picture. Some people also need the cables powering a computer and/or monitor.
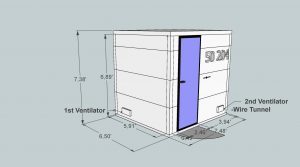
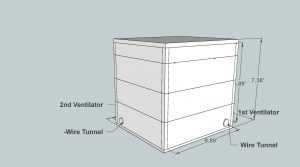
Both of my cable ports face studio walls. As you can see when comparing my booth configuration drawings below with the picture above, the electrical outlet on the wall is almost across from the cable port (adjacent to the 2nd ventilator output), making it easily utilized. The other electrical outlet I planned to use is in the middle of the far wall and not reachable from the corner of the booth.
6. Adjust the door screws so that the door easily closes.
Drew wrote to Studiobricks:
The door does not easily close, which I’m assuming is due to the frame not being exactly square. Will this be fixed with a tight roof frame or will I need to make some adjustments to the components of the door that help keep it closed?
The screw holes on the door for the interior handle don’t exactly line up with the holes on the handle when both handles are installed. There appears to be a misalignment of the larger holes (in the door) for the square rod that connects the interior and exterior handles.
The rod seems to be coming into contact with the edge of the interior hole on the door. This makes it difficult to turn the handle but also doesn’t allow the interior handle to align with the screw holes.
I have the rod inserted into the handles as it describes in the manual so I don’t think it’s something I’m doing wrong.
SB replied with this document to explain how to adjust the door.
We made the explainer video below to help other people understand the process. You don’t want to move the screws very high as the door could start to bind on the top of the frame.
By the way, Drew discovered that 2 of the hinges were screwed in to the door frame using long metal screws. We couldn’t figure out why SB would be clever and make the hinges adjustable and then not use their creation and permanently attach screws to the frame!
The fix requires removing the long screws and replacing them with the smaller ones that allow the hinges to be moved. He found replacement screws at Lowe’s, which look like this:

Drew asked Studiobricks about the door handle. The connecting rod between the inner and outer handles is not allowing the inner handle to match up with the holes drilled for it. Once he resolves this problem with my booth, I’ll update this article with the solution.
This video shows how the booth was delivered and a time lapse of its assembly.
If you’re assembling a Studiobricks booth and would like to have a short (up to 30 minutes), free video chat with Drew, the booth wrangler, send him an email.
The post Assembly Tips for Custom-Size Studiobricks Booths appeared first on Karen Commins.