
How to Create Fixed-Layout iBooks, Part 4
So finally we get to put some content in our book! The first thing you must know is that in fixed-layout ebooks there must be a separate file for every single page. Because you'll be placing all your content precisely, you must define the area in which you will be working. This is why deciding on the size and shape of the page is so important, and here is where I'll show you how to do it. In addition, every page must be the same size and shape. Only their content will be different.
In this part we'll create the first page you'll likely want to make, which is the cover. Whereas in Kindle ebooks you are discouraged from including the actual cover image in the file, adding it instead during the upload process, in iBooks you must include it yourself.
Since the cover is generally a single full page image with the title text included it will make an ideal introduction into how to create a fixed-layout page. You can, of course, add the titles and any other text as a separate layer, but we'll save that for later and only focus on the artwork here.
I should mention that Apple frowns on using images that include text, requiring that any text within the ebook be created as an active layer. This is so that functions such as dictionary definitions, searches, highlighting, text-to-speech, or any other accessibility features be fully functional. Otherwise there would be no difference between the basic fixed-layout format and a standard pdf. However, this requirement does not apply to outer covers, or to title pages or other places where highly customized text is desired. Bear this in mind in your textual choices.
THE FIXED-LAYOUT PAGE
If you open up the template cover.xhtml file in your editor of choice, you'll see something like the following:
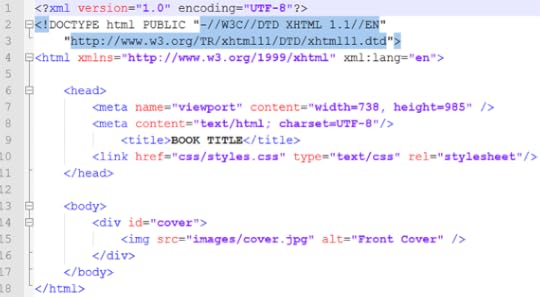
The first few lines provide our language declaration, and note that here we include an additional encoding statement which defines the document as using the "UTF-8" character set. There is also a DOCTYPE declaration which defines the file language as html, and provides the necessary referents.
Finally, there is an xml:lang statement defining the coding language as being written in English. This, of course, assumes you're an English speaker writing for an English audience, which I'll also assume since you're reading this. All of your html files should be encoded with this set as shown. Just copy and paste it as is.
THE HEAD ELEMENT
The next section is where you define the characteristics of the page, and link to the style sheet you'll use to format the page contents.
1. meta name="viewport"
Apple uses a feature called the "viewport" in iBooks to define the actual size of a page. This is not necessarily the size of the iPad display itself, although it can be. As I discussed at great length in the last part, your content is best created at a larger size than the actual iPad screen, for several reasons. Foremost this is so that users can zoom the image up to view more detail, such as reading smaller print. But also as I mentioned so the ebook doesn't become obsolete as soon as a higher resolution screen comes out.
That said, you are certainly free to make your book in any size and shape you wish. If you want to keep your file sizes small and have no need or wish for anyone to zoom your pages larger than the iPad screen, then create each page at the default resolution, as I discussed before, so that a single page will fill the screen in portrait orientation without being zoomed. Don't make each single page the size it will appear in a two-page spread in landscape orientation, because the iPad will zoom it up automatically to fill the screen when viewed as a single page in portrait orientation, and it will look like garbage. But the larger image will look just fine when shrunk to fit beside its opposing page in a two-page spread.
Whatever size you decide on, enter it on the first line here in the "width" and "height" attributes, where the numbers shown are the exact number of pixels that define the size of your page.
2. meta content="text/html"
This may seem a little bit redundant, since you've already given this information above, but here it refers to the actual content of the page and not the coding language of the document. Or so I've been told. Just put it in.
3. <title>
This is utterly pointless, since it doesn't show up anywhere. In fixed-layout ebooks there is no actual header in the upper margin (or footers for page numbers either, by the way, so you'll have to put those in yourself if you want them - see my Ring Saga sample chapter for an example). I imagine this is what that was meant to be, but as I said it won't appear anywhere, so you can put whatever you like there. Use it as a way to describe the page contents if you like, of put some jokes in for curious ebookworms. It really doesn't matter. I'm not even sure it needs to be there, but I haven't tested it.
4. link href=
This is the other line that really matters, as it tells the reading system where to find the formatting information for this page. That data is kept in a separate CSS file, and only the actual page content is located here. CSS (Cascading Style Sheet) is a "stylesheet" as the last element declares, which we'll get to shortly. You can create one and put all your formatting information in it, or make a separate one for every page, or even both, but any formatting that needs to be applied to this page must be referenced here.
The href= element is the only one you'll need to change, as it must specify the location of the specific style sheet you want to apply to the content of this page. Beat in mind that the css file location is relative to where this page is, so if you've put the html page file and its css file in the same folder all you have to do is list the file name. But if the css is in a separate folder, as in the example, then the relative path must be given. If they're in separate folders, start the line with ".../" which tells the OS to start looking at the root level (such as ".../css/styles.css" for example).
Obviously, we haven't created any css files yet, so just give it a name that makes sense and use that name when we get to that point. Or leave it as is and come back to change it later.
THE BODY ELEMENT
Now at last we get to the heart of the matter. The body container holds the actual content of the page, and it's written just like any standard website using html. You'll want to know at least the basics of html, but you don't need a lot. There are hundreds of thousands of quick reference guides out there on the web for free. You can open up ebooks and look at the code it's made of to learn how specific things are done. But for now we'll just keep things simple.
1. <div id="cover">
All we want on this cover page is a single image, so our body only has one element, contained within the <div> tags. Normally you'll just call up the divider using <div> all by itself, closing it with </div> after your content. But in order for your cover image to show up as a thumbnail on your iBookshelf you need to add the id="cover" element and attribute. We'll reference this elsewhere - in the content.opffile - and this is where that file reference will find what it's looking for.
2. <img ...
Since all that's on this page is the cover image, chances are you'll want that image to fill the entire page from edge to edge. To do so, all you need to do is create or resize that image to the exact dimensions of the viewport size you chose for your book.
To insert the image into the page, you call it up using the <img tag, followed by that file's location, or "source" (src), which you reference just as you did for your (currently nonexistent) css file. Technically, the image file is nonexistent as well, as I haven't told you to put it in the image folder yet. But you can do that now, or any time you like. The template already has folders for images, css, and fonts as well. You can just drag and drop yours into the appropriate one, and then delete the other.
Warning! If you delete the only file in a folder, it will delete the folder too, so put your image in there first before deleting the ones you don't want. Of course, you can recreate the folder, but I just thought I'd mention it to save you time.
3. alt=
The text you enter into the "alt" element is usually what you would see pop up if you were to hover a mouse over this image. Of course, the iPad has no mouse, and as cannot hover your finger to make this happen, what you write here will never show up anywhere. However, it is used to vocally describe image content to visually impaired readers who are using verbal accessibility features. So give some thought to what you put here. Most people don't, and I imagine it's a great annoyance to those who would enjoy a bit more information than "front cover". It's unlikely very many visually impaired readers will be avid graphic novel fans, but you never know. I haven't done any research on those statistics, so it's probably best to hedge your bets and add a little something extra. That said, it is required to put something there, but what is left entirely up to you. At any rate, that's what "alt" is for.
You can now save your file and close it down. Be sure you've added the closing tags at the end or you'll get some nasty error messages upon loading the file into iBooks. Chances are you'll miss some of these (I always do), and it will be a pain to go back in and fix them, so just take a moment now to look the file over before moving on.
Congratulations! You have just created the cover for your book. Unfortunately, the file will not yet load successfully into iBooks, as you have no css, and you're still missing two other crucial files. We'll focus on those next so that you can start to get your work in progress functional enough to have a look at what you've got.
NEXT UP: The CSS File


No comments have been added yet.


