
Resizing Elements and Tone Correction- Digitally Correcting Watercolor Pages Part 2
In Part 1 of this miniseries on digital corrections, we talked a little bit about digitizing comic pages and color correction. In this section, I'm going to talk about a correction I make often- head resizing. As I mention in the linked threads, I have a tendency to draw male heads too large (even after resizing them every step of the way!) and resizing heads at this stage is far more than simply selecting and adjusting! Since we're correcting a watercolor page, we also need to be able to fill in the visual gaps such a correction will cause. This type of correction gets a lot easier with practice, so if there's enough demand for a video tutorial or livestream on these types of corrections, I'm happy to accommodate and walk you guys through my process!
The main tools I rely on for these types of corrections are the Stamp and Clone tool. I fill gaps by creating another layer, Cloning from our source layer, and then Stamping onto our new layer. To help mesh the corrections, I'll use a rough edged brush (usually my custom color pencil brush) to erase the edges a bit so it doesn't stand out too much as a patch.
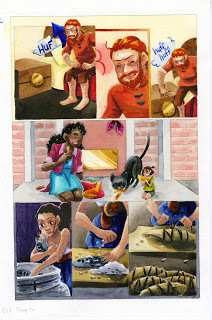
 Left: Original, unaltered scan. Right:Finished and adjusted watercolor page.
The other type of correction we're covering today is adjusting the tone of the paper. This is a simple correction digitally- but a handy one to know, and can be useful for intensifying shadows for dramatic effect.
For this type of correction, we're mainly relying on creating a new layer, setting that layer to Multiply, and using a dark blue or purple for our shadow color. This is a great time to use a watercolor brush as well- although I frequently rely on my custom color pencil brush for this, as it replicates watercolor pencil nicely.
As mentioned in Part 1, there isn't an elegant way to share my tweets here on the blog, so while I'm sharing these threads here, consider this a preview- I really recommend you click through.
Resizing and Correcting Heads: Thread Readable Here
The main tools I rely on for these types of corrections are the Stamp and Clone tool. I fill gaps by creating another layer, Cloning from our source layer, and then Stamping onto our new layer. To help mesh the corrections, I'll use a rough edged brush (usually my custom color pencil brush) to erase the edges a bit so it doesn't stand out too much as a patch.
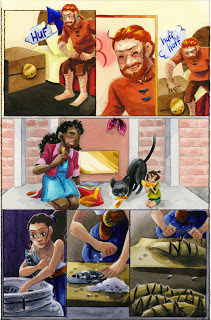
 Left: Original, unaltered scan. Right:Finished and adjusted watercolor page.
The other type of correction we're covering today is adjusting the tone of the paper. This is a simple correction digitally- but a handy one to know, and can be useful for intensifying shadows for dramatic effect.
For this type of correction, we're mainly relying on creating a new layer, setting that layer to Multiply, and using a dark blue or purple for our shadow color. This is a great time to use a watercolor brush as well- although I frequently rely on my custom color pencil brush for this, as it replicates watercolor pencil nicely.
As mentioned in Part 1, there isn't an elegant way to share my tweets here on the blog, so while I'm sharing these threads here, consider this a preview- I really recommend you click through.
Resizing and Correcting Heads: Thread Readable Here
I'm doing some surgery on a page from chapter 8, and wanted to share the proceedings because why not. So Rowan's head in this frame is too large, and I want to resize it. First, I'm going to select the head and manually resize it, leaving an ugly gap. pic.twitter.com/sKkknbSU9w
—


No comments have been added yet.


