Tips on formatting your print book for Createspace and Lulu. Part2: Headers & Footers
Here's the latest instalment in a series of formatting tips. Click on the link to see the previous entries: Part1
Tip#4 Headers and footers
Time to dig out those books from your bookshelf again and take a closer look at the headers and footers. There are a variety of styles, but there are two things that are always true:
There are page numbers (though front matter (e.g. title and copyright notice) is handled differently, as are chapter and part title pages)
Blank pages are always left completely blank (no header; no footer)
Here are some other things you might find:
Name of the book
Name of the author
Name of the story (anthologies and collections)
Name of the chapter (especially with non-fiction)
Header text in in All Caps, Small Caps, or italics to set it apart from the body text.
If there are footers, they tend to only have the page number, and this will usually be centered.
Headers on odd and even pages are mirror images of each other
That's quite enough of that. Let's see how that looks in our example book, Drift by Andrew Cyrus Hudson.

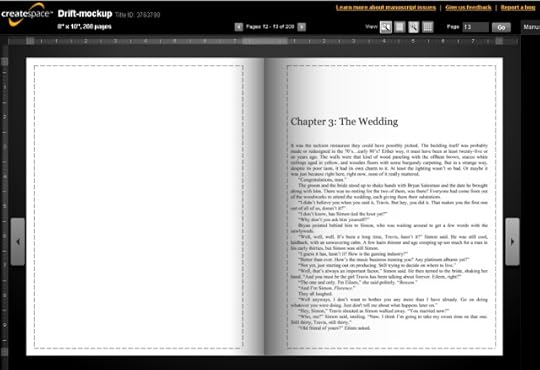
Headers & footers in body text. Click for larger image
Here, on pages 6 and 9, we are past the title pages and blank pages we saw earlier, and showing how the main body of the book works. I've taken a standard style of mirrored headers with no footer. Although the headers are mirrored (the page number is always towards the outer edge of the page) the text is not the same. Even pages have the author name, and odd pages have the book title.
I have placed the title in all caps, using the same font as the body text. Because the author's name is fairly lengthy, I decided to keep Andrew Cyrus Hudson in mixed case. Your headers should recede into the background as the reader reads the story, and I judged that this was best served here by using mixed case. It was a close call; keeping all caps or small caps would have helped differentiate the title from the body text. I tried both and thought this looked best.
And that's what you should do, too. Read the advice, look at a sample of books, and then experiment to see what works best.
Before we see how we deliver this in Word, I'll turn the page once more in Createspace's Interior Reviewer tool.

Headers & footers at chapter start. Click for larger image
We've seen this in earlier tips, but it's a timely reminder that in my page layout plan, I decided to set each chapter so it started on an odd (facing) page. When that means a blank page is needed (as here) it should have no header and no footer. The first page of a chapter has no header either. Note that in this book I'm not using footers. If I was (probably with a centered page number) then the first page of the chapter would have the footer and the blank page would not.
Okay, that's quite enough of Createspace for a few moments, let's look at how we set this up in Word.
The first thing you need to know about Word is that in order to format a print book divided into chapters or similar, you need to divide up your Word document into sections. We'll do exactly that in the next tip, but with regard to headers and footers, the important things about sections are:
For each section, you can choose new headers/footers, or carry on the same as the last section.
For page numbers, you can choose to carry on counting from where you left off last section, or restart at a new number (which you would do if you wanted page numbers for you front matter (usually i, ii, iii rather than 1,2, 3)
You can define headers/footers to be different for the first page of a section. That's how we stop the header appearing on the first page of a chapter or part.
Now, let's see some screenshots of this in Microsoft Word 2007. If you have an earlier version of Word, don't worry. Word 2007 introduced the Ribbon, which makes the user experience very different. However, all the facilities I'm about to explain about were there in earlier versions, and so you can learn the concepts and then look at the online help to explain how to access them in your version of Word.

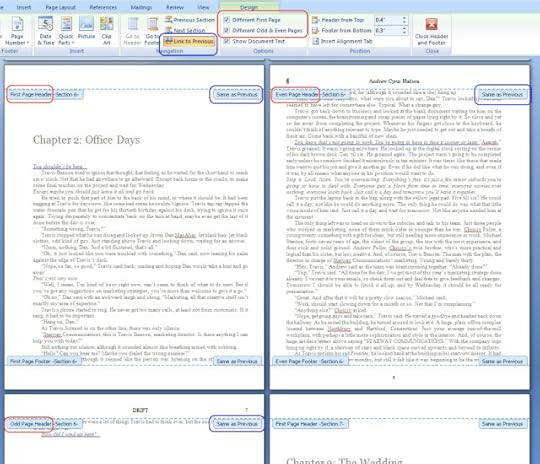
Headers & footers in Word. Click for larger image
Here we have pages 5,6,7, and 8. These pages in Word define what you saw earlier in the Createspace Interior Reviewer. I have clicked in the header area (i.e. the top of the page) to bring up the header and footer tools. This has grayed the main document text, brought up a new menu in the ribbon (Header & Footer Design), and added the pale blue tabs, which give you vital information about how you have defined your sections.
We'll start with the blue tabs. You can see that pages 5,6 & 7 are section 6, and page 8 kicks off section 7. What you can't see is that page 4 was the last page of section 5, and that I have currently got section 6 selected (because I was in chapter two when I brought up the header tools. You can move sections by clicking next/previous section in the ribbon).
Now look at the areas I've ringed in red. On the ribbon, I have set the following options that I'm interested in right now:
Different first page
Different odd and even pages
Now look at the red rings over the pages. I've ringed three of those pale-blue 'tabs'. They read 'First page header', 'even page header', 'odd page header'. This means that section 6 has three different headers, which is precisely what we told it to do as we've just seen on the ribbon.
We only have three pages for this chapter. If we had more, then any following pages would alternate between even page header and odd page header.
To set what goes into the header — in other words, the page number and the title/ author — first of all I have to pick the correct header. If I want to set the odd page header, for example, I need to click the page where the pale-blue tab says 'odd page header'. That will set the header for all the odd pages in the current section.
Next, I click on the header button in the ribbon like this…

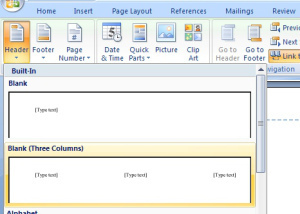
Defining header in Word. Click for larger image
Here, I've picked the option for 'Blank (Three Columns)'. To carry on with the odd page header example, I:I
Clicked on the central '[Type text]' and replaced with 'DRIFT'
Deleted the left-hand '[Type text]'
Clicked on the right-hand '[Type text]' and entered the page number. Now in this case I've used a 'quick part' to define a field. If 'quick part' is gobbledygook, don't worry. Page numbers can be tricky, so we'll come back to them in the next tip, once we've dealt with the rest of headers.
We define the even page header in the same way, but with different text and placement.
As for the first page header… Well, I don't want the first page of the section to have any header, so I leave it blank.
Link to previous
If you look at the last couple of screenshots you'll see a ribbon option called 'Link to previous' and in the pale-blue tabs it says 'same as previous'. You need to know how to use this.
Suppose you have 100 chapters, and you want the odd and even headers, I used in Drift , and you want to leave off the header on the first page of a chapter.
That means you must have 100 sections.
Each section must have a separate first page, odd page, and even page header.
That's 300 headers. You really don't want to define each one by hand; you want to define each one just once, right? For that you need 'link to previous'.
Start towards the beginning of your document, at the first place you want to start using the standard headers (ie after the front matter).
Define all three of your headers.
For each subsequent section, instead of defining three new headers, click on the 'link to previous' ribbon button for each heading type and it will inherit what you defined in the previous section for that heading type. (when I say 'heading type', I mean one of odd- / even-/ first-page header).
Continue this all the way through to the end.
An added bonus, is that this means you can alter something about the header (perhaps set to all caps) and the change will be reflected in all the linked headers.
One gotcha here is that the 'next section' / 'previous section' buttons on the ribbon don't work quite the way you might think. It's best explained with an example.
With the example of Chapter 2, a couple of screenshots ago, suppose we start off on the first page of section 6 (remember — we've defined section 6 to mean the same as Chapter 2). If we click 'Next section', you would be forgiven for thinking we would move from section 6 to section 7. We don't! We move from 'First page header – Section 6' to 'Even page header – Section 6'.
If we carried on hitting 'Next section' we would then get 'Odd page header – section 6'; then 'First page header – section 7', 'Even page header – Section 7' and so on.
I'm trying to explain in writing here, but this would be a good point for you to go, define some headings, and play with the buttons to see how they work.
Which , what, huh?
At first, I found it confusing to work out which setting affected which part of the book. So here's a summary.
We divide the book into sections.
Some things are properties of a section, such as whether we have a different first page header and some setting we'll see in the next tip about page numbers.
We have up to three different header definitions for each section. The next/previous buttons move between these headers and not between sections, despite what the name says.
We can save a whole lot of effort (and risk) by making our header definitions inherit from the previous section.
As for footers, they work the same way as headers.
We're done for this tip. In the next tips we'll be looking a little more at sections and page numbers, but we've got most of it done in the tip you've just read.
This is the latest instalment in a series of formatting tips. Click on the link to see the previous entries: Part1


