
GOOD DIY Art Inspiration + A How-To of Julie’s Original Piece (And A Kickoff of My Weekly DIY Challenge – Wanna Join?)

We feel like there are two kinds of people right now. First, are those who desperately need house projects to fill these days (and give us purpose) and make their house even homier. Then there are those who don’t want to feel guilty about watching the news and marathoning shows (and should feel no guilt – we all process our own way). This post is for the former. I’m in the “have to stay busy” camp and now that the kids are older I LOVE making things with them. So now more than ever I’m looking for easy fun projects that we can do together to create a memor, keep them and us busy as well as add style and personality to our house. So here we go – our first DIY challenge is for those of you who are interested in creating an easy, affordable piece of art for your home or at least watch us do it. I suggest you take Julie’s into high consideration because we all LOVE it and undoubtedly you will too. We also (to keep things super fresh) searched the internet for some of VERY cool and fun ideas. This post is packed, people.
Over the years the EHD team has created a lot of art, mostly because art is a great way to bring in some personality to your home. We all know that art can be expensive, so we are always looking for affordable ways to create our own (and bonus points if the supplies might be in your garage already). Let’s get to it:
Taped Pattern on a Drop Cloth
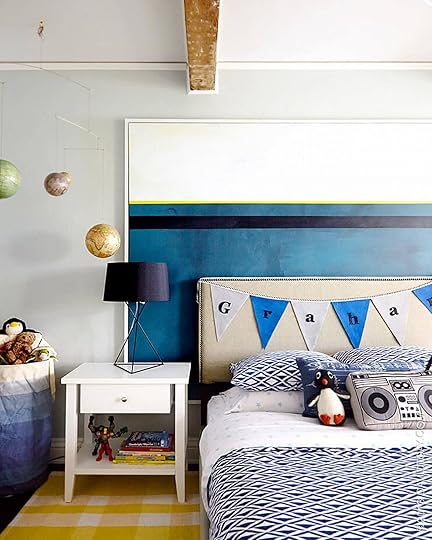 photo by david tsay | from: 5 tips to designing a timeless kids bedroom
Years ago Orlando and I made that massive piece of art with a drop cloth and a frame we built. Then we taped out a pattern and framed it. Now, this is a BIG project, but the idea behind it is so simple and could obviously be much smaller in scale. Also, you don’t have to have a fancy canvas, most fabrics could do (and a painters drop cloth is honestly GREAT).
Potato Stamp Inspo
 photo by tessa neustadt | from: how we styled our living room and kitchen to sell
Now I want to be VERY clear – this stamped art is by Rebecca Atwood (who we love) and was not DIY’d. But we saw that she is even promoting it on her blog as a great DIY and has outlined how to do it. She is THE master so you are in good hands. It’s made with a potato and paint, two things a lot of us have lying around (maybe).
Pressed Flowers
 photo by sara ligorria-tramp | from: our light-filled neutral & textural living room
Maybe one of my favorite pieces of art that involved the kids is the pressed flowers that we framed (in Ikea frames) above. They collected them last spring from the backyard. Some we pressed traditionally (with wax paper and heavy books, over weeks) but most we sped up the process by using this press that you can microwave. Then we simply used super glue to lightly attach to the paper and keep it really quiet and minimal. It is so pretty, such a good memory and the kids signed it at the bottom with a ‘spring 2019’, too.
Kids Art (Upgraded)
 photo by sara ligorria-tramp | from: how we designed our super kid-friendly family room
We have a whole sentimental art wall in our house and it brings me serious joy (said as a true mom, no sarcasm at all). On it, we have kids art (the big blue piece), a framed origami (a playful sculptural cat), self-portraits of them (done with a mirror at their school) and framed kids polaroids (I love my polaroid printer so much).
And now let me hand it over to EHD’s Lead Designer and our resident DIY aficionado, Julie…
From Julie: Adding a DIY into a design project is nothing new around here. Whether it is big one like the window treatments and tent canopy for the kid’s bedroom in the mountain house or small like the pillowcase cover I am always up for it because that extra bit of customization to a space will make it feel more personal and unique to you. That’s why for my own MOTO I included a couple of my own DIYs, one of which is the art piece below, take a peek!
Layered Torn Paper
 photo by sara ligorria-tramp | from: julie’s huge (and diy packed) bedroom upgrade
This piece is so subtle that you might’ve missed it in my bedroom reveal earlier this year. I already had a lot going on in that small, small room of mine but I still wanted to hang something above that vintage folding chair to balance it out between the windows. So, I decided to make one of the most simple yet time-consuming pieces of art I’ve ever done. It’s basically layered torn paper adhered together with some double-sided tape. I already had a left over frame and picked up a kid’s art roll on my last (fingers crossed) trip to IKEA. Initially, I wanted to do something similar to this but then realized that the scale is what made that piece so cool. So instead, I channeled my design fundamentals year in art school and ended up with this.
What You’ll Need:
Picture Frame Drawing Paper RollDouble-Sided TapeMeasuring TapePencilDamp Washcloth
Step One: Measure the length of your frame. I used the 19″x27″ Ribba Frame from Ikea so my initial length is 27″ long.
Step Two: On your paper roll measure and mark with the pencil to 27″. Hot Tip: On the longer pieces it is best to measure & mark both sides for folding in the next step.
Step Three: Fold the paper to the marks and use the washcloth to make the fold damp. Reverse the fold and repeat with the washcloth on the other side. (FYI dampening of the paper makes it easier to tear)
Step Four: Slowly tear the paper along the damp crease. It doesn’t have to be perfect since the idea is to get the edge to look “frayed”.
Step Five: Repeat Steps 2 – 4. Reduce the length of the piece of paper by 1″ each time. By the end you should have papers that range from 27″ long all the way to one that is 1″ in length.
Step Six: Lay down the largest piece (27″) and then the 26″ piece on top of it. The smaller piece of paper should be even in the middle of the larger piece. They should overlap by 1/2″ on either side. Use a piece of tape on all four corners of the backside of each new piece of paper being laid down to secure it. Repeat the process until you have the 1″ strip paper in the very middle and on the top.
Step Seven: Frame and hang it!
Next up, another innovative GIY from our lovely EHD alum, Emily B:
Mixed Media
 photo by sara ligorria-tramp | from: emily bowser’s “refreshed for function” small living room makeover
At the end of 2019, Emily B. revealed her cozy living room which included three original artwork pieces above her sofa, created by none other than herself along with the help of Velinda, me and a couple of bottles of wine. This DIY art has no rules except for one, every time you contribute something to the paper you must shout “ART” and take a sip. So grab all those random pieces of paper, some string, paint and just have fun with it.
Polaroids
 left photo by tessa neustadt, from: sara’s living room reveal | right photo by sara ligorria-tramp, from: arlyn’s bright & happy rental living room makeover
If you have a ton of old Polaroids or old vintage photos in a shoebox under your bed (or high up in that closet), you can create a large and personal art piece like Sara and Arlyn did for their living rooms. Just make sure your photos are all the same size to create a perfect grid! And not to keep plugging this magical machine, but if you don’t have a bunch of polaroids handy and but want to create something like this with old photos from your photo then this printer is your answer.
We aren’t the only creative souls on the internet (duh), so we wanted to share some of our favorite seasoned DIYers and man do they have some ideas that we would love to recreate while we are all staying indoors. And actually I think some of us will this week…stay tuned:)
Dimensional Geometric
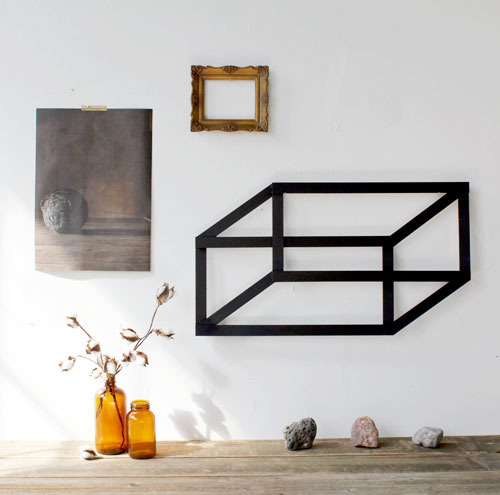 design by kate pruitt via design sponge
Our very own Mallory has been eyeing this 3D wall art DIY (we are big fans of nontraditional art) from Design Sponge for a long time now and is ready to give it a go this weekend. It’s made from balsa wood which was one of my favorite materials to use to build models in school since it’s so easy to use and doesn’t require any heavy machinery. I would love to see someone recreate this in a colorful version as well. 


Emily Henderson's Blog

- Emily Henderson's profile
- 10 followers

