
Assignment: Create a topographic mapset with CalTopo
For at least five years, CalTopo has been my preferred map-making platform, and I use it exclusively for personal trips, guided trips, and guidebooks. The service was launched in late-2011 by Matt Jacobs, and its functionality eventually matched and then greatly surpassed my prior go-to, National Geographic TOPO! desktop software, which has since been discontinued.
As part of our guided backpacking trips, clients are required to participate in an 8-part Planning Curriculum that prepares them for their trip and that can be retooled easily for their personal trips. We run the Curriculum in Google Classroom, but I’ve opted to share this map-making assignment here, since the formatting is more user-friendly and since it may have some public good.
Assignment: Create a mapset using CalTopo
This exercise will introduce you to the CalTopo functions that I use most often, and that other backpackers probably do, too. Like most software, mastery requires extensive use, so completing this assignment is more of a beginning than a mission accomplished.
If you can’t figure out some of the steps, refer to the CalTopo Knowledge Base or leave a comment. Our clients can also pose questions to their group in Classroom.
Activate your account
If you don’t already have a CalTopo subscription, you’ll need one.
Our clients are given a free 6-month PRO subscription, and redemption details are shared in Classroom. Thanks, Matt.
To complete this assignment as written, a BASIC account is required (currently, $20 per year). But a FREE account gets you most of the way there — in the final step, you’ll be limited to 8.5″ x 11″ sheets rather than my preferred 11″ x 17″.
1. Import a geographic file
In most cases you probably would start a map from scratch. But this assignment works better if I start you off with a partially constructed map.
Download this GeoJSON file, which has more CalTopo-specific code than a more standard and commonly used GPX file. If you are having download issues, you may have a Dropbox-blocking firewall.
Import the file into CalTopo, using the “Import” button in the top menu. Import all the data from this file.
Once imported, you will see part of two potential loop itineraries in the Indian Peaks Wilderness, which is in my backyard:
Pawnee-Buchanan Loop (aka Double Bypass), a 28-mile classic among trail runners and backpackers; and,Triple Bypass, which is my more adventurous variant of it and which is one of my eight recommended loop runs and hikes in the Front Range.
 After importing the file, your screen should look like this, except maybe for a different map layer.
2. Saving your work
In the upper-left panel, select “Save this map”.
Choose a map name. Personally, I name my maps by trip date (e.g. 2020-07 Yosemite, 2020-08 San Juans) so that they can be sorted in this order.
Save the map to your account. You need not change the share settings, but it’s worth pointing out that by default your map is publicly available. If you’re planning something top-secret or using proprietary data, it should be made completely private.
All edits hereafter will be auto-saved.
3. Map layers
Select “Forest Service 2016” from the available mapping/imagery layers, using the drop-down menu in the upper-right corner of the screen.
FS Topo 2016 is the best layer for the Indian Peaks Wilderness, and USFS lands in general. In many other areas, I use the “Scanned 7.5” layer, which has digital scans of the discontinued USGS 7.5-minute paper quads.
While you must select a single base layer for your printed maps, other layers can inform your route planning and map making. So utilize them.
4. Objects
Objects is the umbrella term for Lines, Markers, Polygons and other features that can be added to your name. They can be created and edited in several ways:
Select the Add button in the top menu;A left-click or right-click will generate a sub-menu; or,Use the pencil icon in the left pane.
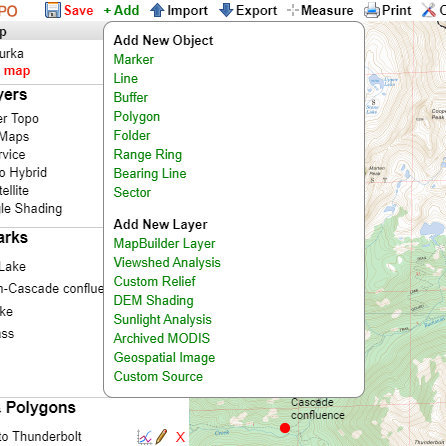 Top menu
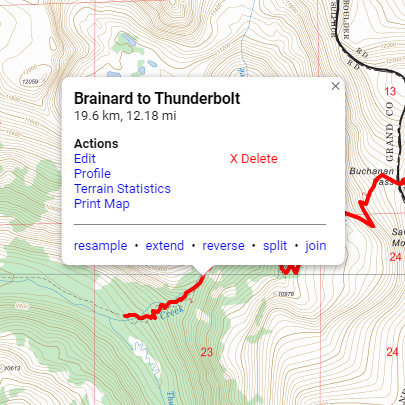 Menu after left-clicking on an object
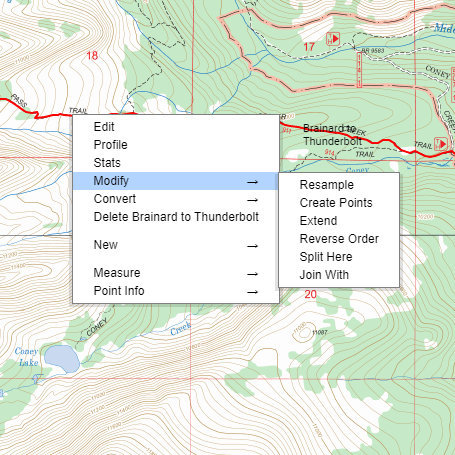 Menu after right-clicking on an object
4a. Lines
Select one of the two itineraries: Pawnee-Buchanan or Triple Bypass. In this step, you’ll close the loop between upper Buchanan Creek and Pawnee Lake.
The Pawnee-Buchanan Loop goes downhill to the confluence of Buchanan and Crater Creeks, and then uphill to the lake.Triple Bypass goes up Thunderbolt Creek and over Paiute Pass, and then drops precipitously to Pawnee Lake.
Extend the existing Line, “Brainard to Thunderbolt,” to Pawnee Lake. If you follow the trails, you can snap-to the underlying trail data; if you go off-trail, you’ll have to make your own route.
Join this extended Line with the other existing Line, “Pawnee to Brainard.” Note for the future: The join-to Line must have a name, or it will not show up as an option.
Rename the completed loop by its full name (i.e. Pawnee-Buchanan or Triple Bypass).
Add a Line to either Crater Lake or Point 12113, in the event you have time for a side trip. This Line could be integrated with your main loop using the split and join tools, but you can leave it as a standalone Line for the sake of this exercise.
4b. Vertical profile
Bring up the vertical Profile of your completed loop, using the left-pane or the line-click menus.
Keep the Profile open for the next step.
 Vertical profile for the Pawnee-Buchanan Loop
4c. Markers
Add a new Marker where you expect to camp each night. Specifically, use the “Tent” icon.
On night 1, identify a nice-looking spot around Mile 11.On night 2, stay at the obvious feature around Mile 19.5 (if you selected Pawnee-Buchanan) or Mile 15 (if you selected Triple Bypass).Name these Markers, “Night1” and “Night2” or similar.
Slide your mouse along the vertical Profile for mileage markers.
4d. Folders
Create a new Folder, and name it “Campsites.”
Move your campsite Markers into this Folder, out of the default Folder, named “Markers.” This can be done by:
Categorizing Markers (and other Objects, like Lines) when they’re first created;Editing them afterwards; or,In the left pane use the “Bulk Ops” feature, which is a huge time-saver when moving or editing multiple objects.
Un-select the Folder, “Lines & Polygons,” which will make its objects disappear, both on your current screen and in the upcoming print-view. For actual field use, you might want your Lines on the map, but I want to demonstrate that in CalTopo you can hide data to clean up the screen and your printed maps.
5. Print your mapset
Select “Print” from the top menu and then “Print to PDF or JPG.”
A new print-view window will open with print-specific options. Select:
11 x 17 paper1:24,000 scaleGeospatial PDF
Make a mapset of your entire route with two Portrait pages. Move the print windows over your route using the center red dot.
 The print-view. My settings are correct, but my map is incomplete.
When you’re ready, select the “Generate PDF” button. Your map set will load in another new window, with the loading speed depending on your internet connection, number of pages, and underlying geographic data.
Save the PDF to your local device, so that you can print it at home or upload it to FedEx Office Online (my pick). Clients should submit their PDF to Classroom for review.
Leave a comment
Where are you getting hung up, or what’s not clear?What other CalTopo functions — both basic and advanced — should be added to this assignment?
The post Assignment: Create a topographic mapset with CalTopo appeared first on Andrew Skurka.


