
Revision Mode in Scrivener

This week, in the #52WeeksOfScrivener series, we’re talking about Revision Mode: how to use it, what it’s good for, and how it differs from Word’s Track Changes.
To go into Revision Mode go to Format -> Revision Mode, and chose which revision you’re working on. We’ll start with First Revision.

After choosing First Revision, you’ll get a pop-up window explaining that you’re entering Revision Mode. Go ahead and click Ok.
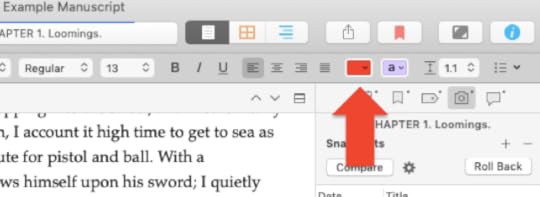
With a plea for Melville’s forgiveness, here’s what chapter one of Moby Dick looks like with some First Revision edits made (you can see they appear in red):

From what I understand, this is SUPER useful if you’re co-writing something with a partner. Because they can easily see what you’ve changed. Then they can go into Second Revision mode and all the changes THEY make will appear in blue. And so you can pass it back and forth easily.
A Few Things To Note
You can export the whole thing to Word with the colors intact by going to File -> Compile. Click form the drop down menu at the top to export to Word. Click the settings wheel. And then make sure that the check box for “remove all text color” is NOT clicked.

It is worth noting that Revision Mode is different from Track Changes in Word in one significant way: you don’t get the little balloon in the sidebar alerting you to where changes have been made, allowing you to accept or reject the change. If you use Word, this will look familiar:

That said, something you can do in Scrivener, that you can’t do in Word, is to save versions as you go.
Scrivener Snapshots
With Scrivener Snapshots, you can save a copy of your draft at any point, label it, and keep it safe for future reference (or to revert back to). Click here to read a detailed post on Snapshots.
Let’s say I’ve done two rounds of edits, the first in red, second in blue, and I have saved Snapshots before starting in on the second round. I can click on the saved version called First Revision in the snapshot menu and the click Compare.

In the Inspector Window, I will get something that looks a lot like track changes does in Word, so that I can review where changes were made:
Wrapping Up Revisions
When you’re all done revising, save a Sanpshot of your work and label it in whatever way will help you remember where you are in your process.
Then go to Format -> Revision Mode -> None.
Then Select All and click to change your font color to black:
You could also export it and check the box in the export settings to remove text color (see above).
Or, you know, just print it on a black and white printer.
Next Week
Next week we’ll talk a little bit about Scrivener’s Quick Reference Windows. Stay tuned, follow on Twitter with #52WeeksOfScrivener, or sign up for my newsletter to get a weekly digest of all my posts.


