
How to Create an Outline for Your Novel in Scrivener

Every year, we’re lucky to have great sponsors for our nonprofit events. Scrivener, a NaNoWriMo 2019 sponsor, is an award-winning word processor and project management program. Today, writer Rebeca Schiller shares some advice about creating an outline for your novel using their software:
I’m in a quandary. The issue is: do I pants my way through November, or do I outline?
Pantsing is fast, but you’ll discover lapses in story logic when you’re revising your manuscript. In my WIP, I’ve had to go back to the beginning several times and make changes because I realized a character’s action made no sense. Set-up, foreshadowing, and motivation had to be added in many early scenes.
This year I’ve decided to outline a new story just in time for NaNoWriMo. The key is to include enough detail so I can write it in one fell swoop, and when it’s time to revise the manuscript I can focus on prettying up the language.
To accomplish this goal, I’ll use Scrivener’s built-in outliner that, in theory, will help me spot my missing plot holes. Below are illustrated steps on how to create an outline using Scrivener:
Step 1: If you like the flexibility of creating your own structure, choose the blank template for your project. I like one that’s based on Alexandra Sokoloff’s Screenwriting Tips for Authors, which I wrote about on the Literature and Latte blog.

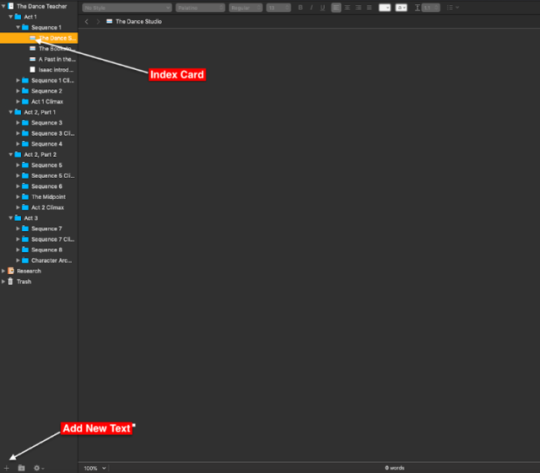
Step 2: After creating the structure, add documents in the first folder by clicking on the + icon found in the Binder’s footer. Next write a synopsis for each scene. The synopsis feature is found in the Inspector under the tab that looks like a notebook. Type in two or three sentences summarizing the scene in the synopsis pane. A small thing to notice: when you type in a synopsis, the blank document icon in the binder turns into an index card.
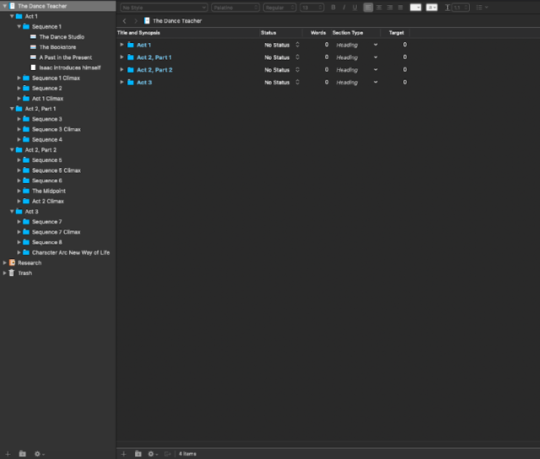
Step 3. In the binder select each scene, and then go to View->Outline where the editor pane will change, displaying a number of columns including Title and Synopsis, word count, section, target, etc. Personally, the only column that interests me for now is Title and Synopsis. New columns for POV label, Setting, Goal, Motivation, Conflict (the character’s), Setting, and Characters in Scene will need to be created.
Step 4. To create a POV using the label feature, go to the Inspector’s footer. Click on Label, a menu will open select Edit. A window will open providing the option to add a custom title, type in POV. Next to one of the tinted dots, double click, and type in the character’s name. Next to create custom columns in the Outliner, click on the arrow located on the far right; a drop down menu will appear, uncheck the columns you won’t use. At the very bottom, click on Custom Columns.

Step 5: A window will open. On the left select Custom Metadata. Clicking on the + icon on the right, type in a column heading. I’ve typed in Setting, Goal, Conflict, Motivation, Characters in Scene. Below that make sure “Text” is selected in the Type field; select left alignment and check word wrap. Hit OK when you’re done.

Step 6: Go back to where the columns are listed in the drop down menu, uncheck the ones you don’t want and check the ones you created. To fill in the fields, double click in the outliner and write your brief description.

Lastly, don’t let elementary school rules on how to outline get in the way of how you write your novel. For years, I followed what I learned in the third grade: I kept my main points brief, used keywords, but after I read through the material, I had no idea of what I was trying to articulate. This is your roadmap be as detailed as you need to be. Remember, its purpose is to help you write your story.


Chris Baty's Blog

- Chris Baty's profile
- 62 followers

