
Our (New-ish) Super Fast, Super Useful Design Process (for Non-Designers and Beginning Designers)
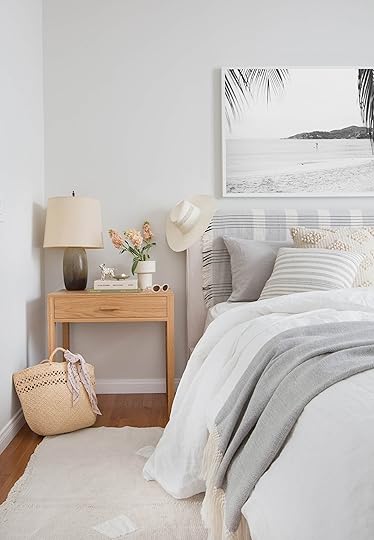 photo by tessa neustadt for ehd | from: 1 bedroom 4 ways with the citizenry
You can’t have “fast, cheap and good” in design. We all know that. At best, you get two out of the three and rarely is “fast” one of them. Often the design process truly is expensive and good, and layering in the word “slow” makes it even more expensive when you are working with a designer (who bills hourly). But for tomorrow’s makeover reveal (that one is a tearjerker so be sure to come back for it), we truly were able to do it in a month because we came up with a new fast process and once we realized how much time it saved us we, figured it was worth a post.
Here’s how it went down.
We only had a month between meeting the “client,” seeing the space and install/shoot of a master bedroom. That’s FAST. The clients (who you’ll hear more about tomorrow) were big readers, totally trusted us and yes, full disclosure, we had a special situation where our partner, VELUX Skylights, was covering the budget. So no, we are not in a normal design/client situation here, it’s more of a weird digital/social media fantasy, and it’s not a process that you can easily replicate.
HOWEVER, the process itself was totally eye-opening. It went SO much faster, and therefore if the client had been paying our hourly rate, the speed of it would have saved them SO much money. Now, this is not a process for a high-end designer/client situation, nor a renovation, but there are times when friends of mine are like “can you just come in and help and I’ll let you do whatever you want and pay for it.” Now I know the process that we’d do to speed it up, make us happy, and hopefully, no one goes insane—although they will still spend a decent amount. It’s true that a room that is full of unique pieces and very personal to the client will take much longer than this, so this process is more for the “I want my space to look pretty and pulled together, quickly, so I’ll let you do whatever you want” process. SUCH A DREAM.
So this post is more for non-designers that want to decorate more quickly or even better, beginning designers/decorators who don’t have a huge budget to spend on time/labor. Also, it’s one you can use on YOURSELF, even without a designer. Let’s walk you through it…
Step 1: See the space and take measurements.

This was our before which had a ton of potential, but just wasn’t pulled together or as functional as the homeowners wanted. This is a very typical “before” for us.
Step 2: Ask them the following questions:
How do you want it to “feel” when you walk in? Get them to throw out adjectives to help guide the design.
What are your functional needs?
What do you want to keep and what in here do you really want to lose?
Is there anything you really HATE? (Kristen HATED velvet, for instance, which we thought was hilarious).
What is your ideal budget (head to the bottom to see what we spent on this)?
Step 3: Use Pinterest to set up a visual language for easy referencing.
We ask almost all our clients (past and present) to create a pinboard before we talk so we have a visual language to reference. I once told a client, on a budget, that if he wants to save time on our hourly design fee that it would behoove him to pin as much as possible so we are doing less guesswork and thus billing fewer hours. He said “WAIT, You bill for that?” and I said “Of course, so to save money you should spend at least a few hours pinning” and he said “But I’m busy, I don’t have time,” which we found hilarious. I politely told him, it’s either his time that’s free or mine that you pay for—you choose. Oh, the undervaluation of design work.
Having a visual reference of what you like is SO important. We had asked Kristen and Raeann to do this and this is an edited down set that gave us the general vibe they were drawn to.
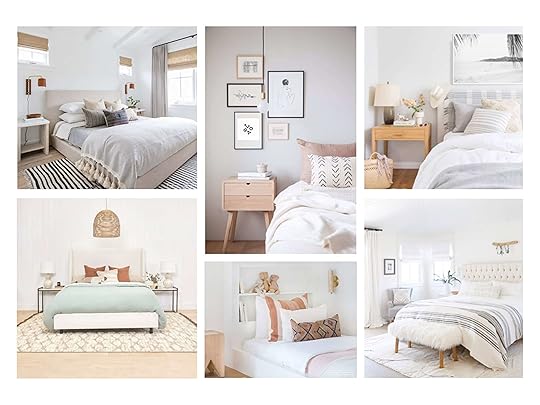 clockwise from the left: image via amber interiors | image via etsy | from: 1 bedroom 4 ways with the citizenry | image via domino | image via amber interiors | image via lulu and georgia
It’s crucial to then go through each pin and ask what they loved about it, what drew them to pinning it. We then take out the ones that feel off because maybe they pinned them just because they liked the symmetry and not the look and feel. So you have to communicate, you can’t just take a pinboard on face value.
Step 4: Sketch out simple measurements and, if you have the skills, create renderings and floor plans before you shop.
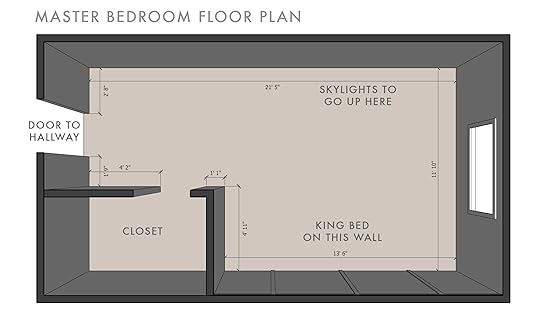
With a rough floorplan with measurements, you can plug in major pieces like bed/nightstands/dresser and rug to ensure that they actually fit. We used SketchUp (well, Julie did), but you definitely do not need that. You also don’t need to worry about plotting out little details just yet like individual pillows, just making sure that the large pieces fit is the most important part here. You could do this with a simple ruler, pencil and graph paper.
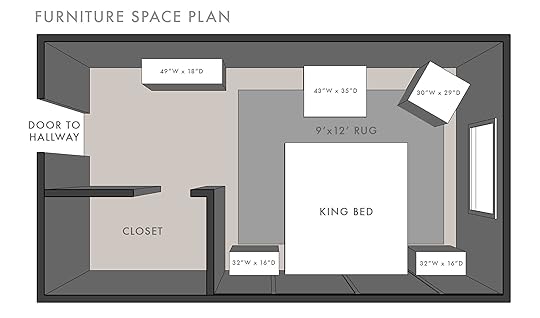
We blocked out the general areas where we knew we’d put certain pieces as well as some ideal dimensions (above), but obviously, that could end up changing as the final pieces may have slightly different dimensions.
Step 5: Create individual boards with pieces that are available in their style and budget.
Okay, this is what we did that was special: We didn’t pull together mood boards until we gave them some options on major pieces that we asked for feedback from. We asked them to “X out” anything they HATED and heart their top 3-4 choices per category to get a sense of what were hard passes and what they were drawn to.
KING BEDS
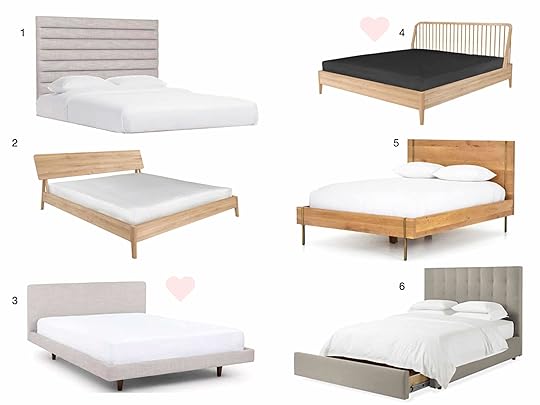
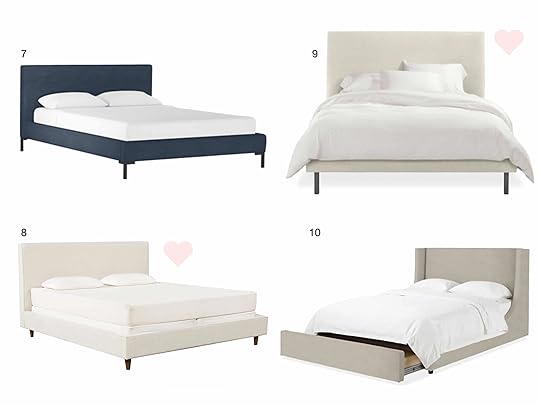
1. Sera Headboard | 2. Andie Platform Bed | 3. Tessu Bed | 4. Dellah Spindle Platform Bed | 5. Karma King Bed | 6. Avery Upholstered Bed | 7. Deva Linen Platform Bed | 8. Dean Sand Eastern King Bed | 9. Ella Bed | 10. Marlo Bed
We asked them to do this for every major category. This really helped us understand what our options TRULY were. Some of these were affordable (like a king bed for $450) and some were a couple thousand. None were insane, but it’s true that we were more focused on “fast and good” than budget.
RUGS
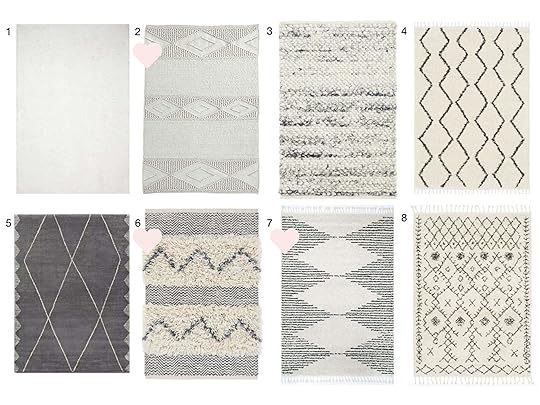
1. Mil-01 White Rug | 2. Macramé Wool Rug | 3. Cobblestone Woven Wool Rug | 4. Nadia Rug | 5. Glacier Diamond Rug | 6. Zags Denim Woven Wool Rug | 7. Rachel Tufted Rug | 8. Naimee Rug
NIGHTSTANDS
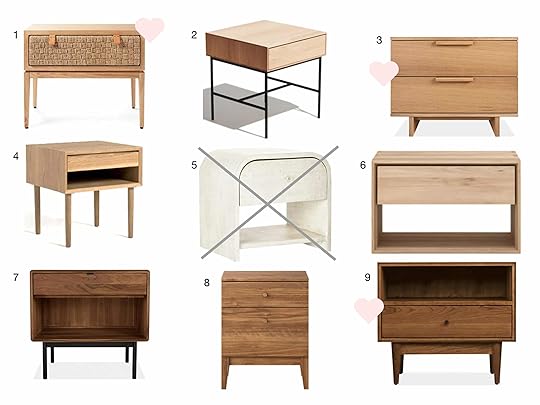
1. Caledonia Woven Nightstand | 2. Loring End Table | 3. Ashby Nightstand | 4. Franny Nightstand | 5. Archer Lacquered Nightstand | 6. Oak Nordic II Bedside Table | 7. Hensley Nightstand | 8. Siegel Nightstand | 9. Grove Wood Nightstand
DRESSERS
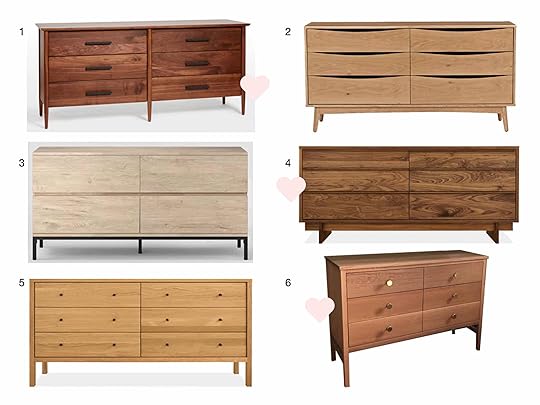
1. Shaw Walnut Dresser | 2. Culla Dresser | 3. Loring Dresser | 4. Anton Dresser | 5. Emerson Dresser | 6. Custom Dresser by Hedge House Furniture
ACCENT CHAIRS
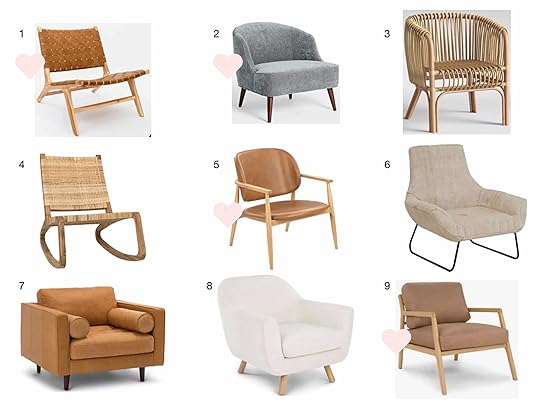
1. Tanner Armchair | 2. Ruxby Chair | 3. Isabella Rattan Chair | 4. Mariposa Chair | 5. Levo Chair | 6. Slide Chair | 7. Sven Chair | 8. Gabriola Chair | 9. Denman Chair
It was such a fast and fun process. They didn’t overthink it (again, probably because true money wasn’t being exchanged) and it felt so fluid. Since everything was in our cohesive style, we knew that we could mix and match to a degree. We could take what they liked/loved and start playing with them on boards to see what would turn into a beautiful room that worked well design-wise. We still had to consider scale, texture, color, wood tones, fabric tones, patterns, etc. But we felt free to be creative in a way that made things so fast.
So Julie started pulling together said boards to show me (not the client, at this point, we had carte blanche, plus it was supposed to be a surprise):


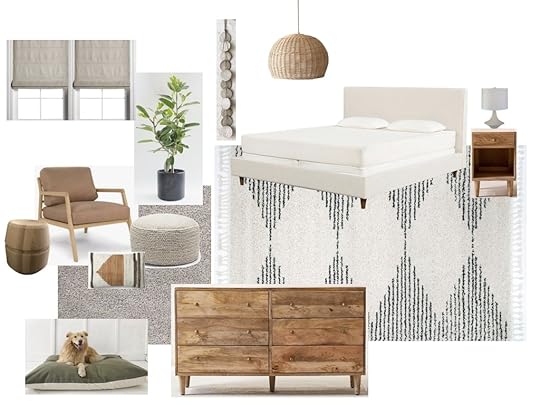
Since the reveal is tomorrow, we are NOT going to show you the final board. 


Emily Henderson's Blog

- Emily Henderson's profile
- 10 followers

