
Design Mistakes: 5 Lessons From the Portland Project (i.e. How We Could Have Saved A LOT OF MONEY)

The which we recently wrapped all the reveals for, was meant to be an investment property (okay fine, a “flip”) that we would renovate, design, sell and then, well, I didn’t go to business school but I think the idea was to profit. There is good news and bad news. The good news is that my brother and I loved working together and are even still speaking! The other good news is that I learned SO MUCH. So many lessons. All day, every day I would say “okay, well that’s a new lesson” but a lot of them were very expensive lessons to learn. I cost us a lot by making big mistakes and choosing to do some more custom (and therefore expensive) things to the house that no one would EVER do in a flip. I’ve said it before and I’ll say it over and over until I die: this is not your typical flip, it was a show house for me and never meant to be “budget”. It simply couldn’t be for the neighborhood it was in. So do I regret doing any of those extra custom things? NO! But I could have saved my brother some money by 1. Being more careful with my mistakes and 2. Knowing some pretty important things about major renovation costs.
So this post is talking about the things we could have done differently to save money and the general lessons that I learned about renovation that I think you should all know to help save you in your renovations.
1. “Cutting” is your real cost.
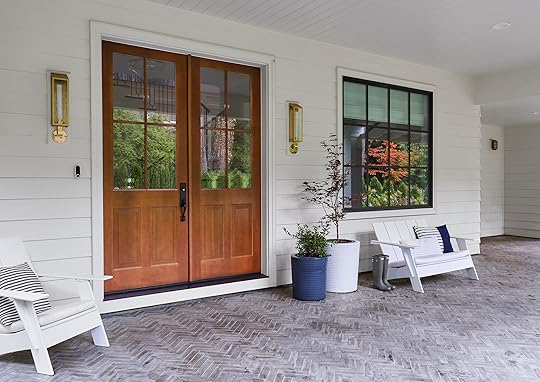 photo by sara ligorria-tramp for ehd
It almost rarely matters what your materials are, but rather how custom you make them that affects labor and labor is the real cost of a renovation. Every single cut that a subcontractor makes costs you money. Let’s talk about the tile in the patio (above). It’s GORGEOUS and, of course, if I were moving in here I wouldn’t change a thing. But for an investment property, I cost us SO much time by choosing to herringbone it instead of a stack or stagger. Why? That front patio was huge and the border around the entire thing had to be cut perfectly at an angle. Hundreds of tiles had to be cut to make the border flush. (and every time you cut, you risk breaking tile, too, which just means another cut and, of course, waste). This patio took WEEKS to tile. WEEKS. We could have saved so much money in labor had we just stacked it—or hell, built a wood deck. Now, am I suggesting to stack or stagger instead of herringbone always and forever? Not necessarily, I love how it looks very much, just know that it can drastically change the cost of the labor so just make sure it’s worth it to you and be prepared for what it will cost. (I did however just see a herringbone floor tile recently where the right angles mimic the square shape of the patio, essentially eliminating the angled cuts around the border if it’s in the shape of a rectangle, so just know this does exist as an option if you like the look but don’t want to/can’t allocate the budget to it).
Need another example? All the moulding and paneling costs. There is a reason why less expensive new builds or a lot of flips don’t have crown moulding—it’s not the material that is expensive, it’s the—YEP—cost of cutting it. We chose to double stack the baseboard in here to give it an extra 10″ step and be thicker and BOY did it look stunning. But that’s double labor time. Every time they had to cut something they have to measure, go outside, grab the wood, cut it, bring it in, realize it’s slightly off (maybe) go back outside, re-cut, bring it back in, etc. MAYBE they are doing this inside if there is space, but for tile it’s always outside due to mess so just the back and forth is such a time suck.
 photo by sara ligorria-tramp for ehd | from: the portland entry and foyer reveal
I didn’t just stop there with the paneling and the special baseboard…
 photo by sara ligorria-tramp for ehd | from: the portland media room reveal
We did a special treatment to the ceiling of the media room and the walls of the rumpus room because I LOVE wasting money, evidently.
 photo by sara ligorria-tramp for ehd | from: the portland rumpus room reveal
Would I have done it differently if it were my home? NO. I LOVE IT. But for an investment property/flip it certainly cut into the potential to profit. (Again, the intent of this house for me wasn’t to make a ton of money. It was a portfolio project so I’m very glad it looks the way it does, but I now know where all the profits disappeared to: custom cuts, at my request). Do I think that doing these things helped the overall price of the house and helped create more of an emotional sale? Not as much as I had hoped.
2. Smooth coat walls cost a fortune.
If I could go back in time, I ABSOLUTELY would have saved money on this. If only I knew then what I know now: that there are more options than just smooth coat and texture spray. Okay, let me explain. Get yourself some coffee because this is about to get really boring unless you are about to renovate.
Dry wall is installed in panels over framing that then have to be mudded and taped next to each other, which is messy and has seams, etc. You either need to mask the imperfections (plaster, spray texture) or smooth them out and make them perfect. Making it smooth is EXTREMELY LABORIOUS WHICH MEANS EXPENSIVE. I can’t boldly capitalize that enough. Plastering can be expensive and is also a particular look that we weren’t going for (although it’s so trendy right now). So I fought HARD with NO room for negotiation to smooth coat the main level, the master bedroom and all the bathrooms. I let the media room and the guest bedrooms be sprayed with texture. So was it worth it?
This is the smooth coat of the living room:
 photo by sara ligorria-tramp for ehd | from: the portland living room reveal
This is the orange peel in the downstairs bedroom:
 photo by sara ligorria-tramp for ehd | from: 14 rules for how we style the perfect bedroom
They look mostly IDENTICAL in photos. In person, there is a difference and yeah, I’m glad the main level isn’t orange peel texture but I wish I had known that we could do what we did in the (a light hand-applied plaster over rolled paint).
This isn’t something we knew before and our contractor up at the mountain house was like “there’s not really a name for it, it’s just kinda messy paint and plaster together.” They tape, mud and clean up as much as they can then roll the paint and then go back afterward with the slightest big of plaster with a trowel and just kinda mess up the wall to make everything more forgiving. It’s like putting on thicker primer and foundation on your face, instead of getting a facelift. You still see the wrinkles but it actually looks good, and it’s FAR less expensive.
WHY AGAIN IS IT SO EXPENSIVE? Because it has to be professionally done. EVERY SINGLE TIME you have to alter anything, you have to bring in a drywall team to fix it, rather than just a painter or project manager touching it up. If you decide to move an outlet? You have to call them. If you decide to change the location of a sconce? Them again.
I literally just wrote 860 words about “smooth coating your drywall” and I’m sure most of you have fallen asleep at your laptop/with smartphone in hand, but I hope this PSA saved some of you the $20k that we could have saved by not smooth coating this house.
Yes. We think the difference would have been roughly $20k due to changes and patching (plus, Ken reminded me that we did smooth coat under all the paneling in the lower level because we didn’t know at the time we were going to do pretty wood work on the walls at the time, so that doesn’t help). So that’s cool. Sorry Ken/Katie.
3. Order windows first.
 photo by sara ligorria-tramp for ehd | from: the portland master bedroom reveal
In my next book, we are outlining the order in which to think about and order things (again, writing the book I wish I had during these renovations) but please just know that windows typically have a very long lead time and will hold up your entire project.
Why can’t the other projects keep going without the windows in? Because while you have them planned out and framed, there are likely some tweaks and therefore installing them before you close up the walls is easier, cleaner and just more ideal to make the frames of them clean, right, perfect, etc.
4. Do a walkthrough with your contractor before you close up all walls.
Again, not being there was a real bummer because junction boxes for sconces got placed that were totally wrong and strange, outlets and light switches got installed not knowing that we had already ordered a 5″ door casing (and thus almost all of them had to be moved), plumbing for our wall-mounted faucets was wrong (not centered over the sinks!). But drywall went up anyway. So, over the course of those months, we realized that so many things had to be moved, and it’s much easier to move them pre-drywall than after (also if I haven’t told you the story yet about how expensive it is to repair smooth coat drywall????).
Also hot tip: take photos and video of the inside of your walls before you close them up. You will want to know the guts of the house, what lies behind the walls and, if you can, even take measurements and draw things out on a photo of the inside of the walls so you know where everything is after you forget years later.
5. Let your expert subs give advice…and TAKE IT.
 photo by sara ligorria-tramp for ehd | from: the portland living room reveal
For example: The electricians recommended where to put the sconces early on, but the project manager we had on the project at the start had a different plan and insisted on the placement. Well, guess what? We had to end up moving almost all of them (hello smooth coating labor costs). Sometimes, you think you know best in the name of “style” but if this is your first(ish) rodeo, keep your ears open and humble yourself enough to listen.
Here’s a follow-up tip: allow for extra electrical wire in case you have to move anything, this way you don’t have to rewire anything, move the junction boxes, etc.
Honestly, I could probably keep going, but outlining the key takeaways and mistakes that might help you or apply to a renovation you guys might be doing or have on the horizon was the focus here. I could tell you about the mistake windows in the kitchen, or the fireplace in the master bedroom that could have been designed much more simply (hence saved money), but I’ll stop here for now and turn it over to you.
You guys seem to be knowledgeable and experienced in so many different home areas so tell me: what else have you learned the hard (read: expensive) way that you’d want to share with your pre-renovation self to save time, money, frustrations, tears, relationships?
The post Design Mistakes: 5 Lessons From the Portland Project (i.e. How We Could Have Saved A LOT OF MONEY) appeared first on Emily Henderson.


Emily Henderson's Blog

- Emily Henderson's profile
- 10 followers

