
Before & After: How We Took a $20 Thrifted Chair & Made it Cool Again

Earlier this year, when we did our reader survey, literally thousands of you begged us to do more simple projects (or what we call internally “micro projects”). You also requested in hoards that we do more vintage and second-hand-focused blog posts so that’s what we’re here for today, folks. Double whammy. You might have noticed that I’ve been deep in the thrifting and flea market-ing game lately (hope you didn’t miss this past Saturday’s post) partly as a result of what you guys asked for but mostly because it’s ALL I actually ever want to do.
So today, we’re trying something different we hope you’re into. We picked up that safari chair up there for $20 last month at the St. Vincent de Paul of Los Angeles thrift store because that is a steal of a deal. Sure, the high-gloss cherry finish on the frame screamed 2002 and made the black canvas seat and back look faded and dingy (which, to be fair, it was…nothing a little wash couldn’t fix, though), but it was in great shape and pretty clean…it just needed a little kick in the tush in terms of style and bringing it into 2019.
[image error]
Did I mention this was $20?!? For a chair that, in the right finish, could go for at least a few hundred in a retail boutique in LA? I’m no chump. So it came home with me and myself and Emily Bowser from my team helped to give this lady a refresh. We love a good cheap makeover around here.

It was a pretty simple process (which is outlined below), and in my usual fashion, there were some mistakes made that we learned from along the way and will share with you. But ultimately, we just hope seeing what can be done with a little vision, a little cash and a little sanding/staining will make you want to run out this weekend and see what you can find to make your own. I’m your official flea market and thrift store ambassador…just go hunt. You never know what you’ll find or what you can turn it into. Okay, PSA over. Let’s get into how we rehabbed this baby and what everyone wants to see…the “after.”
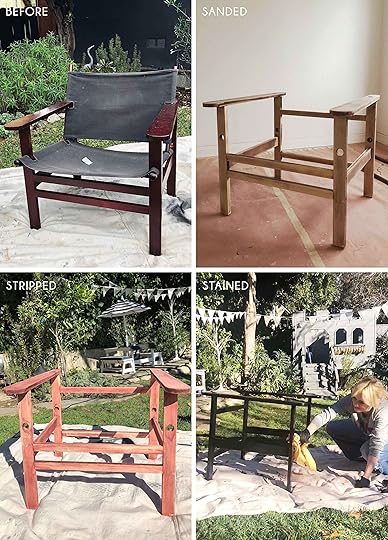
Step 1: Find a chair that has solid bones-slash a silhouette you’re into. If this is your first DIY rodeo, we don’t recommend spending a fortune here, so the twenty buckeroos I spent on this felt like a worthy investment should things go south (though I’ve done this enough, I knew it wouldn’t).
Step 2: We knew we wanted to get rid of that shiny cherry finish, so we went to town sanding the frame once we took it apart. (Quick note: take pictures of the process of taking something like this apart because it was actually a little bit of a puzzle putting it back together, more than you would think). We used 100 grit sandpaper for the bulk of the job and finished it with a finer 220 grit we put on my trusty DeWalt orbital sander. For the harder to reach areas, we used angled sanding blocks. Definitely use face masks and protective glasses! Was there purple-y dust everywhere during the process? Yes, but we persevered because we were confident in the final prize of a rad chair. We sanded…and sanded…and sanded.
Step 3: You might see this photo and think…”wait, why is this all of a sudden a weird red? Did someone spill their Kool-Aid all over perfectly sanded wood?” No my friends, we just couldn’t leave well enough alone. The purple tone persisted so we decided to try a paint stripper. In theory, this should have worked. We used a paintbrush (make sure you wear protective mask, glasses and gloves!) to apply and let it sit overnight, knowing this situation was INTENSE. In the morning, we used a scraper to remove the stain and remove it did…except somehow it was worse?? It was even more purple. Here is the part of the post where I say DO AS I SAY NOT AS I DO. Maybe we needed to do it a few times, or maybe the wood was too raw, or maybe this wood was just TOO stained?? This whole step could have been skipped. Just go straight from sanding to staining (well, wipe down after sanding, of course, to reduce sawdust).
Step 4: Stain that puppy. Stain it dark enough to cover any undertones, like, literally stain it black. We used Minwax Ebony which required two coats. I highly recommend you do this outside because of the fumes and definitely put down a cloth to avoid transferring black onto everything you own. Wear nothing precious, protective glasses, face mask, oh, and WEAR GLOVES unless you want black fingertips for two weeks. Also, as we were doing this, Emily Bowser and I kept saying “wait, why don’t we stain things more” as in, instead of painting. We will forever just stain everything black now. You’ve been warned.

There are a few more steps you’re not seeing in the last grid (we had to take the chair apart to fully sand, strip and stain the dowels that held the canvas seat and back, plus we cleaned the canvas which left it looking worn but in a cool, purposeful way), including the moment between stripping the wood and staining it where we thought maybe we’d leave it oak colored, but it was just too pink. Hence why we stained the whole frame black, and we’re happy we did, because here’s the finished product…

Maybe we’re all biased, but no one here thinks this looks like a $20 chair…what do you think? It could ABSOLUTELY be at least $300…so if you think about it, we just saved $280…that’s how it works, right?!? Styled in this corner of my living room, with my new antique oil lady, it’s such a cool juxtaposition. Throw in an ottoman for ultimate lounging, and you’ve got yourself a little reading/podcast listening nook. (Oh, and for anyone who might ask, the dress is vintage and these are my absolute new favorite sneaker).
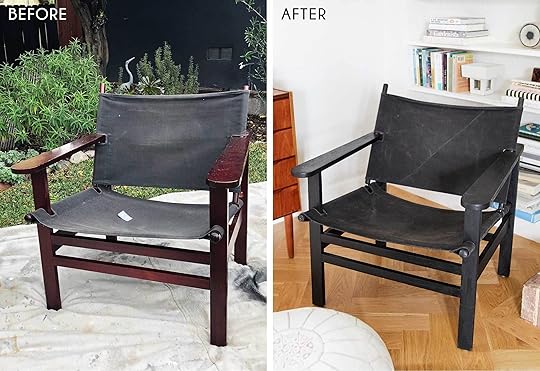
Here is the before and after side by side because that’s the real fun in these kinds of projects. Like seeing a poorly lit frowning face next to a professionally photographed and made up face advertising a “miracle” serum in a late night infomercial. Except there’s no asterisk here or trick of the eye. Just a genuine refresh of something that was already pretty great…a make-under really.
Thanks to Emily Bowser for helping throughout the process, and like I said earlier, I hope you’re inspired to get your hands busy in the near future with a thrifted treasure. Have fun, and tag us using #ShowEmYourDIY if you finish something this weekend.
The post Before & After: How We Took a $20 Thrifted Chair & Made it Cool Again appeared first on Emily Henderson.


Emily Henderson's Blog

- Emily Henderson's profile
- 10 followers

