Cacao Bliss Balls
Chocolatey bliss balls are the best little sweet treats! These amazing chocolate almond bliss balls are vegan and paleo, and made with healthy ingredients like dates and cacao. 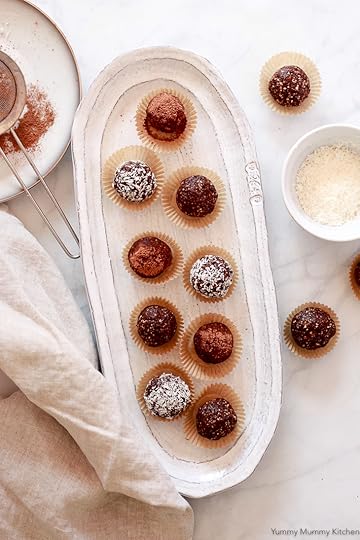
I love to prep healthier natural treats to keep us nourished on busy days. I was about to make my raw brownie energy bars and got out all the ingredients, when I decided to make bliss balls instead. I'm not sure who first coined the term "bliss ball" but I just adore it. We could all use a little bliss now and then, couldn't we? If it comes in the form of a naturally sweet little bite of goodness I'm all for it. What are bliss balls? Bliss balls are basically a sticky sweet concoction of nuts and dates blended together using about a 1 to 1 ratio. From there the bliss balls can be flavored any way you like. Cacao powder is my favorite bliss ball addition because it makes them chocolatey, but there are many other flavor combinations you could go with. Matcha, mint, pistachio, lemon, cinnamon, and coconut are just a few ingredient ideas that come to mind. Which bliss balls should I make next?

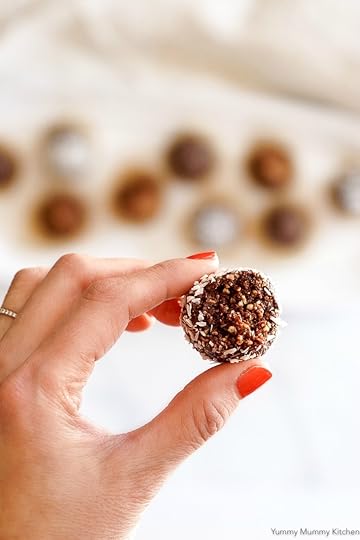
These cacao almond bliss balls are the favorite flavor in my family. They taste a bit like little brownie bites with some crunchy little bits of nuts. I added hemp hearts to this batch for even more protein and omegas. Pitted dates give these bliss balls their sweetness while also binding the mixture together. I've found that some packages of dates have more moisture than others. When using drier dates, you may need to add a little water to hold everything together. You can find dates in the nut section of most grocery stores, especially natural foods stores. You can buy dates already pitted, or pit them yourself. Interestingly, the pitted dates at my grocery store were less expensive than the whole dates. Be very careful you don't leave any date pits in, as they can create very sharp little pieces when blended.
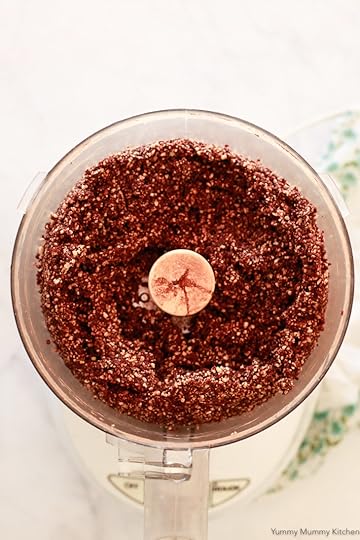
A food processor is the best tool for this job. Pulse the ingredients until the mixture holds together when pressed. A few drops of water, coconut oil, and/or maple syrup can help if it's not holding. Don't over blend because the crunchy nut pieces add delicious texture.

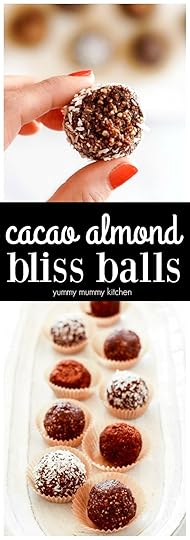
Yummy Hubby and I like these bliss balls best coated in coconut shavings, while the girls like them best plain.
 Aren't these bliss balls cute? It's so nice to have a batch in the fridge for times when we need a quick snack or to satisfy a chocolate craving. I hope you enjoy these! Don't miss the short video to see how it's done!
Here are a couple of ingredients you may need (Amazon affiliate links):
Yield: about 20 ballsAuthor: Yummy Mummy KitchenPrint Recipe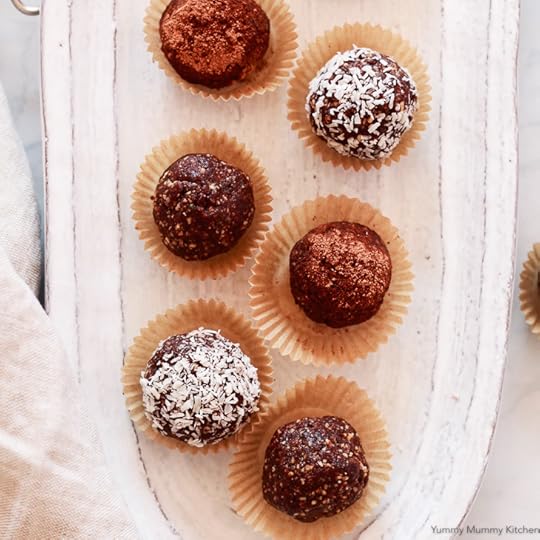 Cacao Almond Bliss BallsChocolatey almond bliss ball energy bites are a delicious healthier treat. Keep them in the fridge for whenever you need a sweet little snack.prep time: 10 MINScook time: total time: 10 minsingredients
1 1/2 cups roasted, unsalted almonds1 1/2 cups pitted dates1/3 cup unsweetened cacao/cocoa powder1/3 cup hemp hearts1/2 teaspoon Himalayan or sea salt 1 teaspoon pure vanilla extract instructions
Place all ingredients in the bowl of a food processor and pulse until nuts are ground and no chunks of dates remain. Squeeze the mixture between your fingers. If it holds together, roll into balls. If not, add a tablespoon of water and pulse again until it does hold together. The stickiness and moisture in dates can vary, so you may need more or less water. notes*You can make your bliss balls extra fancy and fun by rolling them in cacao powder or coconut shavings.
* Nutrition information is approximate and calculated by a third party app for 1/20 of the whole recipe.calories
104fat (grams)
5sat. fat (grams)
1carbs (grams)
13protein (grams)
3sugar (grams)
9http://www.yummymummykitchen.com/2018/01/bliss-balls.htmlCreated using The Recipes Generator.recipe-inner{text-align:left;max-width:620px;border:6px double #009BFF;padding:20px;background:#f2f2f2;margin: 40px auto;font-family:Lato, sans-serif;}.recipe-inner a{color: #4193f0;}#recipe .recipe-name{font-size: 21px;}#recipe .info{font-size:13px;text-transform:capitalize;border-bottom:2px solid #000;padding-bottom:7px;margin-bottom:20px}.info:after{content:'';display:table;clear:both}#recipe .info span:first-child{margin-right:30px}#printbutton{border:0;margin:0;color:#fff;float:right;background:#555; padding:5px;border-radius:3px;cursor:pointer}#recipe .time{text-transform:uppercase;font-size:12px;text-align:center;background:#fff;padding:15px 0;margin-bottom:20px}#recipe .time span:not(:last-child){margin-right:12px}#recipe .time span:not(:last-child):after{content:'';display:inline-block;height:10px;width:1px;background:#000;vertical-align:middle;margin-left:12px}#recipe .summary{line-height:1.7;font-style:italic}.ingredients{line-height:1.7;clear:both}.ingredients h3,.instructions h3,.notes h3{font-size:20px !important;font-weight:400 !important;margin-bottom:0;color:#000;text-transform: uppercase;}.ingredients ul{margin:0!important;margin-top:5px !important;}.instructions li{margin-bottom:15px !important;line-height:1.6;text-align:left;}.ingredients li{text-align:left}#recipe .instructions{margin-top: 30px;}#recipe .instructions ol,#recipe .instructions ol li {list-style:decimal !important;}#recipe .instructions ol{padding-left:39px;margin:0!important;margin-top:6px !important;}.posturl{border-top:1px solid #ccc;padding-top:10px;}.ing-section{padding-left:20px;margin: 10px 0;}.ing-section > span{font-weight:700}.recipe-credit{font-size:13px;border-top: 1px solid #ccc;padding:10px;text-align:center;background:#ffffff;margin:-20px;margin-top:15px;}.recipe-credit a{color:blue;text-decoration:none;}.copyright-statement{font-size: 13px;font-style:italic;border-top: 1px solid #ccc;margin-top:15px;padding-top:15px;line-height:1.6;}.notes pre{font-size: 15px;margin: 10px 0;padding-left: 20px;font-family: inherit;line-height: 1.7;white-space: pre-line;}.notes h3{margin: 0}.nutrition-info{font-size: 0;margin: 20px 0;padding: 10px;background: #fff;}.nutrition-info>div {display: inline-block;font-size: 14px;width: 20%;text-align: center;}.nutrition-info>div:nth-child(5) ~ div{margin-top: 20px;}.nutrition-info>div p{margin-top: 0;margin-bottom: 7px;}#recipe .info{position:relative}#recipe .image{text-align:center;margin:25px 0}#recipe .image img{max-width:100%;width:150px;height:150px;-o-object-fit:cover;object-fit:cover;border-radius:150px}#recipe .recipe-name{margin-top: 20px;text-align:center}#recipe .summary{margin:20px 0;clear:both;line-height:1.7;font-style:italic}#recipe .time{clear:both;border-top:1px dotted #000;border-bottom:1px dotted #000;border-right:0;border-left:0}


I love to prep healthier natural treats to keep us nourished on busy days. I was about to make my raw brownie energy bars and got out all the ingredients, when I decided to make bliss balls instead. I'm not sure who first coined the term "bliss ball" but I just adore it. We could all use a little bliss now and then, couldn't we? If it comes in the form of a naturally sweet little bite of goodness I'm all for it. What are bliss balls? Bliss balls are basically a sticky sweet concoction of nuts and dates blended together using about a 1 to 1 ratio. From there the bliss balls can be flavored any way you like. Cacao powder is my favorite bliss ball addition because it makes them chocolatey, but there are many other flavor combinations you could go with. Matcha, mint, pistachio, lemon, cinnamon, and coconut are just a few ingredient ideas that come to mind. Which bliss balls should I make next?
These cacao almond bliss balls are the favorite flavor in my family. They taste a bit like little brownie bites with some crunchy little bits of nuts. I added hemp hearts to this batch for even more protein and omegas. Pitted dates give these bliss balls their sweetness while also binding the mixture together. I've found that some packages of dates have more moisture than others. When using drier dates, you may need to add a little water to hold everything together. You can find dates in the nut section of most grocery stores, especially natural foods stores. You can buy dates already pitted, or pit them yourself. Interestingly, the pitted dates at my grocery store were less expensive than the whole dates. Be very careful you don't leave any date pits in, as they can create very sharp little pieces when blended.
A food processor is the best tool for this job. Pulse the ingredients until the mixture holds together when pressed. A few drops of water, coconut oil, and/or maple syrup can help if it's not holding. Don't over blend because the crunchy nut pieces add delicious texture.
Yummy Hubby and I like these bliss balls best coated in coconut shavings, while the girls like them best plain.
Aren't these bliss balls cute? It's so nice to have a batch in the fridge for times when we need a quick snack or to satisfy a chocolate craving. I hope you enjoy these! Don't miss the short video to see how it's done! Here are a couple of ingredients you may need (Amazon affiliate links):
Yield: about 20 ballsAuthor: Yummy Mummy KitchenPrint Recipe
Cacao Almond Bliss BallsChocolatey almond bliss ball energy bites are a delicious healthier treat. Keep them in the fridge for whenever you need a sweet little snack.prep time: 10 MINScook time: total time: 10 minsingredients1 1/2 cups roasted, unsalted almonds1 1/2 cups pitted dates1/3 cup unsweetened cacao/cocoa powder1/3 cup hemp hearts1/2 teaspoon Himalayan or sea salt 1 teaspoon pure vanilla extract instructions
Place all ingredients in the bowl of a food processor and pulse until nuts are ground and no chunks of dates remain. Squeeze the mixture between your fingers. If it holds together, roll into balls. If not, add a tablespoon of water and pulse again until it does hold together. The stickiness and moisture in dates can vary, so you may need more or less water. notes*You can make your bliss balls extra fancy and fun by rolling them in cacao powder or coconut shavings.
* Nutrition information is approximate and calculated by a third party app for 1/20 of the whole recipe.calories
104fat (grams)
5sat. fat (grams)
1carbs (grams)
13protein (grams)
3sugar (grams)
9http://www.yummymummykitchen.com/2018/01/bliss-balls.htmlCreated using The Recipes Generator.recipe-inner{text-align:left;max-width:620px;border:6px double #009BFF;padding:20px;background:#f2f2f2;margin: 40px auto;font-family:Lato, sans-serif;}.recipe-inner a{color: #4193f0;}#recipe .recipe-name{font-size: 21px;}#recipe .info{font-size:13px;text-transform:capitalize;border-bottom:2px solid #000;padding-bottom:7px;margin-bottom:20px}.info:after{content:'';display:table;clear:both}#recipe .info span:first-child{margin-right:30px}#printbutton{border:0;margin:0;color:#fff;float:right;background:#555; padding:5px;border-radius:3px;cursor:pointer}#recipe .time{text-transform:uppercase;font-size:12px;text-align:center;background:#fff;padding:15px 0;margin-bottom:20px}#recipe .time span:not(:last-child){margin-right:12px}#recipe .time span:not(:last-child):after{content:'';display:inline-block;height:10px;width:1px;background:#000;vertical-align:middle;margin-left:12px}#recipe .summary{line-height:1.7;font-style:italic}.ingredients{line-height:1.7;clear:both}.ingredients h3,.instructions h3,.notes h3{font-size:20px !important;font-weight:400 !important;margin-bottom:0;color:#000;text-transform: uppercase;}.ingredients ul{margin:0!important;margin-top:5px !important;}.instructions li{margin-bottom:15px !important;line-height:1.6;text-align:left;}.ingredients li{text-align:left}#recipe .instructions{margin-top: 30px;}#recipe .instructions ol,#recipe .instructions ol li {list-style:decimal !important;}#recipe .instructions ol{padding-left:39px;margin:0!important;margin-top:6px !important;}.posturl{border-top:1px solid #ccc;padding-top:10px;}.ing-section{padding-left:20px;margin: 10px 0;}.ing-section > span{font-weight:700}.recipe-credit{font-size:13px;border-top: 1px solid #ccc;padding:10px;text-align:center;background:#ffffff;margin:-20px;margin-top:15px;}.recipe-credit a{color:blue;text-decoration:none;}.copyright-statement{font-size: 13px;font-style:italic;border-top: 1px solid #ccc;margin-top:15px;padding-top:15px;line-height:1.6;}.notes pre{font-size: 15px;margin: 10px 0;padding-left: 20px;font-family: inherit;line-height: 1.7;white-space: pre-line;}.notes h3{margin: 0}.nutrition-info{font-size: 0;margin: 20px 0;padding: 10px;background: #fff;}.nutrition-info>div {display: inline-block;font-size: 14px;width: 20%;text-align: center;}.nutrition-info>div:nth-child(5) ~ div{margin-top: 20px;}.nutrition-info>div p{margin-top: 0;margin-bottom: 7px;}#recipe .info{position:relative}#recipe .image{text-align:center;margin:25px 0}#recipe .image img{max-width:100%;width:150px;height:150px;-o-object-fit:cover;object-fit:cover;border-radius:150px}#recipe .recipe-name{margin-top: 20px;text-align:center}#recipe .summary{margin:20px 0;clear:both;line-height:1.7;font-style:italic}#recipe .time{clear:both;border-top:1px dotted #000;border-bottom:1px dotted #000;border-right:0;border-left:0}


No comments have been added yet.