
Format Your Own Damned Book Part XI -- The Palm Book Wizard
There are several cover creating wizards available for Create Space. I recommend using only one of them: The Palm.

You'll need to go through four out of five pages of possible cover creator wizards to get to it. What it does is allow you to submit a fully formatted front cover, a fully formatted back cover, and choose the colors and text you want to appear on the spine.
The options for the spine are limited. There are four different fonts to choose from, and the font size will depend on how much text is in the title. If you want your spine to be fancier than this you'll need to find another way to make your cover. Before you do, consider that the width of the spine is controlled by the number of pages in the book. If you rewrite your book before submitting it for publication you'll find that letting the wizard deal with the width of the spine will save you work and possibly grief.
If you absolutely must have a wrap-around cover (and some books will require them) then you can't use The Palm and you won't want to use any of the other wizards, with the possible exception of The Pine, which lets you submit your complete cover as a single image. You could also consider submitting a PDF with a fully formatted cover.
I'm going to assume you've chosen to use The Palm.
Your cover images must be 300-600 DPI. Most images you'll find on the Internet are 72 DPI, and you may well wonder how to go about creating a 300 DPI image. The GIMP makes it easy, once you know how.
Create a new image using the File menu. You'll see a dialog like this:
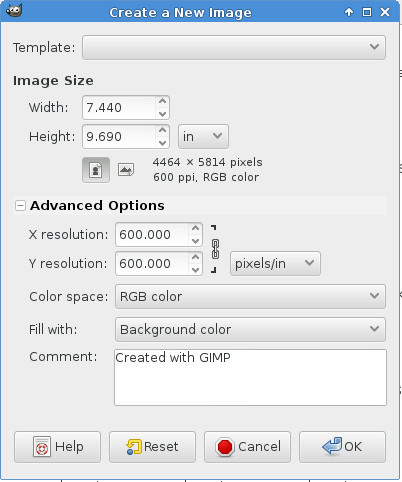
The dialog has image size default to pixels, which is what you'd want for a web image, and it hides the Advanced Options. You'll want to change the image size to be measured in inches (or centimeters, if you roll that way) and in the Advanced Options you'll specify 300 DPI up to 600 DPI. This will create an empty image at the proper DPI. Any art you paste into this image will adopt that DPI.
There are two book sizes I use: 6 x 9 inches, and 7.44 x 9.69 inches. The second one is for how-to books. I wrote some books for FLOSS Manuals and that is the size they prefer for their printed books. They call that size Crown Quarto, which may not be accurate. I use 6 x 9 for everything else. That is the size that Create Space recommends for most books. Unfortunately, once an ISBN has been assigned to a book you cannot change the page size, so put some thought into your selection so you can get it right the first time. Again, look at books in your own collection to help you decide, and remember that page count, not page size, determines the cost of the book.
I'm going to publish this book at 7.44" x 9.69". At 300 DPI that works out to 2232 x 2907 pixels. That means art on the cover needs to be be large enough in pixels to fill that size image. It doesn't have to be 300 DPI though, because when you paste the image on top of your blank 300 DPI canvas it will become 300 DPI.
You should set up your canvas to be the size that you want the book to be, but before you can use it as a cover image you'll need to add a half inch to the outer edge of the front and back cover images. In other words, for the front cover you'll need extra space on the top, bottom, and right sides, and for the back cover you'll need extra space on the top, bottom and left sides.
(If you're Japanese, correct these instructions as needed).
You can easily add this extra space with The GIMP:

Use the Image->Canvas Size to make the canvas larger. I'd recommend doing this in two steps:
1. Change the vertical height first, and use the Center button to vertically center your existing cover inside the larger canvas.
2. Then change the width and leave your image on the left side of the canvas for front covers and drag it to the right side for back covers.
3. Flatten the image using Image->Flatten Image. This will set the extra space in the canvas to the background color.
Now you can add your cover images to The Palm wizard:

It would be a good idea to wait until you have interior pages submitted before you run the cover wizard, otherwise the wizard won't let you work on the spine.
Next up: cool tricks for book nerds!
You'll need to go through four out of five pages of possible cover creator wizards to get to it. What it does is allow you to submit a fully formatted front cover, a fully formatted back cover, and choose the colors and text you want to appear on the spine.
The options for the spine are limited. There are four different fonts to choose from, and the font size will depend on how much text is in the title. If you want your spine to be fancier than this you'll need to find another way to make your cover. Before you do, consider that the width of the spine is controlled by the number of pages in the book. If you rewrite your book before submitting it for publication you'll find that letting the wizard deal with the width of the spine will save you work and possibly grief.
If you absolutely must have a wrap-around cover (and some books will require them) then you can't use The Palm and you won't want to use any of the other wizards, with the possible exception of The Pine, which lets you submit your complete cover as a single image. You could also consider submitting a PDF with a fully formatted cover.
I'm going to assume you've chosen to use The Palm.
Your cover images must be 300-600 DPI. Most images you'll find on the Internet are 72 DPI, and you may well wonder how to go about creating a 300 DPI image. The GIMP makes it easy, once you know how.
Create a new image using the File menu. You'll see a dialog like this:
The dialog has image size default to pixels, which is what you'd want for a web image, and it hides the Advanced Options. You'll want to change the image size to be measured in inches (or centimeters, if you roll that way) and in the Advanced Options you'll specify 300 DPI up to 600 DPI. This will create an empty image at the proper DPI. Any art you paste into this image will adopt that DPI.
There are two book sizes I use: 6 x 9 inches, and 7.44 x 9.69 inches. The second one is for how-to books. I wrote some books for FLOSS Manuals and that is the size they prefer for their printed books. They call that size Crown Quarto, which may not be accurate. I use 6 x 9 for everything else. That is the size that Create Space recommends for most books. Unfortunately, once an ISBN has been assigned to a book you cannot change the page size, so put some thought into your selection so you can get it right the first time. Again, look at books in your own collection to help you decide, and remember that page count, not page size, determines the cost of the book.
I'm going to publish this book at 7.44" x 9.69". At 300 DPI that works out to 2232 x 2907 pixels. That means art on the cover needs to be be large enough in pixels to fill that size image. It doesn't have to be 300 DPI though, because when you paste the image on top of your blank 300 DPI canvas it will become 300 DPI.
You should set up your canvas to be the size that you want the book to be, but before you can use it as a cover image you'll need to add a half inch to the outer edge of the front and back cover images. In other words, for the front cover you'll need extra space on the top, bottom, and right sides, and for the back cover you'll need extra space on the top, bottom and left sides.
(If you're Japanese, correct these instructions as needed).
You can easily add this extra space with The GIMP:
Use the Image->Canvas Size to make the canvas larger. I'd recommend doing this in two steps:
1. Change the vertical height first, and use the Center button to vertically center your existing cover inside the larger canvas.
2. Then change the width and leave your image on the left side of the canvas for front covers and drag it to the right side for back covers.
3. Flatten the image using Image->Flatten Image. This will set the extra space in the canvas to the background color.
Now you can add your cover images to The Palm wizard:
It would be a good idea to wait until you have interior pages submitted before you run the cover wizard, otherwise the wizard won't let you work on the spine.
Next up: cool tricks for book nerds!


No comments have been added yet.
Bhakta Jim's Bhagavatam Class

If I have any regrets about leaving the Hare Krishna movement it might be that I never got to give a morning Bhagavatam class. You need to be an initiated devotee to do that and I got out before that
...more
- Bhakta Jim's profile
- 15 followers

